

As the holiday season draws near, I’ve started planning ways to make our celebrations more relaxed and enjoyable. One of my favorite strategies is preparing make-ahead Christmas appetizers. Think elegant prosciutto-wrapped asparagus and savory stuffed mushrooms, all ready to delight with minimal fuss. Picture a cheese and charcuterie board that effortlessly entices guests. Let’s explore these easy treats that promise more time for laughter and connection.
Prosciutto-Wrapped Asparagus Spears
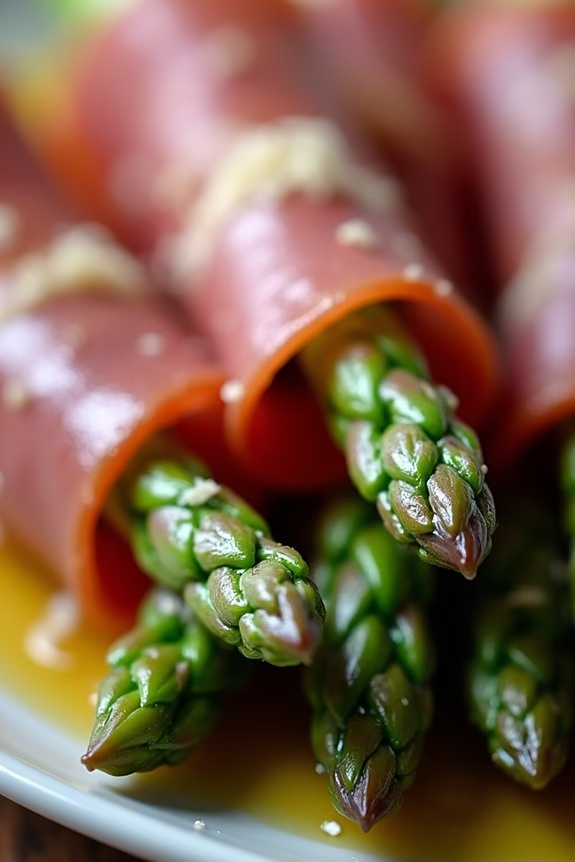
Prosciutto-wrapped asparagus spears are a delightful and elegant appetizer that perfectly combines the tender, earthy flavor of asparagus with the rich, savory taste of prosciutto. This dish isn’t only visually appealing but also incredibly easy to prepare, making it an ideal choice for a make-ahead Christmas appetizer.
The crispy prosciutto envelops the vibrant green asparagus, offering a wonderful contrast in texture and flavor. Whether you’re hosting a holiday party or enjoying a quiet family gathering, these spears are sure to impress your guests.
Preparing these prosciutto-wrapped asparagus spears in advance allows you to focus on other aspects of your holiday meal. The spears can be assembled a day ahead and stored in the refrigerator until you’re ready to bake them. This convenience, combined with their delicious flavor, makes them a must-have on your holiday menu. Serve them warm, and watch them quickly disappear from the platter.
Ingredients for 4-6 People:
- 1 pound fresh asparagus (about 24 spears)
- 12 slices of prosciutto, thinly sliced
- 1 tablespoon olive oil
- 1/2 teaspoon black pepper
- 1/2 lemon, juiced
- 1/4 cup grated Parmesan cheese (optional)
Cooking Instructions:
- Preheat the Oven: Preheat your oven to 400°F (200°C). Line a baking sheet with parchment paper or lightly oil it to prevent sticking.
- Prepare the Asparagus: Wash the asparagus thoroughly and trim the woody ends. You can do this by gently bending each spear until it naturally snaps, or by cutting off about an inch from the bottom.
- Wrap the Asparagus: Take a slice of prosciutto and wrap it tightly around each asparagus spear, starting just below the tip and spiraling down to the end. Repeat this process until all spears are wrapped.
- Season and Arrange: Place the wrapped asparagus spears on the prepared baking sheet. Drizzle olive oil evenly over the spears, then sprinkle with black pepper. If desired, squeeze fresh lemon juice over the top for an added citrus kick.
- Bake: Place the baking sheet in the preheated oven and bake for 10-15 minutes, or until the prosciutto is crispy and the asparagus is tender. Keep an eye on them to verify the prosciutto doesn’t burn.
- Serve: Remove from the oven and, if desired, sprinkle with grated Parmesan cheese while the spears are still hot, allowing it to melt slightly. Serve immediately for the best texture and flavor.
Extra Tips:
When selecting asparagus, opt for medium-sized spears rather than very thin ones, as they’ll hold up better during baking and provide a nice balance to the prosciutto.
If you want to prepare these ahead of time, assemble the wrapped spears and store them in an airtight container in the refrigerator for up to 24 hours. When ready to serve, follow the baking instructions, adding a minute or two if necessary to verify they’re heated through.
Finally, feel free to experiment with additional seasonings like garlic powder or a sprinkle of chili flakes for a bit of heat.
Cheese and Charcuterie Board
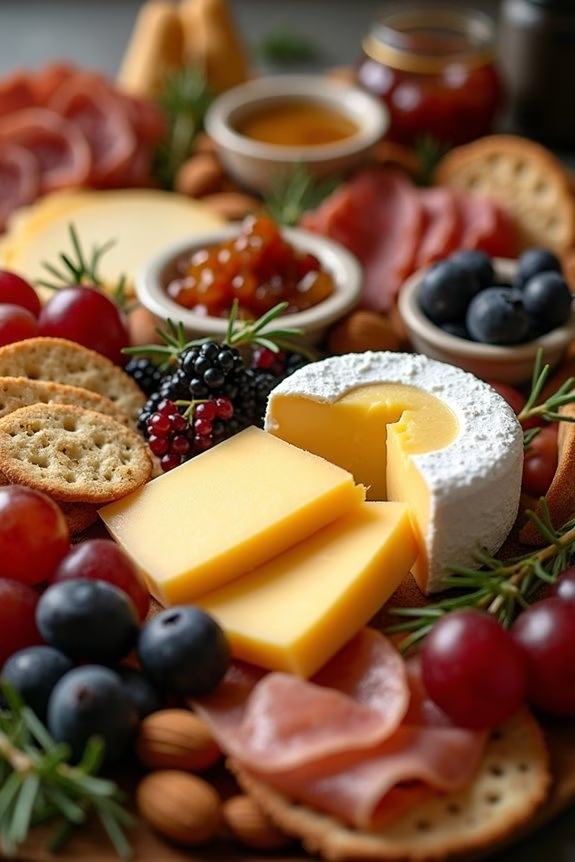
A Cheese and Charcuterie Board is an elegant and versatile appetizer that’s perfect for any Christmas gathering. This make-ahead dish allows you to showcase a variety of flavors and textures, making it a crowd-pleaser for guests of all ages. The combination of assorted cheeses, cured meats, nuts, fruits, and condiments not only looks stunning but also offers something for everyone to enjoy. By preparing the board ahead of time, you can focus on entertaining and enjoying the holiday season with your loved ones.
When creating a Cheese and Charcuterie Board for 4-6 people, it’s important to choose a good balance of flavors and textures. Aim for a mix of soft, semi-soft, and hard cheeses, along with different styles of charcuterie, such as cured sausages, salami, or prosciutto. Adding fruits, nuts, and condiments will enhance the flavors and provide a delightful contrast. Not only is this appetizer easy to assemble, but it also allows you to get creative with your presentation, making it as festive and inviting as the season itself.
Ingredients for 4-6 people:
- 2 soft cheeses (e.g., Brie, Camembert)
- 2 semi-soft cheeses (e.g., Gouda, Havarti)
- 2 hard cheeses (e.g., Cheddar, Manchego)
- 100g prosciutto
- 100g salami
- 100g chorizo
- 1 cup mixed nuts (e.g., almonds, walnuts)
- 1 cup fresh grapes or berries
- 1 jar of fig jam or honey
- 1 small jar of olives
- Assorted crackers and breadsticks
- Fresh rosemary or thyme sprigs for garnish
Instructions:
- Prepare the Cheese: About an hour before serving, remove the cheeses from the refrigerator to allow them to come to room temperature. This will enhance their flavors and make them easier to slice and serve.
- Arrange the Board: Start by placing the cheeses on a large cutting board or platter. Space them out to allow room for slicing and to create visual interest.
- Add the Charcuterie: Roll or fold the slices of prosciutto, salami, and chorizo and place them around the cheeses. Try to distribute different types of meats evenly across the board.
- Incorporate Nuts and Fruits: Fill in the gaps with small clusters of mixed nuts and fresh grapes or berries. This adds a pop of color and texture to the board.
- Add Condiments and Olives: Place a small dish or two of fig jam or honey on the board, along with a jar of olives. Offer small spoons or spreaders for easy serving.
- Arrange Crackers and Breadsticks: Fan out an assortment of crackers and breadsticks around the edges of the board. These will serve as a base for the cheese and charcuterie combinations.
- Garnish and Serve: Finally, garnish the board with fresh rosemary or thyme sprigs for a festive touch. Serve the board with small plates and napkins, and let guests help themselves.
Extra Tips:
When assembling a Cheese and Charcuterie Board, consider the preferences and dietary restrictions of your guests to ascertain there’s something for everyone. You can include gluten-free crackers or a selection of alternative cheeses for guests with specific needs.
Additionally, try to incorporate seasonal elements like cranberries or pomegranate seeds during the Christmas season for an extra festive flair. Don’t hesitate to experiment with your favorite cheeses and meats, and remember that the key to a successful board is variety and balance.
Smoked Salmon Crostini

The crostini can be prepared a day in advance and assembled just before serving, guaranteeing they remain crisp and delicious. Choose a high-quality smoked salmon for the best flavor, and consider garnishing with fresh dill or capers for an extra touch of elegance. This recipe serves 4-6 people, making it ideal for a small gathering or as part of a larger buffet.
Ingredients (serving size: 4-6 people):
- 1 baguette, sliced into 1/4-inch thick rounds
- 8 ounces cream cheese, softened
- 1 tablespoon lemon juice
- Zest of 1 lemon
- 8 ounces smoked salmon, thinly sliced
- Fresh dill, for garnish
- Capers, for garnish
- Olive oil for brushing
- Salt and pepper to taste
Instructions:
- Prepare the Crostini: Preheat your oven to 375°F (190°C). Arrange the baguette slices on a baking sheet. Lightly brush each slice with olive oil, and sprinkle with a pinch of salt and pepper. Bake in the preheated oven for 8-10 minutes, or until the bread is golden brown and crisp. Allow to cool completely.
- Make the Cream Cheese Mixture: In a mixing bowl, combine the softened cream cheese, lemon juice, and lemon zest. Mix until smooth and creamy. This can be done with a spoon or a handheld mixer for a fluffier texture.
- Assemble the Crostini: Once the crostini are cooled, spread a generous amount of the cream cheese mixture onto each slice. Top with a slice of smoked salmon.
- Garnish and Serve: Finish by garnishing each crostini with a small sprig of fresh dill and a few capers. Arrange on a serving platter and serve immediately, or store in the refrigerator for up to an hour before serving.
Extra Tips: For the best results, verify that your cream cheese is softened to room temperature before mixing it with lemon juice and zest; this will make it easier to blend and spread.
When choosing smoked salmon, consider using wild-caught varieties for a richer flavor. If you prefer a bit more texture, add a small amount of finely chopped red onion to the cream cheese mixture.
These crostini pair beautifully with a crisp white wine or champagne, enhancing their role as a festive appetizer.
Stuffed Mushrooms With Herbed Cream Cheese

Make your Christmas gatherings more delightful with these delectable Stuffed Mushrooms With Herbed Cream Cheese. This make-ahead appetizer is perfect for those who want to enjoy the festivities without spending too much time in the kitchen. The earthy flavors of the mushrooms perfectly complement the creamy and tangy herbed cheese filling, creating a harmonious blend that will keep your guests coming back for more.
Whether you’re hosting a large party or a small family gathering, these stuffed mushrooms are bound to be a hit. By preparing these ahead of time, you can guarantee a stress-free holiday experience. You simply need to assemble the mushrooms, store them in the refrigerator, and bake them just before serving. This way, you can enjoy more time with your loved ones and less time worrying about the appetizers.
The following recipe serves 4-6 people, making it ideal for a cozy Christmas event.
Ingredients:
- 16 large white or cremini mushrooms
- 8 oz (225 g) cream cheese, softened
- 1/4 cup grated Parmesan cheese
- 2 tablespoons chopped fresh parsley
- 1 tablespoon chopped fresh chives
- 1 tablespoon chopped fresh thyme
- 2 cloves garlic, minced
- Salt and pepper to taste
- 2 tablespoons olive oil
- 1/4 cup breadcrumbs
Cooking Instructions:
- Preheat the Oven: Begin by preheating your oven to 375°F (190°C). This will guarantee that your mushrooms bake evenly and develop a lovely golden crust.
- Prepare the Mushrooms: Carefully clean the mushrooms using a damp cloth to remove any dirt. Remove the stems and set them aside. You can use the stems in other recipes or discard them.
- Mix the Filling: In a medium-sized bowl, combine the softened cream cheese, Parmesan cheese, parsley, chives, thyme, and minced garlic. Season the mixture with salt and pepper to taste. Stir until all ingredients are well combined and the mixture is smooth.
- Stuff the Mushrooms: Using a small spoon, fill each mushroom cap generously with the herbed cream cheese mixture. Make sure the filling is slightly mounded for a delicious bite.
- Prepare for Baking: Arrange the stuffed mushrooms on a baking sheet lined with parchment paper. Drizzle them lightly with olive oil to help them brown and develop flavor.
- Add Breadcrumbs: Sprinkle a small amount of breadcrumbs over each stuffed mushroom to add a crunchy texture.
- Bake the Mushrooms: Place the baking sheet in the preheated oven and bake for 20-25 minutes, or until the mushrooms are tender and the tops are golden brown.
- Serve: Remove from the oven and let them cool slightly before serving. Enjoy these warm stuffed mushrooms as a delightful appetizer.
Extra Tips:
To make the most out of these stuffed mushrooms, consider using a piping bag to fill the mushroom caps for a cleaner and more professional look. Feel free to adjust the herbs based on what’s available or your personal preference; rosemary or dill can be great alternatives.
If you prefer a spicier kick, add a pinch of red pepper flakes to the cheese mixture. Finally, these mushrooms can be assembled the day before and stored in the fridge overnight, making them an ideal make-ahead option for your holiday feast.
Spinach and Feta Phyllo Triangles

Spinach and Feta Phyllo Triangles are a delightful make-ahead appetizer perfect for any festive gathering, especially during the holiday season. The crisp, flaky phyllo pastry encases a savory filling of spinach and feta cheese, creating a delectable bite-sized treat that’s both elegant and delicious.
These triangles can be prepared in advance, allowing you to enjoy more time with your guests while still serving up a warm, homemade appetizer.
The key to these Spinach and Feta Phyllo Triangles is in the balance of flavors and textures. The creamy feta cheese pairs beautifully with the earthy spinach, and the addition of aromatic seasonings elevates the whole dish.
The phyllo dough, known for its delicate, paper-thin layers, bakes up to a golden, crunchy perfection, making each bite a satisfying experience. This recipe serves 4-6 people and is sure to be a crowd-pleaser at your Christmas celebration.
Ingredients (serves 4-6):
- 1 package (16 oz) frozen phyllo dough, thawed
- 10 oz frozen chopped spinach, thawed and drained
- 1 cup crumbled feta cheese
- 1/2 cup ricotta cheese
- 1/4 cup finely chopped onion
- 2 cloves garlic, minced
- 1 tablespoon olive oil
- 1/4 teaspoon nutmeg
- 1/4 teaspoon salt
- 1/4 teaspoon black pepper
- 1/2 cup unsalted butter, melted
Cooking Instructions:
- Prepare the Filling:
- In a medium skillet, heat olive oil over medium heat. Add the chopped onion and garlic, sautéing until the onion is translucent and fragrant, about 3-4 minutes.
- In a large bowl, combine the sautéed onion and garlic with the drained spinach, crumbled feta, ricotta cheese, nutmeg, salt, and pepper. Mix well until all ingredients are thoroughly combined.
- Prepare the Phyllo Dough:
- Preheat your oven to 375°F (190°C) and line a baking sheet with parchment paper.
- Carefully unroll the phyllo dough on a clean, dry surface. Cover it with a slightly damp kitchen towel to prevent it from drying out as you work.
- Take one sheet of phyllo dough, brush it lightly with melted butter, and place another sheet on top. Repeat this process until you have a stack of three sheets brushed with butter.
- Assemble the Triangles:
- Cut the buttered phyllo sheets lengthwise into 2-3 inch wide strips.
- Place a tablespoon of the spinach and feta mixture at one end of each strip.
- Fold the corner of the strip over the filling to form a triangle. Continue folding, maintaining the triangle shape, until you reach the end of the strip.
- Place the assembled triangles on the prepared baking sheet and brush the tops with more melted butter.
- Bake:
- Bake in the preheated oven for 20-25 minutes, or until the phyllo is golden brown and crisp.
- Remove from the oven and let cool slightly before serving.
Extra Tips:
When working with phyllo dough, it’s important to keep it covered with a damp towel to prevent it from drying out and becoming brittle.
If you’re making these triangles ahead of time, you can assemble them and freeze them before baking. When ready to serve, simply bake them directly from the freezer, adding a few extra minutes to the baking time as needed. This guarantees you have a fresh and delicious appetizer ready in no time.
Cranberry Brie Bites

Cranberry Brie Bites are a delightful and festive appetizer perfect for holiday gatherings. These bite-sized morsels combine the creamy richness of brie cheese with the tartness of cranberry sauce, all nestled in a flaky puff pastry. Not only are they incredibly delicious, but they also look stunning on a holiday table.
Plus, they’re easy to prepare ahead of time, allowing you to enjoy the festivities with your loved ones without the stress of last-minute cooking. This recipe is designed to serve 4-6 people, making it an ideal choice for a small to medium-sized gathering.
The combination of flavors and textures in these cranberry brie bites is sure to impress your guests, leaving them excited for more. The delicate balance of sweet, savory, and buttery flavors is achieved with just a handful of ingredients, making this dish both simple and sophisticated.
Ingredients (serving size: 4-6 people):
- 1 sheet of puff pastry, thawed
- 1 wheel of brie cheese (approximately 8 oz)
- 1 cup of cranberry sauce (homemade or store-bought)
- 1/4 cup chopped walnuts or pecans (optional)
- Fresh rosemary for garnish (optional)
- 1 egg, beaten (for egg wash)
Instructions:
- Preheat the Oven: Start by preheating your oven to 375°F (190°C). Line a baking sheet with parchment paper to prevent sticking and facilitate easy cleanup.
- Prepare the Puff Pastry: Roll out the thawed puff pastry sheet on a lightly floured surface to smooth it out. Cut the pastry into 24 equal squares using a sharp knife or pizza cutter.
- Prepare the Brie: Cut the brie cheese into small cubes, roughly the size of a teaspoon. This allows for easy placement into the pastry cups and guarantees even melting.
- Assemble the Bites: Place each square of puff pastry into a mini muffin tin, pressing gently to form a small cup. Add a cube of brie cheese to each pastry cup, followed by a teaspoon of cranberry sauce on top.
- Add Optional Toppings: If using, sprinkle a few chopped walnuts or pecans over the cranberry sauce for added texture and flavor.
- Egg Wash: Brush the edges of the pastry with the beaten egg to help achieve a golden-brown finish.
- Bake: Place the muffin tin in the preheated oven and bake for about 15-20 minutes, or until the puff pastry is golden and the cheese is melted.
- Garnish and Serve: Once baked, remove the bites from the oven and let them cool slightly. Garnish with fresh rosemary sprigs for an aromatic touch before serving.
Extra Tips:
To make these Cranberry Brie Bites even more convenient, you can prepare them a day in advance. Assemble the bites as directed, but instead of baking, cover the muffin tin with plastic wrap and refrigerate until you’re ready to bake them.
This allows you to pop them in the oven fresh for your guests. Additionally, feel free to experiment with different nuts or even a drizzle of honey for extra sweetness. Just remember that using high-quality brie and cranberry sauce will enhance the overall flavor of this delightful appetizer.
Mini Caprese Skewers
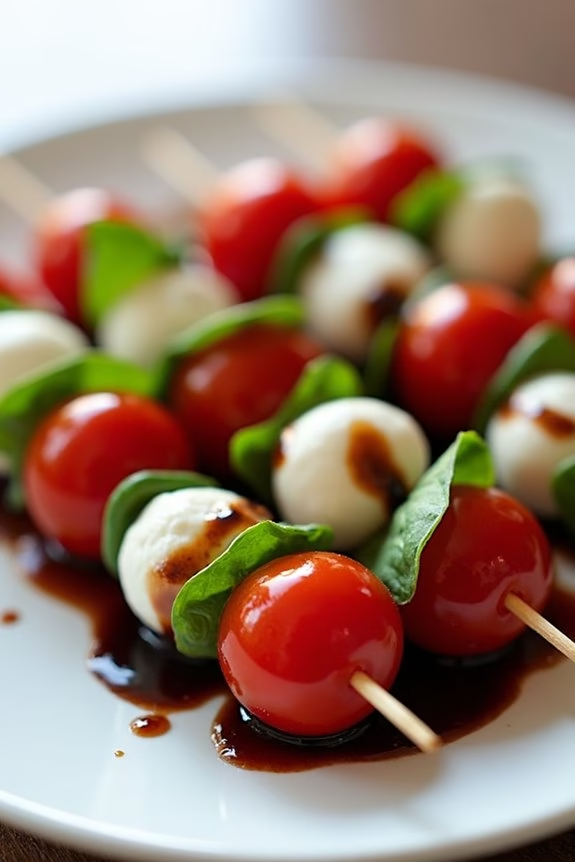
Mini Caprese Skewers are a delightful and visually appealing appetizer that captures the fresh, vibrant flavors of a traditional Caprese salad in a convenient, bite-sized form.
These skewers are perfect for a make-ahead Christmas appetizer, offering a festive touch to any holiday gathering. The combination of juicy cherry tomatoes, creamy mozzarella balls, and fragrant basil leaves, all drizzled with a tangy balsamic glaze, will surely impress your guests and make your holiday entertaining effortless.
These skewers aren’t only easy to assemble but also can be prepared in advance, allowing you more time to enjoy the festivities with friends and family. They provide a burst of flavor with minimal effort and are an excellent choice for those looking to add a touch of elegance to their appetizer spread.
Whether you’re hosting a large party or an intimate gathering, Mini Caprese Skewers are sure to be a hit.
Ingredients for 4-6 people:
- 24 cherry tomatoes
- 24 mini mozzarella balls (bocconcini)
- 24 fresh basil leaves
- 1/4 cup balsamic glaze
- 24 toothpicks or small skewers
- Salt and pepper to taste
Cooking Instructions:
- Prepare the Ingredients: Rinse the cherry tomatoes and basil leaves under cold water and pat them dry with a paper towel. Drain the mozzarella balls from their liquid.
- Assemble the Skewers: Take a toothpick or small skewer and thread one cherry tomato, followed by a basil leaf, and then a mozzarella ball. Repeat this process until all skewers are assembled.
- Season the Skewers: Lightly sprinkle the assembled skewers with salt and pepper to enhance the flavors of the ingredients.
- Drizzle with Balsamic Glaze: Arrange the skewers on a serving platter and drizzle them with balsamic glaze. Be sure to coat each skewer lightly to maintain a balanced flavor.
- Chill and Serve: If preparing in advance, cover the platter with plastic wrap and refrigerate for up to 4 hours. When ready to serve, remove the skewers from the refrigerator and allow them to sit at room temperature for about 10 minutes before serving.
Extra Tips:
For the best flavor, use high-quality mozzarella and balsamic glaze. Fresh basil leaves add an aromatic touch, so try to use them rather than dried basil.
If you can’t find mini mozzarella balls, you can cut a larger mozzarella ball into bite-sized pieces. Feel free to experiment by adding a thin slice of prosciutto or a piece of roasted red pepper to each skewer for an extra layer of flavor.
Remember to adjust the amount of balsamic glaze according to your preference, as it can be quite strong.
Roasted Red Pepper Hummus

Roasted Red Pepper Hummus is a delightful spin on traditional hummus, offering a vibrant color and a sweet, smoky flavor that pairs beautifully with a variety of dippers. This make-ahead appetizer is perfect for Christmas gatherings, as it can be prepared in advance and served with minimal effort. The creamy texture and rich taste make it a crowd-pleaser that will leave guests reaching for more.
Perfect for a serving size of 4-6 people, this hummus can be enjoyed with pita bread, crackers, or fresh vegetables. The roasted red peppers add a depth of flavor that elevates the dish, making it a standout on any holiday table. The recipe is simple to follow and requires just a few ingredients, allowing you to spend more time enjoying the festivities with friends and family.
Ingredients:
- 2 large red bell peppers
- 1 can (15 oz) chickpeas, drained and rinsed
- 1/4 cup tahini
- 2 tablespoons olive oil
- 2 tablespoons fresh lemon juice
- 2 cloves garlic, minced
- 1 teaspoon ground cumin
- 1/2 teaspoon smoked paprika
- Salt and pepper to taste
- Fresh parsley for garnish (optional)
Instructions:
- Roast the Red Peppers: Preheat your oven to 450°F (230°C). Place the red bell peppers on a baking sheet and roast in the oven for 20-25 minutes, turning occasionally, until the skins are charred and blistered. Remove from the oven and transfer the peppers to a bowl. Cover with plastic wrap and let them steam for about 10 minutes to loosen the skins.
- Peel and Prepare the Peppers: Once the peppers are cool enough to handle, peel off the skins, remove the stems, and discard the seeds. Chop the peppers into chunks and set aside.
- Blend the Hummus: In a food processor, combine the chopped roasted red peppers, chickpeas, tahini, olive oil, lemon juice, garlic, cumin, and smoked paprika. Blend until smooth and creamy. If the mixture is too thick, you can add a tablespoon of water at a time until the desired consistency is reached.
- Season to Taste: Taste the hummus and add salt and pepper to taste. Blend again briefly to incorporate the seasoning.
- Serve and Garnish: Transfer the hummus to a serving bowl, drizzle with a little olive oil, and sprinkle with fresh parsley if desired. Serve with pita bread, crackers, or vegetables.
Extra Tips:
For the best flavor, prepare this hummus a day in advance and refrigerate it overnight. This allows the flavors to meld together, creating an even richer taste. If you prefer a spicier version, consider adding a pinch of cayenne pepper or a dash of hot sauce to the mix.
Additionally, always taste the hummus before serving to verify the seasoning is just right, as the flavors can develop and change slightly as it sits.
Pesto Puff Pastry Pinwheels

Pesto Puff Pastry Pinwheels are a delightful and elegant appetizer perfect for any Christmas gathering. With their vibrant green pesto swirl and golden, flaky pastry, these pinwheels not only look festive but also pack a flavorful punch. They’re incredibly easy to prepare ahead of time, allowing you to enjoy more time with your guests rather than being stuck in the kitchen.
The combination of pesto, Parmesan cheese, and delicate puff pastry creates a savory treat that’s sure to impress. What makes Pesto Puff Pastry Pinwheels even more appealing is their versatility. You can serve them warm or at room temperature, making them an excellent choice for holiday parties where the food is often set out for grazing.
The recipe is simple yet sophisticated, requiring just a handful of ingredients and minimal preparation time. Whether you’re an experienced cook or a novice in the kitchen, these pinwheels are sure to be a hit at your holiday festivities.
Ingredients (serving size: 4-6 people):
- 1 sheet of puff pastry, thawed
- 1/2 cup of pesto sauce
- 1/4 cup of grated Parmesan cheese
- 1 egg, beaten
- Flour, for dusting
Cooking Instructions:
- Prepare the Puff Pastry: Preheat your oven to 400°F (200°C). Lightly flour a clean surface and roll out the thawed puff pastry sheet to smooth out any creases. Confirm it maintains a rectangular shape.
- Spread the Pesto: Evenly spread the pesto sauce over the entire surface of the puff pastry, leaving a small border (about 1/2 inch) on all sides to prevent overflow when rolling.
- Add the Cheese: Sprinkle the grated Parmesan cheese over the pesto, ensuring an even distribution across the pastry.
- Roll the Pastry: Starting from one of the longer sides, carefully roll the puff pastry into a tight log. Once rolled, gently press the edge to seal it.
- Chill the Roll: Transfer the rolled pastry to the refrigerator and let it chill for about 15-20 minutes. This will firm up the pastry and make it easier to slice.
- Slice the Pinwheels: Remove the log from the refrigerator and use a sharp knife to slice it into 1/2-inch thick pinwheels. You should get about 12-15 pieces.
- Prepare for Baking: Place the pinwheels on a baking sheet lined with parchment paper, leaving space between each one. Brush the tops with the beaten egg to give them a golden finish.
- Bake: Place the baking sheet in the preheated oven and bake for 12-15 minutes or until the pastry is golden brown and puffed up.
- Cool and Serve: Allow the pinwheels to cool slightly on a wire rack before serving them warm or at room temperature.
Extra Tips: For added flavor, consider sprinkling a pinch of crushed red pepper flakes or pine nuts over the pesto before rolling the pastry. Additionally, if you prefer a more intense cheese flavor, try mixing the Parmesan with some shredded mozzarella.
Chocolate-Dipped Strawberries

Chocolate-Dipped Strawberries are a classic yet elegant appetizer that add a touch of sweetness to any festive gathering. These delectable treats aren’t only visually appealing but also offer a delightful contrast of juicy, ripe strawberries enveloped in a smooth, rich layer of chocolate.
Perfect for getting ahead during the busy holiday season, these can be prepared in advance and stored in the refrigerator until your guests arrive. Whether you’re hosting a large Christmas party or a cozy gathering, these chocolate-dipped strawberries are sure to be a hit with everyone.
The simplicity of this recipe allows you to focus on other holiday preparations. By using high-quality chocolate and fresh strawberries, you’ll create an appetizer that feels both indulgent and invigorating.
The versatility of this dish also means you can customize it to fit your holiday theme by adding toppings like crushed nuts, coconut flakes, or festive sprinkles. With minimal effort and maximum impact, chocolate-dipped strawberries are a must-have addition to your Christmas appetizer menu.
Ingredients for 4-6 servings:
- 1 pound fresh strawberries
- 8 ounces semi-sweet chocolate chips or chunks
- 1 tablespoon coconut oil or vegetable oil
- Optional toppings: crushed nuts, sprinkles, or shredded coconut
Cooking Instructions:
- Prepare the Strawberries: Gently wash the strawberries under cold water and pat them dry with a paper towel. Make sure they’re completely dry, as any moisture can cause the chocolate to seize. Leave the green tops on; they provide a nice handle for dipping.
- Melt the Chocolate: In a microwave-safe bowl, combine the chocolate chips and coconut oil. Microwave in 30-second intervals, stirring after each, until the chocolate is fully melted and smooth. Alternatively, you can melt the chocolate using a double boiler by placing a heatproof bowl over a pot of simmering water, stirring until completely melted.
- Dip the Strawberries: Hold a strawberry by its green top and dip it into the melted chocolate, twisting slightly to coat evenly. Allow any excess chocolate to drip off before placing the strawberry on a baking sheet lined with parchment paper.
- Add Toppings: If desired, sprinkle your chosen toppings over the chocolate-dipped strawberries before the chocolate sets. This step should be done quickly, as the chocolate will begin to harden once it cools.
- Chill the Strawberries: Place the baking sheet with the dipped strawberries in the refrigerator for about 30 minutes, or until the chocolate is fully set.
- Store and Serve: Once the chocolate has hardened, transfer the strawberries to a serving platter or airtight container. Keep them refrigerated until ready to serve.
Extra Tips:
For best results, choose strawberries that are firm and ripe without any blemishes or bruises. When melting chocolate, make sure that no water comes into contact with it, as this can cause the chocolate to seize and become grainy.
If you find the chocolate is too thick for dipping, add a little more coconut oil to achieve the desired consistency. If making these in advance, it’s best to consume them within one to two days for peak freshness.