
Planning a Christmas dinner and feeling the time crunch? No worries, I’ve got you covered with 14 fabulous, last-minute recipes that are sure to delight. From succulent Quick Herb-Roasted Chicken to a charming Cheese and Charcuterie Board, these recipes are both delicious and easy to whip up. They’ll make your holiday feast sparkle without the hassle. Ready to impress your guests with minimal effort?
Quick Herb-Roasted Chicken
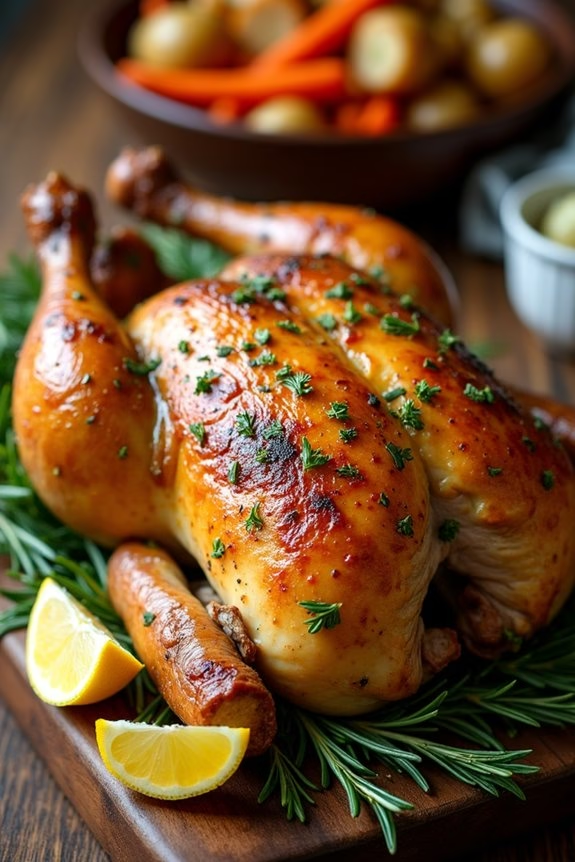
If you’re looking for a delightful and easy-to-make main course for your Christmas dinner, Quick Herb-Roasted Chicken is the perfect choice. This dish combines the rich flavors of fresh herbs and juicy chicken to create a mouthwatering experience that will leave your guests asking for seconds.
Its simplicity in preparation and short cooking time make it an ideal option for those who want to spend less time in the kitchen and more time enjoying the festivities. The succulent meat, infused with aromatic herbs, creates an elegant yet comforting meal for your holiday table.
This recipe serves 4-6 people, making it suitable for a small family gathering or an intimate dinner with friends. The combination of herbs such as rosemary, thyme, and parsley not only enhances the flavor of the chicken but also fills your home with a delightful aroma as it roasts.
Whether you’re a seasoned cook or a beginner, this Quick Herb-Roasted Chicken will impress your guests and become a staple in your holiday meal repertoire.
Ingredients:
- 1 whole chicken (about 4-5 pounds)
- 2 tablespoons olive oil
- 1 tablespoon fresh rosemary, chopped
- 1 tablespoon fresh thyme, chopped
- 1 tablespoon fresh parsley, chopped
- 4 cloves garlic, minced
- 1 lemon, halved
- Salt and pepper to taste
- 1 cup chicken broth
- 4 tablespoons unsalted butter, melted
Cooking Instructions:
- Preheat the Oven: Preheat your oven to 425°F (220°C). This high temperature will guarantee the chicken skin becomes crispy while the inside remains juicy.
- Prepare the Chicken: Pat the chicken dry with paper towels. This step is essential for achieving crispy skin. Place the chicken in a roasting pan breast-side up.
- Mix the Herbs: In a small bowl, combine the olive oil, chopped rosemary, thyme, parsley, minced garlic, salt, and pepper. Rub this herb mixture evenly over the entire chicken, making sure it gets under the skin for maximum flavor.
- Add Lemon and Broth: Squeeze the juice from half of the lemon over the chicken, then place both lemon halves inside the cavity of the chicken. Pour the chicken broth into the bottom of the roasting pan.
- Roast the Chicken: Place the roasting pan in the preheated oven. Roast the chicken for about 1 hour and 15 minutes, or until the internal temperature reaches 165°F (74°C) when measured in the thickest part of the thigh. Baste the chicken with the melted butter every 20 minutes to keep it moist and flavorful.
- Rest before Serving: Once cooked, remove the chicken from the oven and let it rest for 10-15 minutes. This allows the juices to redistribute throughout the meat, resulting in a more tender chicken.
Extra Tips:
For extra flavor, consider adding root vegetables such as carrots and potatoes around the chicken in the roasting pan. They’ll absorb the delicious juices as they cook.
If you’re short on time, you can also use dried herbs instead of fresh ones, but the fresh herbs will provide a more vibrant flavor.
Finally, if your chicken starts browning too quickly, cover it loosely with aluminum foil to prevent burning. Enjoy your hassle-free, flavorful Christmas dinner centerpiece!
Easy Baked Honey Glazed Ham
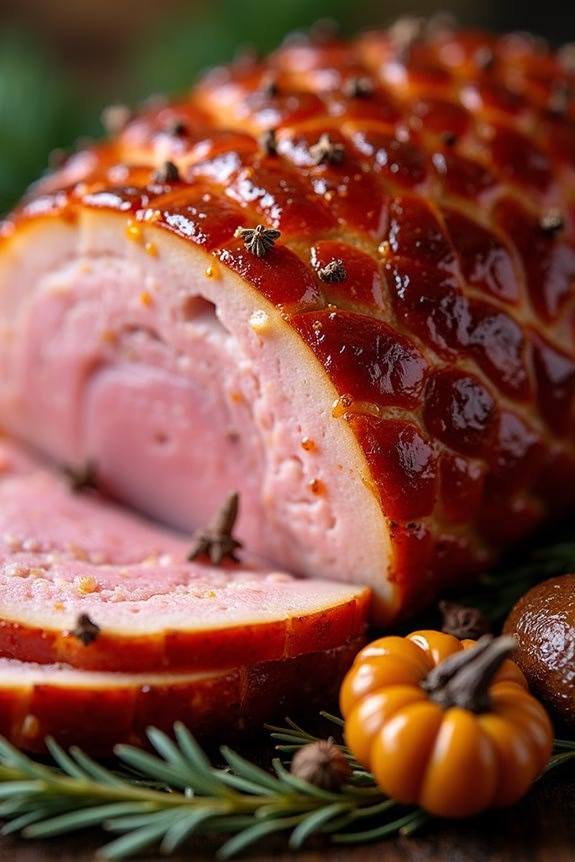
Make your Christmas dinner extra special with this Easy Baked Honey Glazed Ham. This recipe focuses on balancing the rich, savory flavor of the ham with the sweet, sticky glaze, creating a mouth-watering dish that’s sure to be a crowd-pleaser. Perfect for hosting family and friends, this dish not only looks impressive on the table but is also quite simple to prepare, allowing you more time to enjoy the holiday festivities.
The key to this recipe is the honey glaze, which infuses the ham with a delightful sweetness while helping to lock in moisture, guaranteeing that each slice is tender and delicious. This recipe is designed to serve 4-6 people, making it ideal for an intimate gathering or as a centerpiece accompanied by a variety of side dishes. With its beautiful golden-brown crust and succulent interior, this honey-glazed ham will become a beloved tradition in your holiday celebrations.
Ingredients (Serves 4-6):
- 1 (4-5 pound) fully cooked bone-in ham
- 1 cup honey
- 1/4 cup brown sugar
- 2 tablespoons Dijon mustard
- 1/4 cup apple cider vinegar
- 1/2 teaspoon ground cloves
- 1/4 teaspoon ground cinnamon
- 1/2 teaspoon salt
- 1/4 teaspoon black pepper
- Whole cloves (optional, for studding)
Instructions:
- Preheat the Oven: Preheat your oven to 325°F (165°C). Place a rack in the lower third of the oven to accommodate the size of the ham.
- Prepare the Ham: If your ham has a rind, carefully remove it using a sharp knife, leaving a thin layer of fat. Score the surface of the ham in a diamond pattern, about 1/2-inch deep. This helps the glaze penetrate the meat. If desired, stud the intersections of the diamonds with whole cloves.
- Make the Glaze: In a small saucepan over medium heat, combine the honey, brown sugar, Dijon mustard, apple cider vinegar, ground cloves, ground cinnamon, salt, and black pepper. Stir until the sugar is dissolved and the mixture is smooth. Allow it to simmer gently for 2-3 minutes, then remove from heat.
- Glaze the Ham: Place the ham in a roasting pan lined with foil for easy cleanup. Brush about half of the prepared glaze over the ham, making sure to get into the scored cuts.
- Bake the Ham: Cover the roasting pan loosely with foil and bake the ham in the preheated oven for approximately 1 1/2 to 2 hours, or until the internal temperature reaches 140°F (60°C). Baste the ham with the pan juices every 30 minutes.
- Add Final Glaze: During the final 30 minutes of baking, remove the foil and brush the remaining glaze over the ham. Increase the oven temperature to 400°F (200°C) for the last 15 minutes to caramelize the glaze, but watch it closely to prevent burning.
- Rest and Serve: Once done, remove the ham from the oven and let it rest for at least 15 minutes before slicing. This allows the juices to redistribute, guaranteeing moist, flavorful slices.
Extra Tips:
For an even more aromatic ham, consider adding a splash of orange juice to the glaze for a citrusy note. If you prefer a less sweet glaze, reduce the amount of honey slightly and increase the Dijon mustard for a sharper flavor.
Always use a meat thermometer to guarantee your ham is heated through without overcooking, as the temperature of ovens can vary. Finally, any leftovers can be stored in the refrigerator for up to five days and make for fantastic sandwiches or additions to other dishes.
One-Pan Garlic Butter Shrimp
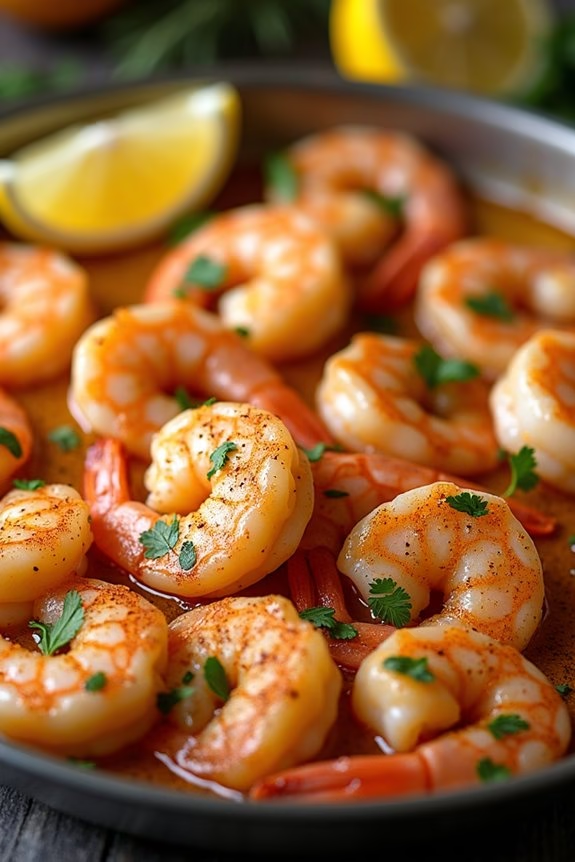
When it comes to preparing a scrumptious Christmas dinner, simplicity can often be key, especially when juggling multiple dishes. This One-Pan Garlic Butter Shrimp recipe is a perfect choice for those who want to deliver a delicious and elegant meal without spending hours in the kitchen.
With minimal preparation and cooking time, you’ll be able to spend more time with loved ones while still presenting a dish that’s certain to impress. The combination of juicy shrimp, aromatic garlic, and rich butter creates a delectable flavor profile that pairs wonderfully with a variety of side dishes or as a standalone treat.
Ideal for serving 4-6 people, this dish is versatile and can be customized with your favorite herbs and spices. The use of a single pan not only simplifies the cooking process but also guarantees easy cleanup, allowing you to enjoy your meal without stressing over a pile of dirty dishes.
Whether you’re a seasoned cook or a beginner, this recipe offers a straightforward approach to creating a mouthwatering meal that everyone will love. Gather your ingredients, follow the simple steps, and prepare to delight your guests with this festive seafood delight.
Ingredients (Serves 4-6):
- 2 pounds large shrimp, peeled and deveined
- 4 tablespoons unsalted butter
- 6 cloves garlic, minced
- 1 lemon, juiced
- 1 teaspoon paprika
- 1 teaspoon Italian seasoning
- Salt and pepper to taste
- 2 tablespoons chopped fresh parsley
- Lemon wedges, for serving
- Optional: crusty bread or cooked pasta for serving
Cooking Instructions:
- Prepare the Shrimp: Begin by rinsing the shrimp under cold water and patting them dry with paper towels. Set them aside while you prepare the other ingredients.
- Melt Butter and Sauté Garlic: In a large skillet over medium heat, melt the unsalted butter. Once melted, add the minced garlic and sauté for 1-2 minutes until fragrant, being careful not to let it burn.
- Cook the Shrimp: Add the shrimp to the skillet in a single layer. Season with salt, pepper, paprika, and Italian seasoning. Cook for 2-3 minutes on one side until they start to turn pink.
- Flip and Flavor: Flip the shrimp and add the lemon juice to the skillet. Continue cooking for another 2-3 minutes, or until the shrimp are fully cooked and opaque throughout.
- Garnish and Serve: Remove the skillet from heat and sprinkle the chopped fresh parsley over the shrimp. Serve immediately with lemon wedges on the side. Optionally, pair with crusty bread or toss with cooked pasta to complete the meal.
Extra Tips:
For the best results, use fresh shrimp if possible, as they tend to have a sweeter flavor and firmer texture. If using frozen shrimp, make certain they’re completely thawed and patted dry to prevent excess water from diluting the garlic butter sauce.
Adjust the amount of garlic and lemon juice based on your personal preference for a more robust or subtle flavor. Additionally, feel free to experiment with other herbs, such as thyme or rosemary, to add a unique twist to the dish.
Enjoy this festive and flavorful dish as part of your Christmas celebration!
Simple Cranberry Balsamic Brussels Sprouts
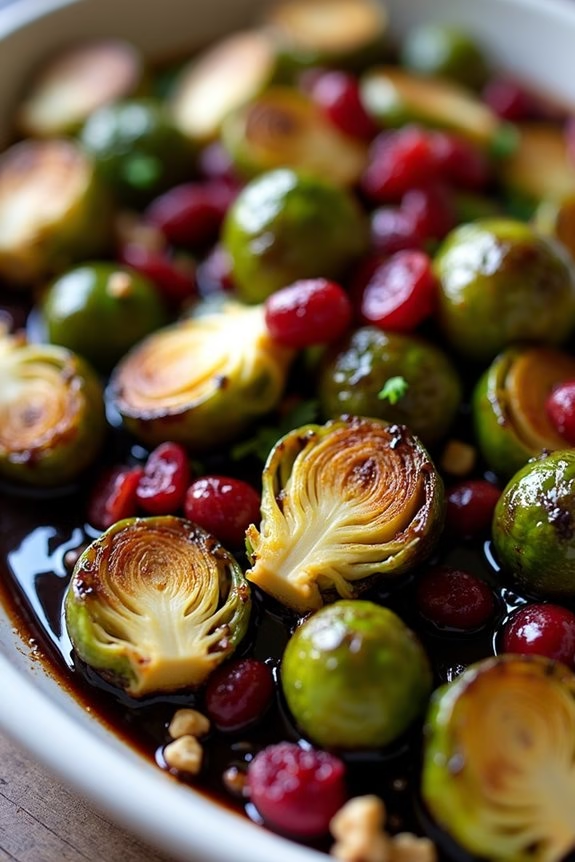
Simple Cranberry Balsamic Brussels Sprouts is a delightful side dish that combines the earthy flavors of Brussels sprouts with the sweet and tangy essence of cranberries and balsamic vinegar. This dish is perfect for adding a pop of color and festive flavor to your Christmas dinner table.
It’s a simple yet sophisticated recipe that’s easy to prepare and certain to impress your guests. This recipe serves 4-6 people, making it an ideal addition to a family gathering or holiday feast. The combination of roasted Brussels sprouts with the tartness of cranberries and the depth of balsamic glaze creates a harmonious balance of flavors that will complement any main course.
Ready to make your Christmas dinner unforgettable? Let’s get started!
Ingredients:
- 1 ½ pounds Brussels sprouts, trimmed and halved
- 2 tablespoons olive oil
- Salt and pepper to taste
- ½ cup dried cranberries
- ¼ cup balsamic vinegar
- 2 tablespoons maple syrup
- ¼ cup chopped walnuts (optional)
- 2 tablespoons chopped fresh parsley (optional)
Instructions:
1. Preheat the Oven:
Preheat your oven to 400°F (200°C). This temperature is ideal for roasting the Brussels sprouts to achieve a crispy exterior and tender interior.
2. Prepare the Brussels Sprouts:
Trim the ends of the Brussels sprouts and remove any yellow or damaged leaves. Cut each sprout in half lengthwise to facilitate even cooking.
3. Season and Roast:
In a large mixing bowl, toss the halved Brussels sprouts with olive oil, salt, and pepper. Confirm they’re evenly coated. Spread them out in a single layer on a baking sheet lined with parchment paper.
Roast in the preheated oven for 20-25 minutes or until they’re golden brown and tender, stirring halfway through to promote even roasting.
4. Prepare the Balsamic Glaze:
While the Brussels sprouts are roasting, combine the balsamic vinegar and maple syrup in a small saucepan over medium heat. Bring to a simmer and let it reduce for about 5-7 minutes, or until it thickens slightly to a syrupy consistency.
Be careful not to let it burn. Remove from heat and set aside.
5. Combine and Serve:
Once the Brussels sprouts are roasted, transfer them to a serving dish. Drizzle with the balsamic glaze and sprinkle the dried cranberries over the top.
If using, add the chopped walnuts for an extra crunch and garnish with fresh parsley. Serve immediately for best flavor and texture.
Extra Tips:
To guarantee the best results with this dish, make sure not to overcrowd the Brussels sprouts on the baking sheet, as this can cause them to steam rather than roast.
If you find your Brussels sprouts aren’t browning as desired, increase the oven temperature slightly for the last few minutes of roasting. For a more intense flavor, you can soak the dried cranberries in warm water or orange juice for 10 minutes before adding them to the dish.
This will plump them up and add a subtle citrus note to the overall flavor profile. Enjoy your festive side dish!
Speedy Parmesan Roasted Potatoes
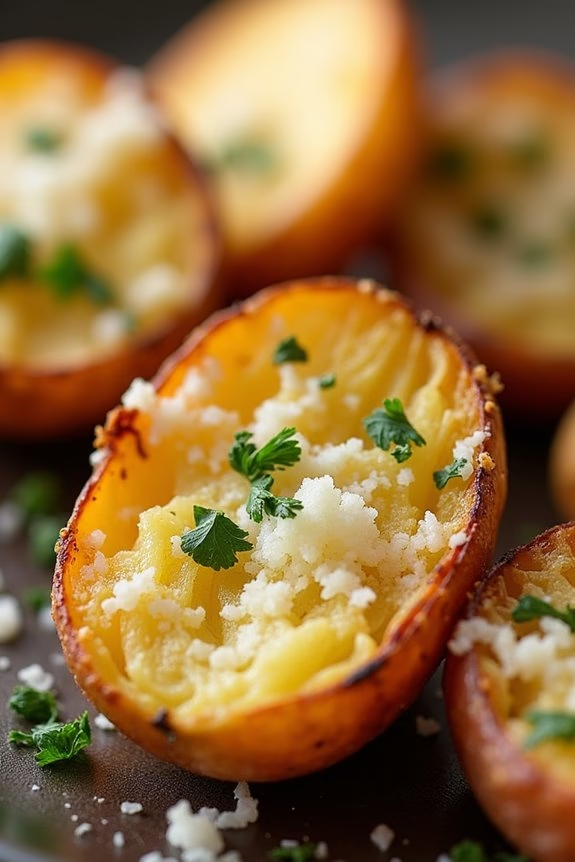
Looking to add a quick yet delicious side dish to your Christmas dinner menu? Speedy Parmesan Roasted Potatoes are the perfect choice. These potatoes are crispy on the outside, tender on the inside, and bursting with flavor. The combination of Parmesan cheese and aromatic herbs creates a delightful balance that will have your guests reaching for seconds.
Plus, this recipe is simple to prepare, making it a great option for those busy holiday cooking days. This dish is perfect for serving 4-6 people, making it ideal for family gatherings or small holiday parties. With minimal preparation and cooking time, you can focus on the main course and other side dishes without sacrificing taste or quality.
The ingredients list is short, featuring pantry staples and fresh produce, guaranteeing that this recipe is both budget-friendly and accessible.
Ingredients:
- 2 pounds baby potatoes, halved
- 3 tablespoons olive oil
- 3/4 cup grated Parmesan cheese
- 1 teaspoon garlic powder
- 1 teaspoon dried oregano
- 1 teaspoon dried thyme
- Salt and pepper to taste
- Fresh parsley, chopped (for garnish)
Instructions:
- Preheat the oven: Set your oven to 400°F (200°C) to make sure it’s hot enough to roast the potatoes to a crispy perfection.
- Prepare the potatoes: Wash and halve the baby potatoes. Dry them thoroughly with a kitchen towel to make sure they roast well and get crispy.
- Mix the coating: In a large mixing bowl, combine the olive oil, Parmesan cheese, garlic powder, dried oregano, dried thyme, salt, and pepper. Stir until the mixture is well combined.
- Toss the potatoes: Add the halved potatoes to the bowl with the olive oil and Parmesan mixture. Toss the potatoes until they’re evenly coated with the mixture.
- Arrange on baking sheet: Spread the coated potatoes in a single layer on a baking sheet. Make sure the cut side is facing down for the best caramelization.
- Roast the potatoes: Place the baking sheet in the preheated oven. Roast the potatoes for 25-30 minutes or until they’re golden brown and tender when pierced with a fork.
- Garnish and serve: Once done, remove the potatoes from the oven. Sprinkle with freshly chopped parsley for a pop of color and added freshness. Serve hot as a side dish.
Extra Tips:
For the best results, choose potatoes that are roughly the same size to make certain they cook evenly. If you don’t have baby potatoes, you can use larger potatoes; just cut them into smaller, uniform pieces.
Feel free to experiment with different herbs and spices to match your taste preferences or complement other dishes in your meal. Additionally, flipping the potatoes halfway through baking can enhance even browning.
Finally, if you’re preparing this dish ahead of time, you can reheat the potatoes in the oven at a low temperature to maintain their crispiness before serving.
Instant Pot Mashed Potatoes

Mashed potatoes are a beloved side dish, especially during the festive Christmas season. They’re creamy, rich, and the ultimate comfort food that pairs perfectly with any main course. Preparing them in an Instant Pot is a game-changer, guaranteeing they’re ready in no time with minimal effort. This method not only saves valuable stove space but also assures consistently perfect texture every time.
For this recipe, Yukon Gold potatoes are recommended due to their natural buttery flavor and smooth texture, which make them ideal for mashing. The addition of butter and cream creates a velvety consistency, while a hint of garlic adds depth to the flavor profile. This recipe serves 4-6 people, making it perfect for a family gathering or a small Christmas dinner party.
Ingredients:
- 3 pounds Yukon Gold potatoes, peeled and quartered
- 1 cup water
- 1 teaspoon salt
- 4 tablespoons unsalted butter
- 1/2 cup heavy cream
- 2 cloves garlic, minced
- Salt and pepper to taste
- Chopped fresh parsley, for garnish (optional)
Cooking Instructions:
- Prep the Potatoes: Begin by peeling and quartering the Yukon Gold potatoes. Confirm the pieces are relatively uniform in size to guarantee even cooking.
- Set Up the Instant Pot: Place the peeled and quartered potatoes into the Instant Pot. Add 1 cup of water and a teaspoon of salt. Secure the lid and confirm the valve is set to the sealing position.
- Cook the Potatoes: Select the ‘Pressure Cook’ or ‘Manual’ setting and set the timer for 8 minutes. Once the cooking time is complete, allow the pressure to release naturally for about 10 minutes, then perform a quick release for any remaining pressure.
- Drain and Mash: Carefully open the lid and drain the potatoes, discarding the cooking water. Return the potatoes to the Instant Pot.
- Mash Ingredients Together: Add the butter, heavy cream, and minced garlic to the potatoes. Use a potato masher or a handheld mixer to mash the potatoes until smooth and creamy. Season with additional salt and pepper to taste.
- Serve: Transfer the mashed potatoes to a serving bowl. Garnish with chopped fresh parsley if desired and serve hot.
Extra Tips:
For an even richer flavor, consider substituting half of the heavy cream with sour cream or cream cheese. If you prefer a lighter version, you can swap the heavy cream with milk, but be aware this might alter the creaminess slightly.
To add a little zing, stir in a tablespoon of Dijon mustard or a sprinkle of grated Parmesan cheese. Remember, the key to perfect mashed potatoes isn’t overmixing them, as this can lead to a gummy texture. Enjoy your festive Instant Pot Mashed Potatoes!
Fast and Flavorful Green Bean Almondine
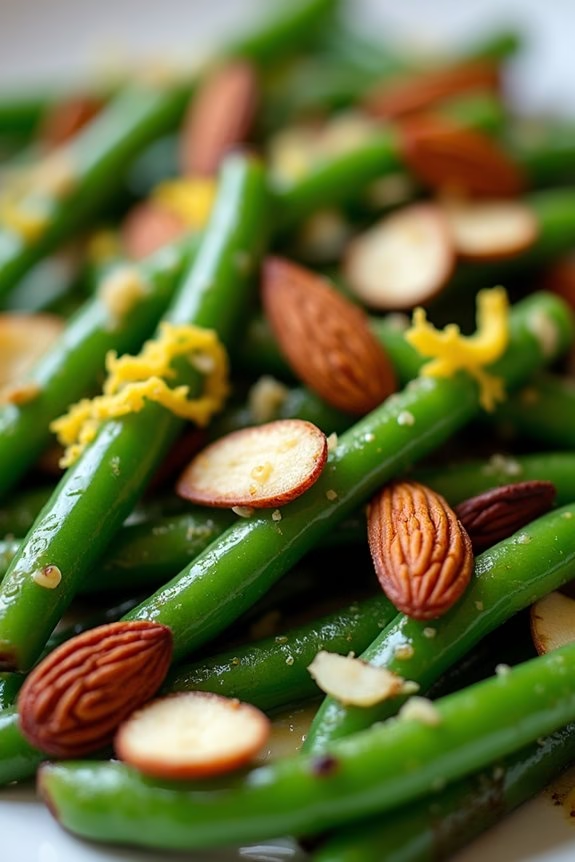
Green Bean Almondine is a classic French side dish that combines the freshness of crisp green beans with the rich, nutty flavor of toasted almonds and a hint of lemon. It’s an elegant yet straightforward recipe that can be whipped up in no time, making it perfect for special occasions like a Christmas dinner.
This dish not only adds a splash of vibrant color to your holiday table but also complements any main course with its subtle yet delightful flavors.
This recipe is quick to make, taking advantage of the natural flavors of its simple ingredients. The combination of buttery almonds and the bright zest of lemon elevates the humble green bean to a dish worthy of any festive meal. Ideal for serving 4-6 people, this recipe guarantees everyone at the table can enjoy a generous portion of this delicious side.
Ingredients (Serves 4-6):
- 1 pound fresh green beans, trimmed
- 1/2 cup sliced almonds
- 2 tablespoons unsalted butter
- 2 tablespoons olive oil
- 1 clove garlic, minced
- 1 tablespoon lemon juice
- 1 teaspoon lemon zest
- Salt and pepper to taste
Cooking Instructions:
1. Prepare the Green Beans: Start by blanching the green beans. Bring a large pot of salted water to a boil. Add the green beans and cook for 3-4 minutes until they’re bright green and tender-crisp.
Immediately drain and plunge them into a bowl of ice water to stop the cooking process. This will help the beans retain their vibrant color and crisp texture.
2. Toast the Almonds: In a large skillet over medium heat, add the sliced almonds. Toast them, stirring frequently, for about 3-5 minutes until they’re golden brown and fragrant.
Be careful not to burn them. Remove the almonds from the skillet and set aside.
3. Sauté the Garlic: In the same skillet, add the butter and olive oil. Once the butter has melted, add the minced garlic.
Sauté for about 1 minute until the garlic is fragrant but not browned.
4. Combine Ingredients: Add the drained green beans to the skillet with the garlic. Toss them to coat in the buttery garlic mixture.
Stir in the lemon juice and lemon zest, making sure the beans are evenly coated.
5. Finish the Dish: Return the toasted almonds to the skillet, and toss everything together.
Season with salt and pepper to taste. Cook for another 2-3 minutes until the green beans are heated through.
6. Serve: Transfer the Green Bean Almondine to a serving dish. Serve immediately while warm, and enjoy the delightful crunch and flavor this side dish brings to your holiday table.
Extra Tips:
For an added depth of flavor, consider using brown butter instead of regular butter in the recipe.
To make this dish ahead of time, you can blanch the green beans and toast the almonds a day in advance. Simply store them in separate airtight containers in the refrigerator and combine with the remaining ingredients just before serving.
Additionally, feel free to experiment with other nuts such as hazelnuts or pecans for a different twist on this classic dish.
20-Minute Creamy Mushroom Pasta
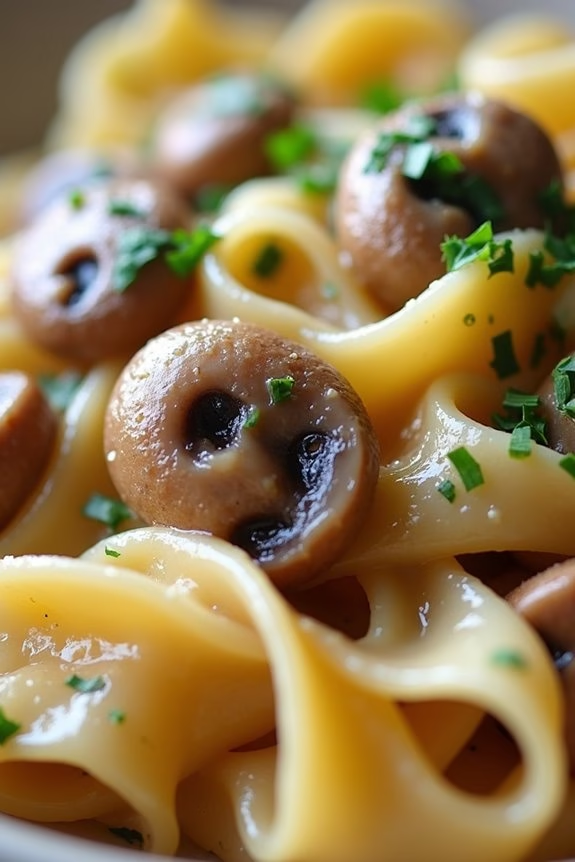
Christmas dinner is the perfect time to indulge in rich and flavorful dishes, and Minute Creamy Mushroom Pasta is a delightful choice that will leave your guests asking for seconds. This velvety pasta dish combines the earthy taste of mushrooms with a luscious cream sauce, creating a comforting meal that’s both elegant and satisfying.
Whether you’re hosting a festive gathering or simply enjoying a quiet Christmas dinner at home, this quick and easy recipe will add a touch of gourmet to your holiday table.
The beauty of Minute Creamy Mushroom Pasta lies in its simplicity and speed of preparation. With a few quality ingredients and straightforward steps, you can have a restaurant-quality dish ready in no time.
The creamy texture and the savory aroma of sautéed mushrooms enveloping the pasta make it a crowd-pleaser that’s sure to impress both vegetarians and meat lovers alike. Let’s jump into the recipe to make this delicious dish for a serving size of 4-6 people.
Ingredients:
- 12 oz (340g) of fettuccine or pasta of your choice
- 2 tablespoons of olive oil
- 1 tablespoon of unsalted butter
- 1 pound (450g) of button or cremini mushrooms, sliced
- 3 cloves of garlic, minced
- 1 cup of heavy cream
- 1/2 cup of grated Parmesan cheese
- Salt and pepper to taste
- Fresh parsley, chopped (for garnish)
Cooking Instructions:
- Cook the Pasta: Bring a large pot of salted water to a boil. Add the fettuccine and cook according to package instructions until al dente. Reserve 1 cup of pasta water, then drain the pasta and set aside.
- Sauté the Mushrooms: In a large skillet, heat the olive oil and butter over medium heat. Add the sliced mushrooms and cook for 5-7 minutes, stirring occasionally, until they’re browned and softened. Be certain not to overcrowd the pan, which will allow the mushrooms to brown nicely.
- Add Garlic: Add the minced garlic to the skillet and sauté for an additional 1-2 minutes until fragrant. Be careful not to burn the garlic, as it can become bitter.
- Create the Sauce: Pour the heavy cream into the skillet with the mushrooms and garlic. Stir well to combine and bring the mixture to a gentle simmer. Allow it to cook for 3-4 minutes until slightly thickened.
- Incorporate Cheese: Gradually add the grated Parmesan cheese to the sauce, stirring constantly until the cheese is melted and the sauce is smooth. Season with salt and pepper to taste.
- Combine Pasta and Sauce: Add the cooked pasta to the skillet with the creamy mushroom sauce. Toss everything together, making sure the pasta is well coated. If the sauce is too thick, add some reserved pasta water, a little at a time, until you reach the desired consistency.
- Serve: Transfer the pasta to serving plates or a large serving dish. Garnish with freshly chopped parsley for a burst of color and freshness.
Extra Tips:
For the best flavor, choose fresh mushrooms and avoid canned varieties, as they tend to be less aromatic.
If you’re looking to enhance the dish further, consider adding a splash of white wine to the sauce for a sophisticated depth of flavor.
To make the dish more indulgent, you can incorporate other types of mushrooms, such as porcini or shiitake, for a more complex taste.
Finally, always reserve a cup of pasta water before draining, as it can help adjust the sauce’s consistency and make sure it clings perfectly to the pasta.
No-Fuss Holiday Stuffing
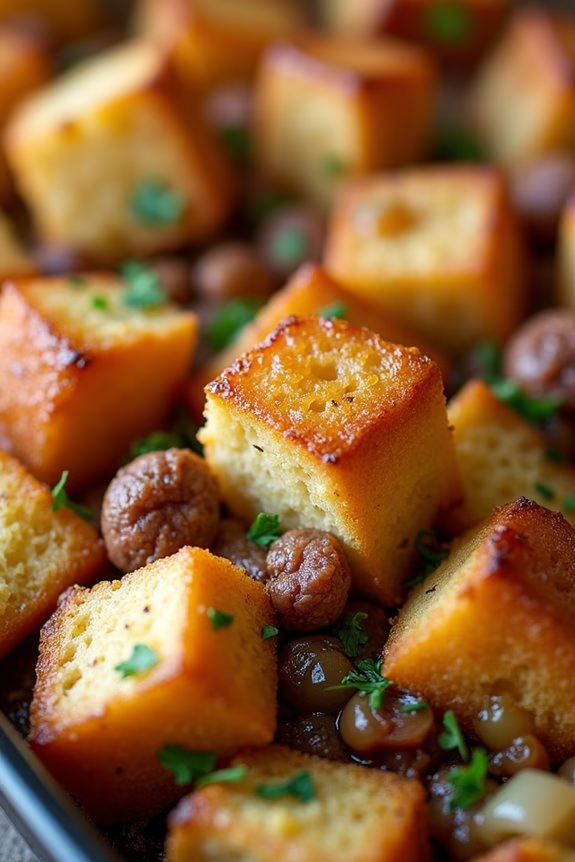
Stuffing is an essential side dish for any Christmas dinner, and this No-Fuss Holiday Stuffing is designed to be simple yet delicious, saving you time and effort while still delivering on taste. This recipe combines flavorful herbs, savory sausage, and toasted bread cubes to create a stuffing that will become a family favorite. The use of pre-cooked sausage and store-bought broth speeds up the preparation process, letting you focus on enjoying the holiday festivities with your loved ones.
Whether you’re serving a small family gathering or a festive feast, this stuffing recipe will complement your holiday spread perfectly. Designed to serve 4-6 people, this recipe guarantees everyone gets a generous portion of this hearty side dish. With minimal prep time and simple ingredients, you’ll have a delicious stuffing on the table in no time, allowing you to spend more time celebrating and less time in the kitchen.
Ingredients for 4-6 servings:
- 1 loaf of day-old Italian or French bread, cut into 1-inch cubes
- 1 pound ground sausage (mild or spicy, per preference)
- 1 medium onion, finely chopped
- 2 stalks celery, finely chopped
- 1 tablespoon olive oil
- 1 teaspoon salt
- 1/2 teaspoon black pepper
- 1 teaspoon dried sage
- 1 teaspoon dried thyme
- 1/2 teaspoon dried rosemary
- 2 cups chicken or vegetable broth
- 2 tablespoons unsalted butter, melted
- 1/4 cup fresh parsley, chopped
Cooking Instructions:
- Preheat the Oven: Start by preheating your oven to 350°F (175°C). Prepare a 9×13 inch baking dish by lightly greasing it with butter or cooking spray.
- Toast the Bread Cubes: Spread the bread cubes evenly on a baking sheet and toast in the preheated oven for about 10 minutes, or until they’re golden and slightly crisp. Remove from the oven and set aside to cool.
- Cook the Sausage: In a large skillet, heat the olive oil over medium heat. Add the ground sausage and cook until browned, breaking it up into small pieces with a spoon. Once cooked, transfer the sausage to a large mixing bowl, leaving the drippings in the skillet.
- Sauté the Vegetables: In the same skillet, add the chopped onion and celery. Sauté for about 5 minutes, or until the vegetables are soft and translucent. Stir in the salt, pepper, sage, thyme, and rosemary, and cook for an additional minute to release the flavors.
- Combine Ingredients: Add the sautéed vegetables, toasted bread cubes, and chopped parsley to the bowl with the sausage. Pour in the chicken or vegetable broth and the melted butter. Gently toss everything together until the bread is evenly coated and the mixture is well combined.
- Bake the Stuffing: Transfer the stuffing mixture to the prepared baking dish, spreading it out evenly. Cover with aluminum foil and bake in the preheated oven for 25 minutes. Remove the foil and bake for an additional 15 minutes, or until the top is lightly browned and crisp.
Extra Tips:
For the best flavor, use bread that’s a day or two old, as it will absorb the broth more effectively without becoming soggy. If you prefer a vegetarian version, simply omit the sausage and use vegetable broth.
Feel free to experiment with additional ingredients such as chopped apples, cranberries, or nuts for added texture and flavor. Remember, this recipe can easily be doubled if you’re expecting more guests, making it a versatile choice for any holiday gathering.
Rapid Mixed Green Salad With Lemon Vinaigrette
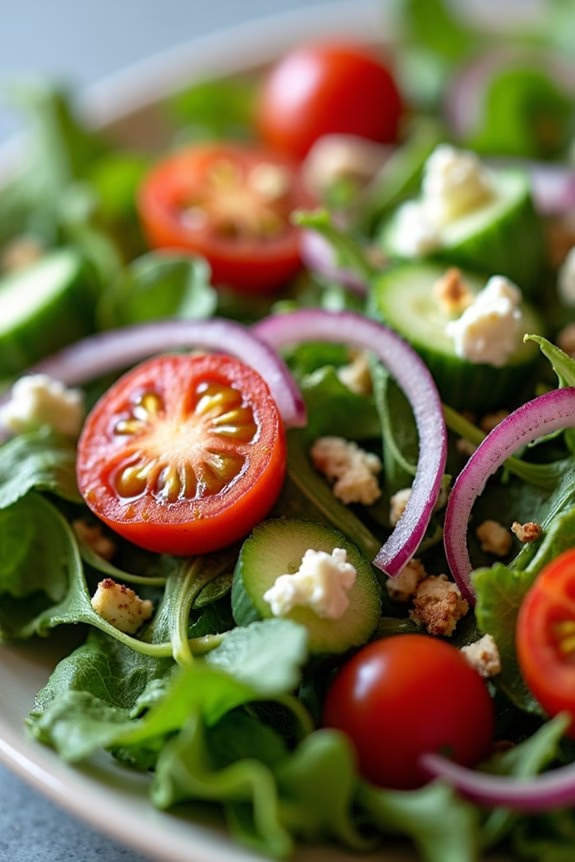
The holiday season is the perfect time to whip up a Rapid Mixed Green Salad With Lemon Vinaigrette. This dish is a delightful blend of fresh, crisp greens tossed in a zesty lemon vinaigrette that will stimulate your taste buds and add a rejuvenating contrast to the rich, hearty flavors typically found on the Christmas dinner table.
Whether you’re hosting a large gathering or enjoying a cozy family meal, this salad is an effortless addition that brings a burst of color and brightness to your festive spread.
This salad isn’t only quick and easy to prepare but also incredibly versatile. You can customize it with your favorite greens and toppings, making it a great option for accommodating various dietary preferences and restrictions.
The tangy lemon vinaigrette is the star of the dish, providing a light, citrusy dressing that perfectly complements the greens. Serve this salad as a starter or a side dish to balance out the richer components of your Christmas dinner, and watch as it becomes a new holiday favorite.
Ingredients (serving size: 4-6 people):
- 6 cups mixed salad greens (such as arugula, spinach, and romaine)
- 1 cup cherry tomatoes, halved
- 1/2 red onion, thinly sliced
- 1/2 cucumber, sliced
- 1/4 cup feta cheese, crumbled
- 1/4 cup toasted almonds or walnuts
- 1/2 cup extra virgin olive oil
- 1/4 cup freshly squeezed lemon juice
- 1 tablespoon Dijon mustard
- 1 teaspoon honey
- Salt and freshly ground black pepper to taste
Instructions:
- Prepare the Greens: Start by washing and drying your mixed salad greens thoroughly. Tear any large leaves into bite-sized pieces and place them in a large salad bowl.
- Add Vegetables: Scatter the halved cherry tomatoes, sliced red onion, and cucumber over the greens. This adds color and texture to the salad.
- Incorporate Cheese and Nuts: Sprinkle the crumbled feta cheese and toasted almonds or walnuts over the top. These ingredients add a savory and crunchy element to the salad.
- Make the Vinaigrette: In a small mixing bowl, whisk together the extra virgin olive oil, freshly squeezed lemon juice, Dijon mustard, honey, salt, and black pepper until well combined. Taste and adjust the seasoning as needed.
- Dress the Salad: Drizzle the lemon vinaigrette over the salad just before serving. Toss the salad gently to guarantee all the greens are evenly coated with the dressing.
- Serve Immediately: Transfer the salad to a serving platter or individual plates and serve immediately to enjoy the fresh flavors at their peak.
Extra Tips:
For the best flavor, use high-quality extra virgin olive oil and fresh, organic greens if possible. You can also add seasonal fruits like pomegranate seeds or apple slices for a festive touch.
If you’re preparing the salad in advance, keep the vinaigrette separate and dress the salad just before serving to maintain the crispness of the greens. Experiment with different nuts or cheese varieties to suit your taste, and enjoy the flexibility this dish offers for your Christmas dinner.
Effortless Cheese and Charcuterie Board

Creating an effortless cheese and charcuterie board is a great way to impress your guests without spending hours in the kitchen. Perfect for Christmas dinner or any festive occasion, this board combines a variety of flavors and textures, offering something for everyone to enjoy. With a selection of cheeses, cured meats, fruits, nuts, and crackers, you can create a visually appealing and delicious spread that encourages mingling and sharing. The key is to select high-quality ingredients that complement each other well.
This cheese and charcuterie board is designed to serve 4-6 people. When arranging your board, consider the aesthetic as much as the taste. Use a large wooden board or marble slab as your base, and arrange your items in a way that’s both inviting and accessible. Don’t forget to include small serving utensils like cheese knives and toothpicks for easy serving. With a little planning and creativity, your cheese and charcuterie board will be the star of the evening.
Ingredients for 4-6 People:
- 3 types of cheese (e.g., Brie, Cheddar, Blue Cheese)
- 3 types of cured meats (e.g., Prosciutto, Salami, Chorizo)
- A handful of grapes
- 1-2 fresh figs, quartered
- 1/4 cup dried apricots
- 1/4 cup mixed nuts (e.g., almonds, walnuts)
- 1/4 cup olives
- 1/2 baguette, sliced
- Assorted crackers
- Honey or fig jam
- Fresh rosemary sprigs for garnish
Instructions:
- Prepare the Board: Begin by selecting your serving board. A large wooden or marble board works well. Arrange small bowls or ramekins on the board to hold items like olives, nuts, or spreads.
- Select and Place Cheeses: Choose a variety of cheeses with different textures and flavors. Place them on the board, spaced out to allow room for slicing and serving. Soft cheeses like Brie can be left whole, while firmer cheeses like Cheddar can be pre-sliced or cut into cubes.
- Add Cured Meats: Roll or fold the cured meats to add visual interest and place them around the cheeses. Try to balance the distribution of meats across the board for an appealing look.
- Incorporate Fruits and Nuts: Add clusters of grapes, quartered figs, and dried apricots in open spaces. Scatter the mixed nuts throughout the board, providing texture and crunch.
- Include Bread and Crackers: Arrange slices of baguette and assorted crackers around the edge of the board. Confirm there are enough for guests to pair with cheese and meats.
- Finish with Extras: Place a small bowl of honey or fig jam on the board for a sweet contrast. Garnish with fresh rosemary sprigs to add a festive touch and aroma.
- Serve and Enjoy: Provide small cheese knives and toothpicks for easy serving. Encourage guests to mix and match the flavors and textures.
Extra Tips:
When assembling your board, remember that variety is key. Aim for a balance of soft and hard cheeses, as well as mild and strong flavors. Consider dietary restrictions and offer gluten-free cracker options if necessary.
Presentation is just as important as taste, so take time to thoughtfully arrange the items. Using small bowls for loose items like olives or jam can help keep your board tidy. Finally, verify everything is at room temperature before serving for best flavor and texture.
Quick No-Bake Chocolate Peppermint Pie
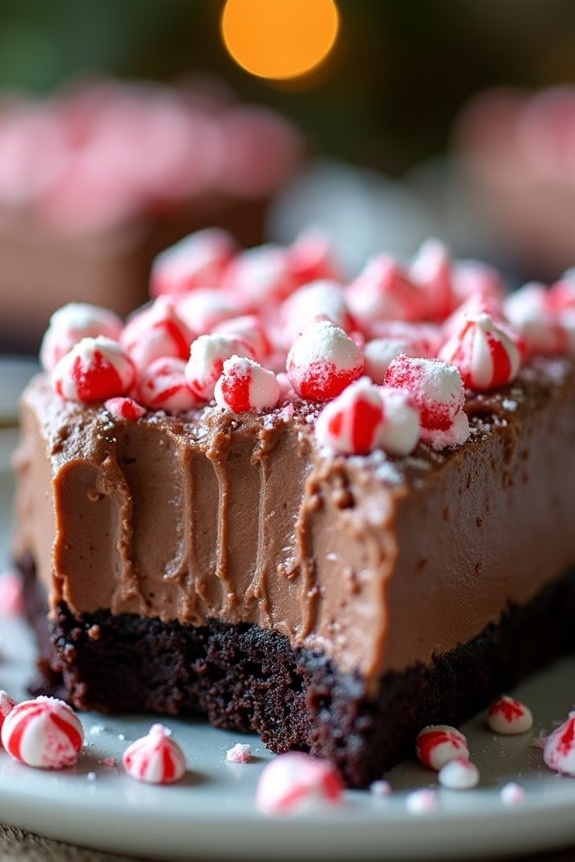
Indulge in the holiday spirit with this delightful Quick No-Bake Chocolate Peppermint Pie that captures the essence of Christmas with its rich chocolatey goodness and invigorating peppermint flavor.
This dessert is perfect for those who want to enjoy a festive treat without spending too much time in the kitchen. With its smooth and creamy filling, nestled in a crunchy cookie crust, it’s sure to be a hit at your Christmas dinner table.
Best of all, this no-bake pie isn’t only easy to make but also a treat for both the eyes and the taste buds with its decorative peppermint toppings.
This recipe is designed to serve 4-6 people, making it ideal for small gatherings or intimate family dinners. The combination of chocolate and peppermint is a classic holiday pairing that everyone will love.
You’ll appreciate how quickly this pie comes together, allowing you more time to enjoy the holiday festivities. Simply follow the instructions, and you’ll have a delicious dessert ready in no time.
Ingredients:
- 1 pre-made chocolate cookie pie crust (9-inch)
- 1 cup semi-sweet chocolate chips
- 1 cup heavy whipping cream
- 1 teaspoon peppermint extract
- 1/4 cup powdered sugar
- Crushed peppermint candies or candy canes (for garnish)
- Whipped cream (optional, for topping)
Cooking Instructions:
- Melt the Chocolate: In a medium-sized heatproof bowl, combine the semi-sweet chocolate chips and 1/2 cup of heavy whipping cream. Melt the chocolate by microwaving it in 30-second intervals, stirring in between until smooth and completely melted. Be careful not to overheat the chocolate.
- Prepare the Filling: Once the chocolate is melted, stir in the peppermint extract until fully incorporated. Set aside and allow the mixture to cool slightly.
- Whip the Cream: In a separate bowl, whip the remaining 1/2 cup of heavy whipping cream with the powdered sugar using an electric mixer on medium-high speed. Whip until you achieve stiff peaks. This should take about 2-3 minutes.
- Combine and Pour: Gently fold the whipped cream into the cooled chocolate mixture until well combined and smooth. Pour the chocolate filling into the pre-made chocolate cookie crust, spreading it evenly.
- Chill: Cover the pie with plastic wrap and refrigerate for at least 2 hours or until the filling is set.
- Garnish and Serve: Before serving, garnish the pie with crushed peppermint candies or candy canes. Add dollops of whipped cream on top if desired for an extra festive touch.
Extra Tips:
For a more intense peppermint flavor, consider adding a few drops more of peppermint extract to the filling, but be cautious as too much could overpower the chocolate.
When crushing the peppermint candies, place them in a ziplock bag and gently crush them with a rolling pin for more uniform pieces.
If you prefer a less sweet pie, try using dark chocolate chips instead. This pie can be made a day in advance, making it a convenient option for busy holiday schedules.
Enjoy your festive dessert!
Speedy Gingerbread Trifle
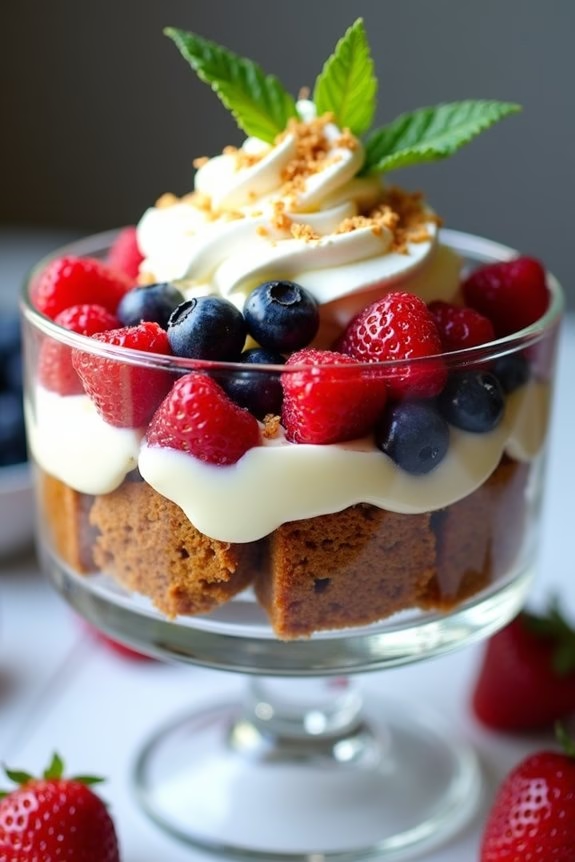
Speedy Gingerbread Trifle is a delightful dessert that combines the warm, spicy flavors of gingerbread with the creamy, rich textures of custard and whipped cream. Perfect for a Christmas dinner, this trifle is a quick and easy way to impress your guests with minimal effort.
The layers of gingerbread cake, creamy custard, and fresh fruits create a visually stunning dessert that tastes as good as it looks. Whether you’re hosting a large family gathering or a small intimate dinner, this speedy trifle is bound to become a holiday favorite.
The beauty of this trifle lies in its simplicity and flexibility. You can prepare the components in advance, allowing you to assemble the dessert just before serving. This recipe serves 4-6 people, making it ideal for a festive gathering.
The combination of ready-made ingredients like store-bought gingerbread cake and instant custard mix guarantees you spend more time enjoying the holiday festivities and less time in the kitchen. Get ready to delight your taste buds with the perfect balance of sweetness, spice, and creaminess.
Ingredients for 4-6 servings:
- 1 loaf of store-bought gingerbread cake
- 2 cups of prepared instant custard
- 1 cup of heavy whipping cream
- 2 tablespoons of powdered sugar
- 1 teaspoon of vanilla extract
- 1 cup of mixed berries (such as raspberries, blueberries, and strawberries)
- 1/2 cup of crushed ginger snap cookies
- Fresh mint leaves for garnish (optional)
Cooking Instructions:
- Prepare the Whipped Cream: In a large mixing bowl, pour in the heavy whipping cream. Add the powdered sugar and vanilla extract. Use an electric mixer to whip the cream until soft peaks form. Be careful not to overwhip, as it can turn into butter.
- Cut the Gingerbread Cake: Slice the store-bought gingerbread loaf into small cubes, approximately 1-inch in size. This will make it easy to layer and serve.
- Layer the Trifle: In a large trifle dish or individual serving glasses, start by placing a layer of gingerbread cake cubes at the bottom. Follow with a layer of prepared custard, then a layer of mixed berries. Repeat the layering process until you reach the top of the dish, ensuring you finish with a layer of custard.
- Top with Whipped Cream: Spoon the whipped cream over the top layer of custard, spreading it evenly. Sprinkle the crushed ginger snap cookies over the whipped cream for added texture and flavor.
- Garnish and Serve: If desired, garnish the trifle with fresh mint leaves for a pop of color. Serve immediately, or refrigerate for up to 2 hours before serving.
Extra Tips: To save time, you can prepare the custard and whip the cream a day in advance, storing them separately in the refrigerator.
When selecting berries, choose a mix of your favorites or whatever is in season for the best flavor. If you have leftover gingerbread cake, it can be frozen and used later for another batch of trifle or other desserts.
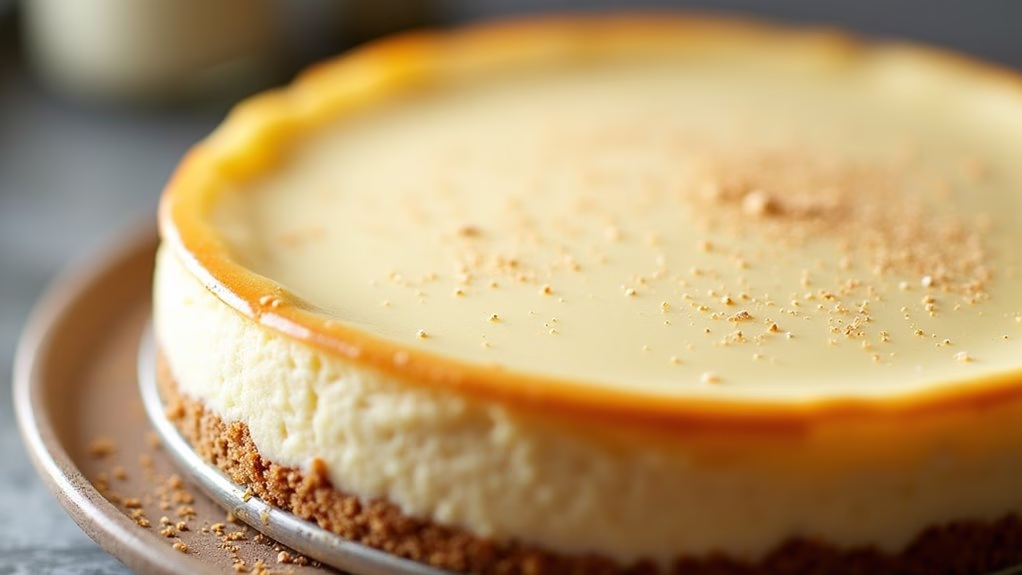
Five-Ingredient Eggnog Cheesecake
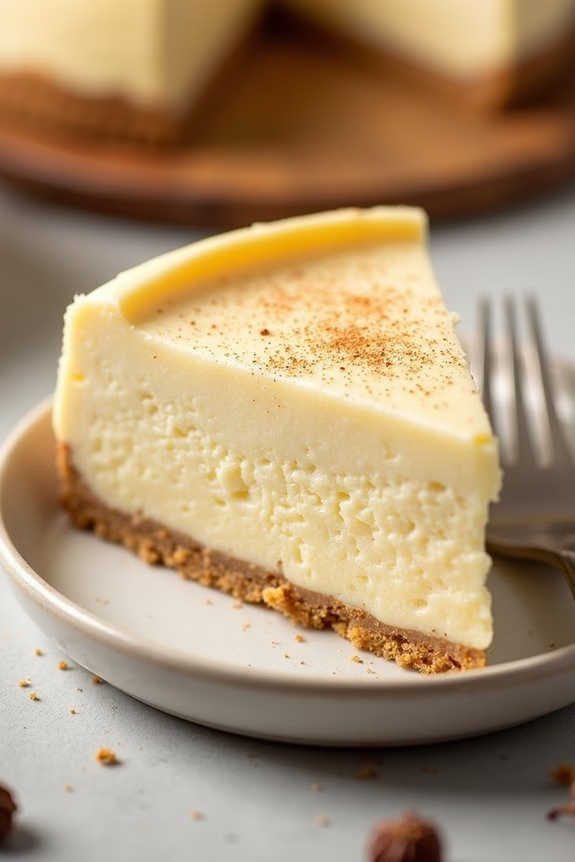
Indulge in the festive spirit with a delectable Five-Ingredient Eggnog Cheesecake, a delightful treat perfect for your Christmas dinner. This cheesecake combines the creamy richness of traditional cheesecake with the warm, spiced flavors of eggnog, making it a show-stopping dessert that’s easy to prepare and even easier to enjoy.
With only five ingredients, this recipe is simple yet sophisticated, offering a smooth and velvety texture that melts in your mouth with every bite. Ideal for serving 4-6 people, this cheesecake requires minimal effort, allowing you to spend more time with your loved ones and less time in the kitchen.
Whether you’re a seasoned baker or a novice, this recipe is foolproof and guarantees a delicious outcome. Serve it as the finale to your holiday feast and watch your guests savor each slice with joy and satisfaction.
Ingredients:
- 1 pre-made graham cracker crust (9-inch)
- 16 ounces cream cheese, softened
- 1 cup eggnog
- 1 cup granulated sugar
- 3 large eggs
Cooking Instructions:
- Preheat the Oven: Begin by preheating your oven to 325°F (165°C). This guarantees that your cheesecake bakes evenly and achieves the perfect consistency.
- Prepare the Filling: In a large mixing bowl, combine the softened cream cheese and granulated sugar. Use an electric mixer to beat them together until smooth and creamy, making sure there are no lumps.
- Incorporate the Eggnog: Gradually add the eggnog to the cream cheese mixture, continuing to beat until well combined. The eggnog will add a rich, holiday flavor to your cheesecake.
- Add the Eggs: Crack the eggs into the mixture, one at a time, beating on low speed after each addition. This helps to incorporate air into the batter, giving your cheesecake a light, airy texture.
- Pour into Crust: Once your filling is smooth and well-mixed, carefully pour it into the pre-made graham cracker crust, spreading it evenly with a spatula.
- Bake: Place the cheesecake on the center rack of your preheated oven. Bake for 45-50 minutes, or until the center is set and the edges are lightly golden. The center will still have a slight jiggle, which will firm up as it cools.
- Cool and Chill: Remove the cheesecake from the oven and allow it to cool to room temperature. Then, refrigerate it for at least 4 hours, or overnight, to confirm it sets properly and the flavors meld together.
Extra Tips:
For the best results, confirm that all ingredients are at room temperature before you begin, as this helps them blend more smoothly. If you prefer a stronger eggnog flavor, you can add a pinch of nutmeg or cinnamon to the filling.
When slicing the cheesecake, use a sharp knife dipped in hot water to achieve clean cuts, wiping the blade between slices. Enjoy your Five-Ingredient Eggnog Cheesecake with a dollop of whipped cream or a sprinkle of nutmeg for an extra festive touch.