

As the holiday season approaches, I’ve put together a charming collection of 12 Christmas dinner recipes tailored perfectly for two. From the comforting warmth of Classic Roast Chicken with Herbs to the sophistication of Pan-Seared Duck Breast with Cherry Sauce, these dishes are all about flavor and togetherness. Picture enjoying Honey-Glazed Ham Steaks or the decadence of Beef Wellington. Each meal pairs beautifully with sides like Creamy Mushroom Risotto, and for a sweet ending, there’s a delightful Chocolate Fondue. Let’s explore these delicious ideas and create memorable moments together.
Classic Roast Chicken With Herbs
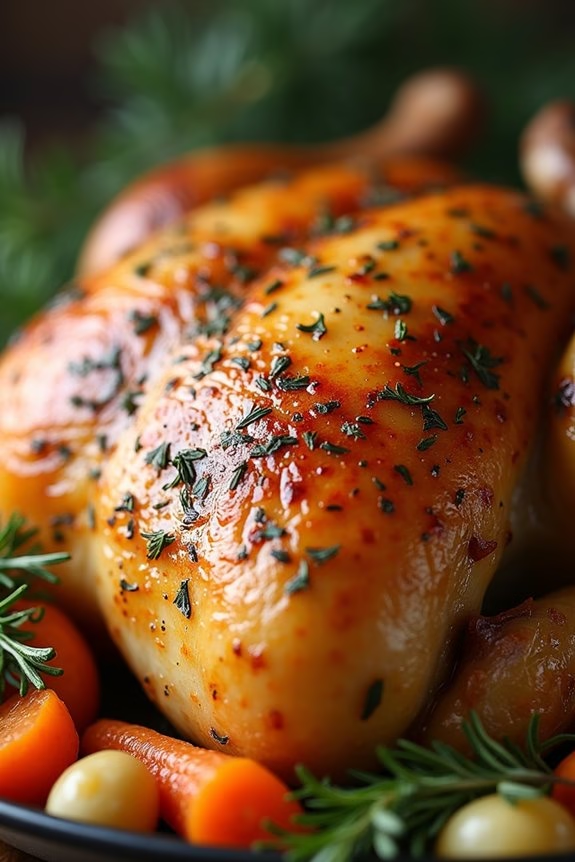
Roasting a chicken is a timeless tradition and a comforting way to celebrate the holidays. A Classic Roast Chicken with Herbs is perfect for an intimate Christmas dinner for two. This dish isn’t only easy to prepare, but it also fills the home with a mouthwatering aroma that epitomizes the holiday spirit. The combination of fresh herbs, garlic, lemon, and butter creates a flavorful, juicy chicken with a crispy skin that’s certain to impress your dining partner.
Despite being designed for two, this recipe can be easily adapted to serve 4-6 people, making it versatile for any occasion. Whether you’re hosting a small gathering or simply want leftovers, this recipe provides the perfect balance of flavors and textures that makes it a popular choice for Christmas dinner. Here’s how you can prepare this delectable roast chicken with herbs.
Ingredients (for 4-6 servings):
- 1 whole chicken (about 4-5 pounds)
- Salt and pepper
- 2 tablespoons olive oil
- 1 lemon, halved
- 1 head of garlic, halved crosswise
- 4 tablespoons unsalted butter, softened
- 1 tablespoon fresh rosemary, chopped
- 1 tablespoon fresh thyme, chopped
- 1 tablespoon fresh parsley, chopped
- 1 onion, quartered
- 4 carrots, peeled and cut into chunks
- 4 parsnips, peeled and cut into chunks
Cooking Instructions:
- Preheat the Oven: Preheat your oven to 425°F (220°C). This high heat is essential to achieve a crispy skin and juicy meat.
- Prepare the Chicken: Remove the giblets from the chicken cavity if present. Rinse the chicken inside and out under cold water, then pat dry with paper towels. Season the cavity generously with salt and pepper.
- Flavor the Chicken: In a small bowl, mix the softened butter with the chopped rosemary, thyme, and parsley. Carefully loosen the skin over the breast of the chicken and rub half of the herb butter mixture between the skin and the meat. Rub the remaining butter mixture over the outside of the chicken.
- Stuff the Cavity: Insert the lemon halves, halved garlic head, and some thyme sprigs into the cavity of the chicken. These aromatics will infuse the chicken with incredible flavor as it roasts.
- Prepare the Vegetables: Arrange the onion quarters, carrot chunks, and parsnip chunks at the bottom of a large roasting pan. Drizzle with olive oil and season with salt and pepper.
- Roast the Chicken: Place the chicken on top of the vegetables in the roasting pan. Roast in the preheated oven for about 1 hour and 20 minutes, or until the internal temperature reaches 165°F (75°C) and the juices run clear when the thigh is pierced.
- Rest and Serve: Remove the chicken from the oven and let it rest for about 10 minutes before carving. This resting period allows the juices to redistribute, resulting in a more succulent chicken. Serve the chicken with the roasted vegetables on the side.
Extra Tips:
To guarantee an even cook, tie the legs of the chicken together with kitchen twine before roasting. If you prefer a more intense flavor, marinate the chicken in the herb butter mixture for a few hours or overnight in the refrigerator before cooking.
For an added touch, baste the chicken with its own juices every 30 minutes during roasting. This not only enhances the flavor but also helps achieve that golden, crispy skin.
Finally, save any leftover chicken bones to make a delicious homemade stock, perfect for soups or future recipes.
Honey-Glazed Ham Steaks
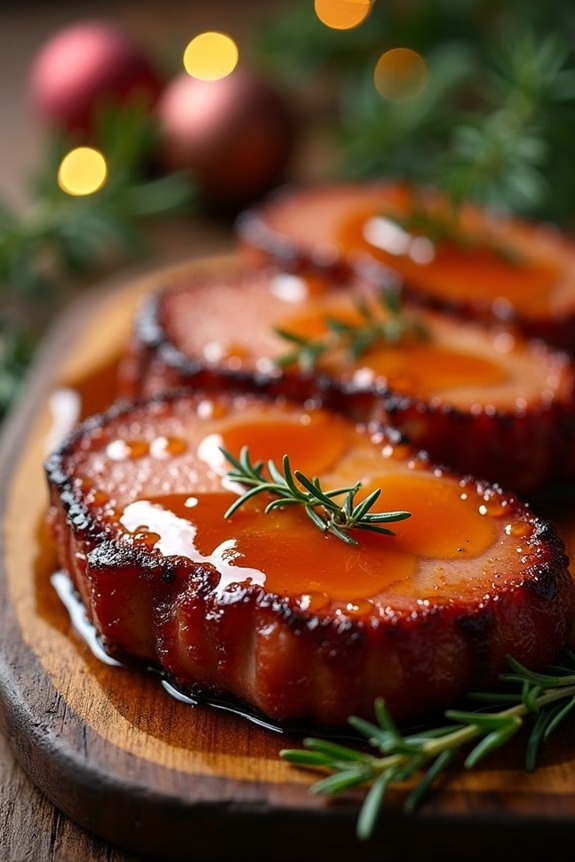
The holiday season is the perfect time to indulge in a cozy and intimate Christmas dinner for two. One dish that always brings warmth and festive cheer to the table is Honey-Glazed Ham Steaks. This dish combines the savory flavors of ham with the sweet, sticky allure of honey glaze, creating a delightful meal that feels both luxurious and comforting.
Whether you’re celebrating the holiday with your partner or a close friend, this recipe is sure to make your Christmas dinner special.
Honey-Glazed Ham Steaks aren’t only delicious but also incredibly easy to prepare, making them perfect for a quiet holiday evening at home. The ham steaks are cooked to perfection and then generously coated with a luscious honey glaze that caramelizes beautifully. The result is a tender, juicy ham with a sweet and savory crust that will have you reaching for seconds.
With just a few simple ingredients, you can create a dish that looks and tastes like a holiday feast.
Ingredients for 4-6 people:
- 4 ham steaks (approximately 6 ounces each)
- 1/2 cup honey
- 1/4 cup brown sugar
- 1/4 cup Dijon mustard
- 2 tablespoons apple cider vinegar
- 1/2 teaspoon ground cloves
- 1/4 teaspoon ground cinnamon
- 1/4 teaspoon black pepper
- 1 tablespoon butter
- 1 tablespoon olive oil
Cooking Instructions:
- Prepare the Glaze: In a medium bowl, combine the honey, brown sugar, Dijon mustard, apple cider vinegar, ground cloves, ground cinnamon, and black pepper. Whisk together until the mixture is smooth and set aside.
- Heat the Pan: In a large skillet, heat the butter and olive oil over medium heat. Allow the butter to melt completely and become slightly foamy before proceeding to the next step.
- Cook the Ham Steaks: Place the ham steaks in the skillet. Cook them for about 3-4 minutes on each side or until they’re lightly browned. Be sure not to overcrowd the pan; cook in batches if necessary.
- Apply the Glaze: Once the ham steaks are browned, pour the prepared honey glaze over them. Reduce the heat to low and let the steaks simmer in the glaze for about 5-7 minutes, turning occasionally to confirm even coating and caramelization.
- Caramelize the Glaze: Increase the heat to medium and cook for an additional 2-3 minutes, allowing the glaze to thicken and caramelize slightly. The glaze should become sticky and adhere to the ham steaks.
- Serve: Remove the ham steaks from the skillet and transfer them to a serving platter. Drizzle any remaining glaze from the pan over the top of the steaks before serving.
Extra Tips:
To enhance the flavor of the Honey-Glazed Ham Steaks, consider marinating the ham in the glaze for a few hours before cooking. This will allow the flavors to penetrate deeper into the meat.
Additionally, if you prefer a spicier glaze, you can add a pinch of cayenne pepper to the glaze mixture. When cooking the ham steaks, confirm the skillet isn’t overcrowded, as this will help achieve a better sear.
Finally, if you find the glaze too thick, you can thin it out with a little bit of water or additional apple cider vinegar. Enjoy your festive meal!
Pan-Seared Duck Breast With Cherry Sauce
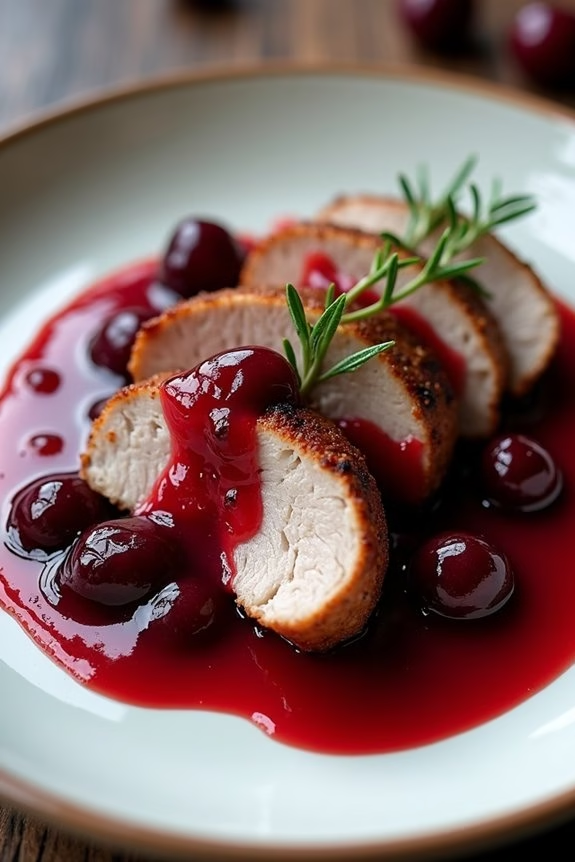
Pan-Seared Duck Breast With Cherry Sauce is a delightful and elegant dish that’s perfect for a cozy Christmas dinner for two. The rich and savory flavors of the duck breast pair beautifully with the sweet and slightly tart cherry sauce, creating a harmonious balance that’s certain to impress.
This dish not only looks sophisticated on the plate but also offers a gourmet dining experience in the comfort of your home. Whether you’re an experienced cook or someone looking to try something new for the holidays, this recipe is guaranteed to become a favorite.
The secret to this dish lies in the perfect sear of the duck breast, which creates a crispy skin while keeping the meat tender and juicy. The cherry sauce, made with fresh or frozen cherries, complements the duck with its vibrant color and depth of flavor.
This recipe is designed for a serving size of 4-6 people, making it ideal for a small family gathering or an intimate dinner with friends. With a few simple steps and quality ingredients, you can create a memorable meal that captures the essence of the holiday season.
Ingredients (Serves 4-6):
- 4 duck breasts
- Salt and pepper to taste
- 1 tablespoon vegetable oil
- 1 shallot, finely chopped
- 1 cup chicken stock
- 1 cup fresh or frozen cherries, pitted
- 1/4 cup red wine
- 2 tablespoons balsamic vinegar
- 1 tablespoon honey
- 1 teaspoon cornstarch mixed with 1 tablespoon water
Cooking Instructions:
- Prepare the Duck Breasts: Pat the duck breasts dry with paper towels. Score the skin in a crosshatch pattern, being careful not to cut into the meat. Season both sides with salt and pepper.
- Sear the Duck Breasts: Heat a large skillet over medium-high heat and add the vegetable oil. Once hot, place the duck breasts skin-side down in the skillet. Cook for about 6-8 minutes until the skin is crispy and golden brown. Flip the breasts and cook for an additional 3-4 minutes or until the internal temperature reaches 135°F for medium-rare. Remove from the skillet and let rest.
- Prepare the Cherry Sauce: In the same skillet, reduce the heat to medium and add the finely chopped shallot. Sauté until translucent. Add the chicken stock, cherries, red wine, balsamic vinegar, and honey. Stir to combine and bring to a simmer.
- Thicken the Sauce: Once the sauce has reduced slightly, add the cornstarch mixture. Stir continuously until the sauce thickens to your desired consistency. Adjust seasoning with salt and pepper as needed.
- Serve: Slice the duck breasts thinly and arrange on a serving platter. Drizzle with the cherry sauce and serve immediately.
Extra Tips:
To achieve a perfectly crispy duck skin, make sure the duck breasts are thoroughly dried before scoring and seasoning. This helps render out the fat and crisp up the skin.
Additionally, avoid moving the duck breasts around in the pan while searing to ensure an even, golden crust. For the cherry sauce, feel free to adjust the sweetness by adding more honey or vinegar to suit your taste. If fresh cherries aren’t available, frozen cherries work wonderfully as a substitute.
Beef Wellington for Two
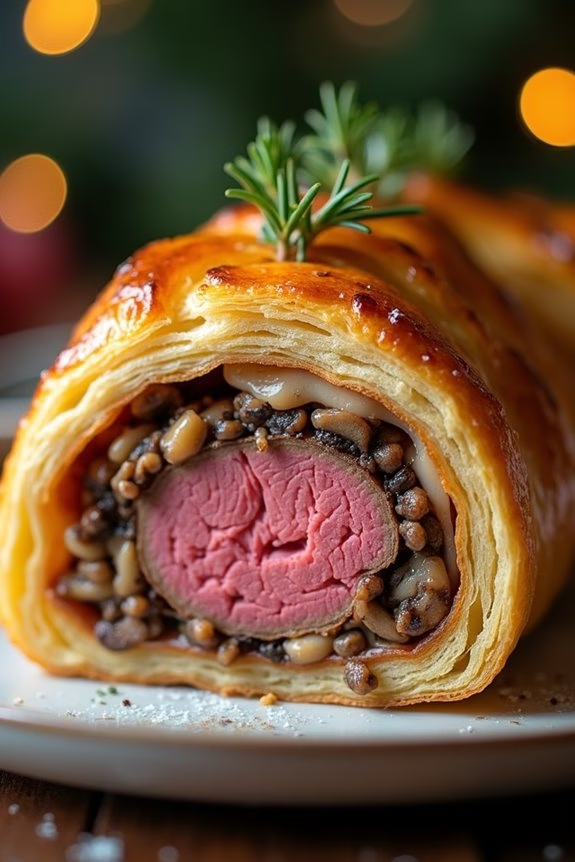
Beef Wellington is a classic dish that combines the rich, savory flavors of beef tenderloin, mushrooms, and puff pastry into a beautifully wrapped package. It’s ideal for a special occasion like Christmas dinner, offering an elegant presentation that’s certain to impress.
When preparing Beef Wellington for two, the key is to balance the flavors and textures so that each element complements the others. The tender beef should be perfectly cooked, the mushroom duxelles should be flavorful, and the pastry should be crisp and golden.
For this recipe, we’ll use individual portions of beef tenderloin to guarantee even cooking and a personalized touch. The beef is first seared to lock in the juices, then coated with a flavorful mushroom mixture and wrapped in prosciutto. Finally, it’s encased in puff pastry and baked to perfection. This dish requires a bit of time and attention to detail, but the result is a stunning centerpiece for your Christmas dinner.
Ingredients for 4-6 servings:
- 4 beef tenderloin steaks (approximately 6-8 oz each)
- Salt and pepper to taste
- 2 tablespoons olive oil
- 2 tablespoons Dijon mustard
- 1 pound mushrooms, finely chopped
- 2 tablespoons butter
- 1 shallot, finely chopped
- 2 cloves garlic, minced
- 2 teaspoons fresh thyme leaves
- 8 slices prosciutto
- 1 pound puff pastry
- 1 egg, beaten
- Flour for dusting
Cooking Instructions:
- Prepare the Beef: Season the beef tenderloin steaks with salt and pepper. Heat olive oil in a skillet over medium-high heat. Sear the steaks for about 2 minutes on each side until browned. Remove from heat and brush with Dijon mustard. Set aside to cool.
- Make the Mushroom Duxelles: In the same skillet, melt the butter and add the chopped mushrooms, shallot, and garlic. Cook over medium heat until the mixture is dry and golden, about 10 minutes. Stir in the thyme, season with salt and pepper, and let it cool.
- Assemble the Beef Wellington: Lay out a sheet of plastic wrap. Place 2 slices of prosciutto, slightly overlapping. Spread a quarter of the mushroom duxelles over the prosciutto. Place a steak on top, and wrap the prosciutto around the steak. Use the plastic wrap to shape it into a tight cylinder. Repeat for each steak and refrigerate for at least 30 minutes.
- Wrap with Puff Pastry: Roll out the puff pastry on a floured surface. Cut into pieces large enough to encase each wrapped steak. Remove the plastic wrap and place the prosciutto-wrapped steak on the pastry. Brush the edges with beaten egg, fold over the pastry to seal, and place seam-side down on a baking sheet.
- Bake: Preheat the oven to 400°F (200°C). Brush the tops of the pastry with more beaten egg. Make a few slits on top to allow steam to escape. Bake for 20-25 minutes until the pastry is golden brown. Let it rest for 10 minutes before serving.
Extra Tips:
For the best results, make sure your beef is at room temperature before searing. This helps in achieving an even sear.
When making the mushroom duxelles, be patient and let the mixture cook until all the moisture has evaporated; this prevents the pastry from becoming soggy.
If you’re short on time, you can prepare the mushroom mixture and assemble the Wellingtons a day in advance, storing them in the fridge until you’re ready to bake.
Finally, when sealing the puff pastry, make sure there are no gaps or tears to keep all the delicious juices inside.
Stuffed Pork Tenderloin With Apple and Cranberry
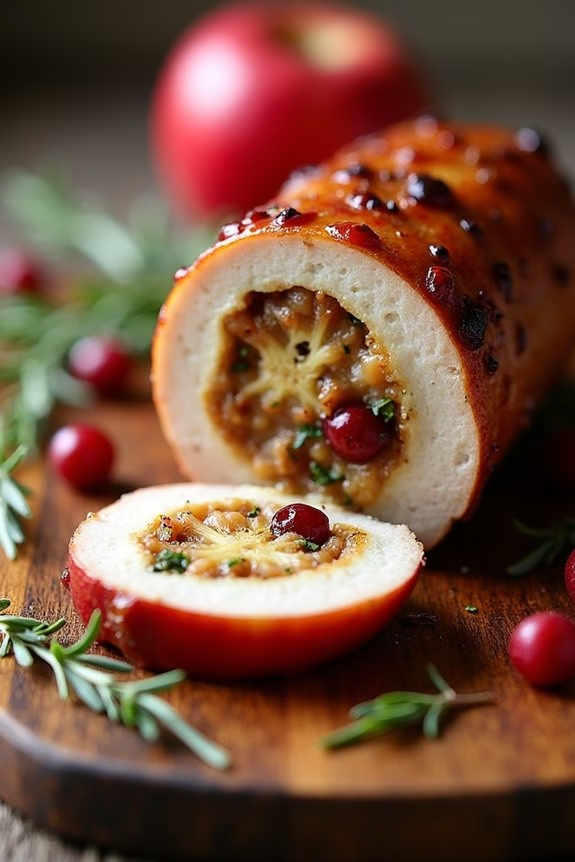
Indulge in the comforting flavors of the season with this elegant Stuffed Pork Tenderloin With Apple and Cranberry dish, perfect for a cozy Christmas dinner for two. The succulent pork tenderloin is filled with a delightful mixture of tart apples and sweet cranberries, combined with aromatic herbs and spices that bring out the festive spirit. This dish not only pleases the palate but also fills your home with the enticing aroma of the holidays.
The contrast of flavors in this stuffed tenderloin creates a harmony that’s both satisfying and sophisticated. The sweetness of the apples and cranberries complements the savory pork, while a touch of sage and thyme adds depth to the dish. Served with a side of roasted vegetables or a fresh salad, this meal is bound to become a cherished tradition for your intimate holiday celebrations.
Ingredients for 4-6 servings:
- 2 pork tenderloins (about 1-1.5 pounds each)
- 2 tablespoons olive oil
- 1 cup peeled and diced apples (such as Granny Smith)
- 1/2 cup dried cranberries
- 1/4 cup chopped walnuts or pecans
- 1 small onion, finely chopped
- 2 cloves garlic, minced
- 1/2 teaspoon dried sage
- 1/2 teaspoon dried thyme
- Salt and pepper to taste
- 1/2 cup chicken broth
- Kitchen twine
Cooking Instructions:
- Prepare the Filling: In a medium-sized skillet, heat 1 tablespoon of olive oil over medium heat. Add the chopped onion and garlic, and sauté until the onion becomes translucent. Stir in the diced apples, dried cranberries, and nuts, cooking for another 5 minutes until the apples soften. Add the sage, thyme, salt, and pepper. Mix well and remove from heat. Let the filling cool slightly.
- Prepare the Pork Tenderloins: Preheat your oven to 375°F (190°C). Butterfly each pork tenderloin by slicing it lengthwise down the middle, without cutting all the way through. Open the tenderloin like a book and place it between two sheets of plastic wrap. Use a meat mallet to pound the meat to an even thickness, about 1/2 inch.
- Stuff the Tenderloins: Spread the prepared apple and cranberry mixture evenly over each tenderloin. Roll the tenderloins tightly around the filling and secure with kitchen twine at 2-inch intervals to hold the shape.
- Sear the Tenderloins: In a large oven-safe skillet, heat the remaining tablespoon of olive oil over medium-high heat. Add the stuffed tenderloins and sear them on all sides until they’re browned, about 3-4 minutes per side.
- Roast the Tenderloins: Pour the chicken broth into the skillet with the tenderloins. Transfer the skillet to the preheated oven and roast for 20-25 minutes, or until the internal temperature of the pork reaches 145°F (63°C).
- Rest and Serve: Remove the tenderloins from the oven and let them rest for 5 minutes before slicing. This allows the juices to redistribute, making for a moist and flavorful dish. Slice the tenderloins and serve with your choice of side dishes.
Extra Tips:
To achieve the perfect balance of flavors, choose apples that are firm and slightly tart, such as Granny Smith, which hold up well during cooking.
When securing the tenderloin with twine, make sure it’s snug but not too tight, allowing the filling to stay intact while cooking.
For an added touch of elegance, deglaze the skillet with a splash of white wine before adding the chicken broth, enhancing the sauce’s depth and flavor.
Finally, remember to let the pork rest before slicing; this vital step makes all the difference in maintaining the dish’s juiciness and tenderness.
Lemon Garlic Shrimp Pasta

Lemon Garlic Shrimp Pasta is a delightful dish that’s perfect for an intimate Christmas dinner for two. This elegant yet simple meal combines the succulent flavors of shrimp with the zestiness of lemon and the aromatic presence of garlic, all tossed with tender pasta.
It’s a harmonious blend that delivers a revitalizing taste, making it an ideal choice for those seeking something light yet satisfying during the holiday season.
The recipe can easily be scaled to serve more guests if needed. For this version, we’ll provide the ingredients for a serving size of 4-6 people, allowing you to enjoy this delicious meal with a few more friends or family. The preparation is straightforward, ensuring you spend less time in the kitchen and more time savoring the festive moments with your loved ones.
Ingredients (Serves 4-6):
- 1 pound linguine or spaghetti pasta
- 1 pound large shrimp, peeled and deveined
- 3 tablespoons olive oil
- 4 cloves garlic, minced
- 1 teaspoon red pepper flakes
- 1 lemon, zest and juice
- 1/4 cup white wine (optional)
- 1/4 cup chopped fresh parsley
- Salt and pepper to taste
- 1/4 cup grated Parmesan cheese
Cooking Instructions:
- Cook the Pasta: Begin by boiling a large pot of salted water. Add the pasta and cook according to the package instructions until al dente. Drain the pasta, reserving 1 cup of the pasta water for later use.
- Prepare the Shrimp: While the pasta is cooking, heat 2 tablespoons of olive oil in a large skillet over medium heat. Add the shrimp and cook for about 2-3 minutes on each side, or until they turn pink and are opaque. Remove the shrimp from the skillet and set aside.
- Sauté the Garlic: In the same skillet, add the remaining 1 tablespoon of olive oil. Add the minced garlic and red pepper flakes, sautéing for about 1 minute until fragrant. Be careful not to burn the garlic.
- Add Lemon and Wine: Stir in the lemon zest and juice, and pour in the white wine if using. Let it simmer for about 2 minutes to reduce slightly and intensify the flavors.
- Combine Shrimp and Pasta: Return the shrimp to the skillet, along with the drained pasta. Toss everything together over low heat, adding reserved pasta water as needed to create a light sauce that coats the pasta.
- Finish with Herbs and Cheese: Stir in the chopped parsley and season with salt and pepper to taste. Serve immediately, garnished with Parmesan cheese.
Extra Tips:
When cooking the shrimp, make sure not to overcook them as they can become rubbery. They should be pink and just cooked through.
If you prefer a richer sauce, add a tablespoon of butter after sautéing the garlic. Additionally, the white wine can be substituted with chicken broth if you prefer a non-alcoholic version.
Adjust the amount of red pepper flakes to your taste preference for spice. Enjoy your Lemon Garlic Shrimp Pasta with a light salad or some crusty bread for a complete meal.
Vegetarian Stuffed Bell Peppers
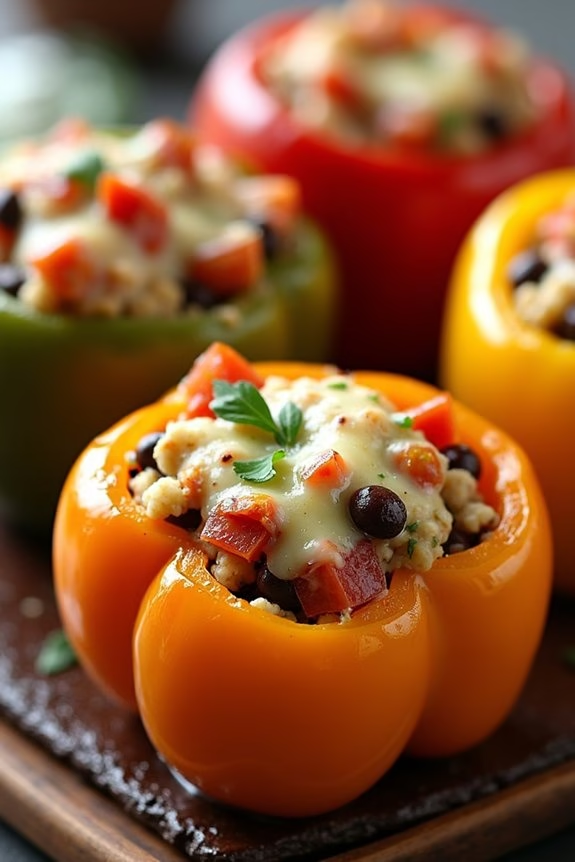
Looking for a festive and delicious dish to serve this Christmas that caters to vegetarians? These Vegetarian Stuffed Bell Peppers are the perfect solution. Bursting with flavor and color, they’ll add a beautiful touch to your holiday table. This dish combines an array of wholesome ingredients that come together to create a satisfying and hearty meal without any meat. The peppers are filled with a savory mixture of grains, beans, and vegetables, making them not only nutritious but also incredibly tasty.
This recipe is designed to serve 4-6 people, making it ideal for a small gathering or an intimate holiday dinner. The stuffed peppers are simple to prepare, yet they look impressive and are sure to delight your guests. They’re versatile and can be adapted to include your favorite spices or vegetables, allowing you to tailor the flavors to your preference. Whether you’re a seasoned vegetarian or simply looking to try something new, these stuffed peppers are assured to be a hit.
Ingredients (Serves 4-6):
- 6 medium-sized bell peppers (any color)
- 1 cup quinoa
- 2 cups vegetable broth
- 1 tablespoon olive oil
- 1 medium onion, chopped
- 3 cloves garlic, minced
- 1 zucchini, diced
- 1 can (15 oz) black beans, drained and rinsed
- 1 can (14.5 oz) diced tomatoes, drained
- 1 teaspoon ground cumin
- 1 teaspoon smoked paprika
- 1 teaspoon dried oregano
- Salt and pepper to taste
- 1 cup shredded cheese (cheddar or mozzarella)
- Fresh parsley or cilantro for garnish
Instructions:
- Preheat the Oven: Start by preheating your oven to 375°F (190°C). This guarantees that it reaches the right temperature by the time you’re ready to bake the peppers.
- Prepare the Quinoa: In a medium saucepan, combine the quinoa and vegetable broth. Bring to a boil, then reduce the heat to low, cover, and simmer for about 15 minutes or until the quinoa is cooked and the liquid is absorbed.
- Prepare the Peppers: While the quinoa is cooking, wash the bell peppers and slice off the tops. Remove the seeds and membranes from the inside. Place the peppers upright in a baking dish.
- Cook the Vegetables: In a large skillet, heat the olive oil over medium heat. Add the chopped onion and garlic and sauté for about 3 minutes until the onion is translucent. Add the zucchini and cook for another 4 minutes until it starts to soften.
- Mix the Filling: In the skillet with the cooked vegetables, add the black beans, diced tomatoes, cooked quinoa, cumin, smoked paprika, oregano, salt, and pepper. Stir well to combine all the ingredients. Cook for another 5 minutes to heat through.
- Stuff the Peppers: Spoon the filling mixture evenly into each of the prepared bell peppers, pressing down gently to pack the filling. Top each pepper with a generous amount of shredded cheese.
- Bake the Peppers: Cover the baking dish with aluminum foil and bake in the preheated oven for about 30 minutes. Remove the foil and bake for an additional 10 minutes, or until the cheese is melted and bubbly.
- Garnish and Serve: Once baked, remove the stuffed peppers from the oven and let them cool slightly. Garnish with chopped fresh parsley or cilantro before serving.
Extra Tips:
When choosing bell peppers for stuffing, try to select ones that are roughly the same size so they cook evenly. You can adjust the level of spice by adding a pinch of cayenne pepper or red pepper flakes to the filling. If you prefer a vegan version, simply omit the cheese or use a plant-based alternative.
These stuffed peppers can also be prepared a day in advance; simply store them in the refrigerator and bake them just before serving.
Seared Scallops With Lemon Butter
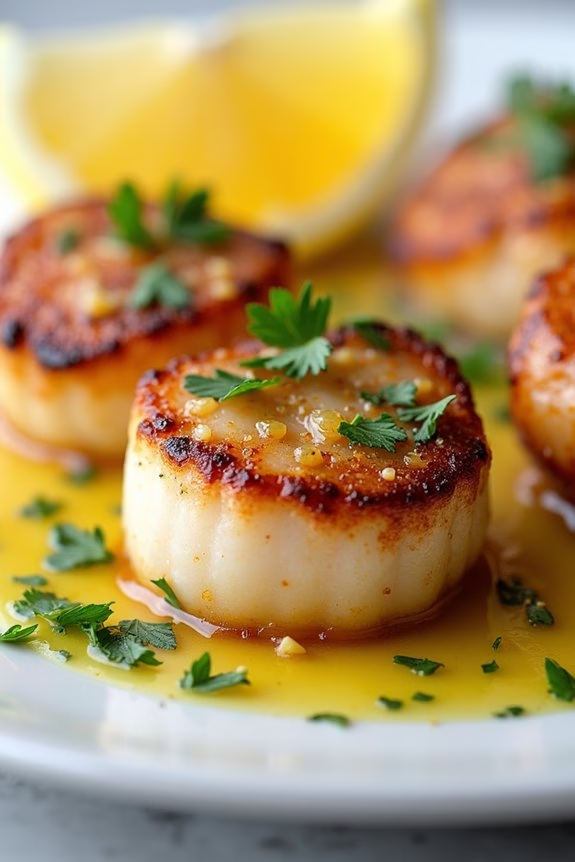
Seared Scallops With Lemon Butter is a delightful dish perfect for an intimate Christmas dinner for two. The combination of tender scallops and tangy lemon butter creates a rich and flavorful experience that’s both elegant and easy to prepare. This dish captures the essence of simplicity and sophistication, making it an ideal choice for a special holiday meal without the fuss of a large feast.
The key to a perfect seared scallop lies in achieving a golden-brown crust while keeping the inside tender and juicy, complemented by the zesty and buttery sauce. This recipe is adapted to serve 4-6 people, making it versatile for a small gathering or a romantic dinner with leftovers. The ingredients are straightforward and readily available, focusing on fresh scallops and a few other essentials to guarantee maximum flavor.
Whether you’re an experienced cook or a beginner looking to impress, this recipe is designed to be approachable and rewarding, providing a restaurant-quality dish in the comfort of your home.
Ingredients for 4-6 servings:
- 2 pounds large sea scallops
- Salt and freshly ground black pepper
- 2 tablespoons olive oil
- 4 tablespoons unsalted butter
- 2 garlic cloves, minced
- 1/4 cup fresh lemon juice
- 2 tablespoons chopped fresh parsley
- Lemon wedges for serving
Instructions:
- Prepare the Scallops: Begin by patting the scallops dry with paper towels to remove any excess moisture. This step is vital to guarantee a proper sear. Season both sides with salt and freshly ground black pepper.
- Heat the Pan: In a large non-stick skillet, heat the olive oil over medium-high heat. The pan needs to be hot enough to create a good sear but not so hot that it burns the oil.
- Sear the Scallops: Carefully add the scallops to the pan in a single layer, making sure not to overcrowd them. Cook the scallops for about 2-3 minutes on each side, or until they develop a golden-brown crust. Avoid moving them around too much to allow for a proper sear.
- Prepare the Lemon Butter Sauce: Remove the scallops from the pan and set them aside. In the same skillet, reduce the heat to medium and add the butter. Once the butter has melted, add the minced garlic and sauté for about 30 seconds until fragrant.
- Add Lemon Juice: Pour in the fresh lemon juice and stir to combine with the butter and garlic. Let it simmer for a minute to blend the flavors, then remove from heat.
- Finish the Dish: Return the scallops to the skillet and gently toss them in the lemon butter sauce. Sprinkle with chopped fresh parsley and serve immediately with lemon wedges on the side.
Extra Tips:
For the best results, always use fresh scallops and avoid those that are frozen or treated with preservatives. The freshness will noticeably impact the texture and taste of the dish.
Additionally, make sure your scallops are thoroughly dried before searing; moisture is the enemy of a good crust. If you want to add a bit more complexity to the dish, consider a pinch of red pepper flakes for a subtle heat or some capers for an extra briny touch.
Baked Salmon With Dill and Lemon
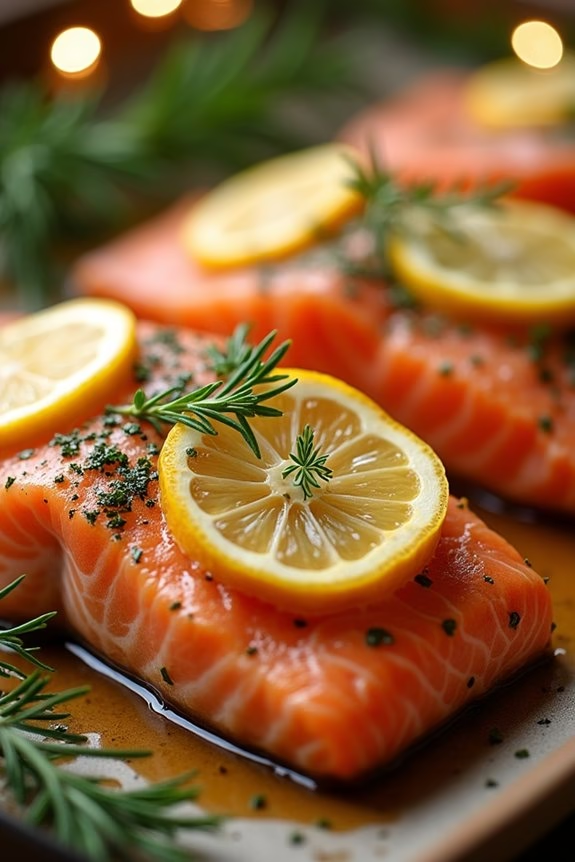
Baked Salmon With Dill and Lemon is a delightful dish perfect for a cozy Christmas dinner for two, offering a revitalizing and zesty taste that harmonizes beautifully with the rich flavor of salmon.
This dish combines the fragrant aroma of fresh dill with the tangy zest and juice of lemon, complementing the tender, flaky texture of the baked salmon. It’s an elegant yet simple meal that feels special enough for the holidays but is easy enough to prepare without stress.
Whether you’re celebrating a quiet Christmas at home or simply want to enjoy a delicious seafood dinner, this recipe is sure to impress. The use of fresh ingredients enhances the natural flavors of the salmon, while the baking process guarantees the fish remains moist and succulent.
This dish isn’t only visually appealing but also packed with nutrients, making it a healthy option for your holiday feast.
Ingredients (for 4-6 servings)
- 4-6 salmon fillets (6-8 ounces each)
- 2 tablespoons olive oil
- 4 tablespoons fresh dill, chopped
- 2 lemons, thinly sliced
- Salt and pepper, to taste
- 1 teaspoon garlic powder
- 1 teaspoon onion powder
- Lemon wedges, for garnish (optional)
Cooking Instructions
- Preheat the Oven: Preheat your oven to 375°F (190°C) to ascertain it’s hot enough to cook the salmon evenly and retain its moisture.
- Prepare the Baking Dish: Lightly grease a baking dish with olive oil to prevent the salmon from sticking. Arrange half of the lemon slices on the bottom of the dish to infuse the salmon with a citrus aroma as it bakes.
- Season the Salmon: Place the salmon fillets on top of the lemon slices in the baking dish. Drizzle olive oil over each fillet to keep them moist during baking. Sprinkle garlic powder, onion powder, salt, and pepper evenly over the fillets for added flavor.
- Add Dill and Lemon: Sprinkle the chopped dill generously over the salmon. Top each fillet with a few lemon slices, pressing them gently into the fish to ascertain they adhere. This step ensures that the flavors of dill and lemon will permeate the salmon.
- Bake the Salmon: Place the baking dish in the preheated oven and bake for 15-20 minutes, or until the salmon is cooked through and flakes easily with a fork. The cooking time may vary depending on the thickness of the fillets, so keep an eye on them to avoid overcooking.
- Rest and Serve: Remove the dish from the oven and let the salmon rest for a few minutes to allow the juices to redistribute. Serve the salmon fillets with the baked lemon slices, garnished with additional fresh dill or lemon wedges if desired.
Extra Tips
For the best results, use fresh, high-quality salmon, as it will yield a better flavor and texture. If fresh dill is unavailable, dried dill can be used, but reduce the amount to 2 tablespoons since dried herbs have a more concentrated flavor.
You can also add a splash of white wine to the baking dish for additional depth of flavor. Finally, consider serving this dish with a side of roasted vegetables or a fresh green salad to complete your festive meal.
Creamy Mushroom Risotto
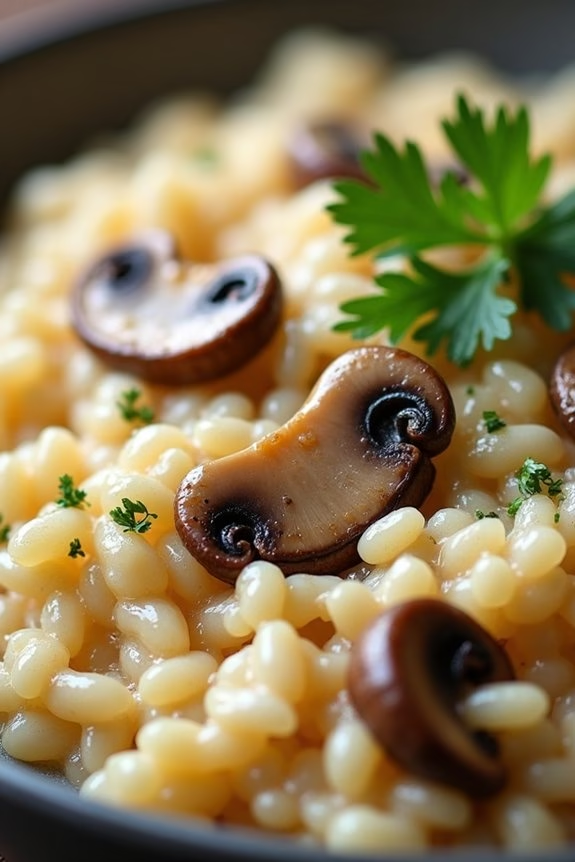
Creamy Mushroom Risotto is a classic Italian dish that embodies comfort and elegance, making it an ideal choice for an intimate Christmas dinner for two. This dish is centered around Arborio rice, which is renowned for its ability to absorb flavors while retaining a creamy texture. The addition of earthy mushrooms creates a depth of flavor, while Parmesan cheese lends a rich, savory finish.
Risotto requires patience and attention, but the result is a luxurious meal that’s worth every minute spent at the stove. For this recipe, we’re preparing a serving size suitable for 4-6 people, ensuring you have enough to enjoy seconds or to share with a couple of friends. This larger batch allows for the rice to absorb the flavors thoroughly while maintaining its creamy consistency.
As you cook, the enticing aroma of sautéed mushrooms and simmering broth will fill your kitchen, setting the stage for a cozy, festive dining experience.
Ingredients (Serves 4-6):
- 2 cups Arborio rice
- 1 pound mixed mushrooms (such as cremini, button, and shiitake), sliced
- 1 small onion, finely chopped
- 3 cloves garlic, minced
- 5 cups vegetable or chicken broth
- 1 cup dry white wine
- 1 cup grated Parmesan cheese
- 3 tablespoons olive oil
- 2 tablespoons unsalted butter
- Salt and pepper to taste
- 2 tablespoons fresh parsley, chopped (optional for garnish)
Instructions:
- Prepare the Broth: In a medium saucepan, heat the vegetable or chicken broth over low heat. Keep it warm but not boiling, as you’ll need it hot for the risotto.
- Cook the Mushrooms: In a large skillet, heat 1 tablespoon of olive oil and 1 tablespoon of butter over medium heat. Add the sliced mushrooms and sauté until golden brown and tender, about 5-7 minutes. Remove the mushrooms from the pan and set aside.
- Sauté Aromatics: In the same skillet, add the remaining olive oil. Add the chopped onion and cook until translucent, about 3-4 minutes. Stir in the minced garlic and cook for an additional minute until fragrant.
- Toast the Rice: Add the Arborio rice to the skillet, stirring frequently for about 2 minutes until the rice is lightly toasted and coated with the oil.
- Deglaze with Wine: Pour in the white wine and stir continuously until it’s mostly absorbed by the rice, releasing any flavorful bits stuck to the bottom of the pan.
- Cook the Risotto: Begin adding the warm broth, one ladleful at a time, stirring constantly. Allow each addition of broth to be absorbed before adding the next. This process should take about 18-20 minutes until the rice is creamy and al dente.
- Finish with Mushrooms and Cheese: Once the rice is cooked, stir in the sautéed mushrooms and grated Parmesan cheese. Add the remaining butter, and season with salt and pepper to taste. Stir until the cheese is melted and the risotto is creamy.
- Serve: Garnish with chopped fresh parsley if desired, and serve immediately.
Extra Tips:
For the perfect risotto, patience is key. Stirring consistently helps the rice release its starch, contributing to that sought-after creamy texture. Use a good quality Parmesan cheese as it enhances the flavor greatly.
If you prefer a non-alcoholic version, simply substitute additional broth for the white wine. Finally, feel free to experiment with different types of mushrooms to add a unique twist to your risotto. Enjoy this comforting dish as a cozy centerpiece for your holiday dinner.
Mini Beef Pot Pies
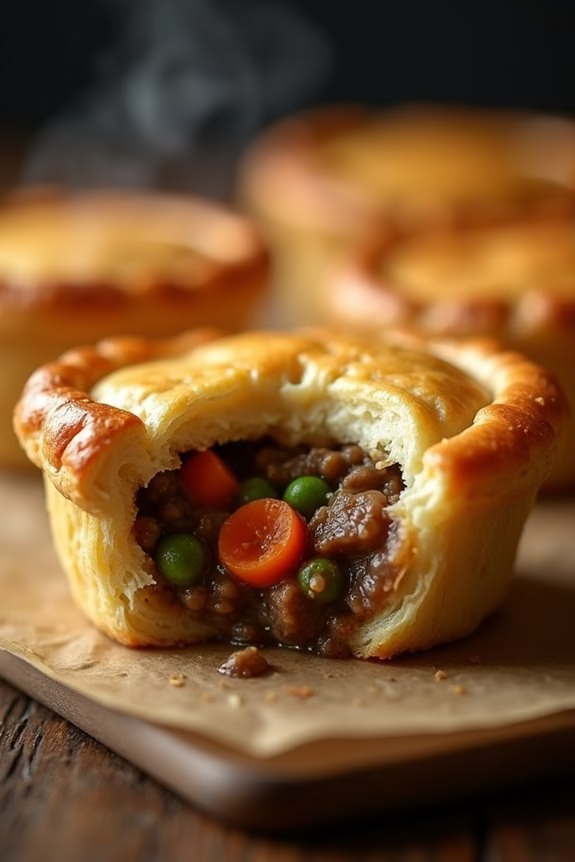
Mini Beef Pot Pies are a delightful and cozy dish perfect for a Christmas dinner for two. These individual pot pies are packed with tender beef, savory vegetables, and a rich, flavorful gravy, all encased in a flaky pastry crust. This comforting dish isn’t only delicious but also visually appealing, making it a wonderful addition to your holiday table.
With their personal-sized portions, Mini Beef Pot Pies offer a charming and satisfying dining experience that’s both hearty and elegant.
Preparing these Mini Beef Pot Pies is a delightful process that fills your kitchen with the warm, inviting aromas of beef stew slowly simmering to perfection. The combination of classic ingredients like beef, carrots, and peas with a luscious, homemade gravy creates a dish that’s both nostalgic and gourmet.
Whether served as a main course or alongside other festive dishes, these pot pies are sure to bring joy and satisfaction to your Christmas dinner celebration.
Ingredients (serving size: 4-6 people):
- 1 pound beef stew meat, cut into small cubes
- 2 tablespoons olive oil
- 1 onion, chopped
- 2 cloves garlic, minced
- 2 cups beef broth
- 1 tablespoon tomato paste
- 1 teaspoon Worcestershire sauce
- 1/2 teaspoon dried thyme
- 1 cup carrots, diced
- 1 cup peas
- 2 tablespoons all-purpose flour
- 1 sheet puff pastry, thawed
- 1 egg, beaten for egg wash
- Salt and pepper to taste
Instructions:
- Prepare the Beef Filling: In a large skillet, heat the olive oil over medium-high heat. Add the beef cubes and season with salt and pepper. Brown the beef on all sides, then remove it from the skillet and set aside.
- Cook the Vegetables: In the same skillet, add the chopped onion and minced garlic. Sauté until the onions are translucent and fragrant, about 3-4 minutes.
- Simmer the Stew: Return the beef to the skillet. Stir in the beef broth, tomato paste, Worcestershire sauce, and dried thyme. Bring the mixture to a simmer, cover, and let it cook for about 30 minutes, or until the beef is tender.
- Thicken the Stew: In a small bowl, mix the flour with a bit of water to create a slurry. Stir this into the beef mixture, along with the diced carrots and peas. Allow the stew to simmer for another 10 minutes, until it thickens.
- Prepare the Pastry: Preheat your oven to 375°F (190°C). Roll out the puff pastry on a floured surface and cut it into circles large enough to cover your individual pie dishes.
- Assemble the Pot Pies: Divide the beef stew mixture evenly among the individual pie dishes. Place a pastry circle over each dish, pressing the edges to seal. Brush the tops with beaten egg.
- Bake: Place the pot pies on a baking sheet and bake in the preheated oven for 20-25 minutes, or until the pastry is golden brown and puffed.
- Serve: Allow the pies to cool slightly before serving to avoid burns from the hot filling.
Extra Tips:
When making the beef filling, confirm the beef is well-browned before simmering to enhance the depth of flavor. If you prefer a thicker stew, you can add more flour to the slurry.
For a more rustic finish, you can cut decorative shapes from the leftover pastry and place them on top of the pies before baking. Finally, if you’re short on time, you can prepare the beef filling a day in advance and assemble the pies right before baking.
Chocolate Fondue for Two

Indulging in a warm, luscious chocolate fondue is an intimate and delightful way to end your Christmas dinner for two. This decadent dessert is perfect for sharing and makes any evening feel extra special with its rich, velvety texture.
Chocolate fondue isn’t only easy to prepare, but it also offers a fun and interactive experience as you dip your favorite fruits, marshmallows, or even pieces of cake into the melted chocolate. The aroma of warm, molten chocolate will fill your home with a cozy, festive atmosphere, making it an ideal choice for a romantic holiday evening.
While the recipe is designed to serve two, it’s incredibly simple to scale up if you’d like to share this luxurious treat with family or friends. The beauty of chocolate fondue lies in its versatility; you can experiment with different types of chocolate or even add a splash of liqueur for an added depth of flavor.
Presented here is a scaled-up recipe suitable for serving 4-6 people, guaranteeing everyone gets to enjoy this chocolatey delight.
Ingredients (for 4-6 servings):
- 12 ounces of high-quality dark chocolate, chopped
- 1 cup heavy cream
- 2 tablespoons unsalted butter
- 1 teaspoon vanilla extract
- Pinch of salt
- Assorted dippers: strawberries, banana slices, marshmallows, pretzels, pound cake cubes
Cooking Instructions:
- Prepare the Ingredients: Chop the dark chocolate into small, even pieces to guarantee it melts smoothly and evenly. Gather all your dippers and arrange them on a platter for easy access during the fondue session.
- Heat the Cream: In a medium saucepan, pour the heavy cream and heat it over medium heat. Stir occasionally and watch closely, making sure it doesn’t boil, but is just hot enough to form small bubbles around the edges of the pan.
- Combine the Chocolate and Cream: Once the cream is hot, remove the saucepan from the heat. Add the chopped chocolate to the cream, letting it sit for a minute to soften. Stir gently with a spatula or whisk until the chocolate is completely melted and the mixture is smooth.
- Add Butter and Vanilla: Stir in the unsalted butter and vanilla extract. Continue to mix until the butter is fully incorporated and the fondue is silky and glossy. Add a pinch of salt to enhance the chocolate flavor.
- Serve the Fondue: Pour the warm chocolate mixture into a fondue pot or a heatproof bowl. If using a fondue pot, use a low flame to keep the chocolate warm and fluid. Arrange the dippers around the fondue for easy access and enjoy dipping!
Extra Tips:
To maintain your chocolate fondue smooth and doesn’t seize, make sure no water comes into contact with the chocolate during melting.
If your fondue begins to thicken too much, gently heat it over a low flame and stir in a tablespoon of warm cream to restore its fluidity. For added flavor, consider adding a tablespoon of your favorite liqueur, such as Grand Marnier or Kahlua, to the chocolate mixture.
Remember to have fondue forks or skewers on hand for dipping, and let everyone take turns to make the experience both enjoyable and interactive.