
As I plan my Christmas dinner, I’m buzzing with excitement about the show-stopping main course options. From the mouthwatering Herb-Crusted Prime Rib to the timeless Honey-Glazed Ham with Pineapple, each dish brings its own magic to the table. I’ve also got a few vegetarian delights ready to impress. And let’s be honest, there’s nothing quite like the joy of surprising guests with a memorable dish. Curious about the rest? Let’s explore!
Herb-Crusted Prime Rib Roast
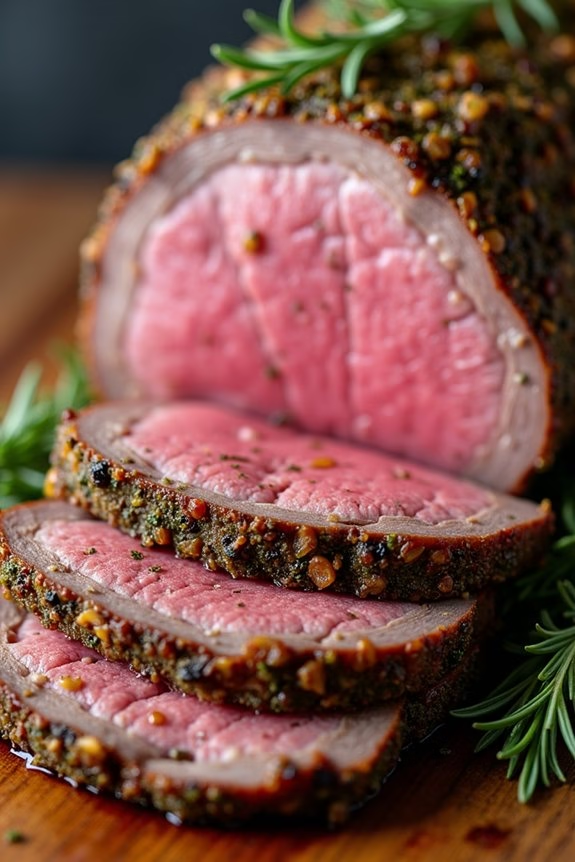
The Herb-Crusted Prime Rib Roast is a sumptuous centerpiece for your Christmas dinner, sure to impress your family and guests. This classic roast is elevated with a flavorful herb crust that enhances the natural richness of the prime rib. The crust is a delightful blend of fresh herbs, garlic, and seasonings, which lock in the juices and create a deliciously savory exterior.
As the roast cooks, the herbs permeate the meat, imparting a fragrant aroma and deep, satisfying flavors. The end result is a tender, juicy prime rib with a perfectly crisp crust that pairs beautifully with your favorite holiday sides.
This recipe is designed to serve 4-6 people, making it perfect for an intimate gathering or a festive family meal. The prime rib roast is seasoned and cooked to perfection, guaranteeing that every bite is a succulent treat. Whether you’re a seasoned cook or trying your hand at a prime rib roast for the first time, this recipe provides easy-to-follow instructions that promise a restaurant-quality dish from the comfort of your home.
Ingredients:
- 1 (4-5 pound) prime rib roast
- 2 tablespoons olive oil
- 2 tablespoons fresh rosemary, finely chopped
- 2 tablespoons fresh thyme, finely chopped
- 6 cloves garlic, minced
- 2 tablespoons kosher salt
- 1 tablespoon freshly ground black pepper
- 1 tablespoon Dijon mustard
Cooking Instructions:
- Preparation: Take the prime rib roast out of the refrigerator at least 1 hour before cooking to allow it to come to room temperature. This guarantees even cooking.
- Preheat the Oven: Preheat your oven to 450°F (232°C). This high initial temperature will help create a beautiful crust on the roast.
- Create the Herb Mixture: In a small bowl, combine olive oil, rosemary, thyme, garlic, salt, pepper, and Dijon mustard. Mix until well combined to form a paste.
- Season the Roast: Pat the prime rib roast dry with paper towels. Rub the herb mixture all over the surface of the roast, ensuring an even coating. Make sure to cover both the top and sides thoroughly.
- Roasting: Place the seasoned roast on a rack in a roasting pan, bone side down. Roast in the preheated oven at 450°F for 20 minutes to form a crust.
- Adjust Temperature: Reduce the oven temperature to 325°F (163°C) and continue roasting for an additional 1 1/2 to 2 hours, or until a meat thermometer inserted into the thickest part of the roast reads 130°F (54°C) for medium-rare.
- Rest the Roast: Remove the roast from the oven and transfer it to a cutting board. Loosely cover it with aluminum foil and let it rest for at least 20 minutes. This allows the juices to redistribute, guaranteeing a moist and tender roast.
- Carve and Serve: Slice the roast against the grain into thick slices and serve immediately. Enjoy the prime rib with your choice of sides and sauces.
Extra Tips:
For best results, confirm your prime rib is of high quality and has a good marbling of fat, which contributes to its tenderness and flavor.
Always use a meat thermometer to check the doneness of the roast rather than relying solely on cooking time. If you prefer your roast medium, aim for an internal temperature of 135°F (57°C).
Remember that the roast will continue to cook slightly as it rests, so it’s best to remove it from the oven a few degrees below your desired doneness.
Honey-Glazed Ham With Pineapple
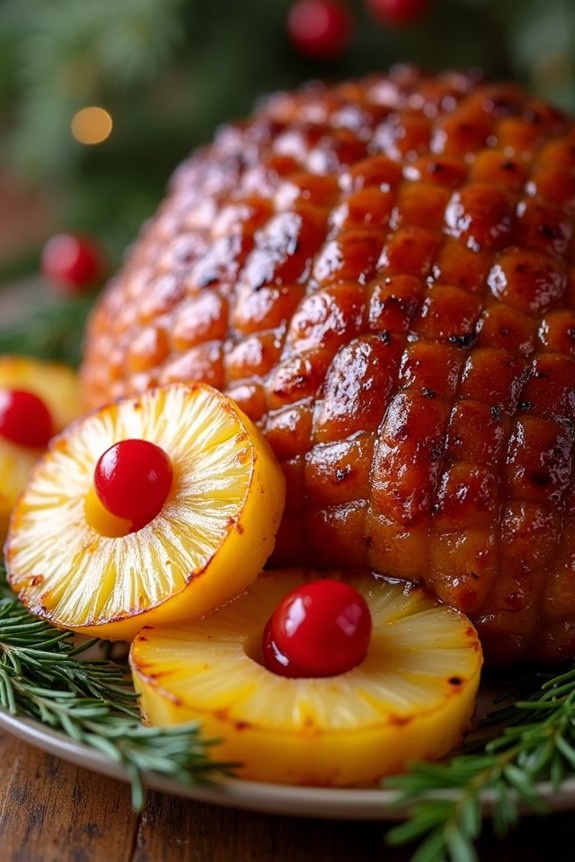
Nothing says festive like a beautifully glazed ham at the center of your Christmas dinner table. The Honey-Glazed Ham With Pineapple is a classic holiday dish that combines the savory richness of ham with the sweet and tangy flavors of honey and pineapple. This recipe creates a perfect balance of flavors that will delight your family and friends, making your Christmas dinner truly memorable.
The glaze not only enhances the taste of the ham but also gives it a glossy, caramelized finish that’s as pleasing to the eye as it’s to the palate. The key to this dish is in the preparation and the careful glazing of the ham to guarantee that every bite is infused with flavor. By using a combination of honey, pineapple juice, and spices, you create a succulent coating that permeates the ham during the baking process.
The addition of pineapple rings not only adds a decorative touch but also contributes a revitalizing contrast to the rich meat. This recipe serves 4-6 people, making it ideal for a cozy family gathering or a small holiday celebration.
Ingredients:
- 1 (4-5 pound) boneless ham
- 1 cup honey
- 1/2 cup brown sugar
- 1/2 cup pineapple juice
- 1 teaspoon ground mustard
- 1/2 teaspoon ground cloves
- 1/4 teaspoon ground cinnamon
- 1 can (20 ounces) pineapple rings
- Maraschino cherries (optional, for garnish)
- Whole cloves for studding (optional)
Cooking Instructions:
- Preheat the Oven: Start by preheating your oven to 325°F (165°C). This temperature is ideal for slowly warming the ham without drying it out.
- Prepare the Ham: Place the ham in a large roasting pan. If using whole cloves, you can stud the ham by inserting them at 1-inch intervals for added flavor and presentation.
- Make the Glaze: In a medium saucepan over medium heat, combine the honey, brown sugar, pineapple juice, ground mustard, ground cloves, and ground cinnamon. Stir until the sugar is completely dissolved and the mixture is smooth and slightly thickened. This should take about 5 minutes.
- Glaze the Ham: Pour about half of the glaze mixture over the ham, guaranteeing it’s evenly coated. Reserve the remaining glaze for basting during the baking process.
- Decorate with Pineapple: Arrange the pineapple rings over the ham, securing them with toothpicks if necessary. If using, place a maraschino cherry in the center of each pineapple ring for a festive touch.
- Bake the Ham: Cover the roasting pan with aluminum foil and place it in the preheated oven. Bake the ham for about 1.5 to 2 hours, or until heated through, basting with the reserved glaze every 30 minutes.
- Caramelize the Glaze: In the last 30 minutes of baking, remove the foil to allow the glaze to caramelize and the ham to develop a golden-brown crust.
- Rest and Serve: Once baked, remove the ham from the oven and let it rest for 10-15 minutes before slicing. This allows the juices to redistribute, guaranteeing every slice is moist and flavorful.
Extra Tips:
For the best results, try to choose a high-quality ham with a good fat cap, as the fat will help keep the ham moist and flavorful during baking.
If you want a more intense glaze flavor, you can score the surface of the ham in a diamond pattern before applying the glaze. This will allow the glaze to penetrate deeper into the meat.
Additionally, if you find that your glaze isn’t thickening as much as you’d like, you can simmer it on the stove a bit longer until it reaches your desired consistency.
Remember to keep an eye on the ham during the final stages of baking to prevent the glaze from burning.
Stuffed Turkey Breast With Cranberry Sauce
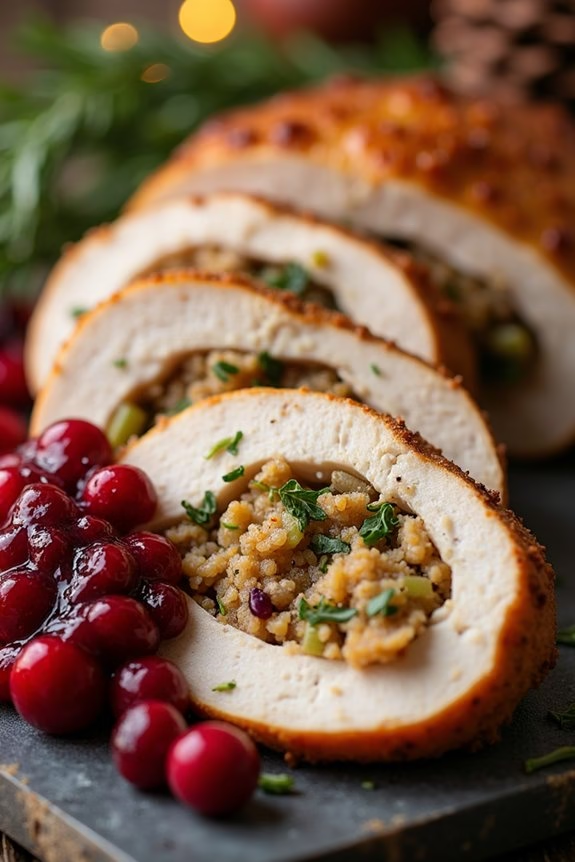
Stuffed Turkey Breast With Cranberry Sauce is a delightful twist on the traditional holiday turkey. This dish offers all the festive flavors of a full-sized turkey, but with a unique and elegant presentation. Perfect for smaller gatherings or when you want to impress your guests with something a bit different, this recipe combines the savory richness of turkey breast with the sweet and tangy notes of cranberry sauce.
The stuffing, which can be customized to your taste, adds texture and depth to the dish, making it a centerpiece worthy of any holiday table.
Preparing Stuffed Turkey Breast With Cranberry Sauce involves careful attention to both the stuffing and the sauce, as both components are key to achieving the perfect balance of flavors. The turkey breast is butterflied and filled with a savory stuffing mixture, then rolled and roasted to perfection.
The cranberry sauce, made from fresh or frozen cranberries, complements the turkey with its vibrant color and invigorating taste. This recipe serves 4-6 people, making it ideal for family gatherings or intimate holiday dinners.
Ingredients:
- 2 boneless turkey breasts (about 1.5 lbs each)
- 2 cups fresh cranberries
- 1 cup granulated sugar
- 1 cup water
- 1 cup bread crumbs
- 1/2 cup chopped onions
- 1/2 cup chopped celery
- 1/4 cup unsalted butter
- 1/4 cup chopped fresh parsley
- 1 teaspoon dried thyme
- 1 teaspoon salt
- 1/2 teaspoon black pepper
- 1/4 teaspoon ground cinnamon
- 1/4 teaspoon ground nutmeg
- 1/4 cup chicken broth
- Kitchen twine
Instructions:
- Prepare the Cranberry Sauce: In a medium saucepan, combine the cranberries, sugar, and water. Bring to a boil over medium heat, stirring occasionally. Reduce the heat to low and simmer for about 10 minutes, or until the cranberries burst and the sauce thickens. Remove from heat and set aside to cool.
- Prepare the Stuffing: In a large skillet, melt the butter over medium heat. Add the onions and celery, and sauté until soft, about 5 minutes. Stir in the bread crumbs, parsley, thyme, salt, pepper, cinnamon, and nutmeg. Mix well and cook for another 2 minutes. Add the chicken broth and stir until the stuffing is moist but not soggy. Remove from heat and let cool slightly.
- Butterfly and Stuff the Turkey Breasts: Place each turkey breast between two sheets of plastic wrap and pound to an even thickness using a meat mallet. Remove the plastic wrap and season both sides of the turkey breasts with salt and pepper. Spread the stuffing evenly over each breast, leaving a border around the edges. Carefully roll up the breasts, starting from a long side, and secure with kitchen twine.
- Roast the Turkey: Preheat your oven to 375°F (190°C). Place the stuffed turkey breasts seam side down on a baking sheet lined with parchment paper. Roast in the preheated oven for about 45-55 minutes, or until the internal temperature reaches 165°F (75°C). Remove from the oven and let rest for 10 minutes before slicing.
- Serve: Slice the turkey rolls into medallions and serve with the cranberry sauce on the side.
Extra Tips:
When preparing Stuffed Turkey Breast With Cranberry Sauce, verify your turkey is evenly pounded to allow for uniform cooking and easier rolling.
For a more flavorful stuffing, consider adding chopped nuts or dried fruits such as apricots or raisins. If you prefer a smoother cranberry sauce, you can blend it after cooking.
Finally, let the turkey rest before slicing to lock in the juices and keep it moist.
Garlic and Rosemary Lamb Chops
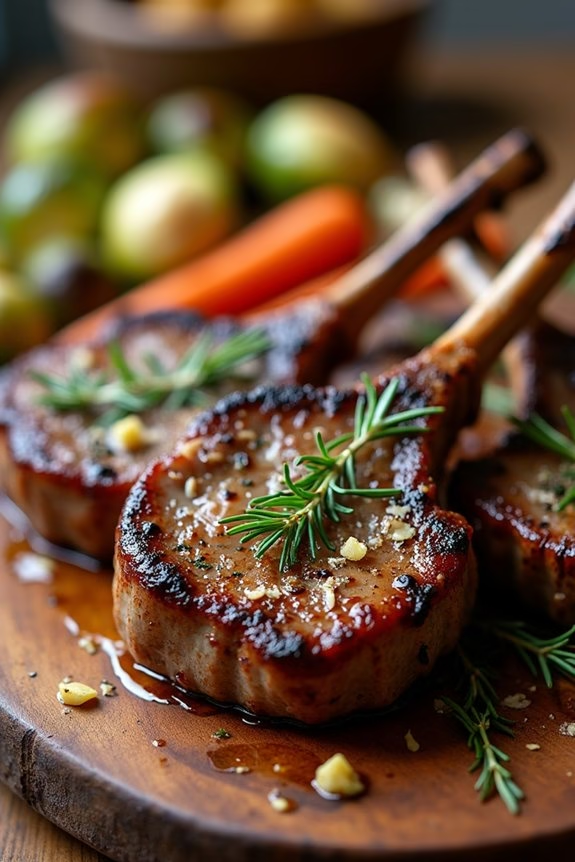
Garlic and Rosemary Lamb Chops are a perfect choice for a festive Christmas dinner, offering a rich, savory flavor profile that’s both elegant and comforting. This dish combines the earthy aroma of rosemary with the pungent, sweet undertones of garlic, creating a delightful crust on succulent lamb chops.
The dish is quick to prepare and makes for a wonderful centerpiece on your holiday table, paired beautifully with a selection of seasonal vegetables or a hearty side dish.
Whether you’re hosting a small gathering or a larger festive feast, this recipe is designed to serve 4-6 people, making it ideal for intimate celebrations. The ingredients are simple yet flavorful, guaranteeing that the natural taste of the lamb shines through, enhanced by the fragrant herbs.
By following the detailed cooking instructions below, you’ll be able to achieve perfectly cooked lamb chops that are juicy and tender, with a deliciously crisp exterior.
Ingredients for 4-6 servings:
- 8 lamb chops, about 1 inch thick
- 4 cloves of garlic, minced
- 2 tablespoons fresh rosemary, finely chopped
- 1 teaspoon salt
- 1 teaspoon black pepper
- 2 tablespoons olive oil
- 2 tablespoons butter
Cooking Instructions:
1. Prepare the Marinade:
In a small bowl, combine the minced garlic, chopped rosemary, salt, pepper, and olive oil. Mix well to create a paste.
2. Marinate the Lamb Chops:
Rub the garlic and rosemary paste evenly over the lamb chops, making sure both sides are well coated. Place the chops in a shallow dish, cover with plastic wrap, and refrigerate for at least 30 minutes to an hour, allowing the flavors to meld.
3. Preheat the Pan:
Heat a large skillet over medium-high heat. Add the butter and let it melt, swirling to coat the bottom of the pan.
4. Cook the Lamb Chops:
Once the butter is sizzling, add the lamb chops to the skillet. Cook for 3-4 minutes on each side for medium-rare, or adjust the cooking time to your desired level of doneness. Use tongs to flip the chops gently, ensuring they develop a nice crust without burning.
5. Rest the Chops:
Remove the lamb chops from the skillet and place them on a plate. Cover loosely with foil and let them rest for about 5 minutes to allow the juices to redistribute.
Extra Tips:
When selecting lamb chops, opt for those with a good amount of marbling, as this will contribute to a more tender and flavorful result.
For best results, confirm the lamb chops are at room temperature before cooking, as this helps them cook more evenly. If you prefer a stronger garlic flavor, consider adding some garlic powder to the marinade.
Additionally, using a meat thermometer can help guarantee perfect doneness; aim for an internal temperature of 145°F for medium-rare lamb. Serve the lamb chops immediately after resting with your choice of sides for a delightful Christmas dinner.
Baked Salmon With Dill and Lemon

Baked Salmon With Dill and Lemon is a delightful and healthy dish that’s perfect for a festive Christmas dinner. This recipe combines the rich, buttery flavor of salmon with the fresh, citrusy notes of lemon and the aromatic, slightly tangy flavor of dill.
It’s a simple yet elegant dish that will impress your guests with its beautiful presentation and exquisite taste. The baked salmon is tender and flaky, while the lemon and dill add a revitalizing touch that enhances its natural flavors.
This dish isn’t only delicious but also incredibly easy to prepare, making it a great option for those who want to serve an impressive meal without spending hours in the kitchen. The preparation and cooking time is minimal, leaving you more time to enjoy the company of your family and friends.
With this recipe, you can serve a nutritious and flavorful meal that’s sure to be a highlight of your Christmas dinner.
Ingredients (Serves 4-6)
- 2 pounds of salmon fillet
- 2 tablespoons olive oil
- 1 teaspoon sea salt
- 1/2 teaspoon black pepper
- 1 lemon, thinly sliced
- 1 tablespoon fresh dill, chopped
- 2 garlic cloves, minced
Cooking Instructions
- Preheat the Oven: Begin by preheating your oven to 375°F (190°C). This guarantees that the oven is at the right temperature for even cooking.
- Prepare the Baking Dish: Lightly grease a baking dish with olive oil to prevent the salmon from sticking. Place the salmon fillet in the dish, skin side down.
- Season the Salmon: Drizzle the olive oil over the salmon. Sprinkle it evenly with sea salt and black pepper. This base seasoning will enhance the natural flavors of the fish.
- Add Lemon and Dill: Arrange the lemon slices on top of the salmon, ensuring they’re evenly distributed. Sprinkle the chopped fresh dill over the lemon and salmon to add a fragrant aroma and fresh taste.
- Add Garlic: Evenly distribute the minced garlic over the salmon. The garlic will add a depth of flavor to the dish.
- Bake the Salmon: Place the baking dish in the preheated oven. Bake for approximately 20-25 minutes, or until the salmon flakes easily with a fork and has reached an internal temperature of 145°F (63°C).
- Serve: Once cooked, remove the salmon from the oven and let it rest for a few minutes. Serve it warm, garnished with additional dill if desired.
Extra Tips
When selecting your salmon fillet, try to choose one that’s even in thickness for consistent cooking. If you prefer a more intense lemon flavor, you can squeeze fresh lemon juice over the salmon just before serving.
Additionally, for a more robust flavor, you can marinate the salmon with the olive oil, dill, and garlic mixture for about 30 minutes before baking. Remember to check the salmon frequently towards the end of the cooking time to avoid overcooking it, which can lead to a dry texture.
Vegetarian Mushroom Wellington
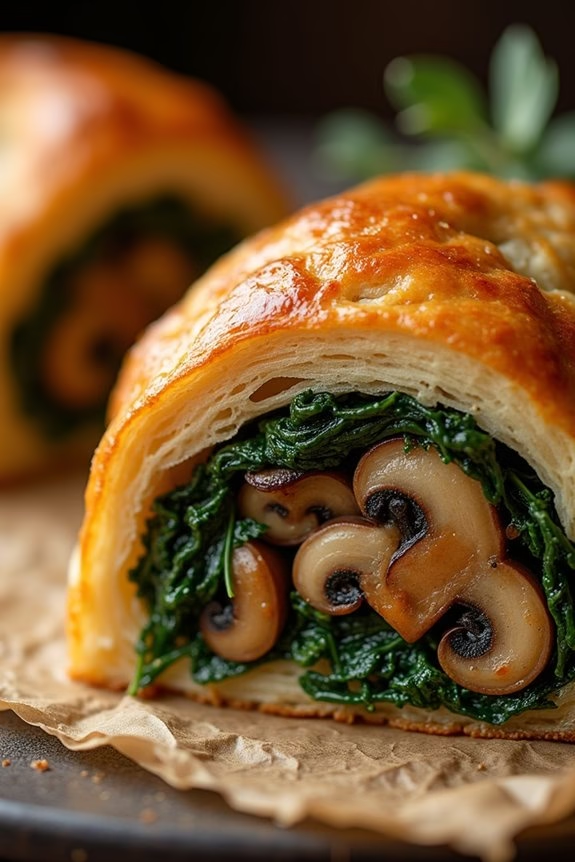
Vegetarian Mushroom Wellington is a delightful and savory dish that’s perfect for a festive Christmas dinner. This hearty and flavorful recipe makes a great centerpiece for a vegetarian feast, guaranteeing that everyone at the table has something to enjoy.
The dish features a rich mushroom filling encased in golden, flaky puff pastry, offering a wonderful combination of textures and tastes. The filling is made with a variety of mushrooms, assuring a deep, umami flavor that’s enhanced with herbs and seasoning. This Vegetarian Mushroom Wellington isn’t just for vegetarians; it’s a hit with any guest who appreciates a well-crafted, delicious meal.
The presentation of the Mushroom Wellington is as impressive as its taste. When sliced, each piece reveals a beautiful cross-section of the mushroom filling, wrapped snugly in the pastry. This dish is perfect for serving 4-6 people and is sure to make your Christmas dinner memorable.
It’s an excellent choice for those looking to serve a vegetarian main course that feels indulgent and special. Plus, it can be prepared ahead of time, allowing you to enjoy more time with your guests rather than in the kitchen.
Ingredients for 4-6 people:
- 2 tablespoons olive oil
- 1 large onion, finely chopped
- 2 cloves garlic, minced
- 500 grams mixed mushrooms, chopped
- 2 teaspoons fresh thyme leaves
- 1 teaspoon fresh rosemary, chopped
- Salt and pepper to taste
- 100 grams spinach leaves
- 2 tablespoons Dijon mustard
- 1 sheet of puff pastry (enough to wrap the filling)
- 1 egg, beaten (for egg wash)
- 1 tablespoon breadcrumbs
- 1 tablespoon grated Parmesan cheese (optional)
Cooking Instructions:
- Prepare the Mushroom Filling:
- Heat olive oil in a large pan over medium heat. Add the chopped onion and sauté until it becomes translucent.
- Add the minced garlic and continue to cook for an additional minute until fragrant.
- Stir in the chopped mushrooms and cook until they release their moisture and become golden brown, about 10 minutes.
- Add the fresh thyme, rosemary, salt, and pepper. Mix well and cook for another 2 minutes.
- Add Spinach and Final Touches:
- Add the spinach leaves to the mushroom mixture and cook until wilted.
- Remove the pan from heat and stir in the Dijon mustard. Allow the mixture to cool slightly.
- Prepare the Puff Pastry:
- Preheat your oven to 200°C (400°F).
- Roll out the puff pastry on a lightly floured surface. Place it on a baking sheet lined with parchment paper.
- Assemble the Wellington:
- Spread the breadcrumbs in the center of the pastry (this helps to absorb any excess moisture), then spoon the mushroom filling on top.
- If using, sprinkle the grated Parmesan cheese over the filling.
- Fold the pastry over the filling, sealing the edges by pressing them together. Trim any excess pastry if necessary.
- Bake the Wellington:
- Brush the surface of the pastry with the beaten egg to give it a golden finish.
- Make a few slits on top of the pastry to allow steam to escape.
- Bake in the preheated oven for 25-30 minutes, or until the pastry is golden brown and crisp.
Extra Tips:
When preparing the Vegetarian Mushroom Wellington, make certain that the mushroom mixture isn’t too wet before wrapping it in the pastry. Excess moisture can make the pastry soggy.
If your mixture seems too damp, cook it a bit longer to evaporate more liquid. You can also prepare the mushroom filling a day in advance, which will help the flavors meld together and save you time on the day of your celebration.
Additionally, allowing the wellington to rest for a few minutes after baking will make slicing easier and ensure cleaner, more presentable servings.
Slow-Cooked Beef Brisket
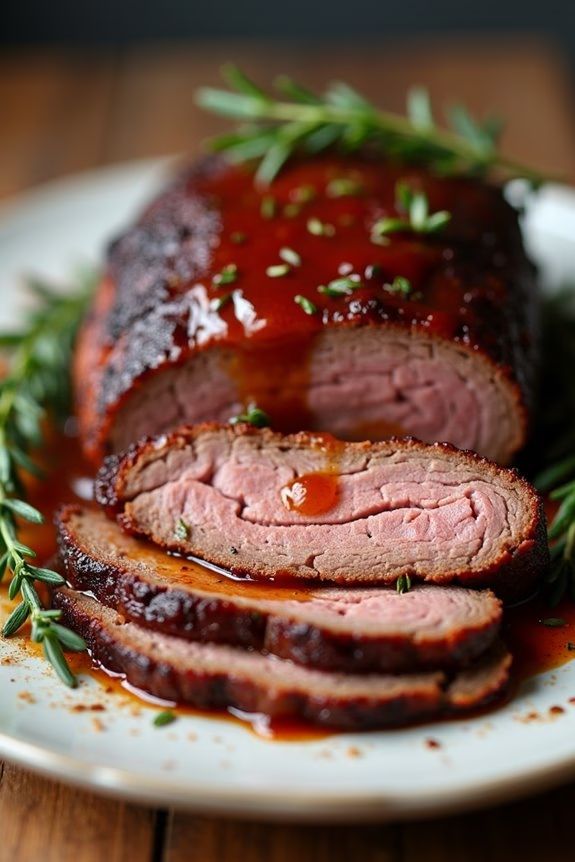
As the holiday season approaches, there’s nothing quite as comforting and festive as a Slow-Cooked Beef Brisket to grace your Christmas dinner table. This tender and flavorful dish is a celebration of rich, savory goodness that’s sure to impress your family and friends. By allowing the brisket to cook slowly, the meat becomes incredibly tender, and the flavors meld together to create a mouthwatering centerpiece for your holiday feast.
The beauty of this dish lies in its simplicity and the depth of flavor that develops over time. Ideal for serving 4-6 people, this recipe combines a few key ingredients that work in harmony to enhance the natural flavors of the beef. Whether you’re hosting a small gathering or a traditional family dinner, this Slow-Cooked Beef Brisket will be a delightful addition to your Christmas menu.
Ingredients for 4-6 People:
- 3-4 pounds beef brisket
- 2 tablespoons olive oil
- 1 large onion, sliced
- 4 cloves garlic, minced
- 1 cup beef broth
- 1 cup red wine
- 1/4 cup tomato paste
- 2 tablespoons Worcestershire sauce
- 1 tablespoon brown sugar
- 2 teaspoons smoked paprika
- 1 teaspoon dried thyme
- Salt and pepper to taste
Cooking Instructions:
- Preheat and Prepare: Preheat your oven to 300°F (150°C). Pat the brisket dry with paper towels and season generously with salt and pepper on both sides.
- Sear the Brisket: In a large, oven-safe pot or Dutch oven, heat the olive oil over medium-high heat. Add the brisket and sear it on both sides until browned, about 4-5 minutes per side. Remove the brisket and set it aside.
- Sauté Aromatics: In the same pot, add the sliced onion and minced garlic. Sauté for about 3-4 minutes until the onion becomes translucent, stirring occasionally to prevent burning.
- Deglaze the Pot: Pour in the red wine and beef broth to deglaze the pot, scraping up any browned bits from the bottom. This step will add depth to your sauce.
- Add Remaining Ingredients: Stir in the tomato paste, Worcestershire sauce, brown sugar, smoked paprika, and thyme. Mix well until the ingredients are combined.
- Return the Brisket: Place the seared brisket back into the pot, ensuring it’s submerged in the liquid. Cover the pot with a lid or aluminum foil.
- Slow-Cook: Transfer the pot to the preheated oven and allow the brisket to cook slowly for 3-4 hours or until the meat is tender and easily pulls apart with a fork.
- Rest and Serve: Once cooked, remove the brisket from the oven and let it rest for about 15 minutes. Slice the brisket against the grain and serve with the rich sauce spooned over the top.
Extra Tips:
For best results, prepare the brisket a day in advance and let it sit in the refrigerator overnight. This allows the flavors to further develop and the meat to become even more tender.
When reheating, gently warm the brisket in the oven at a low temperature to avoid drying it out. Additionally, feel free to add vegetables like carrots and potatoes during the last hour of cooking for a complete one-pot meal.
Spiced Orange Duck Breast
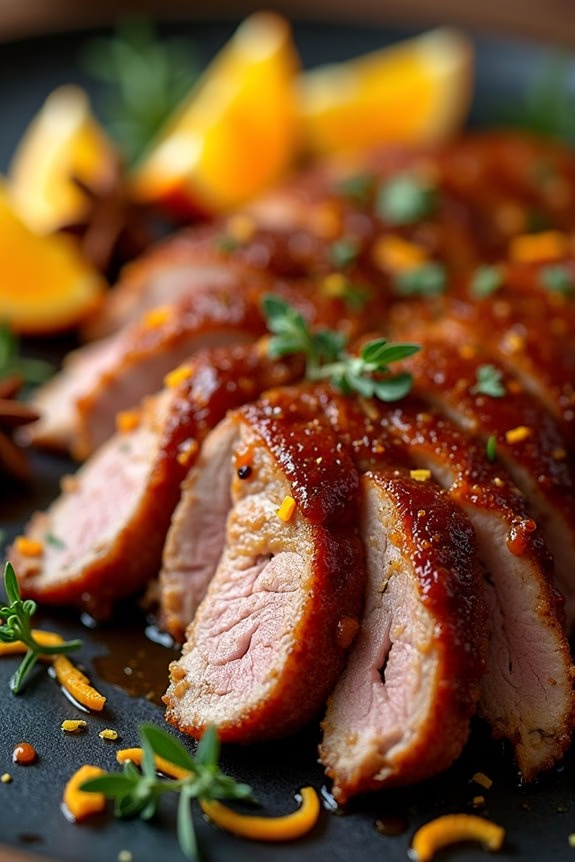
Spiced Orange Duck Breast is an exquisite and flavorful dish that makes for an exceptional centerpiece at your Christmas dinner. The combination of the rich, succulent duck with the sweet and aromatic spices of orange and star anise creates a symphony of flavors that will leave your guests impressed and delighted.
This dish not only offers a gourmet experience but is also surprisingly simple to prepare, allowing you to dazzle your friends and family without spending the entire day in the kitchen.
The key to this recipe is to perfectly balance the savory and sweet components, allowing the natural flavors of the duck to shine through while being enhanced by the warm spices and citrus notes. The duck breasts are seared to achieve a crispy, golden skin, then roasted to perfection. A spiced orange glaze is then applied, bringing a glossy finish and an irresistible aroma.
This dish is best served alongside roasted vegetables or a creamy potato mash, creating a harmonious meal that celebrates the festive season.
Ingredients (Serves 4-6):
- 4 duck breasts
- 2 tablespoons olive oil
- Salt and pepper to taste
- 1 cup fresh orange juice
- Zest of 2 oranges
- 2 tablespoons honey
- 3 tablespoons soy sauce
- 1 cinnamon stick
- 3 star anise
- 1 tablespoon grated ginger
- 2 cloves garlic, minced
- 1 tablespoon cornstarch
- 2 tablespoons water
Instructions:
- Prepare the Duck Breasts: Pat the duck breasts dry with a paper towel. Score the skin in a crisscross pattern, taking care not to cut into the meat. Season both sides generously with salt and pepper.
- Sear the Duck: Heat olive oil in a large oven-safe skillet over medium-high heat. Place the duck breasts skin-side down in the skillet and sear for about 6-8 minutes until the skin is crispy and golden brown. Flip the breasts and cook for another 2 minutes on the meat side.
- Roast the Duck: Preheat your oven to 400°F (200°C). Transfer the skillet with the duck breasts to the oven and roast for 8-10 minutes for medium-rare or longer depending on your preferred level of doneness.
- Prepare the Orange Glaze: While the duck is roasting, combine orange juice, orange zest, honey, soy sauce, cinnamon stick, star anise, grated ginger, and minced garlic in a saucepan. Bring to a boil, then reduce the heat and simmer for about 10 minutes until slightly thickened.
- Thicken the Glaze: In a small bowl, mix cornstarch and water to create a slurry. Gradually whisk the slurry into the simmering glaze until it thickens to your desired consistency. Remove from heat and set aside.
- Glaze the Duck: Once the duck is done roasting, remove it from the oven and let it rest for 5 minutes. Brush the spiced orange glaze generously over the duck breasts.
- Serve: Slice the duck breasts thinly and serve them drizzled with any remaining glaze from the saucepan. Pair with your choice of sides.
Extra Tips:
For an even more intense flavor, marinate the duck breasts in a mixture of orange juice, soy sauce, and spices for a few hours before cooking. This will infuse the meat with additional citrus and spice notes.
Remember to let the duck rest after roasting to allow the juices to redistribute, ensuring each bite is tender and juicy. If the glaze becomes too thick, simply add a little more orange juice to reach your desired consistency.
Enjoy your Spiced Orange Duck Breast for a memorable and festive holiday meal!
Chestnut and Butternut Squash Risotto
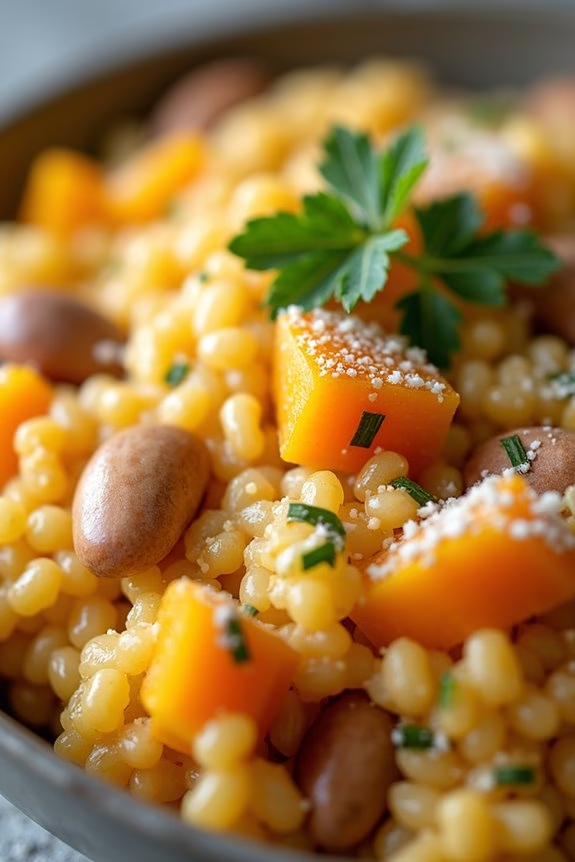
Chestnut and Butternut Squash Risotto is a delightful dish perfect for Christmas dinner. Combining the creamy texture of risotto with the earthy flavor of roasted chestnuts and the natural sweetness of butternut squash, this dish is bound to impress your guests.
It’s a comforting meal that offers a unique twist on traditional holiday fare, making it a memorable addition to your festive table. This recipe serves 4-6 people and is great for both novice and experienced cooks. The key to a perfect risotto is patience and attention to detail, guaranteeing each step is carefully executed for the best result.
The risotto is enriched with aromatic herbs and finished with Parmesan cheese, creating a rich and satisfying taste.
Ingredients:
- 1 cup arborio rice
- 1 medium butternut squash, peeled and diced
- 1 cup roasted chestnuts, chopped
- 1 small onion, finely chopped
- 2 cloves garlic, minced
- 4 cups vegetable stock
- 1 cup white wine
- 1/2 cup grated Parmesan cheese
- 2 tablespoons olive oil
- 2 tablespoons unsalted butter
- Salt and pepper to taste
- Fresh thyme or parsley for garnish
Cooking Instructions:
- Prepare the Butternut Squash: Preheat your oven to 400°F (200°C). Toss the diced butternut squash with 1 tablespoon of olive oil, salt, and pepper. Spread it out on a baking sheet and roast for about 20-25 minutes, or until tender and slightly caramelized. Set aside.
- Cook the Aromatics: In a large skillet or saucepan, heat the remaining olive oil and 1 tablespoon of butter over medium heat. Add the chopped onion and cook until soft and translucent, about 5 minutes. Stir in the minced garlic and cook for another minute until fragrant.
- Toast the Rice: Add the arborio rice to the pan and cook, stirring frequently, for about 2-3 minutes until the edges of the rice grains appear translucent.
- Deglaze with Wine: Pour in the white wine and stir continuously until it’s mostly absorbed by the rice, which should take about 2 minutes.
- Add the Stock Gradually: Begin adding the vegetable stock, one ladle at a time, allowing the rice to absorb the liquid before adding more. Stir frequently to guarantee even cooking. Continue this process until the rice is creamy and just cooked through, which should take about 18-20 minutes.
- Incorporate Chestnuts and Squash: Gently fold in the roasted butternut squash and chopped chestnuts into the risotto. Cook for an additional 2-3 minutes to warm through.
- Finish the Risotto: Remove the pan from heat and stir in the remaining tablespoon of butter and the grated Parmesan cheese until melted and combined. Adjust the seasoning with salt and pepper to taste.
- Garnish and Serve: Serve the risotto hot, garnished with fresh thyme or parsley for a touch of color and flavor.
Extra Tips:
When making risotto, it’s important to use a good quality arborio rice, as its high starch content is what gives risotto its creamy texture.
Be patient and add the stock gradually, which allows the rice to release its starches slowly. Stirring often is essential, as it helps prevent the rice from sticking to the pan and guarantees even cooking.
If you prefer a richer flavor, you can substitute chicken stock for the vegetable stock or add a splash of cream at the end. Remember, the key to risotto is patience and attention. Enjoy your festive cooking!
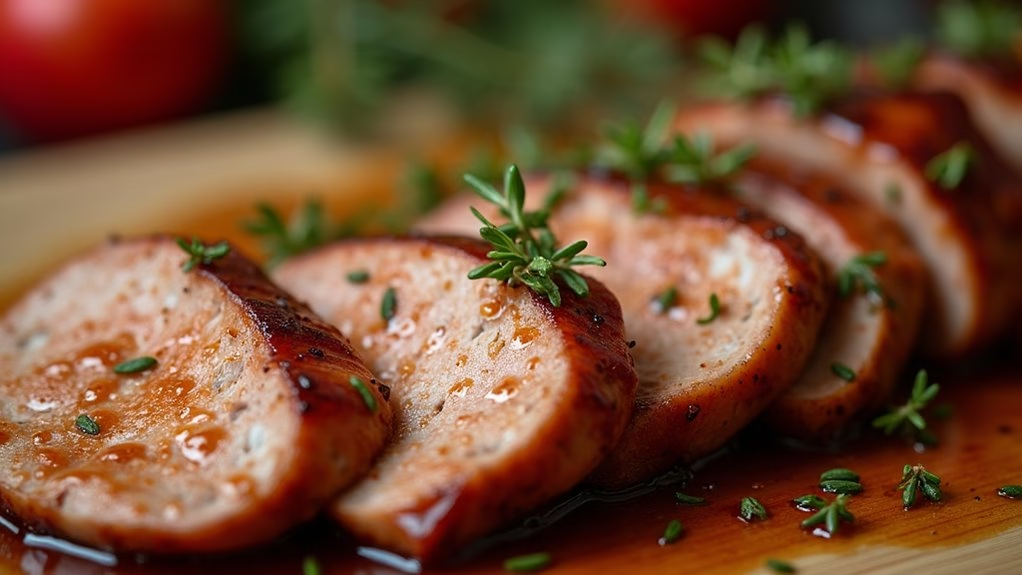
Pork Tenderloin With Apple Cider Glaze
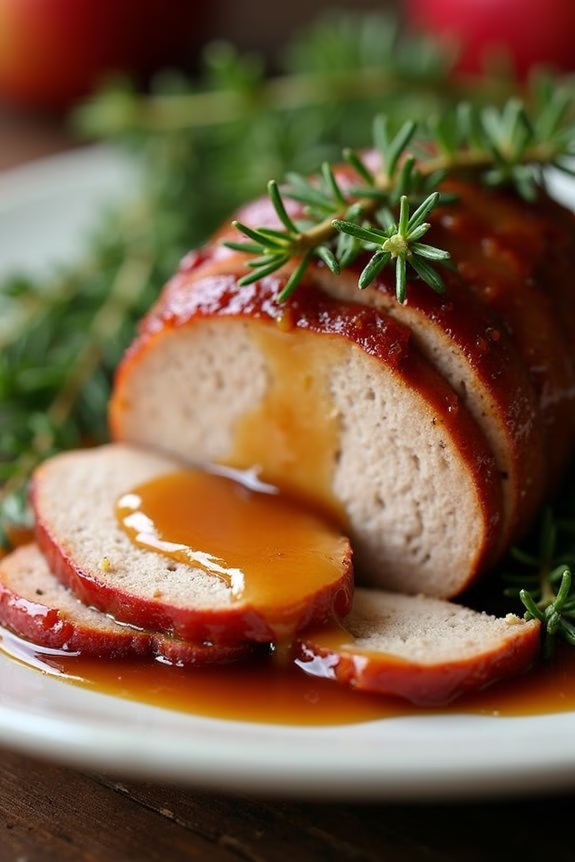
Pork Tenderloin with Apple Cider Glaze is a delightful dish perfect for your Christmas dinner spread. The sweetness of the apple cider glaze perfectly complements the savory flavors of the pork, creating a harmonious blend that’s certain to impress your family and guests.
This dish isn’t only delicious but also relatively simple to prepare, making it an ideal choice for both seasoned cooks and beginners looking to add a touch of elegance to their holiday menu.
The key to this dish is the apple cider glaze, which is made by reducing apple cider with a few select ingredients to enhance its natural sweetness and flavor. When paired with the tender and juicy pork tenderloin, the result is a mouthwatering combination that celebrates the festive season.
This recipe serves 4-6 people, making it perfect for a small to medium-sized gathering.
Ingredients:
- 2 pork tenderloins (each about 1 pound)
- Salt and freshly ground black pepper
- 2 tablespoons olive oil
- 1 cup apple cider
- 1/4 cup apple cider vinegar
- 2 tablespoons brown sugar
- 1 tablespoon Dijon mustard
- 2 cloves garlic, minced
- 1 teaspoon fresh thyme leaves (or 1/2 teaspoon dried thyme)
- 1 tablespoon unsalted butter
Cooking Instructions:
- Prepare the Tenderloin: Preheat your oven to 400°F (200°C). Season the pork tenderloins generously with salt and black pepper on all sides.
- Sear the Pork: In a large oven-safe skillet, heat the olive oil over medium-high heat. Once hot, add the pork tenderloins and sear them on all sides until browned, about 3-4 minutes per side. Remove the pork from the skillet and set aside.
- Make the Glaze: In the same skillet, add the apple cider, apple cider vinegar, brown sugar, Dijon mustard, minced garlic, and thyme. Stir to combine and bring the mixture to a simmer over medium heat. Let it reduce for about 5-7 minutes or until it becomes slightly thickened.
- Roast the Pork: Return the seared pork tenderloins to the skillet, spoon some of the glaze over them, and transfer the skillet to the preheated oven. Roast for 15-20 minutes or until the internal temperature of the pork reaches 145°F (63°C).
- Finish the Glaze: Remove the skillet from the oven and transfer the pork to a cutting board to rest. Place the skillet back on the stove over low heat, stir in the butter, and continue to cook the glaze until it’s thick and glossy, about 2-3 minutes.
- Serve: Slice the pork tenderloin into medallions and drizzle the apple cider glaze generously over the slices. Serve immediately.
Extra Tips:
For the best results, make sure that the pork tenderloin is at room temperature before cooking to promote even cooking.
Using a meat thermometer is highly recommended to prevent overcooking the pork. If you prefer a thicker glaze, allow the cider mixture to reduce longer before adding the butter.
Additionally, feel free to garnish with fresh thyme sprigs for an extra touch of flavor and presentation.