

Hosting Christmas dinner can be a whirlwind of excitement and stress. But what if you could ease the pressure with make-ahead recipes? Picture savory sausage and herb stuffing prepared the night before, letting all those delicious flavors mingle. Creamy mashed potatoes already whipped to perfection and ready to be reheated. Honey-glazed carrots and roasted garlic green beans are simmering, with a refreshing cranberry orange relish to complete the meal. Curious about the rest? Let’s explore more!
Savory Sausage and Herb Stuffing
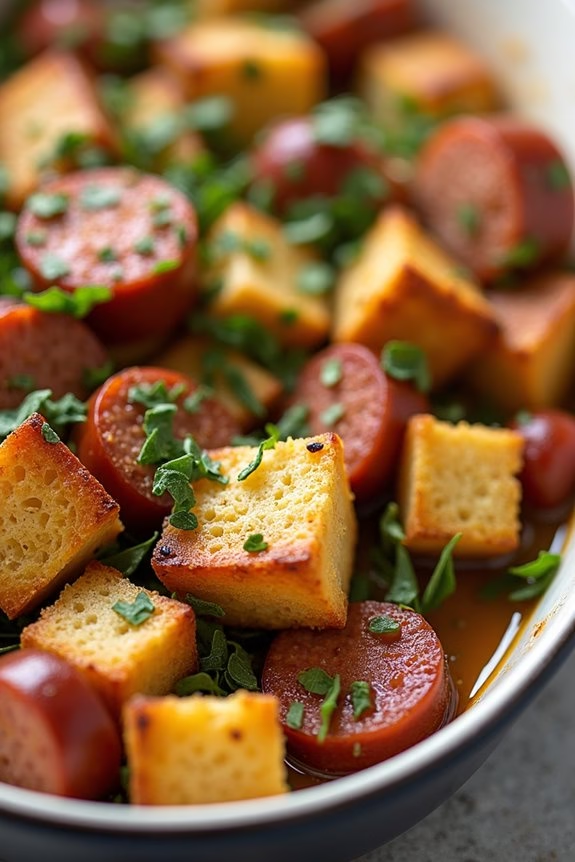
Savory Sausage and Herb Stuffing is a classic side dish that perfectly complements any Christmas dinner. This make-ahead recipe combines the rich flavors of savory sausage, aromatic herbs, and crusty bread to create a dish that’s both comforting and festive.
Preparing this stuffing in advance won’t only save you time on the big day but will also allow the flavors to meld together, resulting in a more flavorful and cohesive dish. Whether you’re hosting a large gathering or an intimate family meal, this stuffing is sure to be a hit.
This stuffing can be customized to suit your guests’ taste preferences by adjusting the herbs or adding in extra ingredients such as nuts or dried fruits. By following this recipe, you’ll have a delicious and hearty stuffing that can be reheated just before serving, making your holiday meal preparation stress-free.
This recipe serves 4-6 people, ensuring there’s plenty to go around and maybe even enough for leftovers.
Ingredients for 4-6 servings:
- 1 loaf of crusty bread (about 1 pound), cut into 1-inch cubes
- 1 pound Italian sausage, casings removed
- 1 large onion, diced
- 3 stalks of celery, diced
- 2 cloves of garlic, minced
- 2 teaspoons fresh sage, chopped
- 2 teaspoons fresh thyme, chopped
- 1/4 cup fresh parsley, chopped
- 2 cups chicken or vegetable broth
- 1/2 cup unsalted butter, melted
- Salt and pepper to taste
Instructions:
- Prepare the Bread: Preheat your oven to 350°F (175°C). Spread the bread cubes evenly on a baking sheet. Toast them in the oven for 10-15 minutes or until they’re dry and lightly browned. Remove from the oven and set aside to cool.
- Cook the Sausage: In a large skillet over medium heat, cook the sausage until browned and cooked through, breaking it up into small pieces with a spoon. Remove the sausage from the skillet with a slotted spoon and set aside.
- Sauté Vegetables: In the same skillet, add the diced onion and celery. Cook until the onion is translucent and the celery is tender, about 5 minutes. Add the minced garlic and cook for an additional 1 minute until fragrant.
- Combine Ingredients: In a large mixing bowl, combine the toasted bread cubes, cooked sausage, sautéed vegetables, fresh herbs, salt, and pepper. Gradually add the broth and melted butter, mixing gently until the bread is evenly moistened.
- Transfer and Bake: Pour the mixture into a greased baking dish. Cover with foil and bake in the preheated oven for 30 minutes. Remove the foil and bake for an additional 15 minutes, or until the top is golden brown and crispy.
- Cool and Store: If making ahead, allow the stuffing to cool completely before covering it tightly and storing it in the refrigerator for up to two days. Reheat in a 350°F (175°C) oven before serving.
Extra Tips:
For a more flavorful stuffing, consider adding a handful of dried cranberries or chopped walnuts for added texture and taste. If you prefer a spicier kick, opt for hot Italian sausage instead of mild.
Always taste the mixture before baking to adjust seasoning as needed; the salt content can vary depending on the type of sausage and broth used. Finally, if you find the stuffing too dry, you can add a bit more broth before baking to achieve the desired consistency.
Classic Make-Ahead Mashed Potatoes
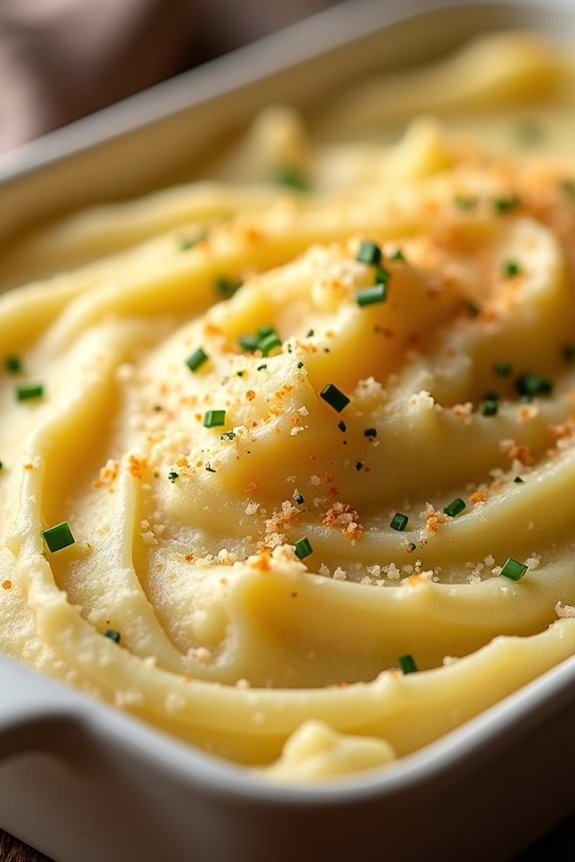
Mashed potatoes are a quintessential side dish for any Christmas dinner, and preparing them ahead of time can save you a lot of stress on the big day. This classic make-ahead mashed potatoes recipe is creamy, fluffy, and full of flavor, making it the perfect accompaniment to your holiday meal. By preparing them in advance, you can focus on other dishes, entertain your guests, and enjoy the festivities without being tied to the stove.
These mashed potatoes are made with simple ingredients that come together to create a rich and satisfying dish. With the addition of butter and cream cheese, these potatoes are both indulgent and comforting. Plus, by making them ahead, the flavors have time to meld together, resulting in an even more delicious dish. Whether you’re hosting a large gathering or a small family dinner, these make-ahead mashed potatoes will be a hit at your Christmas table.
Ingredients for 4-6 servings:
- 3 pounds Yukon Gold potatoes, peeled and quartered
- 1/2 cup unsalted butter, softened
- 8 ounces cream cheese, softened
- 1/2 cup sour cream
- 1/4 cup whole milk
- 1 teaspoon salt
- 1/2 teaspoon ground black pepper
- 1 tablespoon chives, chopped (optional)
- 1/4 cup parmesan cheese, grated (optional)
Instructions:
- Boil the Potatoes: Place the peeled and quartered potatoes into a large pot of cold, salted water. Bring to a boil over medium-high heat. Once boiling, reduce the heat and simmer for 15-20 minutes, or until the potatoes are fork-tender.
- Drain and Mash: Drain the potatoes in a colander and return them to the pot. Allow them to sit in the warm pot for a few minutes to help evaporate any residual moisture. Use a potato masher or a hand mixer to mash the potatoes until smooth.
- Mix in Ingredients: Add the softened butter and cream cheese to the mashed potatoes and mix until well combined. Gradually stir in the sour cream and milk, mixing until the potatoes are creamy and smooth. Season with salt and pepper to taste.
- Transfer to Baking Dish: Spoon the mashed potatoes into a buttered baking dish. If desired, sprinkle the top with chopped chives and grated parmesan cheese for extra flavor.
- Cool and Refrigerate: Allow the mashed potatoes to cool completely, then cover the baking dish with plastic wrap or aluminum foil. Refrigerate for up to two days until you’re ready to bake them.
- Reheat and Serve: Preheat your oven to 350°F (175°C). Remove the plastic wrap or foil and cover the dish with aluminum foil. Bake for 20-25 minutes, or until the potatoes are heated through. For a golden-brown top, remove the foil in the last 10 minutes of baking. Serve hot.
Extra Tips:
When preparing make-ahead mashed potatoes, using Yukon Gold potatoes is recommended as they’ve a buttery flavor and creamy texture that works wonderfully for mashing. If you prefer a richer flavor, you can substitute half-and-half for the milk.
To save time on Christmas Day, consider baking the potatoes while your main dish is resting. If you find the potatoes too thick after refrigeration, simply stir in a little warm milk to achieve your desired consistency before reheating.
Honey-Glazed Carrots With Thyme
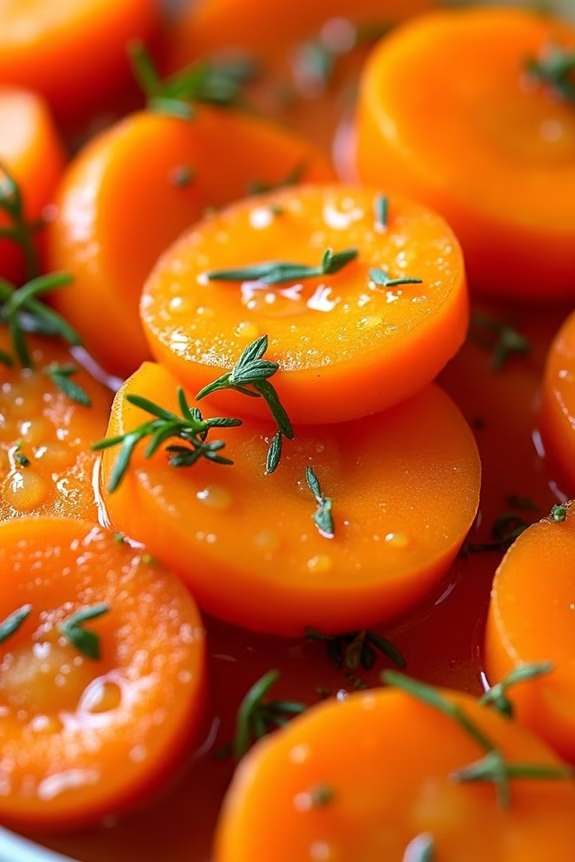
Honey-Glazed Carrots With Thyme is a delightful side dish that perfectly complements your make-ahead Christmas dinner. The natural sweetness of the carrots, when enhanced by honey and fresh thyme, creates a harmonious blend of flavors that will satisfy the taste buds of all your holiday guests.
This dish isn’t only visually appealing with its vibrant orange hue but also easy to prepare, making it an ideal choice for those looking to streamline their holiday cooking process. This recipe allows you to prepare the dish in advance and simply reheat it when you’re ready to serve your Christmas feast.
The honey glaze adds a beautiful sheen to the carrots, while the thyme infuses a subtle earthy aroma and flavor. With just a few simple ingredients, you can create a dish that’s both sophisticated and comforting, making your holiday meal even more memorable. This recipe serves 4-6 people.
Ingredients:
- 2 pounds of carrots, peeled and cut into 1/2-inch rounds
- 3 tablespoons of honey
- 2 tablespoons of unsalted butter
- 1 tablespoon of olive oil
- 1 teaspoon of fresh thyme leaves (or 1/2 teaspoon dried thyme)
- Salt and pepper to taste
- 1/4 cup of water
Cooking Instructions:
- Prepare the Carrots: Begin by peeling the carrots and slicing them into 1/2-inch rounds. This guarantees they cook evenly and absorb the honey glaze effectively.
- Cook the Carrots: In a large skillet, heat the olive oil over medium heat. Add the carrot slices and sauté for about 5 minutes, stirring occasionally until they start to soften.
- Add Water and Steam: Pour in the water and cover the skillet with a lid. Allow the carrots to steam for about 5 minutes, or until they’re just tender. This steaming step helps to cook the carrots through without burning them.
- Create the Glaze: Remove the lid and add the butter, honey, and thyme to the skillet. Stir well to coat the carrots evenly with the glaze. Continue cooking, uncovered, for another 3-4 minutes, allowing the sauce to thicken and the carrots to caramelize slightly.
- Season and Serve: Season the carrots with salt and pepper to taste. Toss everything together to guarantee even seasoning. Transfer the honey-glazed carrots with thyme to a serving dish, ready to be enjoyed.
Extra Tips:
When making Honey-Glazed Carrots With Thyme, consider using different colored carrots for a more festive presentation.
If you’re preparing this dish ahead of time, allow the carrots to cool completely before storing them in an airtight container in the refrigerator. When ready to serve, gently reheat them in a skillet with a splash of water to refresh the glaze.
For those who prefer a stronger thyme flavor, feel free to add an extra pinch of thyme before serving.
Cranberry Orange Relish
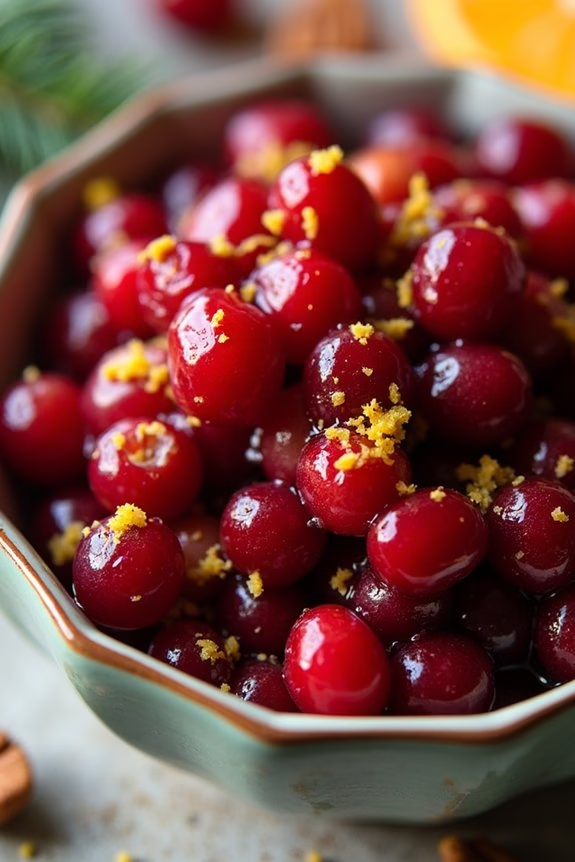
Cranberry Orange Relish is a vibrant and invigorating addition to any holiday table. This zesty relish combines the tartness of fresh cranberries with the sweet citrus notes of oranges, creating a perfect balance of flavors. Not only does it complement roasted meats beautifully, but it also adds a colorful, festive touch to your Christmas dinner spread.
Best of all, this dish can be prepared ahead of time, allowing you to focus on other aspects of your holiday feast.
Another great aspect of Cranberry Orange Relish is its simplicity and ease of preparation. With just a few ingredients and minimal cooking time, this relish can be whipped up in no time. The bright, bold flavors develop even more after a day or two in the fridge, making it an ideal make-ahead side dish.
It’s a crowd-pleaser that’s sure to impress your guests with its burst of flavor and festive appearance.
Ingredients for 4-6 servings:
- 12 ounces fresh cranberries
- 1 large orange, zested and juiced
- 1/2 cup granulated sugar
- 1/4 cup chopped pecans (optional)
- 1/4 teaspoon ground cinnamon
- Pinch of salt
Cooking Instructions:
- Prepare the Cranberries: Rinse the cranberries under cold water and drain them well. Pick through them to remove any stems or blemished berries. This guarantees that only fresh, ripe cranberries make it into your relish.
- Zest and Juice the Orange: Using a microplane or fine grater, zest the orange, taking care only to remove the bright orange skin and not the white pith. Once zested, cut the orange in half and juice it, ensuring you have about 1/4 cup of juice. This will impart a citrusy sweetness to the relish.
- Combine Ingredients: In a food processor, combine the cranberries, orange zest, orange juice, sugar, pecans (if using), cinnamon, and salt. Pulse the mixture until it reaches your desired consistency. Some prefer it finely chopped, while others like a chunkier texture.
- Chill the Relish: Transfer the mixture to a bowl, cover it with plastic wrap, and refrigerate for at least 2 hours or overnight. This resting period allows the flavors to meld together and the sugar to dissolve completely, creating a harmonious blend.
Extra Tips:
For added texture and flavor, consider adding a handful of chopped fresh mint or a tablespoon of finely grated ginger to the relish. If you prefer your relish on the sweeter side, you can adjust the sugar to taste.
This dish can be made up to three days in advance, making it a stress-free addition to your holiday meal prep. Serve it chilled or at room temperature, allowing the vibrant flavors to shine.
Maple-Glazed Ham
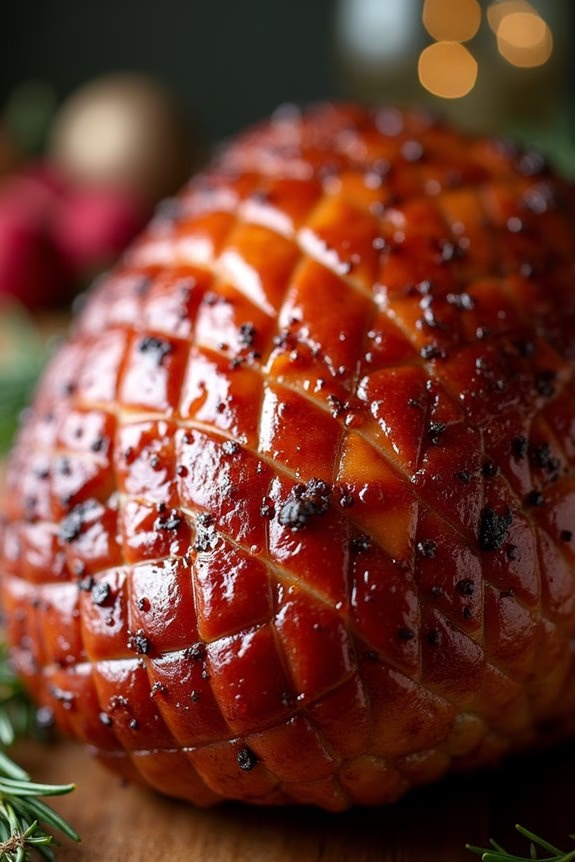
When it comes to planning a make-ahead Christmas dinner, a Maple-Glazed Ham is a show-stopping centerpiece that brings both flavor and festivity to the table. Its sweet and savory glaze, combined with the succulent meat, makes it a crowd-pleaser for family and friends.
This dish can be prepared in advance, allowing you to spend less time in the kitchen on the day of celebration and more time enjoying the company of loved ones.
The secret to a perfect Maple-Glazed Ham lies in the balance of flavors and the technique of glazing. The maple syrup adds a rich sweetness, while the mustard and spices give depth and a touch of heat to the dish.
This recipe is designed for 4-6 people, making it ideal for smaller gatherings or as part of a larger spread with other holiday favorites.
Ingredients (for 4-6 servings):
- 1 bone-in half ham (5-6 pounds)
- 1 cup pure maple syrup
- 1/4 cup Dijon mustard
- 2 tablespoons apple cider vinegar
- 1/2 teaspoon ground cinnamon
- 1/4 teaspoon ground cloves
- 1/2 teaspoon ground black pepper
- 1/4 cup water
Cooking Instructions:
- Preheat the Oven: Preheat your oven to 325°F (165°C). This moderate temperature guarantees the ham heats evenly without drying out.
- Prepare the Glaze: In a medium saucepan, combine the maple syrup, Dijon mustard, apple cider vinegar, cinnamon, cloves, and black pepper. Heat over medium heat, stirring occasionally, until the mixture is well combined and just begins to simmer. Remove from heat and set aside.
- Prepare the Ham: Place the ham in a roasting pan, flat side down. Score the surface of the ham in a diamond pattern, about 1/4 inch deep, to allow the glaze to penetrate the meat. Pour the water into the bottom of the pan to prevent the ham from drying out.
- Apply the First Coat of Glaze: Brush about one-third of the glaze over the scored surface of the ham. Reserve the remaining glaze for later use.
- Roast the Ham: Place the ham in the preheated oven and roast for approximately 1 1/2 to 2 hours, or until the internal temperature reaches 140°F (60°C). Baste the ham with the reserved glaze every 30 minutes to build layers of flavor.
- Final Glaze and Caramelization: In the last 10 minutes of cooking, increase the oven temperature to 425°F (220°C). Apply the remaining glaze and let it caramelize, giving the ham a beautiful golden-brown finish. Keep a close eye on it to prevent burning.
- Rest and Serve: Remove the ham from the oven and let it rest for at least 15 minutes before carving. This rest period allows the juices to redistribute, guaranteeing a moist and flavorful ham.
Extra Tips:
For an even deeper flavor, prepare the glaze a day ahead to allow the spices to meld.
Additionally, if you have leftovers, maple-glazed ham makes excellent sandwiches and can be used in soups or casseroles.
When carving, cut thin slices against the grain for the most tender results. If you prefer a smokier flavor, consider using smoked ham and adjust cooking times accordingly.
Roasted Garlic Green Beans
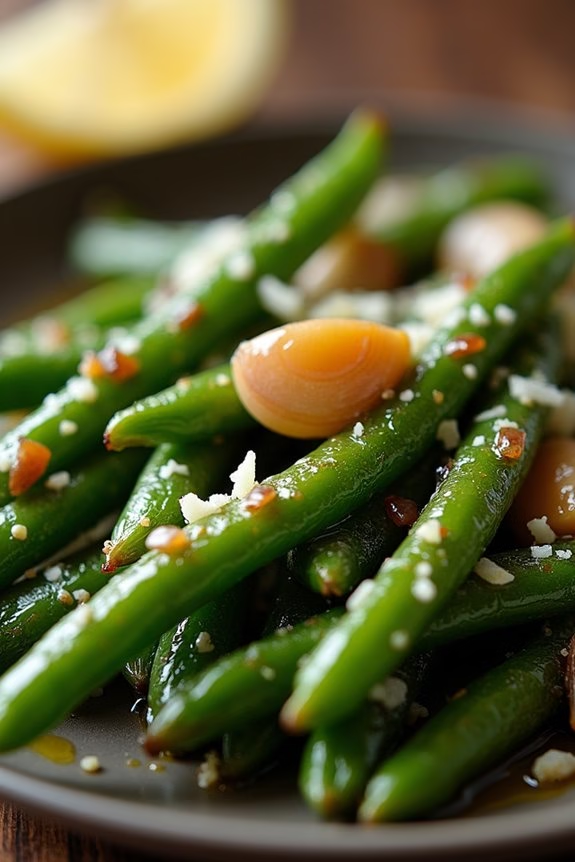
Roasted Garlic Green Beans is a delightful side dish that brings a burst of flavor to your Christmas dinner table. This dish combines the natural freshness of green beans with the rich, aromatic essence of roasted garlic, resulting in a savory experience that complements any main course.
The beauty of this recipe lies not only in its simplicity but also in its capacity to be prepared ahead of time, making it an ideal choice for those busy holiday gatherings. Whether you’re serving turkey, ham, or a vegetarian feast, these green beans will add an elegant touch to your meal.
The key to achieving the perfect Roasted Garlic Green Beans is selecting fresh, crisp beans and pairing them with high-quality olive oil and garlic. When roasted, the garlic infuses the beans with a depth of flavor that’s both comforting and sophisticated. This dish is designed to serve 4-6 people, making it a versatile addition to your Christmas dinner menu.
Plus, with a preparation time that allows you to focus on other dishes, you’ll find yourself spending less time in the kitchen and more time enjoying the festive celebrations with your loved ones.
Ingredients (Serves 4-6):
- 1 pound fresh green beans, trimmed
- 2 tablespoons olive oil
- 4 cloves garlic, minced
- Salt to taste
- Black pepper to taste
- 1 tablespoon lemon juice
- 1/4 cup grated Parmesan cheese (optional)
Cooking Instructions:
- Preheat Oven: Begin by preheating your oven to 425°F (220°C). This high temperature will allow the beans to roast quickly and evenly.
- Prepare Green Beans: Wash and trim the green beans, removing any stems or rough edges. Pat them dry with a paper towel to guarantee they roast rather than steam in the oven.
- Season the Beans: In a large mixing bowl, combine the green beans with olive oil, minced garlic, salt, and black pepper. Toss the beans until they’re evenly coated with the oil and seasoning.
- Roast the Beans: Spread the seasoned green beans in a single layer on a baking sheet lined with parchment paper. This will prevent sticking and make cleanup easier.
- Cook in the Oven: Place the baking sheet in the preheated oven and roast for 15-20 minutes, or until the beans are tender and slightly browned. Stir the beans halfway through the cooking time to guarantee even roasting.
- Add Final Touches: Once the beans are roasted, remove them from the oven and drizzle with lemon juice. If desired, sprinkle with grated Parmesan cheese for an extra layer of flavor.
- Serve Immediately: Transfer the roasted garlic green beans to a serving dish and serve immediately while hot.
Extra Tips:
For the freshest taste, choose green beans that are firm and bright in color. You can roast the garlic separately and add it to the beans in the final minutes of roasting if you prefer a milder garlic flavor.
If you’re preparing this dish ahead of time, you can blanch the green beans, toss them with oil and garlic, and store them in the refrigerator until you’re ready to roast them. This will save time and guarantee that the beans retain their vibrant color and crisp texture.
Creamy Pumpkin Soup
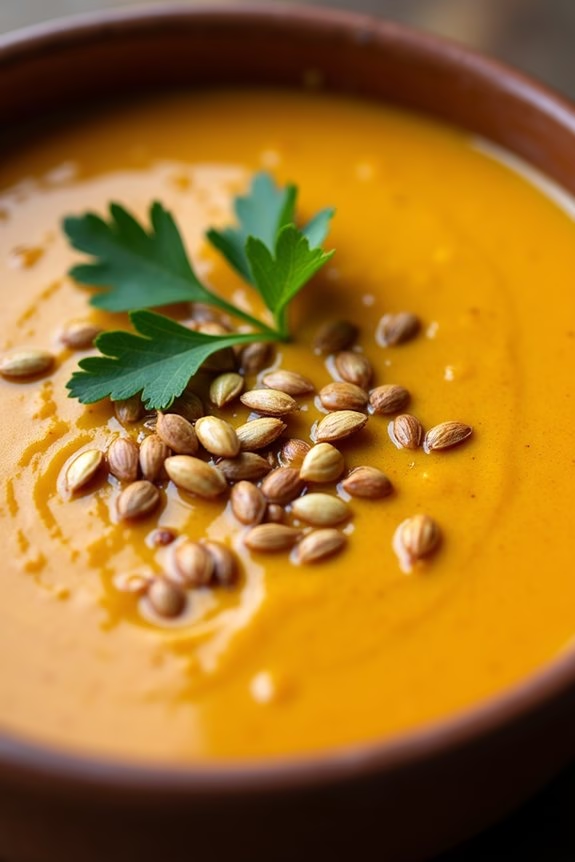
As the holiday season approaches, the hustle and bustle of preparing a festive feast can be overwhelming. That’s why a make-ahead dish like Creamy Pumpkin Soup can be a lifesaver. This soup is a warm, comforting starter that perfectly encapsulates the flavors of fall and winter. It’s rich, velvety, and infused with aromatic spices that evoke the cozy spirit of Christmas. Not only does it taste incredible, but it can also be prepared in advance, allowing you to focus on other aspects of your Christmas dinner.
This Creamy Pumpkin Soup is an excellent choice for serving 4-6 people and can be easily scaled up or down depending on your needs. The base of the soup is pureed pumpkin, which is blended with chicken or vegetable stock, cream, and a harmonious blend of spices. The creamy texture and delightful flavor make it a hit for any age group. This recipe is perfect for those looking to impress their guests without the added stress of last-minute cooking, ensuring that you have more time to spend with loved ones.
Ingredients for Creamy Pumpkin Soup (Serves 4-6):
- 2 tablespoons olive oil
- 1 medium onion, chopped
- 2 cloves garlic, minced
- 1 teaspoon ground cinnamon
- 1 teaspoon ground nutmeg
- 1/2 teaspoon ground ginger
- 1/4 teaspoon cayenne pepper (optional)
- 4 cups pumpkin puree (canned or fresh)
- 4 cups chicken or vegetable broth
- 1 cup heavy cream
- Salt and pepper to taste
- Toasted pumpkin seeds for garnish (optional)
- Fresh parsley for garnish (optional)
Cooking Instructions:
- Prepare the Aromatics: In a large pot, heat the olive oil over medium heat. Add the chopped onion and sauté until translucent, about 5 minutes. Stir in the minced garlic and cook for an additional 1-2 minutes until fragrant.
- Add Spices: Sprinkle in the cinnamon, nutmeg, ginger, and cayenne pepper (if using). Stir the spices into the onion and garlic mixture, allowing them to bloom for about 1 minute.
- Combine Pumpkin and Broth: Add the pumpkin puree to the pot, followed by the chicken or vegetable broth. Stir well to combine all the ingredients. Bring the mixture to a gentle simmer and let it cook for about 15-20 minutes, allowing the flavors to meld.
- Blend the Soup: Using an immersion blender, blend the soup until smooth and creamy. Alternatively, you can transfer the soup in batches to a countertop blender. Be cautious with the hot liquid.
- Add Cream and Season: Stir in the heavy cream, and let the soup heat through for another 5 minutes. Season with salt and pepper to taste.
- Garnish and Serve: Ladle the soup into bowls and garnish with toasted pumpkin seeds and fresh parsley if desired. Serve immediately or allow to cool and refrigerate for up to two days.
Extra Tips:
When making Creamy Pumpkin Soup, using fresh pumpkin puree can elevate the flavor, but canned pumpkin works perfectly for convenience. If you prefer a vegan version, substitute the heavy cream with coconut milk or almond milk.
Adjust the spices to your preference; if you prefer a spicier kick, increase the cayenne pepper. This soup can be made up to two days in advance. Reheat gently on the stove, adding a splash of broth or water if it thickens too much. Garnish just before serving to keep the textures vibrant and fresh.
Herb-Crusted Beef Tenderloin

Herb-Crusted Beef Tenderloin is a sophisticated and flavorful main course that’s perfect for your make-ahead Christmas dinner. This dish features a succulent beef tenderloin coated in a fragrant mixture of fresh herbs, garlic, and breadcrumbs, creating a delightful crust that seals in the juices. The tenderloin is roasted to perfection, resulting in a tender and juicy interior that’s sure to impress your guests.
Not only does it taste incredible, but it also presents beautifully on your holiday table, making it a centerpiece worthy of the occasion. Preparing this dish ahead of time allows you to enjoy a stress-free holiday meal. You can easily prepare the herb crust in advance and coat the tenderloin, leaving you with minimal work on the day of your gathering.
This recipe serves 4-6 people, making it ideal for an intimate family dinner or a small gathering with friends. The combination of herbs in the crust complements the rich flavor of the beef, guaranteeing every bite is a celebration of the holiday season.
Ingredients for 4-6 servings:
- 1 (2-3 pound) beef tenderloin, trimmed
- 2 tablespoons olive oil
- 4 cloves garlic, minced
- 1 cup fresh breadcrumbs
- 1/4 cup grated Parmesan cheese
- 2 tablespoons fresh rosemary, chopped
- 2 tablespoons fresh thyme, chopped
- 2 tablespoons fresh parsley, chopped
- Salt and freshly ground black pepper, to taste
Cooking Instructions:
- Preheat the Oven: Preheat your oven to 400°F (200°C). This guarantees that the oven is at the right temperature to properly roast the tenderloin.
- Prepare the Herb Crust: In a medium bowl, combine the minced garlic, breadcrumbs, Parmesan cheese, rosemary, thyme, parsley, salt, and pepper. Mix well to distribute the herbs and seasonings evenly throughout the breadcrumb mixture.
- Season the Tenderloin: Pat the beef tenderloin dry with paper towels. Rub it all over with olive oil, then season generously with salt and freshly ground black pepper. This step helps the crust adhere to the meat and enhances its flavor.
- Apply the Herb Crust: Press the herb and breadcrumb mixture onto the tenderloin, ensuring that it’s evenly coated on all sides. The olive oil will help the crust stick to the tenderloin.
- Roast the Tenderloin: Place the herb-crusted tenderloin on a roasting rack set in a shallow roasting pan. Roast in the preheated oven for about 25-30 minutes, or until the internal temperature reaches 130°F (54°C) for medium-rare doneness.
- Rest the Meat: Once cooked, remove the tenderloin from the oven and let it rest for 10-15 minutes. This allows the juices to redistribute throughout the meat, making it more tender and flavorful.
- Slice and Serve: Slice the tenderloin into thick medallions before serving. The rested meat will be easier to cut, and the slices will look more appealing on the plate.
Extra Tips:
To ascertain the best results, use a meat thermometer to check the internal temperature of the tenderloin, as oven temperatures can vary. If you prefer your beef cooked to a different level of doneness, adjust the cooking time accordingly.
When making the herb crust, fresh herbs are recommended for the most vibrant flavor, but dried herbs can be used in a pinch. Finally, consider serving the beef with a simple red wine reduction or a classic horseradish sauce to complement the rich flavors of the tenderloin.
Cheesy Scalloped Potatoes
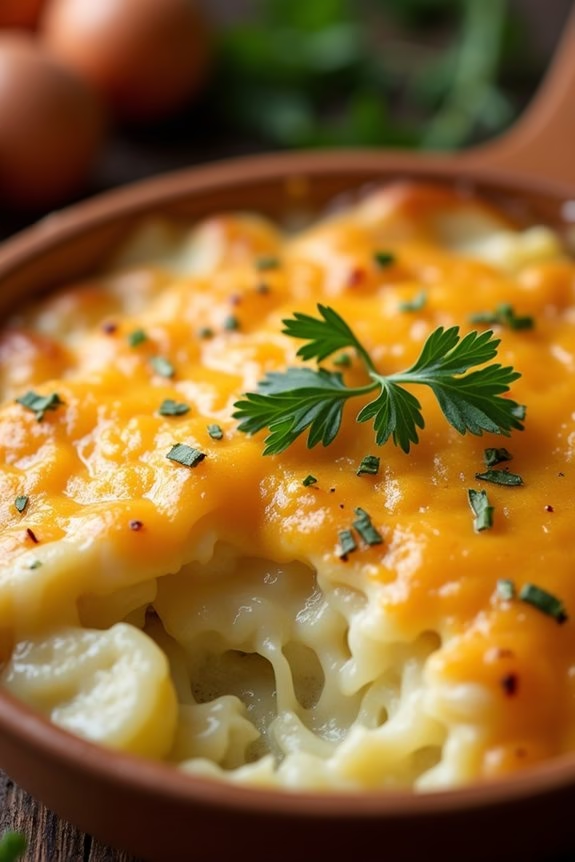
Cheesy Scalloped Potatoes are a classic, comforting side dish that perfectly complements any festive Christmas dinner. This make-ahead recipe isn’t only delicious but also convenient, allowing you more time to enjoy the holiday with loved ones.
The creamy layers of thinly sliced potatoes, smothered in a rich, cheesy sauce, make for a decadent dish that pairs well with a variety of main courses. Whether served alongside a holiday ham or a tender roast, these potatoes are sure to be a hit at your Christmas table.
Preparing this dish in advance is a game-changer for holiday gatherings. You can assemble the scalloped potatoes the day before and simply pop them into the oven when you’re ready, freeing up your time to focus on other aspects of your meal preparation.
The end result is a golden-brown, bubbling masterpiece that your family and friends will fall in love with. This recipe serves 4-6 people, providing enough for everyone to enjoy a generous helping.
Ingredients:
- 3 pounds of russet potatoes, peeled and thinly sliced
- 2 cups of shredded cheddar cheese
- 1 cup of shredded mozzarella cheese
- 2 cups of heavy cream
- 3 tablespoons of unsalted butter
- 3 cloves of garlic, minced
- 1 teaspoon of salt
- 1/2 teaspoon of black pepper
- 1/2 teaspoon of dried thyme
- 1/4 cup of grated Parmesan cheese
- 1 tablespoon of chopped fresh parsley, for garnish (optional)
Cooking Instructions:
1. Preheat the Oven: Preheat your oven to 375°F (190°C).
2. Prepare the Baking Dish****: Grease a 9×13-inch baking dish with butter to prevent sticking.
3. Slice the Potatoes: Peel and thinly slice the potatoes, aiming for about 1/8-inch thickness. Uniform slices facilitate even cooking.
4. Create the Sauce: In a medium saucepan, melt the butter over medium heat. Add the minced garlic and sauté for about 1 minute until fragrant.
Pour in the heavy cream, stirring continuously. Add in the salt, pepper, and dried thyme. Bring to a gentle simmer, then remove from heat.
5. Layer the Potatoes: Arrange a third of the sliced potatoes in an even layer at the bottom of the prepared baking dish. Pour a third of the cream mixture over the potatoes, then sprinkle a third of the cheddar and mozzarella cheeses on top.
Repeat this layering process two more times, finishing with a generous layer of cheese on top.
6. Bake the Dish: Cover the baking dish with aluminum foil and bake in the preheated oven for 45 minutes. Remove the foil and bake for an additional 25-30 minutes, or until the top is golden brown and the potatoes are tender when pierced with a fork.
7. Add the Finishing Touches: In the last 5 minutes of baking, sprinkle the grated Parmesan cheese over the top to create a crispy, cheesy crust.
Once done, remove from the oven and let it cool for 10 minutes before serving.
Extra Tips:
For a smoother preparation, you can slice the potatoes using a mandoline slicer, which will save time and facilitate even thickness.
If you prefer a sharper flavor, consider using a mix of cheeses like gruyere or gouda in addition to cheddar. Additionally, if you’re making this dish ahead of time, allow the assembled, uncooked dish to cool completely before refrigerating.
When you’re ready to bake, let it sit at room temperature for about 30 minutes to facilitate even cooking. Garnish with fresh parsley before serving for a pop of color and freshness.
Spiced Pear and Pecan Salad
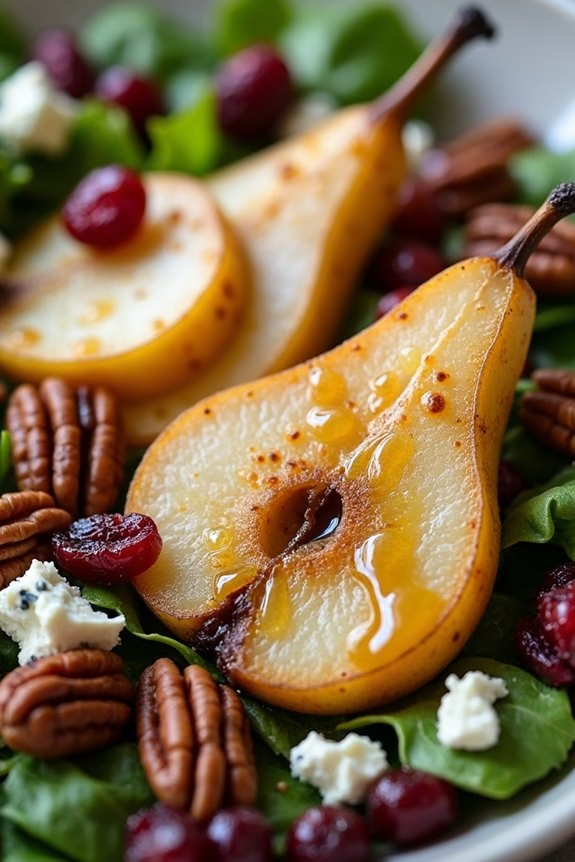
Looking for a revitalizing and festive dish to include in your make-ahead Christmas dinner menu? The Spiced Pear and Pecan Salad is a delightful combination of sweet, spiced pears, crunchy pecans, and fresh greens, drizzled with a tangy vinaigrette. This salad adds a burst of color and flavor to your holiday table, and it can be prepared in advance to save time on the big day. The combination of juicy pears and nutty pecans makes it a perfect side dish that complements any main course.
This recipe serves 4-6 people and can be easily scaled if you’re expecting more guests. The spiced pears can be made ahead of time, allowing the flavors to meld beautifully. On the day of your gathering, simply toss the salad together and serve. With its balance of textures and flavors, this salad is sure to become a holiday staple in your home.
Ingredients:
- 4 ripe pears, cored and sliced
- 1/4 cup brown sugar
- 1/2 teaspoon ground cinnamon
- 1/4 teaspoon ground nutmeg
- 1/4 teaspoon ground ginger
- 1 tablespoon unsalted butter
- 1 cup pecan halves
- 8 cups mixed salad greens (e.g., arugula, spinach, and romaine)
- 1/2 cup crumbled blue cheese
- 1/4 cup dried cranberries
Vinaigrette:
- 1/4 cup olive oil
- 2 tablespoons apple cider vinegar
- 1 tablespoon honey
- 1 teaspoon Dijon mustard
- Salt and pepper to taste
Instructions:
1. Prepare the Spiced Pears: In a large skillet, melt the butter over medium heat. Add the brown sugar, cinnamon, nutmeg, and ginger, stirring until the sugar dissolves and the spices are fragrant.
Add the sliced pears to the skillet, tossing to coat them evenly with the spiced mixture. Cook for about 5-7 minutes, stirring occasionally, until the pears are tender but not mushy. Remove from heat and let them cool completely. Store them in an airtight container in the refrigerator if preparing in advance.
2. Toast the Pecans: Preheat your oven to 350°F (175°C). Spread the pecan halves on a baking sheet and toast in the oven for 8-10 minutes, or until they’re golden and fragrant.
Let them cool completely before using. This step can also be done ahead of time and stored in a sealed container at room temperature.
3. Make the Vinaigrette: In a small bowl, whisk together the olive oil, apple cider vinegar, honey, Dijon mustard, and a pinch of salt and pepper.
Adjust the seasoning to taste. This can be made ahead and stored in the refrigerator.
4. Assemble the Salad: In a large salad bowl, combine the mixed greens, cooled spiced pears, toasted pecans, blue cheese, and dried cranberries.
Drizzle the vinaigrette over the salad and toss gently to combine, ensuring all ingredients are evenly coated.
5. Serve: Transfer the salad to a serving platter or individual plates. This salad is best served immediately after tossing, but the components can be stored separately and assembled just before serving.
Extra Tips:
When selecting pears for this salad, choose ones that are ripe but still firm enough to hold their shape when cooked. Bartlett or Anjou varieties work well.
If you’re preparing the salad in advance, keep the pears and dressing separate from the greens to prevent them from wilting. For a nut-free alternative, try substituting the pecans with sunflower seeds or pumpkin seeds.
Additionally, if blue cheese isn’t to your taste, feta or goat cheese can be excellent substitutes.
Chocolate Yule Log Cake
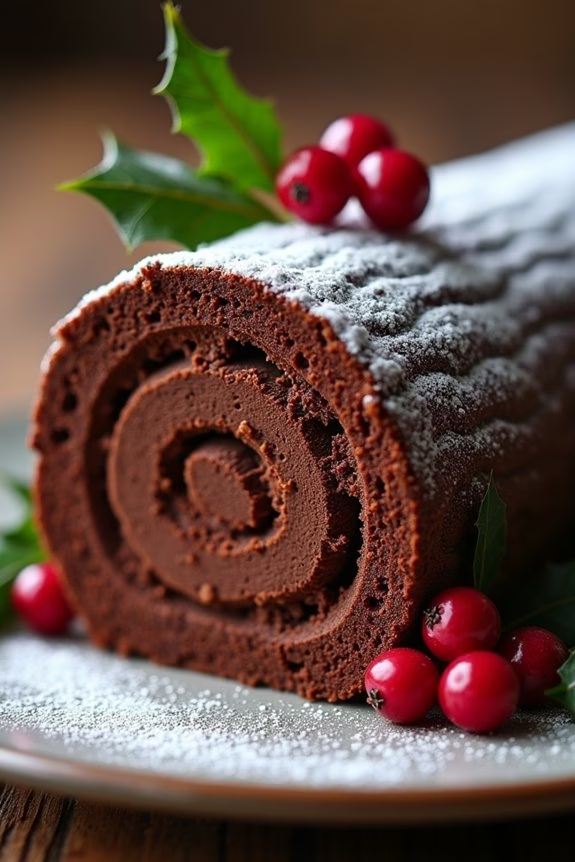
The Chocolate Yule Log Cake, or “Bûche de Noël,” is a traditional holiday dessert that’s as delightful to eat as it’s to look at. This festive cake is shaped like a log, symbolizing the Yule log that families would burn on Christmas Eve. With its rich chocolate sponge cake, creamy filling, and luscious ganache coating, this dessert is sure to impress your guests.
The beauty of this recipe is that it can be made ahead of time, allowing you more freedom to enjoy the festivities. This recipe serves 4-6 people and involves creating a rolled chocolate sponge cake filled with a delicious cream and covered with a smooth chocolate ganache. It’s then decorated to resemble a real log, often with powdered sugar to mimic snow. The cake can be made a day in advance, giving the flavors time to meld together, and guaranteeing that your Christmas dinner ends on a sweet note.
Ingredients:
- 4 large eggs
- 3/4 cup granulated sugar
- 1/3 cup all-purpose flour
- 1/3 cup unsweetened cocoa powder
- 1 teaspoon baking powder
- 1/4 teaspoon salt
- 1 teaspoon vanilla extract
- 1 cup heavy cream
- 2 tablespoons confectioners’ sugar
- 8 ounces semisweet chocolate, chopped
- 1 cup heavy cream (for ganache)
- 2 tablespoons unsalted butter
- Powdered sugar for dusting
- Fresh berries or holly for decoration (optional)
Cooking Instructions:
- Preheat the Oven: Start by preheating your oven to 350°F (175°C). Line a 15×10-inch jelly roll pan with parchment paper and lightly grease it.
- Prepare the Sponge Cake: In a mixing bowl, beat the eggs and granulated sugar together until thick and pale. This should take about 5 minutes. Sift together the flour, cocoa powder, baking powder, and salt, then gradually fold into the egg mixture. Add vanilla extract and mix gently.
- Bake the Cake: Pour the batter into the prepared pan, spreading it evenly. Bake for 12-15 minutes, or until the cake springs back when touched lightly in the center. Don’t overbake.
- Roll the Cake: While the cake is still warm, turn it out onto a clean kitchen towel dusted with powdered sugar. Carefully peel off the parchment paper. Roll the cake up with the towel, starting from the short side. Let it cool completely.
- Prepare the Filling: In a chilled bowl, whip the heavy cream with confectioners’ sugar until stiff peaks form. Gently unroll the cooled cake and spread the whipped cream over the surface. Roll the cake back up without the towel.
- Make the Ganache: Heat the heavy cream in a saucepan until it begins to simmer. Remove from heat and pour over the chopped chocolate and butter in a bowl. Let it sit for a few minutes, then stir until smooth and glossy.
- Assemble the Cake: Place the rolled cake on a serving platter. Cut a small diagonal slice from one end of the cake and attach it to the side to create a branch. Pour the ganache over the cake, spreading it evenly with a spatula.
- Decorate: Use a fork to create a bark-like texture on the ganache. Dust the cake lightly with powdered sugar to resemble snow. Decorate with fresh berries or holly if desired.
Extra Tips:
For a successful Chocolate Yule Log Cake, make certain that you don’t overbake the sponge, as it needs to be pliable for rolling. If you’re worried about cracking, roll the cake while it’s still warm but not hot.
The ganache should be thick but spreadable; if it’s too runny, let it cool a bit more before applying. Finally, feel free to get creative with decorations, adding meringue mushrooms or marzipan figures for an extra festive touch.