

When it comes to Halloween potlucks, I’m all about crafting dishes that delight both the eyes and the taste buds. Picture a table filled with spooky spider deviled eggs and mummy jalapeño poppers, each bite a fun blend of flavors. And that’s just the start. How about a witch’s brew soup that bubbles with mystery? These ghoulish goodies are sure to steal the spotlight!
Spooky Spider Deviled Eggs
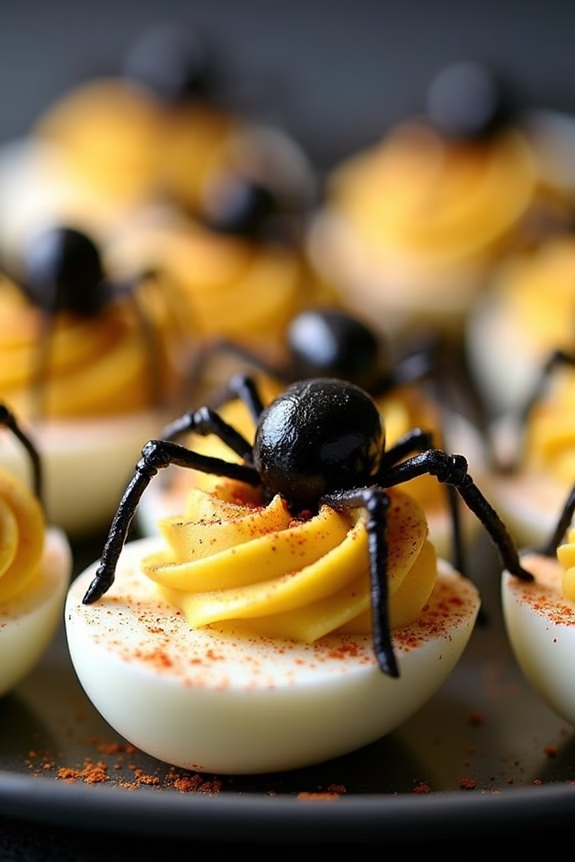
Delight your Halloween party guests with these eerie Spooky Spider Deviled Eggs. This fun and festive dish combines delicious deviled eggs with an arachnid twist, making them just the right amount of creepy for your Halloween spread.
Not only are these deviled eggs visually striking with their little olive spider toppers, but they also pack a flavorful punch with a creamy yolk filling. Whether you’re hosting a large Halloween bash or a small gathering, these deviled eggs are certain to be a hit.
The playful presentation of Spooky Spider Deviled Eggs makes them perfect for both adult parties and kid-friendly gatherings. You can prepare the filling ahead of time and assemble these spooky snacks just before your event, guaranteeing that they remain fresh and delicious.
With a serving size of 4-6 people, these eggs are easy to whip up with common kitchen ingredients and a bit of creativity. Get ready to impress your guests with this simple yet eye-catching Halloween treat.
Ingredients (serves 4-6):
- 6 large eggs
- 3 tablespoons mayonnaise
- 1 teaspoon Dijon mustard
- Salt and pepper to taste
- Paprika for garnish
- 12 black olives
Cooking Instructions:
- Boil the Eggs: Place the eggs in a medium saucepan and cover them with cold water. Bring the water to a boil over medium-high heat. Once boiling, remove from heat, cover the saucepan, and let the eggs sit for 10-12 minutes.
- Peel the Eggs: After the eggs have rested, transfer them to a bowl of ice water to cool for about 5 minutes. Once cooled, gently tap each egg on a hard surface to crack the shell, then peel carefully.
- Prepare the Filling: Cut each egg in half lengthwise and gently remove the yolks, placing them in a separate bowl. Set the egg whites aside.
- Mix the Yolks: Mash the yolks with a fork until smooth. Add mayonnaise, Dijon mustard, salt, and pepper, and mix until creamy and well combined.
- Fill the Egg Whites: Spoon or pipe the yolk mixture back into the hollow centers of the egg whites, mounding slightly.
- Create the Spiders: Take the black olives and cut them in half. Place one half on top of the yolk filling to act as the spider’s body. Slice the other half into thin strips and arrange them around the olive body to form eight spider legs.
- Garnish: Lightly sprinkle paprika over the filled eggs for added flavor and color.
- Serve: Arrange the Spooky Spider Deviled Eggs on a serving platter and refrigerate until ready to serve.
Extra Tips:
For a smoother yolk filling, use a food processor to blend the yolks with the other filling ingredients. This will guarantee a silky texture.
When cutting the olives for the spider legs, use a sharp knife for clean slices. If you want to prepare these eggs ahead of time, store the yolk mixture and egg whites separately in the refrigerator, then assemble them just before serving.
Adjust the spice level to your liking by experimenting with different types of mustard or adding a dash of hot sauce to the yolk mixture. Enjoy your spooky creation!
Mummy Jalapeño Poppers
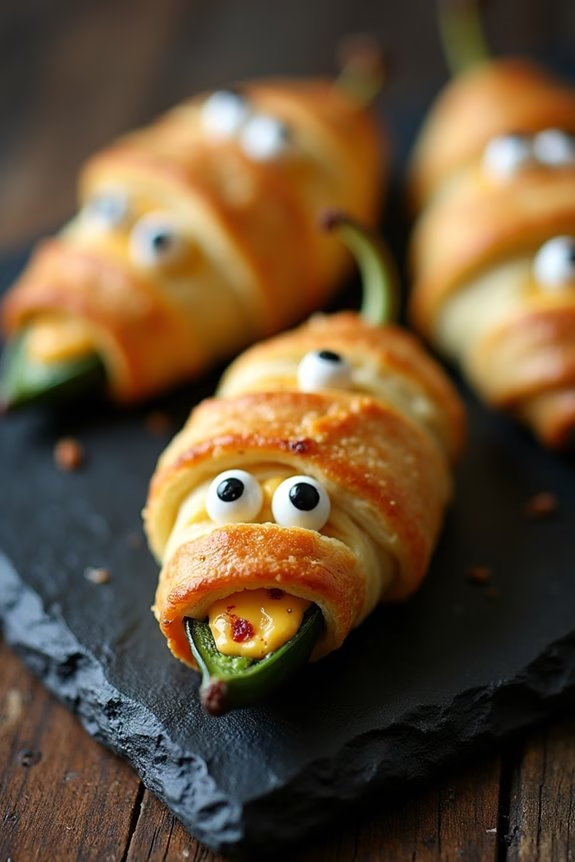
Mummy Jalapeño Poppers are a spooktacular treat perfect for your Halloween festivities. These delightful appetizers are a fun twist on the classic jalapeño poppers, featuring a creamy cheese filling wrapped in crescent roll dough to create the appearance of a mummy. Not only do they make a great addition to any Halloween party spread, but they’re also a deliciously spicy snack that’s sure to become a favorite.
The combination of the spicy jalapeño with the rich cheese and buttery pastry will have your guests coming back for more. The key to making successful Mummy Jalapeño Poppers is balancing the heat of the jalapeños with the creamy filling and ensuring the dough is wrapped just right to give the appearance of a mummy.
With a little bit of creativity and patience, you’ll have a platter full of poppers that are both a treat to the taste buds and a feast for the eyes. This recipe serves 4-6 people, making it perfect for a small gathering or as part of a larger Halloween menu.
Ingredients (serving size: 4-6 people):
- 12 large jalapeño peppers
- 8 oz cream cheese, softened
- 1 cup shredded cheddar cheese
- 1 tsp garlic powder
- 1 tsp onion powder
- 1/2 tsp smoked paprika
- Salt and pepper to taste
- 1 package crescent roll dough
- 24 small candy eyes
Cooking Instructions:
- Prepare the Jalapeños: Begin by preheating your oven to 375°F (190°C). Wash the jalapeño peppers thoroughly. Slice each pepper in half lengthwise, and remove the seeds and membranes to reduce the heat level. Be sure to wear gloves to protect your hands from the jalapeño oils.
- Make the Filling: In a medium mixing bowl, combine the softened cream cheese, shredded cheddar cheese, garlic powder, onion powder, smoked paprika, salt, and pepper. Mix until all ingredients are well incorporated and creamy.
- Fill the Jalapeños: Using a small spoon or a piping bag, fill each jalapeño half with the cheese mixture, ensuring an even amount in each.
- Wrap with Dough: Unroll the crescent roll dough and separate it into individual triangles. Cut each triangle into thin strips, about 1/4 inch wide. Wrap each filled jalapeño half with dough strips, leaving small gaps for baking expansion and placing them to resemble mummy bandages.
- Add Eyes: Gently press two candy eyes into the dough near the top of each jalapeño popper, ensuring they stick firmly.
- Bake: Place the wrapped jalapeños on a baking sheet lined with parchment paper. Bake in the preheated oven for 15-18 minutes, or until the dough is golden brown and crispy.
- Serve: Allow the Mummy Jalapeño Poppers to cool slightly before serving to avoid burning from the hot filling. Serve them warm for the best experience.
Extra Tips: When handling jalapeños, it’s essential to wear gloves to avoid skin irritation from the oils. If you prefer a milder popper, you can soak the halved jalapeños in cold water for about 30 minutes after removing the seeds and membranes. This will help reduce their heat.
Additionally, if you can’t find candy eyes, you can use small dots of cream cheese or a slice of olive as a substitute. Enjoy your Halloween-themed dish!
Witch’s Brew Soup
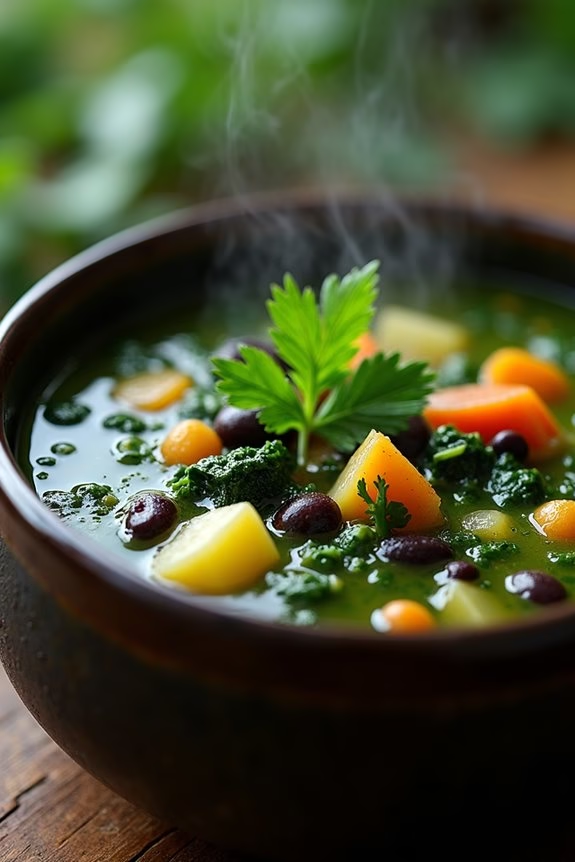
As Halloween approaches, there’s nothing quite like embracing the spooky spirit with a cauldron of Witch’s Brew Soup. This eerie yet delicious concoction is the perfect addition to any Halloween gathering or family dinner. Packed with vibrant vegetables and a hint of mystery, this soup won’t only warm you up on a chilly October evening but also delight your taste buds with its rich and hearty flavors.
With its deep green hue and a touch of smokiness, it’s sure to enchant both children and adults alike. This Witch’s Brew Soup is a versatile recipe that allows you to add your own touch of magic. Whether you’re hosting a Halloween party or simply want to enjoy a festive meal, this soup is both easy to prepare and a showstopper on the table.
The combination of nutrient-rich ingredients makes it a healthy option, while the addition of seasonings adds layers of flavor that will keep everyone coming back for more. Gather your ingredients, grab your cauldron, and let’s get brewing!
Ingredients for 4-6 servings:
- 2 tablespoons olive oil
- 1 large onion, chopped
- 3 cloves garlic, minced
- 3 cups vegetable broth
- 2 cups chopped spinach
- 1 cup chopped kale
- 2 medium potatoes, peeled and diced
- 1 cup chopped carrots
- 1 cup chopped celery
- 1 can (15 oz) black beans, drained and rinsed
- 1 teaspoon smoked paprika
- 1 teaspoon dried thyme
- Salt and pepper to taste
- 1/4 cup fresh parsley, chopped
Cooking Instructions:
- Prepare Ingredients: Begin by preparing all your vegetables. Chop the onion, mince the garlic, and dice the potatoes. Also, chop the spinach, kale, carrots, and celery so they’re ready to go.
- Sauté Aromatics: In a large pot or Dutch oven, heat the olive oil over medium heat. Add the chopped onion and sauté for about 5 minutes until it’s translucent. Stir in the minced garlic and continue to cook for another minute until fragrant.
- Build the Soup Base: Pour in the vegetable broth and bring it to a gentle simmer. Add the chopped spinach, kale, diced potatoes, carrots, and celery to the pot. Stir well to combine all ingredients.
- Season the Soup: Add the drained black beans, smoked paprika, dried thyme, salt, and pepper to the pot. Stir everything together and allow the soup to simmer gently for 20-25 minutes, or until the potatoes and carrots are tender.
- Finish and Serve: Once the vegetables are cooked, stir in the fresh parsley. Taste the soup and adjust seasoning if necessary. Serve hot, and enjoy the magical blend of flavors in your Witch’s Brew Soup.
Extra Tips:
For an extra touch of Halloween flair, consider serving the soup in hollowed-out mini pumpkins or cauldrons. This adds a whimsical presentation that will delight your guests.
If you prefer a creamier texture, you can blend a portion of the soup and mix it back into the pot. Additionally, feel free to customize the soup by adding other seasonal vegetables or even a bit of hot sauce for a spicy kick. Remember, the key is to have fun and enjoy the enchanting process of creating your own Witch’s Brew Soup!
Ghostly Pizza Bites
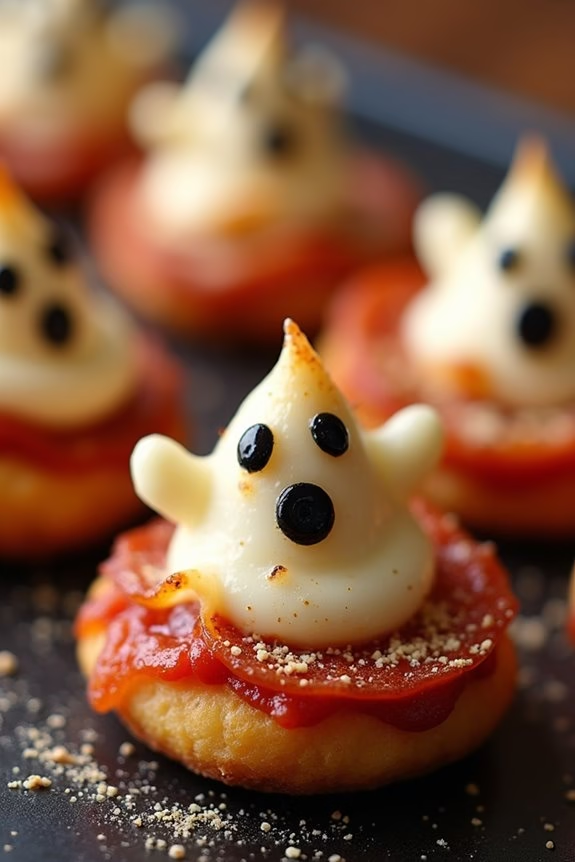
Ghostly Pizza Bites are a spooktacular treat perfect for your Halloween festivities. These mini pizzas aren’t only delicious but also fun to make, offering a delightful surprise with every bite. With a crispy crust and bubbling cheese, topped with ghostly figures, they’re sure to be a hit with both kids and adults alike. Serve them as appetizers at your Halloween party or as a fun dinner option to get everyone in the spooky spirit.
These hauntingly good pizza bites are made with simple ingredients and can be customized to suit your tastes. The ghosts are created using slices of mozzarella cheese, which melt perfectly over the savory tomato sauce and your choice of toppings. With a few easy steps, you can transform ordinary pizza into a Halloween masterpiece that will delight your guests and leave them craving more.
So gather your ingredients and prepare to start a culinary adventure that will haunt your taste buds in the best possible way.
Ingredients for Ghostly Pizza Bites (Serving Size: 4-6 people):
- 1 package of pre-made pizza dough or a 12-inch pizza crust
- 1 cup of pizza sauce
- 2 cups of shredded mozzarella cheese
- 6 slices of mozzarella cheese (for ghost shapes)
- 1/2 cup of mini pepperoni slices
- 1/4 cup of black olives (sliced)
- 1 tablespoon of olive oil
- 1 teaspoon of Italian seasoning
- 1/2 teaspoon of garlic powder
- Flour (for dusting)
Cooking Instructions:
- Preheat the Oven: Begin by preheating your oven to 425°F (220°C). This guarantees a hot baking environment for a crispy crust.
- Prepare the Dough: Lightly dust your work surface with flour and roll out the pizza dough to a thickness of about 1/4 inch. Use a round cookie cutter or a glass to cut out small circles from the dough.
- Prepare the Baking Sheet: Line a baking sheet with parchment paper and place the dough circles on it. Brush each dough circle lightly with olive oil to help it crisp up while baking.
- Add the Sauce: Spread a spoonful of pizza sauce over each dough circle, making sure you leave a small border for the crust.
- Add Cheese and Toppings: Sprinkle shredded mozzarella cheese over the sauce. Then, place mini pepperoni slices and black olive pieces as desired on each pizza bite.
- Create Ghosts: Use a small ghost-shaped cookie cutter to cut ghost shapes out of the mozzarella slices. Place one ghost shape on top of each pizza bite.
- Season and Bake: Sprinkle the pizza bites with Italian seasoning and garlic powder. Bake in the preheated oven for 8-10 minutes or until the cheese is melted and the crust is golden brown.
- Cool and Serve: Allow the pizza bites to cool slightly before serving. This will help the cheese set a bit, making them easier to handle.
Extra Tips: To make the ghost shapes stand out even more, use a straw or a toothpick to create small eyes and a mouth in the mozzarella slice before placing it on the pizza bite. If you don’t have a ghost-shaped cutter, you can use a knife to carefully cut out ghost shapes.
For added flavor, consider adding a pinch of crushed red pepper flakes or a drizzle of balsamic glaze before serving. These Ghostly Pizza Bites can be made ahead of time and reheated, making them a convenient option for party planning.
Pumpkin Patch Brownies
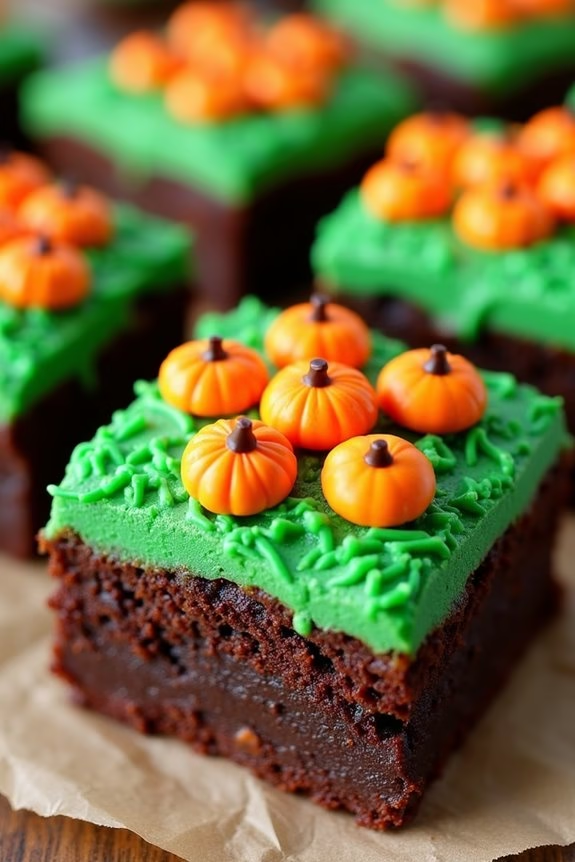
Indulge in the festive spirit of Halloween with these delightful Pumpkin Patch Brownies. These decadent treats combine the richness of chocolate with the whimsical appearance of a pumpkin patch, making them a perfect addition to any Halloween celebration. The fudgy brownies serve as the base, while the top is adorned with colorful pumpkin candies and green frosting to mimic a spooky yet fun pumpkin patch landscape.
Whether you’re hosting a Halloween party or simply enjoying the holiday with your family, these brownies are sure to be a hit.
Creating these Pumpkin Patch Brownies isn’t only a treat for the taste buds but also a fun activity for the whole family. Children will delight in decorating the brownies with colorful candies and frosting, while adults will appreciate the deep, chocolatey flavor enhanced by a hint of pumpkin spice.
The recipe is simple enough for novice bakers and can be prepared in advance, giving you more time to enjoy the festivities. Let’s explore the ingredients and steps needed to make these delicious and visually appealing brownies for a serving size of 4-6 people.
Ingredients:
- 1 cup unsalted butter
- 2 cups granulated sugar
- 4 large eggs
- 1 teaspoon vanilla extract
- 1 cup all-purpose flour
- 1/2 cup unsweetened cocoa powder
- 1/2 teaspoon baking powder
- 1/4 teaspoon salt
- 1 teaspoon pumpkin pie spice
- 1 cup semi-sweet chocolate chips
- 1 cup orange pumpkin candies
- Green frosting for decoration
Instructions:
- Preheat and Prepare: Preheat your oven to 350°F (175°C). Grease a 9×13 inch baking pan or line it with parchment paper for easy removal of the brownies.
- Mix Wet Ingredients: In a large mixing bowl, melt the unsalted butter. Once melted, stir in the granulated sugar until well combined. Add the eggs one at a time, mixing well after each addition. Stir in the vanilla extract.
- Combine Dry Ingredients: In a separate bowl, sift together the all-purpose flour, unsweetened cocoa powder, baking powder, salt, and pumpkin pie spice.
- Combine Wet and Dry Ingredients: Gradually add the dry ingredients to the wet ingredients, stirring until just combined. Be careful not to overmix. Fold in the semi-sweet chocolate chips.
- Bake the Brownies: Pour the brownie batter into the prepared baking pan, spreading it evenly. Bake in the preheated oven for 25-30 minutes, or until a toothpick inserted into the center comes out with a few moist crumbs.
- Cool and Decorate: Allow the brownies to cool completely in the pan on a wire rack. Once cooled, spread the green frosting over the top to create a grassy appearance. Decorate with orange pumpkin candies to mimic a pumpkin patch.
- Serve: Cut the brownies into squares and serve. Enjoy the delightful combination of flavors and the festive appearance.
Extra Tips:
For an extra touch of creativity, use a piping bag to add vines and leaves around the pumpkin candies with the green frosting. If you don’t have pumpkin candies, candy corn can be a great alternative for a similar festive look.
Also, feel free to adjust the amount of pumpkin pie spice according to your taste preference. These brownies can be stored in an airtight container at room temperature for up to 3 days, making them a convenient make-ahead treat for your Halloween festivities.
Vampire Blood Salsa
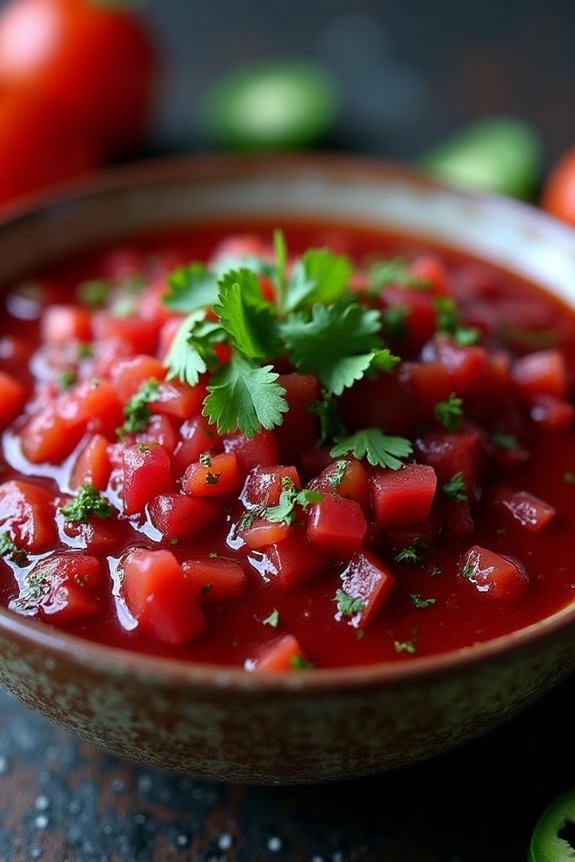
Transform your Halloween party into a fang-tastic feast with this eerie and delicious Vampire Blood Salsa. This vibrant red salsa not only looks spooky but is packed with bold flavors that will satisfy even the most discerning vampire palates. Perfect for serving with tortilla chips or as a topping for tacos, this salsa adds a festive and chilling twist to your Halloween spread.
The secret to its blood red hue is the use of ripe tomatoes and a touch of beet juice, giving it that extra gory appeal while maintaining a crisp and tangy taste. The combination of tomatoes, onions, jalapeños, and cilantro guarantees a classic salsa base, but the addition of beet juice provides an unexpected depth of flavor and color.
This salsa is easy to prepare and can be made ahead of time, allowing you to focus on other Halloween festivities. Whether you’re hosting a haunted house party or just want to add some spooky fun to your dinner table, this Vampire Blood Salsa will surely be a hit among your guests.
Ingredients (serves 4-6 people):
- 6 ripe tomatoes, finely chopped
- 1 small red onion, finely chopped
- 2 jalapeños, seeded and minced
- 2 cloves garlic, minced
- 1/4 cup fresh cilantro, chopped
- 1 tablespoon lime juice
- 1 tablespoon beet juice
- Salt and pepper to taste
Cooking Instructions:
- Prepare the Tomatoes: Start by washing and finely chopping the ripe tomatoes. Place them in a large mixing bowl. The tomatoes will form the base of your salsa, providing that crisp and juicy texture.
- Chop the Other Vegetables: Finely chop the red onion, and mince the jalapeños and garlic. Add these to the bowl with the tomatoes. The onion adds a sharp bite, while the jalapeños contribute a spicy kick; adjust the amount based on your heat preference.
- Add Fresh Herbs: Chop the cilantro and sprinkle it into the bowl. Cilantro brings a invigorating contrast to the heat of the jalapeños and the tang of the lime juice.
- Add Lime and Beet Juice: Pour in the lime juice and beet juice. The lime juice enhances the flavors and the beet juice not only adds to the blood red color but also a hint of earthiness to the salsa.
- Season and Mix: Season the salsa with salt and pepper to taste. Stir everything together thoroughly, guaranteeing that all the ingredients are well combined.
- Chill Before Serving: For the best flavor, let the salsa chill in the refrigerator for at least 30 minutes before serving. This allows the flavors to meld together beautifully.
Extra Tips:
For a smoother texture, you can pulse the ingredients in a food processor a few times. If you prefer a milder salsa, remove the seeds from the jalapeños before mincing them. Adjust the beet juice quantity carefully to achieve your desired shade of red; a little goes a long way.
Monster Mash Guacamole
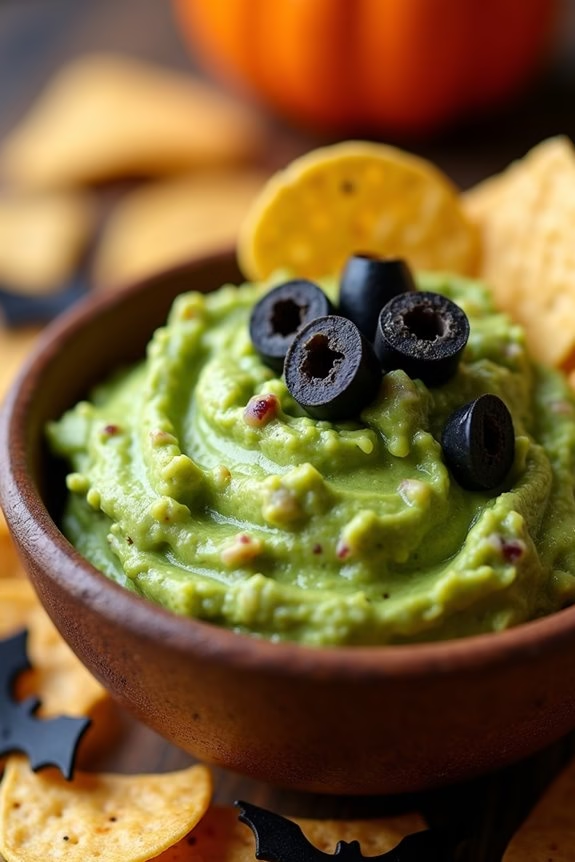
Monster Mash Guacamole is a fun and festive take on a classic dish, perfect for your Halloween party spread. This ghoulishly green guacamole is a great way to serve a healthy snack while keeping up with the spooky theme of the holiday. The creamy texture of avocados paired with a variety of fresh ingredients makes this dish both delicious and visually appealing.
Whether you’re hosting a Halloween gathering or just want to add some seasonal flair to your meals, Monster Mash Guacamole is sure to be a hit with both kids and adults alike.
The secret to the “monster” element lies in the playful presentation and the unique blend of flavors that give this guacamole its signature taste. With the addition of a few simple ingredients, you can transform ordinary guacamole into an impressive centerpiece that captures the essence of Halloween.
Follow this easy-to-make recipe to serve a batch of Monster Mash Guacamole for 4-6 people that will leave your guests howling for more.
Ingredients:
- 4 ripe avocados
- 2 medium tomatoes, diced
- 1 small red onion, finely chopped
- 1 jalapeño pepper, seeded and minced
- 2 tablespoons lime juice
- 1/4 cup fresh cilantro, chopped
- 1/2 teaspoon salt
- 1/4 teaspoon ground cumin
- 1/4 teaspoon black pepper
- 1/2 cup black olives, sliced (for decoration)
- Tortilla chips (for serving)
Instructions:
- Prepare the Avocados: Start by cutting each avocado in half, remove the pits, and scoop the flesh into a medium-sized mixing bowl. Use a fork or potato masher to mash the avocados until they reach your desired consistency, whether you like your guacamole smooth or chunky.
- Mix in Vegetables: Add the diced tomatoes, chopped red onion, and minced jalapeño to the mashed avocados. Stir gently to combine the ingredients, ensuring an even distribution throughout the mixture.
- Add Flavorings: Pour in the lime juice, chopped cilantro, salt, cumin, and black pepper. Stir well to incorporate the flavors. The lime juice not only adds a zesty taste but also helps prevent the avocados from browning.
- Decorate: To give your guacamole a monster look, arrange the black olive slices on top of the guacamole as eyes or spooky shapes. Be creative with your design to enhance the Halloween theme.
- Serve: Transfer the Monster Mash Guacamole to a serving bowl and surround it with tortilla chips for dipping. Serve immediately to maintain the freshness and vibrant color of the guacamole.
Extra Tips:
For an extra spooky touch, consider using cookie cutters to shape the tortilla chips into Halloween-themed designs like bats or pumpkins.
To keep your guacamole fresh for longer, press a piece of plastic wrap directly onto the surface of the guacamole before refrigerating. This will help reduce exposure to air, slowing down the browning process.
If you find the guacamole too spicy, you can adjust the heat by using less jalapeño or removing it entirely. Enjoy your hauntingly good Monster Mash Guacamole!
Creepy Crawly Pasta Salad
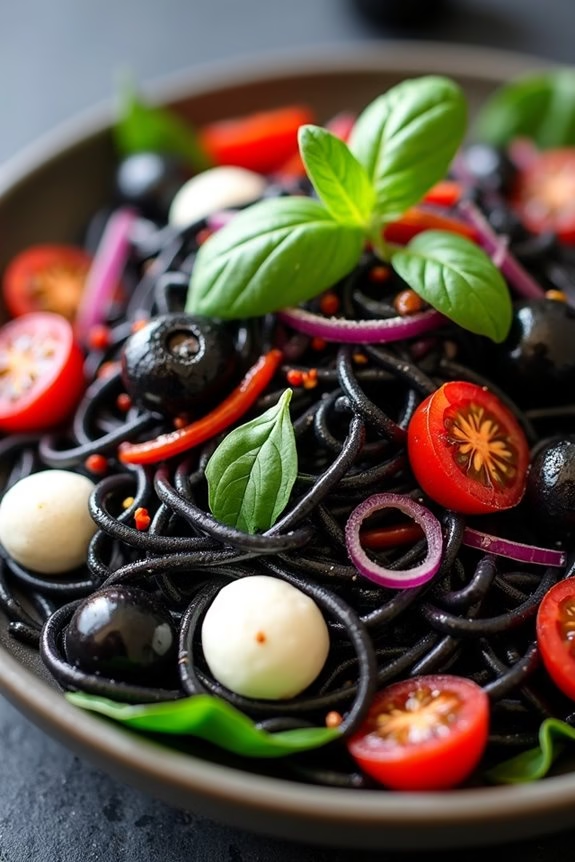
Creepy Crawly Pasta Salad is a fun and spooky dish perfect for Halloween gatherings. This pasta salad combines the eerie appearance of wriggly pasta with the deliciousness of a classic salad, making it both a treat for the eyes and the taste buds.
It’s a great way to add a festive touch to your Halloween spread, and it’s bound to be a hit with both kids and adults alike. The dish is versatile, allowing you to play around with ingredients to suit your taste preferences while keeping the creepy theme intact.
This recipe creates a serving size suitable for 4-6 people, making it ideal for a small Halloween party or family dinner. The key to achieving the creepy crawly effect lies in the choice of pasta and the addition of a few special ingredients that bring the dish to life.
By using black or squid ink pasta in combination with fun and spooky ingredients, you can create a dish that’s as delightful to look at as it’s to eat. Let’s get started on crafting this spooktacular pasta salad!
Ingredients:
- 12 oz black or squid ink pasta
- 1 cup cherry tomatoes, halved
- 1 cup black olives, pitted and sliced
- 1 cup baby spinach leaves
- 1/2 cup mozzarella balls
- 1/2 cup roasted red peppers, sliced
- 1/4 cup red onion, thinly sliced
- 1/4 cup olive oil
- 2 tablespoons balsamic vinegar
- 1 teaspoon garlic powder
- Salt and pepper to taste
- Fresh basil leaves for garnish
Instructions:
- Cook the Pasta: Begin by bringing a large pot of salted water to a boil. Add the black or squid ink pasta and cook according to the package instructions until al dente. Once cooked, drain the pasta and rinse it under cold water to stop the cooking process and set it aside.
- Prepare the Vegetables: While the pasta is cooking, prepare the vegetables. Halve the cherry tomatoes, slice the black olives, and chop the roasted red peppers and red onion. Confirm that all ingredients are bite-sized for easy mixing and eating.
- Combine Ingredients: In a large mixing bowl, combine the cooked pasta, cherry tomatoes, black olives, baby spinach, mozzarella balls, roasted red peppers, and red onion. Toss the ingredients together gently to confirm even distribution.
- Make the Dressing: In a small bowl, whisk together the olive oil, balsamic vinegar, garlic powder, salt, and pepper. Adjust the seasoning to taste.
- Dress the Salad: Pour the dressing over the pasta salad, and toss everything together until the pasta and vegetables are well-coated with the dressing.
- Chill the Salad: Cover the bowl with plastic wrap and refrigerate for at least 30 minutes to allow the flavors to meld together.
- Serve: Before serving, give the salad a final toss and garnish with fresh basil leaves. Serve chilled or at room temperature.
Extra Tips:
To enhance the Halloween theme, consider adding edible eyeballs made from sliced mozzarella balls with a black olive slice in the center for a spooky touch.
If you can’t find black or squid ink pasta, you can dye regular pasta with food-grade black food coloring during cooking. For added crunch, you can include pumpkin seeds or sunflower seeds.
Remember to adjust the seasoning as needed, especially if you make any substitutions or additions. This pasta salad can be made a day ahead, allowing the flavors to develop even further.
Jack-o’-Lantern Stuffed Peppers

Celebrate Halloween with a spooky twist on traditional stuffed peppers by creating Jack-o’-Lantern faces on orange bell peppers. These fun and festive stuffed peppers are delicious, nutritious, and perfect for a Halloween dinner party or family meal. Not only do they look the part, but they also make for a hearty meal with a scrumptious filling of seasoned ground meat, rice, and vegetables.
The Jack-o’-Lantern stuffed peppers are a creative way to enjoy a classic dish while embracing the Halloween spirit. The recipe is simple to follow, and the carved faces add a playful element that kids and adults alike will enjoy. The vibrant colors of the peppers make them an eye-catching centerpiece, and the filling can be seasoned to your taste, ensuring everyone will be satisfied.
Ingredients (serves 4-6):
- 6 large orange bell peppers
- 1 pound ground beef or turkey
- 1 cup cooked rice
- 1 medium onion, diced
- 2 cloves garlic, minced
- 1 can (14.5 ounces) diced tomatoes, drained
- 1 cup shredded mozzarella cheese
- 1 teaspoon Italian seasoning
- 1 teaspoon salt
- 1/2 teaspoon black pepper
- 1 tablespoon olive oil
Cooking Instructions:
- Prepare the Peppers: Preheat your oven to 375°F (190°C). Carefully slice the tops off the bell peppers and remove the seeds and membranes. Using a small knife, carve Jack-o’-Lantern faces into one side of each pepper.
- Cook the Filling: In a large skillet, heat olive oil over medium heat. Add the diced onion and minced garlic, sautéing until the onion becomes translucent. Add the ground beef or turkey, cooking until browned and fully cooked. Drain any excess fat.
- Combine Filling Ingredients: Stir in the cooked rice, drained diced tomatoes, Italian seasoning, salt, and black pepper. Allow the mixture to cook for an additional 5 minutes, ensuring all ingredients are well combined and heated through.
- Stuff the Peppers: Spoon the filling into each hollowed-out pepper, pressing down slightly to pack the filling tightly. Place the stuffed peppers upright in a baking dish.
- Bake and Top with Cheese: Cover the dish with aluminum foil and bake in the preheated oven for 25 minutes. Remove the foil, sprinkle the shredded mozzarella cheese over each pepper, and return to the oven for an additional 10-15 minutes, or until the cheese is melted and bubbly.
- Serve: Once the peppers are done, remove them from the oven and let them cool slightly before serving. Enjoy the festive and flavorful Jack-o’-Lantern stuffed peppers with your favorite side dish or a green salad.
Extra Tips: When carving the Jack-o’-Lantern faces, be gentle to avoid cracking the peppers. You can customize the filling by adding other vegetables such as corn or black beans, or by using different cheeses for varied flavors. If you prefer a vegetarian version, substitute the meat with a plant-based alternative or additional veggies. For added spice, mix in some chili powder or hot sauce to the filling.
Haunted Graveyard Cupcakes

Looking to add some spooky flair to your Halloween party spread? Haunted Graveyard Cupcakes are the perfect treat to tantalize both the eyes and taste buds of your guests.
These devilishly decadent cupcakes combine rich chocolate flavors with a hauntingly creative design that captures the eerie essence of a graveyard. Complete with cookie tombstones, gummy worms, and a crumbly layer of chocolate “soil,” these cupcakes promise to be the star of your dessert table.
The preparation is as enjoyable as the presentation, making this recipe a fun project for the whole family. Whether you’re an experienced baker or a beginner, these cupcakes are easy to execute while allowing room for creativity with decoration. This recipe yields 12 cupcakes, making it ideal for serving 4-6 people, depending on how hungry your ghouls and goblins are.
Ingredients:
- 1 cup all-purpose flour
- 1/2 cup unsweetened cocoa powder
- 1 teaspoon baking powder
- 1/2 teaspoon baking soda
- 1/4 teaspoon salt
- 1/2 cup unsalted butter, softened
- 1 cup granulated sugar
- 2 large eggs
- 1 teaspoon vanilla extract
- 1/2 cup buttermilk
- 1 cup chocolate frosting
- 12 chocolate sandwich cookies, crushed
- 6 oval-shaped cookies (e.g., Milano) for tombstones
- Edible writing gel (black or brown)
- Gummy worms
- Green icing or green fondant for grass
Instructions:
- Preheat the Oven: Begin by preheating your oven to 350°F (175°C). Line a 12-cup muffin tin with cupcake liners to prepare for baking.
- Mix Dry Ingredients: In a medium-sized bowl, sift together the flour, cocoa powder, baking powder, baking soda, and salt. This guarantees a smooth batter without any lumps.
- Cream Butter and Sugar: In a separate large bowl, using an electric mixer, cream the softened butter and sugar together until light and fluffy. This should take about 2-3 minutes.
- Add Eggs and Vanilla: Beat in the eggs one at a time, making sure each egg is fully incorporated before adding the next. Add the vanilla extract and mix well.
- Combine Wet and Dry Ingredients: Gradually add the dry ingredient mixture to the butter mixture, alternating with the buttermilk. Begin and end with the dry ingredients, mixing until just combined.
- Fill and Bake: Divide the batter evenly among the prepared cupcake liners, filling each about two-thirds full. Bake in the preheated oven for 18-20 minutes, or until a toothpick inserted into the center of a cupcake comes out clean.
- Cool and Decorate: Allow the cupcakes to cool completely on a wire rack. Once cooled, spread a generous amount of chocolate frosting on each cupcake.
- Create the Graveyard Scene: Press the crushed chocolate cookies onto the frosting to create the appearance of soil. Write spooky messages on the oval cookies with the edible gel, and press one into each cupcake as a tombstone. Arrange gummy worms and add green icing or fondant around the tombstone to mimic grass.
Extra Tips:
To make the decorating process even more fun, consider using different colored icing or fondant to create additional details like flowers or tiny pumpkins.
If you’re short on time, store-bought cupcakes can also be used as a base, allowing you to focus solely on the decoration. Keep in mind that the cookies may soften over time due to moisture in the frosting, so it’s best to decorate them closer to serving time.
Enjoy these creepy yet delightful treats, and have a spooktacular Halloween!