
Halloween is just around the corner, and it’s the perfect time to mix a little spooky with a lot of style. I’ve put together ten charcuterie board ideas that are sure to enchant your guests and bring a touch of elegance to your celebrations. Think Spooky Spider Web Cheese Wheels and Sinister Salami and Olive Skulls to create a bewitching spread. These boards are more than just eye candy; they’re a feast for the senses. Ready to add some flair to your Halloween soirée?
Spooky Spider Web Cheese Wheel
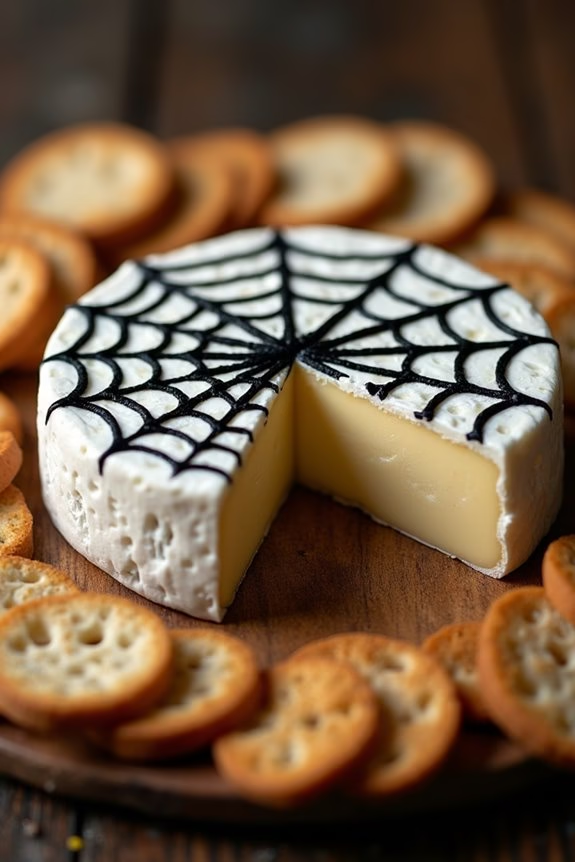
Transform your Halloween charcuterie board into a delightfully eerie centerpiece with the Spooky Spider Web Cheese Wheel. This recipe combines a creamy brie or camembert wheel with a spooky spider web design crafted from tangy cream cheese. It’s the perfect blend of taste and aesthetic, making it ideal for adult Halloween gatherings.
The spider web’s intricate design is simple to create, adding a touch of elegance and creepiness to your festive spread. The cheese wheel not only looks impressive but also offers a rich, creamy flavor that pairs well with a variety of accompaniments like crackers, fruits, and cured meats.
This dish is designed to serve 4-6 people, making it a great addition to any Halloween party. Whether you’re hosting or attending, this Spooky Spider Web Cheese Wheel is sure to captivate your guests and become a conversation starter.
Ingredients (serves 4-6 people):
- 1 wheel of brie or camembert cheese (8-10 ounces)
- 2 ounces of cream cheese, softened
- 1 tablespoon sour cream
- Black food coloring
- Crackers or bread, for serving
- Optional: plastic spider decoration
Cooking Instructions:
- Prepare the Cheese Wheel: Take the brie or camembert cheese wheel out of the refrigerator about 30 minutes before you plan to serve it. This allows it to reach room temperature, enhancing its creamy texture and flavor.
- Make the Spider Web Mixture: In a small bowl, mix the softened cream cheese with the sour cream until smooth. Add a few drops of black food coloring to the mixture and stir until the color is evenly distributed. Adjust the color to your liking with more food coloring if necessary.
- Create the Spider Web Design: Transfer the black cream cheese mixture into a piping bag or a small zip-top bag with a tiny corner snipped off. Pipe a spiral pattern starting from the center of the cheese wheel outward, leaving about half an inch between each line of the spiral.
- Draw the Web: Using a toothpick or a skewer, start from the center of the cheese wheel and gently drag it outwards through the lines of the spiral to form the web-like design. Clean the toothpick as needed to maintain clean lines.
- Garnish and Serve: If desired, place a fake plastic spider on top of the cheese wheel for an added spooky effect. Arrange crackers or slices of bread around the cheese wheel and serve immediately.
Extra Tips: When selecting your cheese, make certain it has a firm rind to help hold the design. If you don’t have a piping bag, a small plastic bag with a corner cut off works just as well.
For a more dramatic effect, you can use edible glitter or black sesame seeds to add texture to your web. Remember to remove the plastic spider before eating, and enjoy your Spooky Spider Web Cheese Wheel with a selection of your favorite Halloween-themed beverages!
Bloody Beet Hummus and Veggie Platter
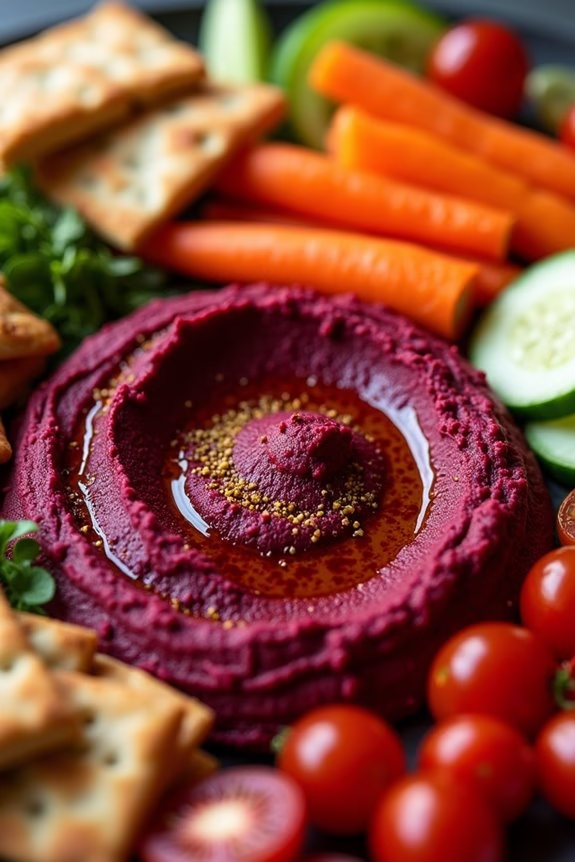
Transform your Halloween gathering into a feast for the senses with a Bloody Beet Hummus and Veggie Platter. This vibrant and spooky dish is perfect for adults looking to enjoy a festive and healthy snack. The deep red hues of the beet hummus create a blood-like effect, which is both eerie and delicious.
Paired with an array of fresh vegetables and some crunchy crackers, this platter is sure to be a hit at your Halloween celebration. Not only is this dish visually striking, but it’s also packed with nutrients. Beets are rich in antioxidants and provide a natural sweetness to the hummus, while chickpeas offer a dose of protein and fiber.
The accompanying vegetables add crunch and color, making this platter not only appealing to the eyes but also satisfying to the palate. Serve this Bloody Beet Hummus and Veggie Platter as an appetizer or a centerpiece for your Halloween charcuterie board to impress your guests.
Ingredients (serving size: 4-6 people):
- 1 medium beet, roasted and peeled
- 1 can (15 oz) chickpeas, drained and rinsed
- 2 cloves garlic
- 3 tablespoons tahini
- 2 tablespoons fresh lemon juice
- 1 tablespoon olive oil
- 1 teaspoon ground cumin
- Salt and pepper to taste
- Assorted fresh vegetables (such as carrots, cucumbers, bell peppers, and cherry tomatoes)
- Crackers or pita chips
Cooking Instructions:
- Prepare the Beet: Preheat your oven to 400°F (200°C). Wrap the beet in aluminum foil and roast it in the oven for about 45-60 minutes, or until tender. Once cooked, let it cool slightly, then peel and roughly chop it.
- Blend the Hummus: In a food processor, combine the roasted beet, chickpeas, garlic, tahini, lemon juice, olive oil, and cumin. Blend until smooth. If the mixture is too thick, add a little water to reach your desired consistency. Season with salt and pepper to taste.
- Assemble the Platter: Transfer the beet hummus to a serving bowl. Arrange the assorted fresh vegetables and crackers or pita chips around the bowl on a large platter.
- Serve and Enjoy: Garnish the hummus with a drizzle of olive oil or a sprinkle of cumin, if desired. Serve immediately, or cover and refrigerate until ready to serve.
Extra Tips:
For an even more dramatic presentation, use a Halloween-themed platter or place the hummus in a carved-out mini pumpkin. You can also add spooky elements like plastic spiders or eyeball decorations to enhance the Halloween theme.
If you want a smoother hummus, consider peeling the chickpeas before blending. This process can be a bit time-consuming, but it results in a creamier texture. Finally, feel free to experiment with different vegetables based on your preferences or what’s in season.
Ghoulishly Green Guacamole Graveyard
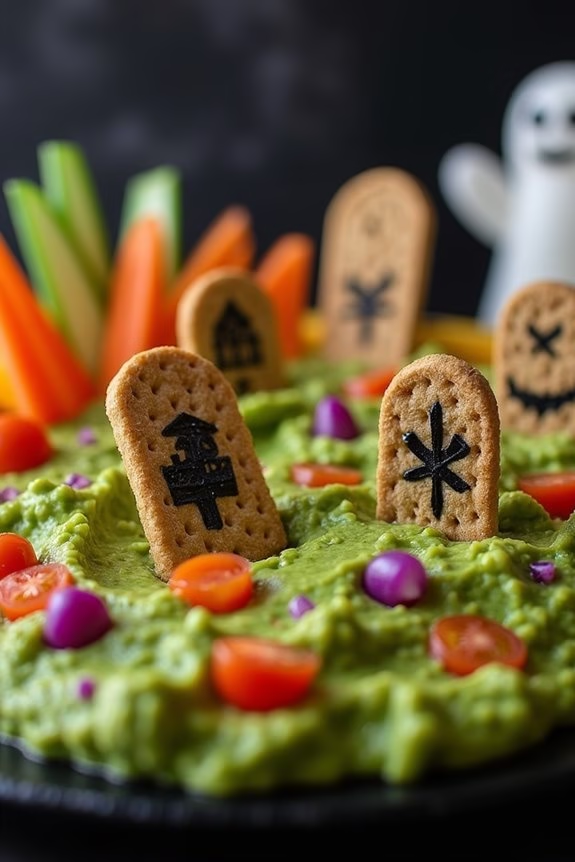
Transform your Halloween charcuterie board into a haunting masterpiece with this Ghoulishly Green Guacamole Graveyard. This spooky yet delicious recipe combines creamy guacamole with eerie elements to create a festive dip that’s perfect for adults looking to add a bit of fright to their party spread.
The vibrant green of the guacamole serves as the perfect base for crafting a graveyard scene complete with edible tombstones and ghostly garnishes. Ideal for a gathering of 4-6 people, this dish isn’t only a visual treat but also a flavorful one, blending the freshness of avocados with the zesty kick of lime and garlic.
It’s a delightful way to bring some ghoulish fun to your Halloween festivities while also satisfying the taste buds. Get ready to impress your guests with this creative and tasty addition to your holiday charcuterie board.
Ingredients (serving size: 4-6 people):
- 4 ripe avocados
- 2 limes, juiced
- 1 medium tomato, diced
- 1 small red onion, finely chopped
- 2 cloves garlic, minced
- 1 jalapeño, seeded and finely chopped
- Salt and pepper to taste
- 1/4 cup fresh cilantro, chopped
- 4-6 small tortilla chips or crackers (for tombstones)
- Black edible food marker
- Assorted vegetables (such as carrots, cucumbers, and celery) for decoration
Instructions:
- Prepare the Avocados: Cut the avocados in half, remove the pits, and scoop the flesh into a mixing bowl. Use a fork or potato masher to mash the avocados to your desired consistency, leaving some chunks for texture.
- Mix the Guacamole: Add lime juice, diced tomato, chopped red onion, minced garlic, and chopped jalapeño to the mashed avocados. Stir the mixture until all ingredients are well combined.
- Season the Guacamole: Season the guacamole with salt and pepper to taste, and gently fold in the chopped cilantro.
- Create the Tombstones: Using a black edible food marker, write spooky messages or draw simple designs on the small tortilla chips or crackers to resemble tombstones.
- Assemble the Graveyard: Spread the guacamole evenly on a serving platter or board. Insert the decorated tortilla chips or crackers into the guacamole to simulate tombstones standing upright.
- Decorate the Scene: Use assorted vegetables to create a graveyard scene around the tombstones. You can carve ghost shapes from cucumbers or use carrot sticks to mimic creepy trees.
- Serve and Enjoy: Place the Ghoulishly Green Guacamole Graveyard in the center of your Halloween charcuterie board for all to admire and enjoy.
Extra Tips: For an extra touch of spookiness, consider adding a few drops of green food coloring to the guacamole to enhance its ghoulish appearance. If you want to add more heat, include the seeds from the jalapeño or add a dash of hot sauce to the guacamole.
Remember to prepare the guacamole just before serving to maintain its vibrant color and freshness, as avocados tend to brown when exposed to air. Enjoy your frightfully delicious creation!
Witch’s Brew Brie With Cranberry Cauldron

Witch’s Brew Brie With Cranberry Cauldron is a delightful and spooky addition to any Halloween charcuterie board. This dish combines the creamy, rich flavor of baked brie with the sweet-tart zing of cranberry sauce, all presented in a cauldron-like fashion that’s both festive and delicious.
Perfect for a gathering of adults looking to enjoy a Halloween-themed snack, this recipe is sure to impress with its combination of flavors and eye-catching presentation. This dish not only serves as an exquisite appetizer but also adds a touch of elegance to your Halloween spread.
The warm, gooey brie pairs wonderfully with the tangy cranberry sauce, creating a balance of flavors that melts in your mouth. Best of all, Witch’s Brew Brie With Cranberry Cauldron is easy to prepare, making it an excellent choice for a last-minute addition to any gathering.
Let’s plunge into what you’ll need to create this spooky treat for 4-6 people.
Ingredients:
- 1 wheel of brie cheese (about 8 ounces)
- 1 cup canned whole cranberry sauce
- 1 tablespoon honey
- 1 teaspoon fresh rosemary, finely chopped
- 1/4 cup chopped pecans
- 1 sheet of puff pastry
- 1 egg (for egg wash)
- Assorted crackers or sliced baguette for serving
Cooking Instructions:
- Preheat the Oven: Begin by preheating your oven to 375°F (190°C). This guarantees that the brie and pastry will cook evenly.
- Prepare the Brie: Unwrap the brie and place it in the center of the puff pastry sheet. Trim the pastry if necessary, leaving enough to fully wrap the brie.
- Make the Cranberry Mixture: In a small bowl, mix together the cranberry sauce, honey, rosemary, and pecans until well combined. This mixture will provide a sweet, savory topping that complements the brie perfectly.
- Top the Brie: Spoon the cranberry mixture over the top of the brie, spreading it evenly.
- Wrap the Brie: Gently fold the puff pastry over the brie, making sure to seal all edges. You can use a little water to help seal the pastry if needed.
- Prepare the Egg Wash: Beat the egg in a small bowl and brush it over the pastry. This will give the pastry a golden, glossy finish when baked.
- Bake: Place the wrapped brie on a baking sheet lined with parchment paper. Bake in the preheated oven for 20-25 minutes, or until the pastry is golden brown and crispy.
- Cool and Serve: Allow the baked brie to cool for about 5 minutes before transferring it to a serving platter. Serve with assorted crackers or sliced baguette.
Extra Tips:
For the best results, use a brie wheel that’s neither too firm nor overly ripe. This will guarantee the cheese melts to the perfect consistency inside the pastry.
If you prefer a slightly different flavor profile, try substituting the pecans with walnuts, or add a pinch of cinnamon to the cranberry mixture for a hint of warmth.
To keep the puff pastry from becoming soggy, make sure the cranberry mixture isn’t too liquidy and is well-drained before topping the brie. Enjoy this festive and tasty treat as part of your Halloween celebration!
Mummified Meat and Cheese Bites

These mummified meat and cheese bites aren’t only fun to eat but also simple to prepare. With a few ingredients and some creativity, you can transform ordinary charcuterie staples into a bewitching Halloween snack.
Whether you’re hosting a Halloween bash or enjoying a cozy night in, these bites are sure to impress your guests and satisfy their taste buds. Here is a recipe to make this spooky appetizer for 4-6 people.
Ingredients:
- 1 sheet of puff pastry, thawed
- 8 slices of deli ham
- 8 slices of salami
- 1 cup of shredded cheddar cheese
- 1 cup of shredded mozzarella cheese
- 1 egg, beaten
- 16 small black olives, halved
- Flour for dusting
Instructions:
- Prepare the Baking Sheet: Preheat your oven to 400°F (200°C). Line a baking sheet with parchment paper to prevent sticking.
- Roll Out the Puff Pastry: Lightly dust a clean surface with flour. Roll out the thawed puff pastry sheet until it’s about 1/8 inch thick. Cut the sheet into 1-inch wide strips for wrapping.
- Assemble the Bites: Lay out a slice of ham and a slice of salami on a flat surface. Sprinkle a tablespoon of cheddar cheese and a tablespoon of mozzarella cheese on top of the meats. Roll the meats with the cheese into a compact cylinder.
- Wrap like a Mummy: Take a strip of puff pastry and wrap it around the meat and cheese cylinder, leaving small gaps to create a mummy-like appearance. Repeat the process for each piece.
- Add the Eyes: Place two olive halves on one end of the wrapped cylinder to create the appearance of eyes.
- Brush with Egg Wash: Place each wrapped bite on the prepared baking sheet. Brush the tops with beaten egg to give them a golden finish.
- Bake: Bake in the preheated oven for 15-20 minutes, or until the puff pastry is golden brown and crispy.
- Cool and Serve: Remove from the oven and let them cool slightly before serving. Enjoy them warm for the best flavor.
Extra Tips:
To guarantee the best results, make sure the puff pastry is fully thawed but still cold when you begin working with it, as this will make it easier to handle and wrap.
If you prefer a spicier kick, you can substitute the cheddar cheese with pepper jack cheese or add a sprinkle of crushed red pepper.
Additionally, you can prepare these bites in advance and store them in the refrigerator until you’re ready to bake them, making them a convenient option for hosting.
Frightening Fruit and Nut Medley

Halloween is the perfect time to get creative with your charcuterie boards, especially when catering to adults looking for a mix of sophistication and seasonal spookiness. The Frightening Fruit and Nut Medley is designed to captivate with its haunting presentation and tantalizing flavors. This medley combines an eerie selection of fresh fruits, dried fruits, and a variety of nuts, creating a balance of sweetness and crunch that’s certain to be a hit at any Halloween gathering.
This dish isn’t only visually striking with its dark and moody colors, but it also offers a delightful mix of textures and tastes. The combination of sweet figs, tart cranberries, and crunchy almonds, all drizzled with a touch of honey, guarantees a delicious treat that will leave your guests spellbound. Perfect for a serving size of 4-6 people, this recipe is an ideal addition to your adult Halloween charcuterie board.
Ingredients:
- 1 cup fresh blackberries
- 1 cup fresh figs, halved
- 1 cup dried apricots
- 1/2 cup dried cranberries
- 1/2 cup whole almonds
- 1/2 cup shelled pistachios
- 1/2 cup walnut halves
- 1/4 cup honey
- 1 tablespoon fresh rosemary, chopped
- 1 teaspoon sea salt
Instructions:
- Prepare the Fresh Fruits: Start by washing the blackberries thoroughly and set them aside to dry. Halve the fresh figs and arrange them attractively on a large platter or wooden board.
- Assemble the Dried Fruits and Nuts: Scatter the dried apricots and cranberries around the figs, creating a balanced look. Position the almonds, pistachios, and walnut halves among the fruits, making sure that each type of nut is evenly distributed for aesthetic appeal.
- Add the Final Touches: Drizzle the entire medley with honey to add a touch of sweetness that complements the fruit and nut flavors. Sprinkle the chopped rosemary and sea salt over the top for an aromatic and savory finish.
- Serve and Enjoy: Present your Frightening Fruit and Nut Medley at your Halloween gathering alongside other charcuterie elements, like cheeses and cured meats, if desired. Encourage guests to mix and match the ingredients for a truly delightful experience.
Extra Tips:
When selecting ingredients, choose fresh fruits that are ripe and at their peak for the best flavor and presentation.
Feel free to experiment with other dried fruits and nuts based on personal preference or availability. Adding a small selection of dark chocolate pieces can enhance the board’s visual appeal and provide an additional layer of indulgence.
Remember to keep the nuts and honey in separate sections if any guests have allergies or dietary restrictions.
Bone-Chilling Breadstick Bones

Bone-Chilling Breadstick Bones are a spooky and savory addition to any Halloween charcuterie board for adults. These eerie breadsticks not only look the part but are also deliciously crisp and flavorful, making them a perfect snack to accompany your festive spread.
The breadsticks are shaped like bones, adding a touch of whimsy and fright to your gathering, while their buttery, herbed flavor pairs perfectly with a variety of cheeses, meats, and dips.
Crafting these bone-shaped breadsticks is a fun and simple process that only requires a few ingredients and some creativity. Using pre-made pizza dough, these breadsticks can be whipped up in no time, and the addition of garlic and herbs elevates them to a new level of deliciousness.
With this recipe, you can create a serving size suitable for 4-6 people, making it ideal for small gatherings or intimate Halloween parties.
Ingredients (Serving Size: 4-6 people)
- 1 package of pre-made pizza dough
- 3 tablespoons unsalted butter, melted
- 2 cloves garlic, minced
- 1 tablespoon fresh rosemary, finely chopped
- 1 tablespoon fresh thyme, finely chopped
- 1 teaspoon sea salt
- 1 teaspoon black pepper
- 1/4 cup grated Parmesan cheese
Cooking Instructions
1. Prepare the Dough: Preheat your oven to 375°F (190°C). Roll out the pre-made pizza dough on a lightly floured surface to about 1/4-inch thickness.
Using a sharp knife or pizza cutter, cut the dough into strips approximately 8 inches long and 1 inch wide.
2. Shape the Bones: To shape each strip into a bone, make a small slit at each end of the dough strip and gently roll the ends outward to create the appearance of bone ends.
Pinch the ends to form a rounded shape resembling the knobby ends of a bone.
3. Flavor the Breadsticks: In a small bowl, combine the melted butter, minced garlic, rosemary, thyme, sea salt, and black pepper.
Brush this mixture generously over each prepared breadstick.
4. Bake the Breadsticks: Place the shaped breadsticks on a baking sheet lined with parchment paper.
Bake in the preheated oven for 15-18 minutes, or until the breadsticks are golden brown and crisp.
5. Finish with Cheese: Remove the breadsticks from the oven and immediately sprinkle the grated Parmesan cheese over them while they’re still hot, allowing the cheese to melt slightly.
6. Cool and Serve: Let the breadsticks cool on the baking sheet for a few minutes, then transfer them to a serving platter.
Serve them alongside your Halloween charcuterie board for a spooky and delicious treat.
Extra Tips
To guarantee your Bone-Chilling Breadstick Bones come out perfectly every time, make sure to not overwork the dough while shaping the bones, as this can make them tough.
If you prefer a more intense garlic flavor, consider using garlic powder in addition to the minced garlic.
For a more dramatic presentation, you can also sprinkle some black sesame seeds over the breadsticks before baking.
These breadsticks can be made a few hours ahead of time and stored in an airtight container until ready to serve, guaranteeing you have one less thing to prepare during your Halloween festivities.
Phantom Fig and Prosciutto Platter
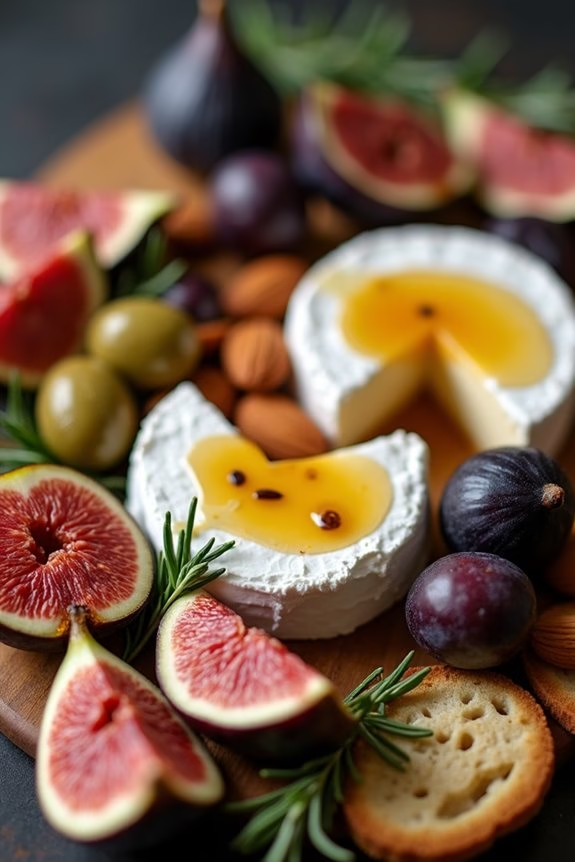
The Phantom Fig and Prosciutto Platter is a hauntingly delicious addition to your Halloween charcuterie board. This dish combines the sweet, rich flavor of fresh figs with the savory, delicate taste of prosciutto, creating a balance that’s both sophisticated and festive.
Perfect for an adult Halloween gathering, this platter isn’t only a treat for the taste buds but also a visual delight, with the deep purples and reds of the figs contrasting beautifully with the pale, translucent slices of prosciutto.
This platter is designed to serve 4-6 people, making it an ideal choice for a small get-together. The preparation is simple and requires minimal cooking, allowing you to focus on presentation and flavor combinations. The Phantom Fig and Prosciutto Platter can be assembled in just a few minutes, making it a convenient yet impressive dish to serve at your Halloween celebration.
Ingredients for 4-6 people:
- 12 fresh figs
- 12 slices of prosciutto
- 1 cup of assorted olives
- 1/2 cup of marcona almonds
- 1 small wheel of brie or camembert cheese
- 1/4 cup of honey
- 1/4 cup of balsamic reduction
- Fresh rosemary sprigs for garnish
- Crackers or sliced baguette
Cooking Instructions:
- Prepare the Figs: Wash the figs gently under cool water and pat them dry with a paper towel. Slice each fig in half lengthwise to reveal their beautiful interior.
- Wrap the Figs: Take each slice of prosciutto and wrap it around the middle of a fig half, securing it gently so that the fig is enveloped but still visible on either side.
- Assemble the Platter: On a large serving board or platter, arrange the wrapped figs in the center. Surround them with clusters of assorted olives and marcona almonds.
- Add the Cheese: Place the wheel of brie or camembert on the board, cutting a few wedges for easy serving. Drizzle the cheese with a bit of honey for added sweetness.
- Drizzle and Garnish: Drizzle the balsamic reduction over and around the figs and cheese. Garnish the platter with fresh rosemary sprigs, adding a touch of green and a fragrant aroma.
- Serve: Add crackers or slices of baguette around the edges of the platter, ensuring there’s enough for guests to pair with the figs and cheese.
Extra Tips:
To enhance the flavors, consider lightly toasting the marcona almonds in a dry skillet before adding them to the platter. This will bring out their natural oils and nutty flavor.
If you prefer a stronger cheese, swap out the brie or camembert for a blue cheese or a sharp cheddar. For an extra touch of Halloween theme, use cookie cutters to shape the cheese or bread into festive shapes like bats or ghosts.
Sinister Salami and Olive Skulls

Get ready to add a spine-chilling twist to your Halloween party with these Sinister Salami and Olive Skulls. This dish combines the rich, savory flavors of gourmet salami with the briny bite of black olives, all shaped into eerie skulls that are sure to impress your guests.
Perfect for an adult Halloween gathering, this charcuterie board centerpiece provides a unique way to serve a classic appetizer with a festive and spooky flair. The salty tang of olives pairs harmoniously with the robust taste of salami, creating a deliciously haunting treat.
This recipe is designed to serve 4-6 people and is an ideal conversation starter at any Halloween celebration. With a minimalistic approach, you can seamlessly incorporate these skulls into your charcuterie board, alongside cheeses, crackers, and additional accompaniments of your choice.
Whether you’re a seasoned charcuterie artist or a novice enthusiastic to try something new, these Sinister Salami and Olive Skulls are sure to be a hit among guests, adding a touch of dark elegance to your Halloween spread.
Ingredients:
- 24 slices of thinly sliced salami
- 12 large black olives
- 1/2 cup cream cheese
- 1 tablespoon finely chopped chives
- 1 teaspoon garlic powder
- Black pepper to taste
- Toothpicks or small skewers
Instructions:
- Prepare the Salami Slices: Lay out the salami slices on a clean surface. If they’re too thick, gently press them with a rolling pin to thin them out, making them pliable enough to shape into skulls.
- Make the Cream Cheese Filling: In a small bowl, mix the cream cheese, finely chopped chives, garlic powder, and a pinch of black pepper until well combined. This will serve as the “brain” filling for your skulls.
- Shape the Skulls: Take a slice of salami and place a small spoonful of the cream cheese mixture in the center. Fold the salami over the filling, shaping it into a rough skull shape. Use your fingers to pinch and mold the salami to create eye sockets and a jawline. Repeat with the remaining salami and filling.
- Prepare the Olive Eyes: Slice the black olives in half. Use a small knife to carve out tiny circles from the olive halves to form “eyes” for the skulls.
- Assemble the Skulls: Gently press the olive eyes into the eye sockets of each salami skull. Secure the skulls on a toothpick or small skewer to hold their shape.
- Chill Before Serving: Place the assembled skulls on a plate or tray and refrigerate for at least 30 minutes to allow the cream cheese filling to firm up.
Extra Tips:
For an added layer of flavor, consider incorporating a variety of salami types, such as spicy or herbed versions, to create a diverse flavor profile.
If you find the salami isn’t holding its shape, try chilling it slightly before shaping, as cold salami is easier to mold. You can also experiment with different fillings, such as goat cheese or herbed ricotta, to suit your taste preferences.
Remember to serve the Sinister Salami and Olive Skulls with a selection of crackers and cheeses to complete your charcuterie board.
Creepy Chocolate and Cheese Pairings
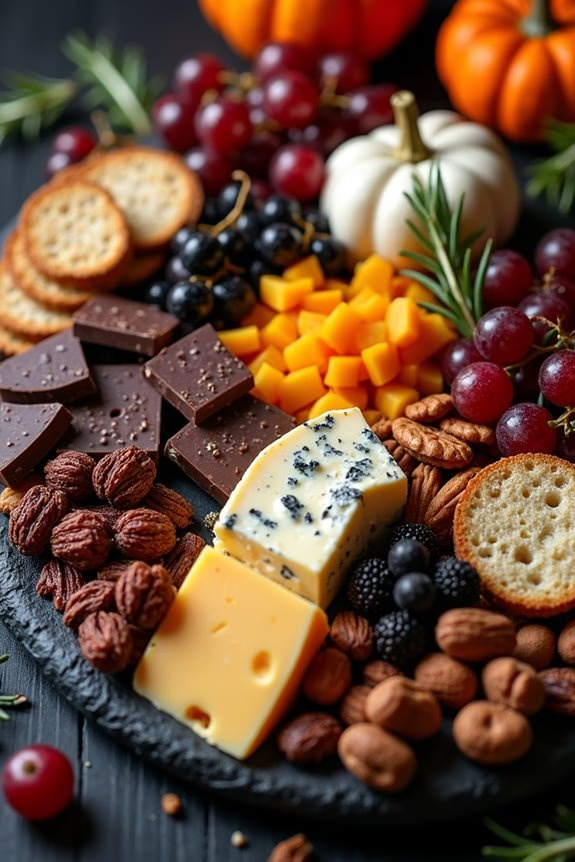
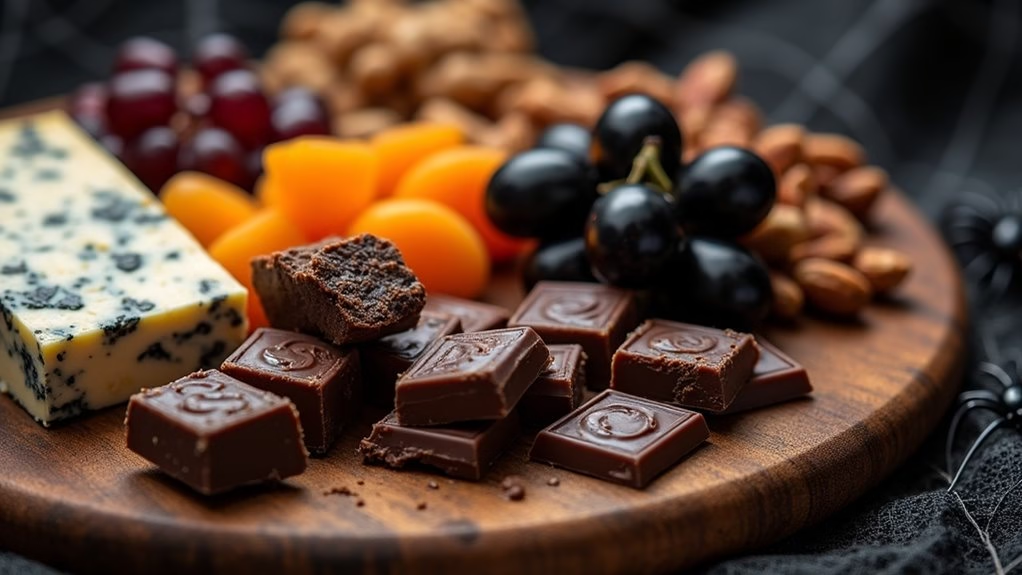
Get ready to elevate your Halloween gathering with a Spooky Chocolate and Cheese Charcuterie Board, perfect for adults who appreciate a blend of sweet, savory, and a touch of eerie elegance. This board combines the richness of dark chocolates with an array of cheeses, each paired to enhance the flavor profile of the other. From sharp cheddars to creamy blues, and dark chocolates infused with sea salt or chili, this board creates a complex and delightful tasting experience that’s both indulgent and mysterious.
To create the ultimate Halloween-themed board, focus on presentation as much as taste. Use dark, moody plates or wooden boards, and incorporate spooky elements like faux cobwebs, small pumpkins, and themed decorations. The contrasting colors of the chocolates, cheeses, and garnishes won’t only taste amazing but also look visually stunning. This Spooky Chocolate and Cheese Charcuterie Board serves 4-6 people, making it an ideal centerpiece for your Halloween party or an intimate gathering with friends.
Ingredients (Serves 4-6):
- 150g dark chocolate with sea salt
- 150g dark chocolate with chili
- 150g plain dark chocolate
- 200g aged cheddar cheese
- 200g creamy blue cheese
- 200g brie cheese
- 150g smoked gouda
- 100g dried figs
- 100g dried apricots
- 150g mixed nuts (almonds, walnuts, pecans)
- 1 small bunch of black grapes
- 1 small bunch of red grapes
- 1 baguette, sliced
- Assorted crackers
- Honey for drizzling (optional)
- Fresh rosemary for garnish
Cooking Instructions:
- Prepare the Board: Start by selecting a large serving board or platter. Arrange the cheeses evenly across the board, making sure there’s enough space between each to add the chocolates and other accompaniments.
- Slice and Arrange Cheeses: Cut the aged cheddar and gouda into bite-sized cubes. Slice the brie into wedges. Crumble the blue cheese into chunks. Place each type of cheese in separate sections of the board.
- Prepare Chocolates: Break the dark chocolates into small, manageable pieces. Group the chocolates near their complementary cheeses; for example, place the dark chocolate with chili next to the creamy blue cheese for a bold pairing.
- Add Fruits and Nuts: Scatter dried figs and apricots around the cheeses. Place clusters of black and red grapes in the corners of the board for a pop of color. Sprinkle mixed nuts throughout the board for added texture.
- Add Bread and Crackers: Arrange slices of baguette and assorted crackers along the edges of the board. This guarantees easy access for guests to pair with cheeses and chocolates.
- Garnish and Final Touches: Drizzle honey over the brie cheese for an added layer of sweetness. Use fresh rosemary sprigs to garnish the board, adding a touch of greenery and depth.
Extra Tips:
When crafting your Spooky Chocolate and Cheese Charcuterie Board, consider the pairings and flavors that complement each other. For instance, the sea salt in dark chocolate can enhance the nuttiness of smoked gouda, while chili-infused chocolate pairs well with the tanginess of blue cheese.
Be mindful of the board’s balance; offer a variety of textures and flavor profiles to cater to different palates. Finally, don’t forget the visual element—use Halloween-themed decorations like small plastic spiders or bats for an added spooky touch that will delight your guests.