
Oh, Halloween is such a delightful time for getting creative in the kitchen, isn’t it? 🎃 There’s just something so magical about crafting spooky appetizers that charm every guest. Picture a table sprinkled with Witch’s Broomstick Pretzels and Ghostly Cheese Puffs. Each one is an enchanting little masterpiece. Ready to discover the rest of my ghoulishly fun treats?
Witch’s Broomstick Pretzels
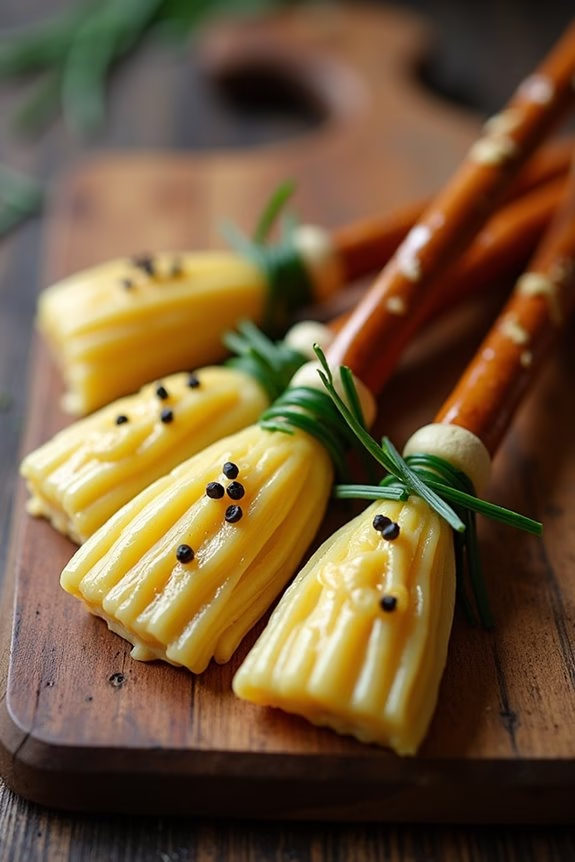
Witch’s Broomstick Pretzels are a fun and festive appetizer perfect for your Halloween celebration. These charming snacks not only capture the spooky spirit of the holiday but are also incredibly easy to make. With their broomstick-like appearance, they’re sure to be a hit among guests of all ages.
Whether you’re hosting a Halloween party or simply want to make a themed treat for your family, Witch’s Broomstick Pretzels will add a touch of magic to your spread.
To create these whimsical treats, you’ll need just a few basic ingredients to transform ordinary pretzel sticks and cheese into delightful broomsticks. The combination of salty pretzels and creamy cheese is always a crowd-pleaser, making this appetizer the perfect choice for your Halloween festivities.
With minimal preparation and no cooking required, you’ll be able to whip up these snacks in no time, leaving you more time to enjoy the festivities.
Ingredients (Serving Size: 4-6 people):
- 24 pretzel sticks
- 12 string cheese sticks
- 24 fresh chive strands
Cooking Instructions:
- Prepare the Cheese: Unwrap each string cheese stick and cut them in half crosswise. This will give you 24 pieces of cheese.
- Create the Broom Bristles: Take each piece of string cheese and carefully pull apart the cheese from one end, stopping about halfway down. This will create the appearance of broom bristles.
- Assemble the Broomsticks: Insert one end of a pretzel stick into the unshredded end of the cheese piece, pushing gently so the cheese holds onto the pretzel stick securely.
- Secure with Chives: Take a strand of chive and wrap it around the top of the cheese, where the cheese and pretzel meet, to secure the cheese in place. Tie a small knot or simply tuck in the ends to hold it firmly.
- Repeat: Continue these steps until all pretzels and cheese pieces have been assembled into broomsticks.
- Serve: Arrange the Witch’s Broomstick Pretzels on a serving platter and enjoy immediately or cover and store in the refrigerator until ready to serve.
Extra Tips:
For best results, use fresh string cheese that’s easy to pull apart, as this will make creating the broom bristles simpler. If the cheese starts to get too soft, chill it in the refrigerator for a few minutes to firm it up again.
To add a touch of color and flavor, consider using flavored string cheese. Additionally, if you find chives difficult to work with, you can substitute them with thin strips of green onion.
Remember to serve these delightful snacks on the day of preparation for peak freshness and appeal.
Ghostly Cheese Puffs
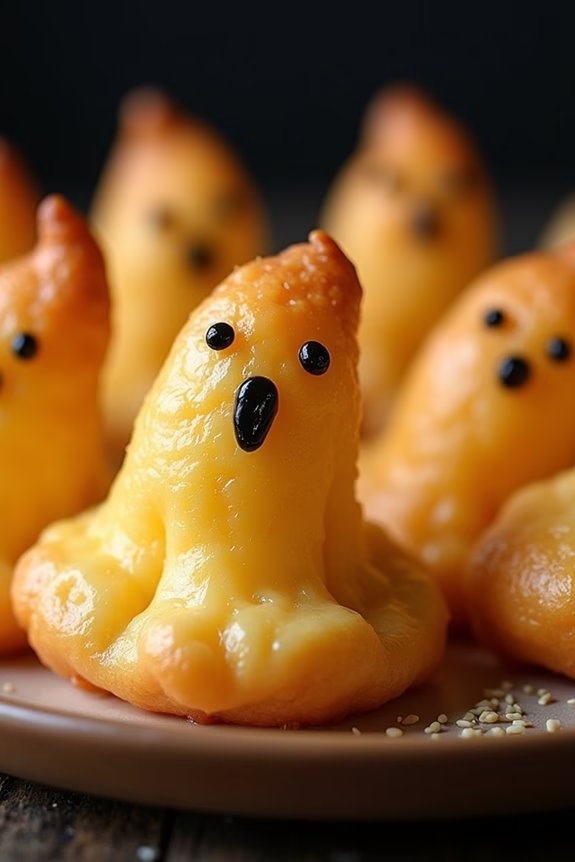
Ghostly Cheese Puffs are the perfect spooky treat to serve at your Halloween gathering. These enchanting appetizers aren’t only delicious but also add a touch of whimsy to your party spread. With their light, airy texture and cheesy goodness, they’re sure to be a hit with both kids and adults alike.
The ghostly theme is achieved with a few simple techniques to transform ordinary cheese puffs into little specters that will haunt your snack table in the most delightful way.
Creating Ghostly Cheese Puffs involves crafting a simple choux pastry, a classic French dough known for its versatility and lightness. The dough is then infused with cheese and shaped into cute ghostly forms before being baked to golden perfection. The result is a batch of hauntingly tasty treats that are crisp on the outside and soft on the inside, with a rich, cheesy flavor.
Follow the steps below to make a serving size perfect for 4-6 people.
Ingredients:
- 1 cup water
- 1/2 cup unsalted butter
- 1/2 teaspoon salt
- 1 cup all-purpose flour
- 4 large eggs
- 1 cup shredded cheddar cheese
- 1/4 cup grated Parmesan cheese
- 1/4 teaspoon ground black pepper
- Black sesame seeds (for eyes)
Instructions:
- Preheat the Oven: Start by preheating your oven to 425°F (220°C). Line two baking sheets with parchment paper to prevent the puffs from sticking.
- Prepare the Dough: In a medium saucepan, combine the water, butter, and salt. Bring the mixture to a boil over medium heat. Once boiling, remove from heat and immediately add the flour all at once, stirring vigorously with a wooden spoon until the mixture forms a ball and pulls away from the sides of the pan.
- Incorporate the Eggs: Allow the dough to cool slightly for 2-3 minutes. Then, add the eggs one at a time, mixing well after each addition. The dough should be smooth and glossy. Stir in the cheddar cheese, Parmesan cheese, and black pepper until evenly incorporated.
- Shape the Ghosts: Transfer the dough to a piping bag fitted with a large round tip. Pipe small mounds onto the prepared baking sheets, spacing them about 2 inches apart. To create ghostly shapes, use a damp finger to smooth and shape the tops into peaks.
- Add the Eyes: Press two black sesame seeds into each puff to form the ghost’s eyes.
- Bake: Place the baking sheets in the preheated oven and bake for 10 minutes. Then, lower the temperature to 375°F (190°C) and continue baking for another 20-25 minutes, or until the puffs are golden brown and firm to the touch.
- Cool and Serve: Remove the cheese puffs from the oven and let them cool slightly on a wire rack before serving. Enjoy these ghostly goodies warm for the best flavor and texture.
Extra Tips:
When making Ghostly Cheese Puffs, it’s important to guarantee your dough is smooth and glossy before piping, as this will help achieve the perfect rise and texture.
If you don’t have a piping bag, you can use a ziplock bag with a corner snipped off as an alternative. Be sure not to open the oven door during the first 10 minutes of baking, as this could cause the puffs to deflate.
For an extra spooky touch, consider serving the puffs with a side of marinara “bloody” sauce for dipping.
Mummy Jalapeño Poppers

Mummy Jalapeño Poppers are a spooky and delicious appetizer perfect for Halloween gatherings. These little bites are a creative twist on the traditional jalapeño poppers, wrapped in a crispy crescent roll to resemble a mummy’s bandages. With a creamy cheese filling and just the right amount of spice, they’re guaranteed to be a hit at any Halloween party. The combination of gooey cheese and spicy jalapeños wrapped in flaky pastry makes them irresistible.
These poppers aren’t only fun to make but also simple, requiring just a handful of ingredients. They can be prepared ahead of time and baked right before serving, making them a convenient option for entertaining. Whether you’re hosting a Halloween party or just looking to add some festive flair to your meal, Mummy Jalapeño Poppers are a must-try. This recipe serves 4-6 people, making it perfect for a small gathering.
Ingredients:
- 10-12 large jalapeño peppers
- 8 oz cream cheese, softened
- 1 cup shredded cheddar cheese
- 1/2 teaspoon garlic powder
- 1/2 teaspoon onion powder
- 1/4 teaspoon smoked paprika
- Salt and pepper to taste
- 1 can crescent roll dough
- 1 egg, beaten
- Candy eyeballs for decoration (optional)
Instructions:
- Prepare the Jalapeños: Preheat your oven to 375°F (190°C). Carefully slice each jalapeño in half lengthwise and remove the seeds and membranes using a small spoon. This will create a cavity for the filling.
- Make the Filling: In a medium-sized bowl, combine the softened cream cheese, shredded cheddar cheese, garlic powder, onion powder, smoked paprika, salt, and pepper. Mix until smooth and evenly combined.
- Stuff the Jalapeños: Spoon the cheese mixture into each jalapeño half, filling them generously but making sure the filling doesn’t overflow.
- Wrap with Dough: Unroll the crescent roll dough and cut it into thin strips. Wrap each stuffed jalapeño with the dough strips, leaving small gaps to resemble mummy bandages. Confirm the ends of the dough are secured.
- Add Egg Wash: Place the wrapped jalapeños on a baking sheet lined with parchment paper. Brush each with the beaten egg to help them brown evenly during baking.
- Bake: Bake in the preheated oven for 15-20 minutes, or until the dough is golden brown and the cheese is bubbly.
- Decorate: Let the poppers cool slightly before adding candy eyeballs to the top of each jalapeño to complete the mummy look.
Extra Tips: When handling jalapeños, it’s recommended to wear gloves to avoid skin irritation from the peppers’ oils. If you prefer less heat, feel free to substitute with mini sweet peppers. For a different flavor profile, try adding cooked bacon bits or chives to the cheese filling.
These poppers can be made a day ahead and stored in the refrigerator; just reheat them in the oven before serving for maximum crispiness.
Monster Eyeball Deviled Eggs

Monster Eyeball Deviled Eggs are a spooky and delicious addition to your Halloween appetizer spread. These creepy yet tasty treats are perfect for setting the eerie mood at your Halloween gathering, while also providing a savory and enjoyable snack for guests of all ages.
The classic deviled egg is given a ghoulish twist, transforming into eerie eyeballs that are both visually striking and deliciously satisfying. These devilish delights are easy to prepare and require only a few ingredients that are likely already in your pantry.
The recipe involves hard-boiled eggs, a flavorful filling, and some clever garnishes to create the eye-popping effect. Whether you’re hosting a Halloween party or simply want to surprise your family with a festive snack, Monster Eyeball Deviled Eggs are certain to be a hit.
Ingredients (Serving Size: 4-6 people):
- 6 large eggs
- 1/4 cup mayonnaise
- 1 tablespoon Dijon mustard
- Salt and pepper to taste
- Green and red food coloring
- 12 black olives, pitted and halved
- 1-2 tablespoons ketchup
Instructions:
1. Boil the Eggs: Place the eggs in a saucepan and cover them with water. Bring the water to a boil over medium-high heat. Once boiling, remove the pan from the heat, cover it, and let the eggs sit for about 10-12 minutes.
Afterward, transfer the eggs to a bowl of ice water to cool.
2. Prepare the Eggs: Once cooled, peel the eggs and slice them in half lengthwise. Carefully remove the yolks and place them in a separate bowl. Arrange the egg white halves on a serving platter.
3. Make the Filling: Mash the egg yolks with a fork until smooth. Add mayonnaise, Dijon mustard, and a pinch of salt and pepper. Mix until the filling is creamy and well combined.
4. Color the Filling: Divide the yolk mixture into two bowls. Add a few drops of green food coloring to one bowl and mix until the color is evenly distributed. Repeat with red food coloring in the other bowl.
5. Fill the Eggs: Spoon the colored yolk mixtures into the egg white halves. You can use a piping bag for a more polished look.
6. Create the Eyeballs: Place an olive half, cut side down, on top of each filled egg to make the pupil. Use a toothpick to draw squiggly lines of ketchup from the olive to the edges of the yolk filling, creating a bloodshot effect.
7. Chill and Serve: Refrigerate the eggs for at least 30 minutes before serving to allow the flavors to meld and the colors to set.
Extra Tips:
When creating your Monster Eyeball Deviled Eggs, consider experimenting with different fillings to suit your taste preferences. You can add herbs, spices, or even a touch of hot sauce for an extra kick.
For a more pronounced eyeball effect, try using different colored olives or edible food gel for the pupils. Additionally, if you don’t have food coloring, beet juice can be a natural alternative for coloring the yolk filling.
These little adjustments can add a unique twist to your dish and guarantee your Halloween appetizers are a memorable hit.
Spooky Spider Crackers
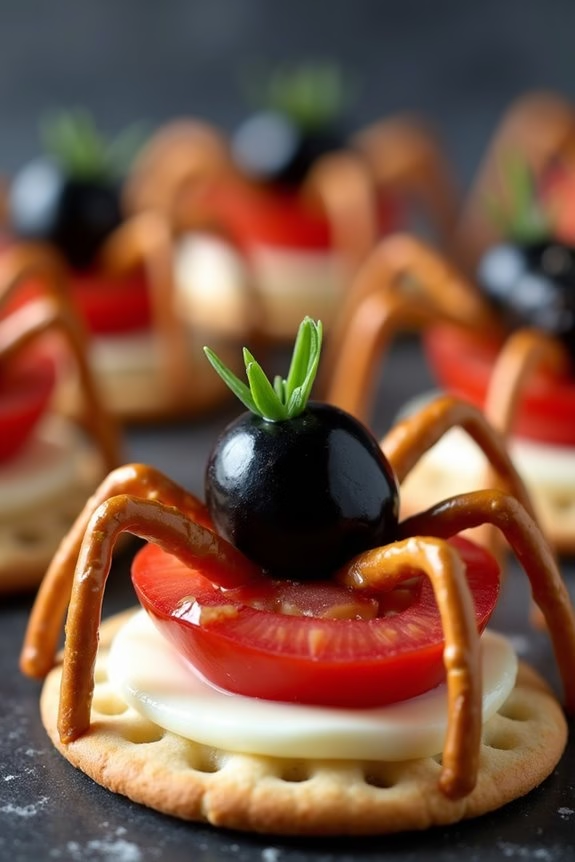
Spooky Spider Crackers are the perfect Halloween appetizer to delight and frighten your guests. These eerie, edible arachnids aren’t only visually striking, but they also pack a delicious punch. Made with crisp crackers, creamy cheese, and savory olives, these little spiders are easy to assemble and make for a great addition to any Halloween spread.
Whether you’re hosting a party or just looking for a fun treat to enjoy at home, these Spooky Spider Crackers are bound to be a hit with both kids and adults. Gather your ingredients and let your creativity run wild as you assemble these creepy crawlers. The process is simple and fun, making it a great activity to involve the whole family in.
Just follow the instructions below to create these delightful Halloween appetizers that are as tasty as they’re terrifying. Perfect for a serving size of 4-6 people, this recipe guarantees that everyone gets their fill of this spooky snack.
Ingredients:
- 24 round crackers
- 1 cup cream cheese, softened
- 12 black olives, pitted and halved
- 48 pretzel sticks
- 24 small cherry tomatoes, halved
- 24 small pieces of chives (for garnish)
Instructions:
- Prepare the Base: Lay out the round crackers on a large serving platter. These will be the base of your spider bodies.
- Create the Spider Body: Use a butter knife to spread a generous layer of cream cheese on each cracker. This will help secure the other ingredients and add a creamy texture.
- Add the Spider’s Head: Place a halved black olive on one side of each cracker to form the spider’s head. Position it so that the rounded side faces up.
- Attach the Legs: Insert four pretzel sticks on each side of the cracker into the cream cheese, making sure they’re evenly spaced. These will act as the spider’s legs. Press gently to secure them in place.
- Finish with Eyes and Garnish: Place two cherry tomato halves on top of each olive half to create the spider’s eyes. Optionally, add a small piece of chive on each tomato half for an extra eerie touch.
- Serve and Enjoy: Once all the spiders are assembled, serve immediately on the platter. Encourage guests to admire and then devour these spooky creations.
For extra tips, consider using a piping bag for the cream cheese if you want more precision and a neater finish. If you prefer a different flavor, you can substitute the cream cheese with a flavored spread or dip.
Be sure to handle the pretzel sticks carefully to avoid breaking them while inserting them into the cream cheese. These Spooky Spider Crackers are best served fresh, so try to assemble them shortly before your guests arrive to confirm they remain crisp and delicious.
Pumpkin Patch Hummus Cups
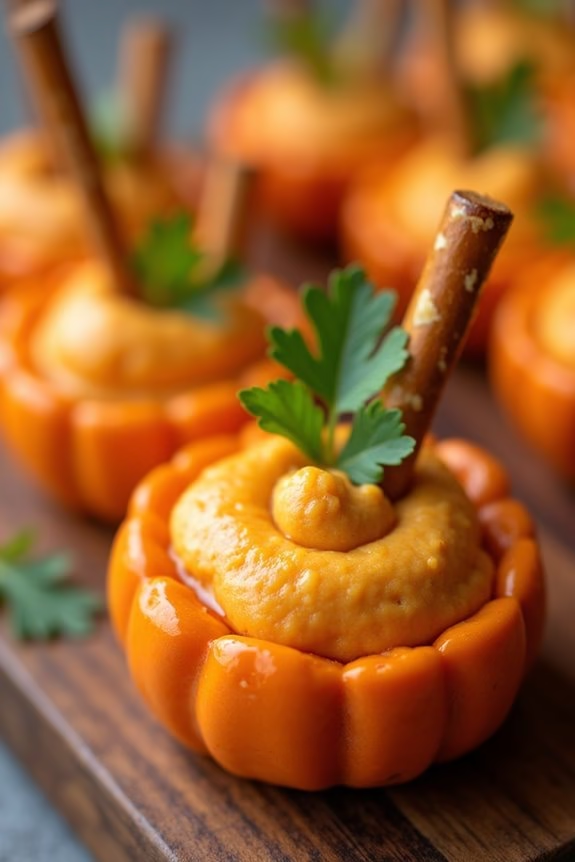
Pumpkin Patch Hummus Cups are a delightful and festive appetizer perfect for any Halloween gathering. These cute and delicious bites combine the creamy texture of hummus with the savory crunch of vegetables, all presented in a charming pumpkin patch theme.
Whether you’re hosting a spooky party or simply looking for a fun way to enjoy an autumn snack, these hummus cups will surely impress your guests with their creative presentation and delightful flavors.
The base of these cups is a classic hummus, blended to perfection with the rich taste of pumpkin puree, adding a seasonal twist. The hummus is then piped into individual cups, topped with pretzel sticks to mimic pumpkin stems, and garnished with fresh herbs to represent vines.
Not only are these appetizers visually appealing, but they’re also packed with nutrients, making them a wholesome choice for your Halloween spread.
Ingredients (serving size: 4-6 people)
- 1 can (15 oz) chickpeas, drained and rinsed
- 1/2 cup pumpkin puree
- 2 tablespoons tahini
- 2 tablespoons lemon juice
- 2 cloves garlic, minced
- 1 teaspoon ground cumin
- Salt and pepper to taste
- 1/4 cup olive oil
- 24 mini pretzel sticks
- Fresh parsley or cilantro for garnish
- 24 small round cups or mini muffin liners
Instructions
- Prepare the Hummus Base: In a food processor, combine the chickpeas, pumpkin puree, tahini, lemon juice, garlic, cumin, salt, and pepper. Blend until smooth and creamy, scraping down the sides as needed.
- Add Olive Oil: With the food processor running, slowly drizzle in the olive oil until the mixture is well combined and has reached your desired consistency. Taste and adjust seasoning if necessary.
- Assemble the Cups: Spoon the hummus mixture into a piping bag or a plastic bag with a corner snipped off. Pipe the hummus into the mini cups or muffin liners, filling each one about three-quarters full.
- Create the Pumpkin Patch: Insert a pretzel stick into the center of each hummus-filled cup to act as the pumpkin’s stem. Add a small sprig of parsley or cilantro beside each pretzel stick to mimic leaves or vines.
- Serve and Enjoy: Arrange the filled cups on a serving platter, creating a pumpkin patch effect. Serve immediately, or cover and refrigerate until ready to serve.
Extra Tips
When making Pumpkin Patch Hummus Cups, it’s important to guarantee the hummus isn’t too thin, as it needs to hold its shape in the cups. If your hummus seems too runny, you can add more chickpeas or a tablespoon of tahini to thicken it up.
Additionally, feel free to experiment with different herbs for garnishing; mint or dill can be a nice alternative. If you want to add an extra kick, consider incorporating a pinch of smoked paprika or cayenne pepper into the hummus mixture.
This dish not only adds a festive touch to your Halloween table but also offers a healthy, crowd-pleasing option.
Bloody Mary Shrimp Shooters
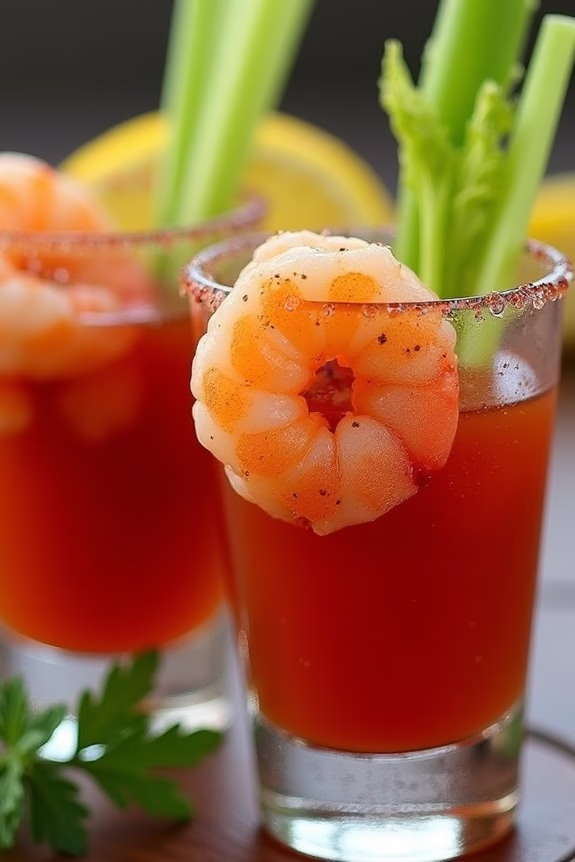
Bloody Mary Shrimp Shooters are a perfect way to add a spooky yet sophisticated touch to your Halloween appetizer menu. This dish combines the classic flavors of a Bloody Mary cocktail with fresh, succulent shrimp, creating a savory bite-sized treat that’s both visually striking and delicious.
With a blend of tomato juice, spices, and vodka, each shooter is a burst of flavor, complemented by the tender poached shrimp perched on the rim of each glass. These shooters aren’t only flavorful but also fun and easy to assemble, making them a hit at any Halloween gathering.
The combination of spicy, tangy, and savory flavors is sure to delight your guests, while the striking presentation adds a festive flair. These appetizers serve 4-6 people, making them an ideal choice for intimate gatherings or as part of a larger spread of Halloween-themed dishes.
Ingredients:
- 1 pound large shrimp, peeled and deveined
- 1 tablespoon olive oil
- Salt and pepper, to taste
- 1 cup tomato juice
- 1/4 cup vodka
- 2 tablespoons fresh lemon juice
- 1 tablespoon Worcestershire sauce
- 1 teaspoon hot sauce (such as Tabasco)
- 1 teaspoon horseradish
- 1/2 teaspoon celery salt
- 1/2 teaspoon smoked paprika
- 1/4 teaspoon ground black pepper
- Celery stalks, cut into small sticks, for garnish
- Lemon wedges, for garnish
- Fresh parsley, for garnish
- Small shooter glasses
Cooking Instructions:
- Prepare the Shrimp: In a large skillet, heat the olive oil over medium heat. Season the shrimp with a pinch of salt and pepper. Add the shrimp to the skillet and cook for 2-3 minutes on each side, or until they turn pink and opaque. Remove the shrimp from the skillet and set aside to cool.
- Make the Bloody Mary Mixture: In a large mixing bowl, combine the tomato juice, vodka, lemon juice, Worcestershire sauce, hot sauce, horseradish, celery salt, smoked paprika, and black pepper. Stir the mixture until all the ingredients are well blended.
- Assemble the Shooters: Pour the Bloody Mary mixture into small shooter glasses, filling each one about three-quarters full. Carefully place a cooled shrimp on the rim of each glass.
- Add Garnishes: Insert a celery stick into each glass for garnish. Add a lemon wedge and a sprig of fresh parsley to each shooter for an extra touch of flavor and color.
- Chill and Serve: Place the shrimp shooters in the refrigerator to chill for at least 30 minutes before serving to allow the flavors to meld together. Serve cold for the best taste experience.
Extra Tips:
For an extra kick, you can adjust the amount of hot sauce and horseradish based on your spice preference. If you prefer a non-alcoholic version, simply omit the vodka and add an extra tablespoon of lemon juice for added tanginess.
To guarantee the shrimp are perfectly tender and not overcooked, watch them closely as they cook and remove them from heat as soon as they’re opaque. Additionally, pre-chilling the tomato juice mixture before assembling can guarantee a cool shooter when served.
Vampire Bat Wings
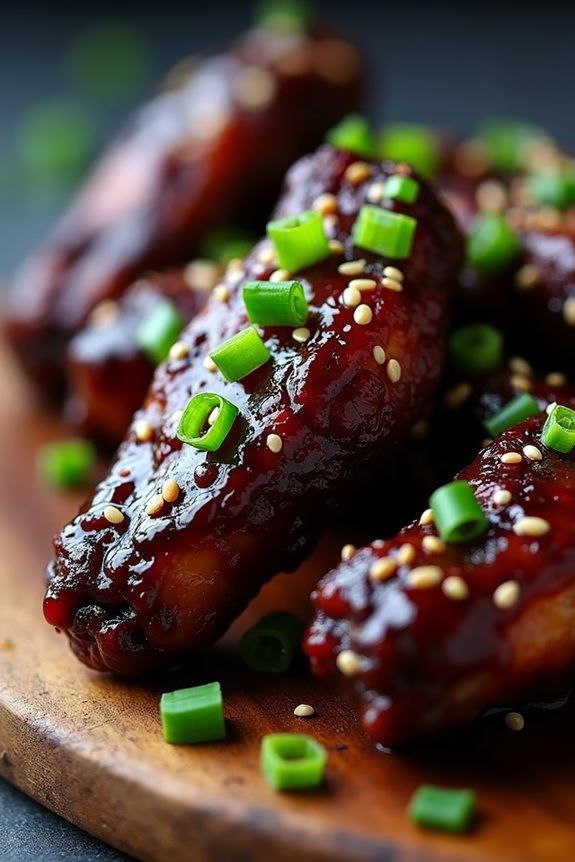
Vampire Bat Wings are the perfect spooky treat to serve at your Halloween gathering. These tantalizing wings are coated in a deep, dark glaze that gives them a sinister look, while the sweet and spicy flavors will have your guests coming back for more. Not only do they fit the Halloween theme, but they also provide a delicious and satisfying snack that’s easy to make and sure to impress.
The secret to these Vampire Bat Wings lies in the marinade, which infuses the chicken with flavor before it’s baked to perfection. The black color of the wings is achieved with a combination of soy sauce and balsamic glaze, adding a rich depth of flavor. This dish serves 4-6 people, making it ideal for a small party or family gathering.
Ingredients:
- 3 pounds of chicken wings
- 1 cup soy sauce
- 1/2 cup balsamic glaze
- 1/4 cup honey
- 4 cloves garlic, minced
- 1 tablespoon grated fresh ginger
- 1/2 teaspoon cayenne pepper
- 1 tablespoon sesame oil
- 1 tablespoon black food coloring (optional)
- Green onion and sesame seeds for garnish
Instructions:
- Prepare the Marinade: In a large mixing bowl, combine soy sauce, balsamic glaze, honey, minced garlic, grated ginger, cayenne pepper, sesame oil, and black food coloring. Mix until well combined to form a smooth marinade.
- Marinate the Wings: Add the chicken wings to the bowl and toss them in the marinade until they’re thoroughly coated. Cover the bowl with plastic wrap and refrigerate for at least 2 hours or overnight for maximum flavor infusion.
- Preheat the Oven: Preheat your oven to 400°F (200°C). Line a baking sheet with aluminum foil and place a wire rack on top. This will help the wings cook evenly and become crispy.
- Arrange the Wings: Remove the marinated wings from the refrigerator and arrange them in a single layer on the wire rack. Reserve the remaining marinade for basting.
- Bake the Wings: Place the baking sheet in the preheated oven and bake the wings for 20 minutes. After 20 minutes, remove the wings and baste them with the reserved marinade.
- Finish Cooking: Return the wings to the oven and bake for an additional 15-20 minutes, or until the wings are cooked through and have a dark, glossy coating.
- Garnish and Serve: Once cooked, remove the wings from the oven and let them rest for a few minutes. Garnish with sliced green onions and sesame seeds before serving.
For extra tips, consider using a broiler for the last 2-3 minutes of cooking to achieve a crispy skin if desired. Be sure to watch them closely to prevent burning. If you prefer a milder version, reduce or omit the cayenne pepper. Additionally, if you’re concerned about using food coloring, the natural glaze from the balsamic and soy sauce will still give the wings a dark appearance without it.
Enjoy your delicious and eerie Vampire Bat Wings!
Frankenstein’s Guacamole Dip

Frankenstein’s Guacamole Dip is a spooktacular addition to your Halloween appetizers lineup. This creatively ghoulish dip brings a fun twist to a classic favorite, making it perfect for any festive gathering. Not only does it look frightfully fun, but it’s also packed with fresh flavors that are sure to delight your guests. Serve this at your next Halloween party, and watch as it becomes a monstrous hit.
This dish combines the creamy goodness of guacamole with a touch of Halloween spirit by transforming it into the face of Frankenstein. With a few simple decorations, your guacamole will come to life, complete with a frighteningly delicious taste. This recipe serves 4-6 people, making it an ideal choice for a small party or family gathering.
Ingredients:
- 4 ripe avocados
- 1 lime, juiced
- 1 teaspoon salt
- 1/2 cup diced onion
- 3 tablespoons chopped fresh cilantro
- 2 roma tomatoes, diced
- 1 teaspoon minced garlic
- 1 pinch ground cayenne pepper
- 8 black olives (for decoration)
- 1 small cucumber (for decoration)
- 1 red bell pepper (for decoration)
- 1 pack of tortilla chips
Instructions:
- Prepare the Avocados: Slice the avocados in half, remove the pits, and scoop the flesh into a large bowl. Use a fork to mash the avocados until they reach your desired consistency—chunky or smooth.
- Mix in the Flavors: Add the lime juice and salt to the avocados. Stir well to combine. Next, fold in the diced onion, chopped cilantro, diced tomatoes, minced garlic, and cayenne pepper. Mix thoroughly until all ingredients are evenly incorporated.
- Design Frankenstein’s Face: Spread the guacamole mixture evenly on a serving platter to create a flat surface. Use sliced black olives to form the hairline and eyes. Cut the cucumber into thin rounds and place them at the sides of the face as bolts. Slice the red bell pepper into thin strips to create a mouth and stitches on the face.
- Serve: Surround the Frankenstein guacamole face with tortilla chips, and serve immediately to maintain the vibrant colors and freshness of the guacamole.
Extra Tips: To prevent the guacamole from browning, press a piece of plastic wrap directly onto the surface of the guacamole before serving. For an extra kick, consider adding diced jalapeños to the mix. If you want to make it ahead of time, prepare the guacamole up to two hours before serving and store it in the refrigerator. Remember to adjust the spice level to suit your guests’ preferences, and feel free to get creative with the decorations for Frankenstein’s face.
Creepy Crawly Taco Cups
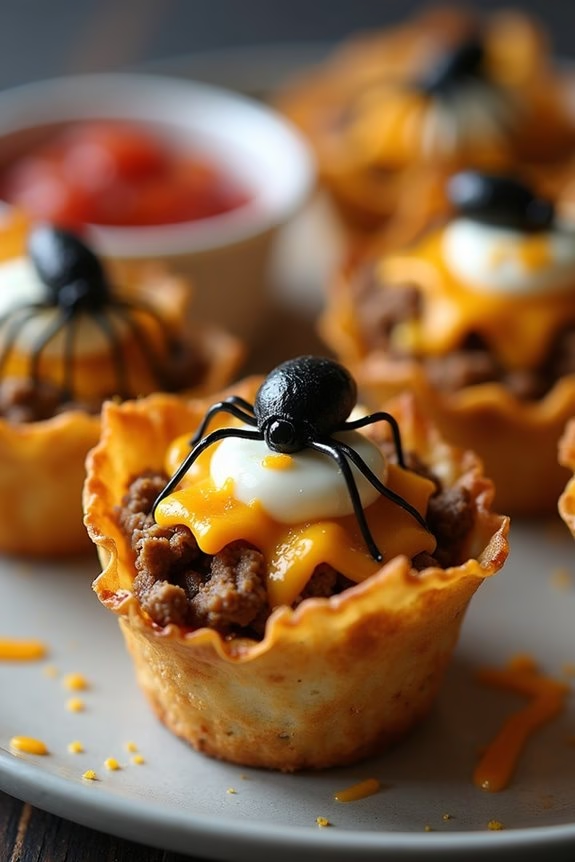
Creepy Crawly Taco Cups are the perfect spooky appetizer for your Halloween gathering. These tasty bites aren’t only delicious but also add a fun and eerie touch to your festive spread. The taco cups are made with seasoned beef, cheese, and other classic taco ingredients, all nestled in a crispy wonton wrapper. Topped with cute olive spider decorations, these creepy crawly treats are bound to be a hit with both kids and adults alike.
The key to making Creepy Crawly Taco Cups is in the presentation. By using black olives to create little spider shapes on top of each taco cup, you can transform a simple appetizer into a themed culinary masterpiece. Not only are these taco cups visually appealing, but they’re also easy to make and can be prepared ahead of time, allowing you more time to enjoy the festivities with your guests. This recipe will serve 4-6 people, making it ideal for a small gathering or as part of a larger Halloween buffet.
Ingredients:
- 12 wonton wrappers
- 1 pound ground beef
- 1 packet taco seasoning
- 1 cup shredded cheddar cheese
- 1/2 cup salsa
- 1/4 cup sour cream
- 12 black olives
- 1 tablespoon olive oil
- Salt and pepper to taste
Instructions:
- Preheat the Oven: Begin by preheating your oven to 375°F (190°C). This will guarantee that your taco cups bake evenly and become crispy.
- Prepare the Wonton Wrappers: Lightly brush a muffin tin with olive oil. Place a wonton wrapper into each muffin cup, pressing down gently to form a cup shape. This will be the base for your taco cups.
- Cook the Beef: In a skillet over medium heat, add the ground beef. Cook until browned, breaking it apart with a spoon as it cooks. Drain any excess fat.
- Season the Beef: Add the taco seasoning to the beef along with a splash of water. Stir well to coat the beef with the seasoning and cook for another 2-3 minutes.
- Assemble the Taco Cups: Spoon a tablespoon of the cooked beef mixture into each wonton cup. Top with a sprinkle of shredded cheddar cheese.
- Bake the Taco Cups: Place the muffin tin in the preheated oven and bake for 8-10 minutes, or until the wonton wrappers are golden brown and the cheese has melted.
- Prepare the Olive Spiders: While the taco cups are baking, slice the black olives in half lengthwise to make the spider bodies. Cut the other halves into thin strips to create legs.
- Decorate the Taco Cups: Once the taco cups are done baking, remove them from the oven and allow them to cool slightly. Top each cup with a dollop of salsa and sour cream. Arrange the olive pieces on top to resemble spiders.
- Serve: Arrange the Creepy Crawly Taco Cups on a serving platter and watch them disappear at your Halloween party!
Extra Tips:
When making Creepy Crawly Taco Cups, verify the wonton wrappers are pressed well into the muffin tin to avoid them collapsing during baking.
You can prepare the beef mixture ahead of time and store it in the refrigerator. Simply reheat it before assembling the taco cups.
Feel free to customize the filling with additional ingredients like black beans or corn for extra flavor.
Finally, if you prefer a spicier kick, use hot salsa or add some chopped jalapeños to the beef mixture.
Haunted Mini Pizzas
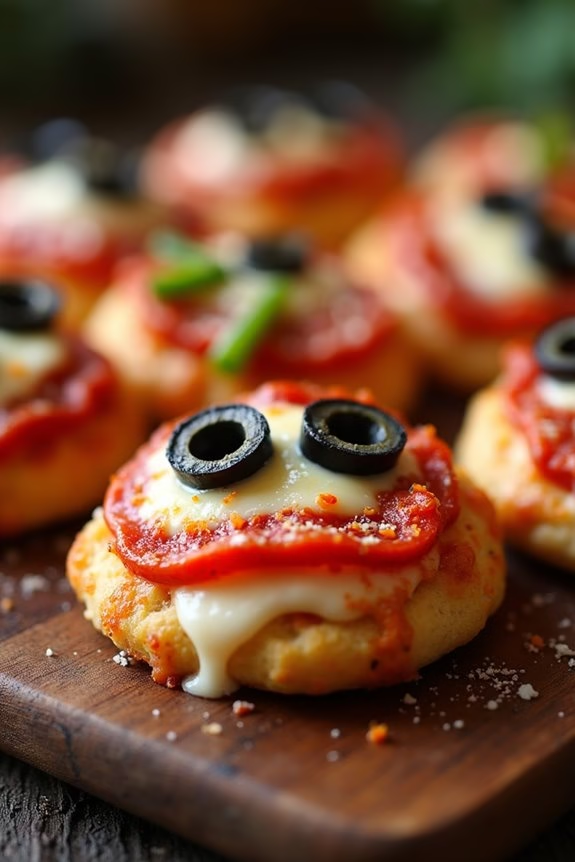
Get ready to add a spooky twist to your Halloween party with these Haunted Mini Pizzas. Perfect for 4-6 people, these bite-sized pizzas aren’t only delicious but also fun to make. With simple ingredients and a bit of creativity, you can transform regular mini pizzas into ghostly treats that are sure to be a hit at your gathering.
Whether you’re hosting a party or just want to enjoy a themed snack with your family, these Haunted Mini Pizzas are the perfect addition to your Halloween menu.
The recipe calls for a few basic ingredients that you probably already have in your kitchen, along with some Halloween-themed toppings to make them extra special. You’ll start by preparing the mini pizza bases, then add a layer of sauce and cheese before decorating them with olives, peppers, and other toppings to create spooky faces.
It’s a fun activity that kids and adults alike will enjoy, and the end result is a delicious, festive appetizer that everyone will love.
Ingredients (Serves 4-6):
- 6 mini pizza bases or English muffins
- 1 cup of pizza sauce
- 1 1/2 cups of shredded mozzarella cheese
- 18 black olive slices
- 1 red bell pepper
- 1 green bell pepper
- 1 small package of pepperoni slices
- 1 teaspoon of dried oregano
- 1 teaspoon of garlic powder
Cooking Instructions:
- Prepare the Oven: Preheat your oven to 375°F (190°C) to guarantee it’s hot enough to bake the mini pizzas evenly.
- Prepare the Bases: Place the mini pizza bases or halved English muffins on a baking tray lined with parchment paper to prevent sticking.
- Add the Sauce: Spread a generous tablespoon of pizza sauce on each mini pizza base, covering the surface evenly.
- Sprinkle the Cheese: Distribute the shredded mozzarella cheese evenly over each pizza, guaranteeing a good layer of cheese that will melt and hold the toppings in place.
- Create Spooky Faces: Slice the olives, red and green bell peppers, and use the pepperoni slices to create ghostly and monster faces. Use olive slices for eyes, and use strips of bell peppers and pepperoni to form mouths, fangs, or other facial features.
- Season the Pizzas: Sprinkle a pinch of dried oregano and garlic powder on each pizza for added flavor.
- Bake the Pizzas: Place the baking tray in the preheated oven and bake for 10-12 minutes, or until the cheese is fully melted and the edges of the pizza bases are golden brown.
- Serve Warm: Remove from the oven and let them cool slightly before serving. Enjoy your Haunted Mini Pizzas warm for the best flavor experience.
Extra Tips:
For an even spookier look, use cookie cutters to shape the cheese into ghosts or use different colored bell peppers to create a variety of faces.
You can also add more toppings like mushrooms or spinach to increase the nutritional value. If you’re making these with kids, let them get creative with the toppings and design their own haunted faces.
For a crispier base, lightly toast the mini pizza bases before adding the toppings.
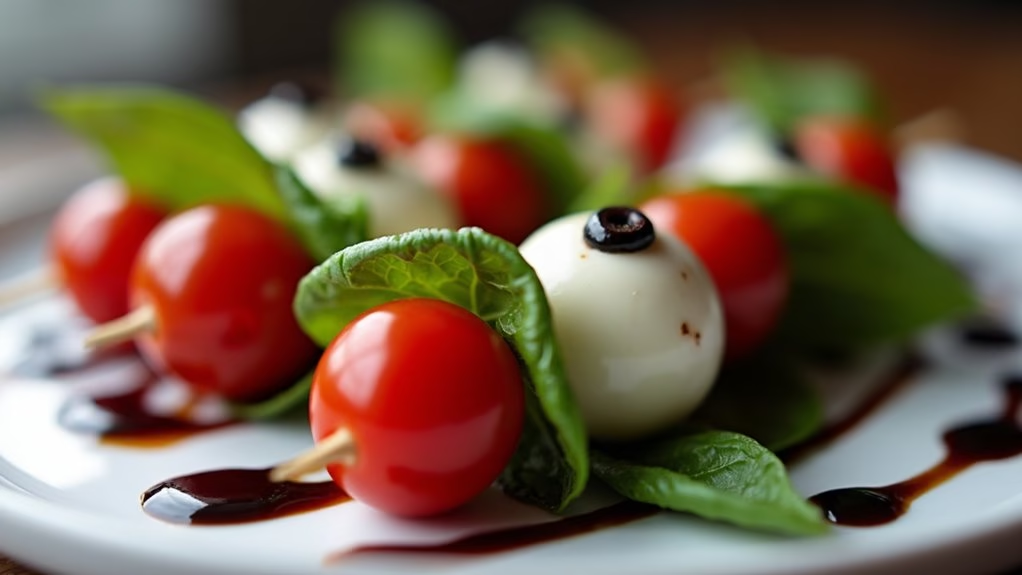
Bewitching Caprese Skewers
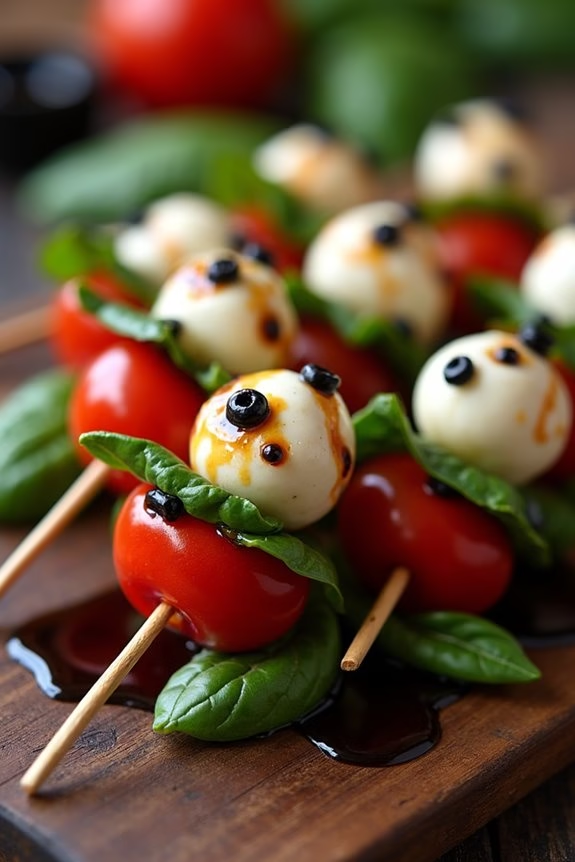
Enchanting Caprese Skewers are the perfect Halloween appetizer that combines the classic flavors of a traditional Caprese salad with a spooky twist. These skewers aren’t only delicious but also visually intriguing, making them a great addition to any Halloween gathering. The vibrant colors of the fresh ingredients make these skewers stand out, while the addition of a few clever touches guarantees they fit right in with your spooky theme.
This recipe involves skewering fresh mozzarella balls, cherry tomatoes, and fresh basil leaves, and then adding a touch of balsamic glaze for an extra burst of flavor. The skewers are then decorated with small edible black olives cut to resemble creepy eyes, lending a fun and eerie element to the dish. These Enchanting Caprese Skewers are easy to assemble and can be prepared in advance, allowing you to enjoy the festivities with your guests.
Ingredients (serves 4-6 people):
- 20 cherry tomatoes
- 20 fresh mozzarella balls (bocconcini)
- 20 fresh basil leaves
- 10 small black olives
- 1/4 cup balsamic glaze
- 20 wooden skewers
Instructions:
- Prepare the ingredients: Begin by rinsing the cherry tomatoes and basil leaves under cold water, then pat them dry with a clean towel. Cut the black olives into small pieces small enough to resemble eyes.
- Assemble the skewers: Take a wooden skewer and start by threading a cherry tomato, followed by a basil leaf, then a mozzarella ball. Repeat this sequence until each skewer has two sets of tomato, basil, and mozzarella.
- Add the spooky touch: Attach two small olive pieces onto each mozzarella ball to create the appearance of eyes. You may need to gently press them into the cheese to make sure they stay in place.
- Drizzle with balsamic glaze: Lay the skewers on a serving platter and drizzle generously with balsamic glaze. Make sure each skewer receives a good coating for added flavor.
- Chill before serving: Place the platter in the refrigerator for about 15 minutes to let the flavors meld together and serve chilled.
Extra Tips: For the best results, use high-quality ingredients, such as fresh mozzarella and ripe cherry tomatoes, to make certain the flavors shine through. If you want to add an extra bit of spookiness, consider using a pastry brush to paint the balsamic glaze in a zigzag pattern, resembling a spider web. Additionally, if you prefer a more intense flavor, you can marinate the mozzarella balls in olive oil, garlic, and Italian herbs for an hour before assembling the skewers.