
Halloween is just around the corner, and it’s the perfect time to get a little spooky in the kitchen.
I’ve been cooking up some fun and eerie appetizer ideas that will surely impress your guests.
From Spooky Spider Deviled Eggs to Dracula’s Bloody Beet Hummus, these dishes are both a feast for the eyes and the taste buds.
They’re not just about the looks; they’re packed with flavors everyone will love.
Ready to add a touch of frightful fun to your festivities?
Spooky Spider Deviled Eggs
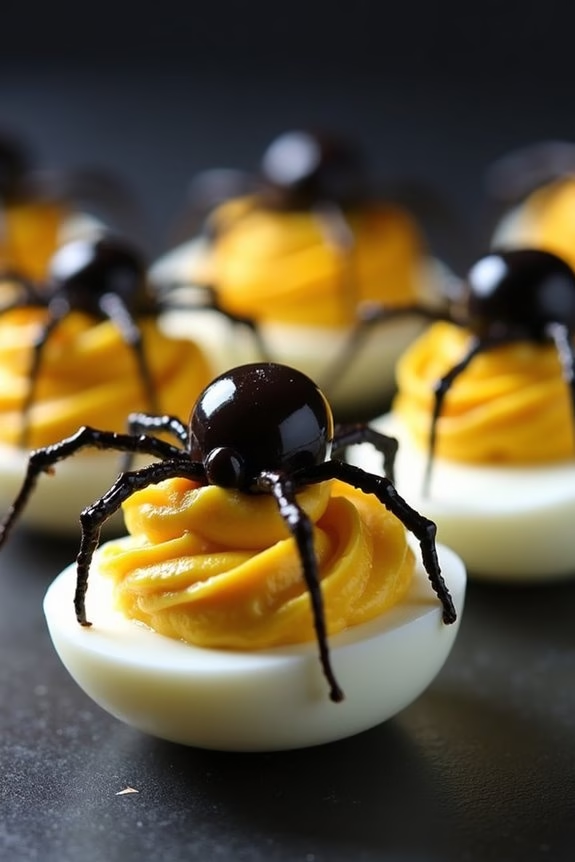
Spooky Spider Deviled Eggs are a fun and eerie addition to any Halloween party spread. These devilishly delightful bites aren’t only visually striking but also packed with flavor. The creamy yolk mixture, enhanced with a hint of mustard and mayonnaise, is complemented perfectly by the savory olives that form the creepy spider topping. They’re sure to be a hit among kids and adults alike, making them a perfect appetizer for your festive gathering.
Creating these Spooky Spider Deviled Eggs isn’t only easy but also a fantastic way to get creative in the kitchen. The process involves hard-boiling eggs, preparing a smooth yolk filling, and crafting little spider decorations from ripe olives. The result is both delicious and whimsically spooky, adding a special touch to your Halloween table. With just a few ingredients and some simple steps, you can prepare a batch of these themed treats for a serving size of 4-6 people.
Ingredients:
- 6 large eggs
- 3 tablespoons mayonnaise
- 1 teaspoon yellow mustard
- 1/8 teaspoon salt
- 1/8 teaspoon black pepper
- 12 black olives
Instructions:
- Boil the Eggs: Place the eggs in a saucepan and cover them with cold water. Bring the water to a boil over medium-high heat. Once boiling, cover the pan, remove it from heat, and let the eggs sit for 10-12 minutes.
- Cool and Peel: Carefully transfer the eggs to a bowl of ice water to cool them quickly. Once cooled, peel the eggs gently to avoid damaging the whites.
- Prepare the Filling: Slice each egg in half lengthwise and scoop out the yolks into a mixing bowl. Mash the yolks with a fork until smooth. Add mayonnaise, mustard, salt, and pepper to the yolks, mixing until well combined.
- Fill the Egg Whites: Spoon or pipe the yolk mixture back into the egg white halves, creating a generous mound on each.
- Create the Spiders: Cut 6 of the olives in half for the spider bodies. Slice the remaining olives into thin rings to form the spider legs. Place half an olive on each filled egg as the body, and arrange 8 olive slices around it to mimic spider legs.
- Chill Before Serving: Place the completed deviled eggs on a serving platter and refrigerate for at least 30 minutes before serving to allow the flavors to meld.
Extra Tips:
When making Spooky Spider Deviled Eggs, verify the eggs are completely cooled before peeling to avoid tearing the whites. If you don’t have a piping bag for the yolk mixture, a small plastic sandwich bag with the corner snipped off works well.
For a more dramatic presentation, consider adding a sprinkle of paprika or cayenne pepper on top of the filling before adding the spider decorations. This not only enhances the flavor but also adds a pop of color.
Ghostly Guacamole Dip
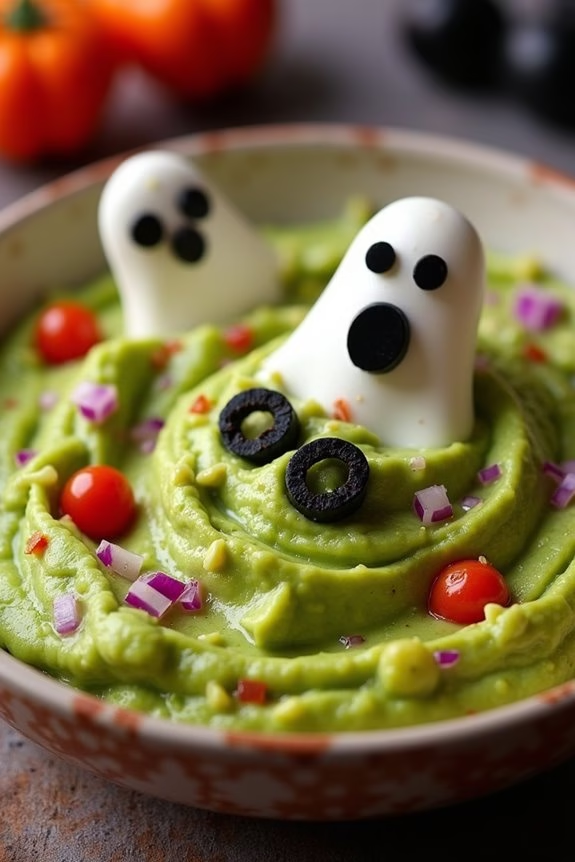
Ghostly Guacamole Dip is a spooktacular appetizer that’s perfect for Halloween gatherings. This eerie twist on classic guacamole not only looks frightfully fun but tastes deliciously fresh and creamy. The vibrant green of the avocado is transformed into a ghostly delight with a few simple ingredients, making it an instant crowd-pleaser at any Halloween party.
This delightful dip is easy to prepare and can be paired with a variety of dippers, such as tortilla chips or veggie sticks. Ghostly Guacamole Dip is a great way to bring a festive touch to your snack table, and it’s sure to be a hit with both kids and adults. Here’s how to make this hauntingly good appetizer for 4-6 people.
Ingredients:
- 4 ripe avocados
- 1 small red onion, finely chopped
- 2 Roma tomatoes, diced
- 1 lime, juiced
- 1 clove garlic, minced
- 1/4 cup fresh cilantro, chopped
- Salt to taste
- Black olives (for decoration)
Cooking Instructions:
- Prepare the Avocados: Begin by cutting the avocados in half and removing the pits. Scoop the avocado flesh into a mixing bowl.
- Mash the Avocados: Use a fork or potato masher to mash the avocado until you achieve your desired consistency. For a smoother guacamole, mash more thoroughly; for chunkier guacamole, mash less.
- Mix in the Flavors: Add the chopped red onion, diced tomatoes, lime juice, minced garlic, and chopped cilantro to the mashed avocado. Stir the mixture until all ingredients are well combined.
- Season: Add salt to taste, mixing it thoroughly into the guacamole. Adjust the seasoning as needed.
- Create the Ghostly Effect: Transfer the guacamole to a serving dish. To create ghost faces, slice black olives into thin rounds and use them to form eyes and a mouth on top of the guacamole. You can be creative with the expressions to make them as spooky or friendly as you like.
- Serve: Serve the Ghostly Guacamole Dip with tortilla chips or veggie sticks.
Extra Tips:
For the best flavor, use ripe avocados that are slightly soft to the touch. To prevent the guacamole from browning, place cling wrap directly on the surface of the dip before refrigerating, or add an extra squeeze of lime juice.
If you want to spice things up, consider adding a finely chopped jalapeño or a dash of cayenne pepper. This dish is best served fresh, so try to prepare it shortly before serving. Enjoy your festive and delicious Ghostly Guacamole Dip!
Mummy Jalapeño Poppers
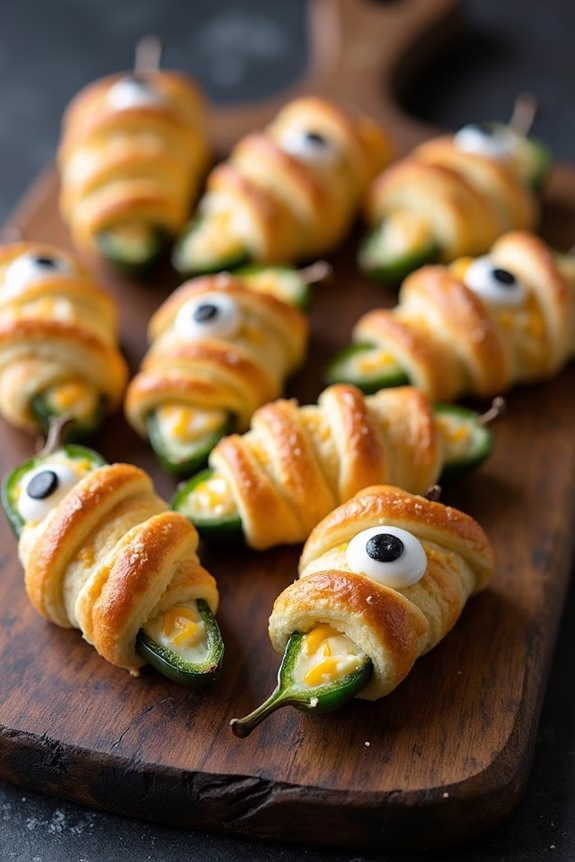
Looking to add a spooky yet delicious touch to your Halloween party menu? Mummy Jalapeño Poppers are the perfect appetizer to delight your guests with both a kick of heat and a fun presentation.
These poppers are a creative twist on the classic jalapeño popper, wrapped in crescent roll dough to resemble mummies. They aren’t only visually appealing but also packed with cheesy, creamy fillings that complement the spicy flavor of the jalapeños.
This recipe is designed to serve 4-6 people, making it ideal for a small gathering or as part of a larger assortment of Halloween-themed snacks. The combination of crispy dough, gooey cheese, and spicy jalapeños is sure to be a hit.
Mummy Jalapeño Poppers are easy to prepare, and they make a delightful addition to your Halloween festivities.
Ingredients:
- 12 large jalapeño peppers
- 8 oz cream cheese, softened
- 1 cup shredded cheddar cheese
- 1/2 teaspoon garlic powder
- 1/2 teaspoon onion powder
- 1/4 teaspoon smoked paprika
- 1 can (8 oz) refrigerated crescent roll dough
- 1 egg, beaten
- Candy eyes or sliced olives for decoration
Cooking Instructions:
- Preparation: Preheat your oven to 375°F (190°C). Line a baking sheet with parchment paper to prevent sticking.
- Prepare the Jalapeños: Slice each jalapeño in half lengthwise and remove the seeds and membranes. For less heat, make sure all seeds are removed. Set aside.
- Make the Filling: In a medium bowl, mix together the softened cream cheese, shredded cheddar cheese, garlic powder, onion powder, and smoked paprika until smooth and well combined.
- Stuff the Jalapeños: Using a spoon or piping bag, fill each jalapeño half with the cheese mixture. Be generous but make sure the filling is level with the edges of the jalapeño.
- Wrap the Mummies: Unroll the crescent roll dough and slice into thin strips (about 1/4 inch wide). Wrap each stuffed jalapeño with strips of dough to resemble a mummy, leaving a small space for eyes.
- Add the Eyes: Gently press candy eyes or small slices of olives into the dough-wrapped jalapeños to create the look of a mummy face.
- Egg Wash: Brush each mummy popper with the beaten egg to help achieve a golden-brown finish.
- Bake: Place the wrapped jalapeños on the prepared baking sheet and bake in the preheated oven for 12-15 minutes, or until the dough is golden brown and crispy.
- Serve: Allow to cool slightly before serving. Arrange on a platter for a spooky presentation.
Extra Tips:
When handling jalapeños, it’s advisable to wear gloves to avoid the spicy oils from irritating your skin.
If you prefer a milder popper, you can soak the jalapeños in cold water for about 30 minutes after deseeding to reduce the heat.
Feel free to experiment with different types of cheese or add cooked bacon bits to the filling for extra flavor.
Enjoy your Mummy Jalapeño Poppers as a part of your Halloween spread, and watch them disappear quickly!
Witch’s Broomstick Pretzels
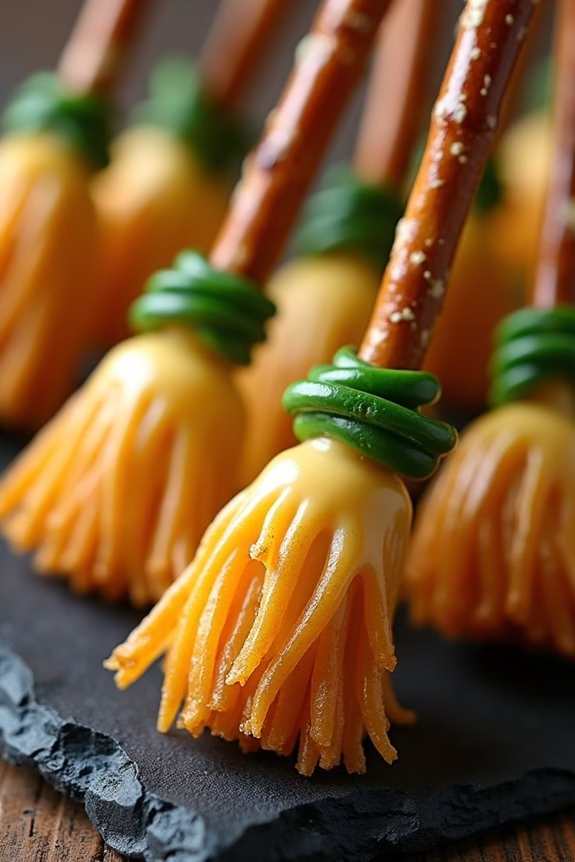
Witch’s Broomstick Pretzels are a fun and festive appetizer perfect for any Halloween gathering. These savory snacks are designed to resemble tiny broomsticks, making them a delightful addition to your spooky spread. The combination of salty pretzels and creamy cheese creates a delicious harmony of flavors, while the chives add a fresh, slightly tangy touch.
These Witch’s Broomstick Pretzels aren’t only tasty but also simple to make, allowing you to whip up a batch quickly for your guests. The charm of this dish lies in its playful presentation, making it an ideal choice for parties with children and adults alike.
Whether you’re hosting a Halloween bash or simply want to bring a themed treat to a potluck, these broomstick pretzels will surely be a hit. The recipe requires minimal ingredients and time, ensuring that you have more moments to enjoy the festivities. Let’s get started on crafting these whimsical appetizers.
Ingredients (Serves 4-6)
- 12 large pretzel sticks
- 6 string cheese sticks
- 12 fresh chives
- 2 tablespoons of butter (optional for brushing)
Cooking Instructions
- Prepare the Cheese: Take the string cheese sticks and cut each one in half crosswise. This will give you a total of 12 pieces. Use a knife to make lengthwise cuts about halfway up each piece, creating a fringed effect that mimics the bristles of a broom.
- Attach the Pretzels: Gently insert a pretzel stick into the uncut end of each fringed string cheese piece. Push carefully to avoid breaking the pretzel or splitting the cheese.
- Secure with Chives: Take a fresh chive and wrap it around the base where the cheese meets the pretzel. Tie it into a knot to secure the broomstick shape. Trim any excess chive if necessary.
- Optional Butter Brushing: If you desire a slightly richer flavor, melt the butter in a small saucepan or microwave. Use a pastry brush to lightly coat the cheese portion of each broomstick. This step is optional and can be skipped if you prefer a lighter taste.
- Serve: Arrange the Witch’s Broomstick Pretzels on a platter and serve immediately. These are best enjoyed fresh but can be prepared a few hours in advance and stored in the refrigerator.
Extra Tips
For an extra touch of flavor, consider sprinkling the cheese ends with a pinch of garlic powder or smoked paprika before securing them with the chives.
If you find it challenging to tie the chives, try blanching them in hot water for about 10 seconds, then immediately cooling them in ice water; this will make them more pliable. Additionally, be gentle when inserting the pretzel sticks to avoid cracking them—twisting slightly as you insert can help.
Enjoy these whimsical treats and have a spooky, delicious Halloween!
Bloody Mary Shrimp Cocktail
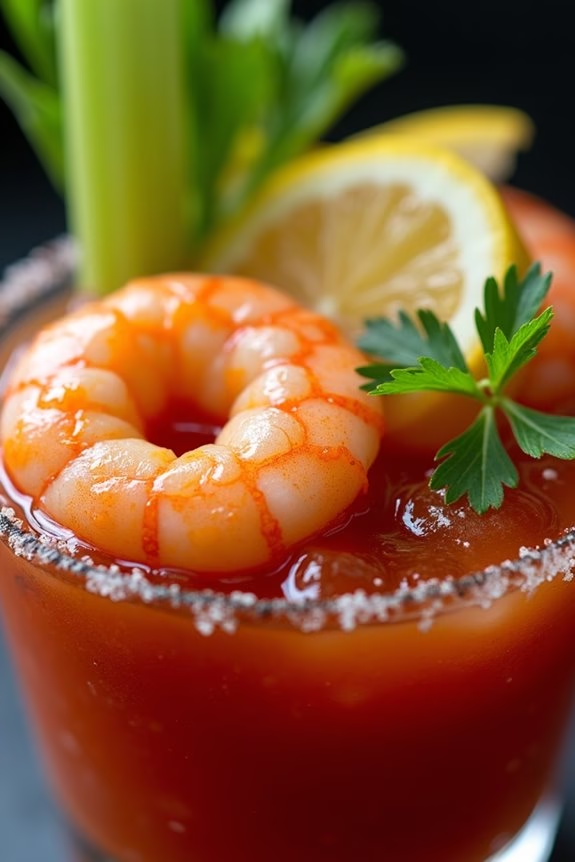
Halloween is the perfect time to serve up some spooky and delicious appetizers, and the Bloody Mary Shrimp Cocktail fits the bill perfectly. This dish combines the classic flavors of a Bloody Mary cocktail with succulent shrimp, creating a tantalizing and eye-catching appetizer that will be a hit at any Halloween gathering.
The spicy and tangy cocktail sauce pairs beautifully with the tender shrimp, offering a unique twist on the traditional shrimp cocktail. This dish isn’t only flavorful but also visually striking, making it the ideal centerpiece for your Halloween spread.
The vibrant red hue of the cocktail sauce, reminiscent of the classic Bloody Mary, adds a festive touch that complements the theme of the holiday. With a balance of spice, acidity, and the natural sweetness of the shrimp, this appetizer is bound to thrill your guests and leave them craving more.
Ingredients for 4-6 servings:
- 1 pound large shrimp, peeled and deveined
- 1 tablespoon olive oil
- Salt and pepper to taste
- 1 cup tomato juice
- 2 tablespoons prepared horseradish
- 2 tablespoons lemon juice
- 1 teaspoon Worcestershire sauce
- 1 teaspoon hot sauce (such as Tabasco)
- 1 teaspoon celery salt
- 1 tablespoon vodka (optional)
- Lemon wedges and celery sticks for garnish
- Fresh parsley for garnish (optional)
Cooking Instructions:
- Prepare the Shrimp: Preheat your oven to 400°F (200°C). Place the peeled and deveined shrimp on a baking sheet. Drizzle with olive oil and season with salt and pepper. Toss the shrimp to guarantee they’re evenly coated with the oil and seasoning.
- Roast the Shrimp: Arrange the shrimp in a single layer on the baking sheet. Bake in the preheated oven for 6-8 minutes, or until the shrimp are pink and opaque. Remove from the oven and let them cool to room temperature.
- Make the Cocktail Sauce: In a mixing bowl, combine the tomato juice, horseradish, lemon juice, Worcestershire sauce, hot sauce, and celery salt. Stir until all the ingredients are well blended. If desired, add vodka to give the sauce a classic Bloody Mary kick.
- Assemble the Cocktail: Once the shrimp are cooled, arrange them in individual cocktail glasses or a large serving bowl. Pour the Bloody Mary cocktail sauce over the shrimp, ensuring they’re well coated.
- Garnish and Serve: Garnish each serving with lemon wedges, celery sticks, and a sprig of fresh parsley if using. Serve immediately, allowing guests to squeeze lemon over the shrimp for added flavor.
Extra Tips:
When selecting shrimp, opt for fresh or frozen shrimp that are already peeled and deveined to save time. If you’re using frozen shrimp, guarantee they’re completely thawed before roasting.
Adjust the level of spiciness in the cocktail sauce by altering the amount of hot sauce according to your taste preference. For a non-alcoholic version, simply omit the vodka, and you’ll still enjoy a deliciously zesty shrimp cocktail.
Finally, for a dramatic presentation, consider serving the cocktail in a large glass bowl placed on a bed of ice to keep the shrimp chilled throughout your Halloween event.
Monster Eyeball Caprese Bites
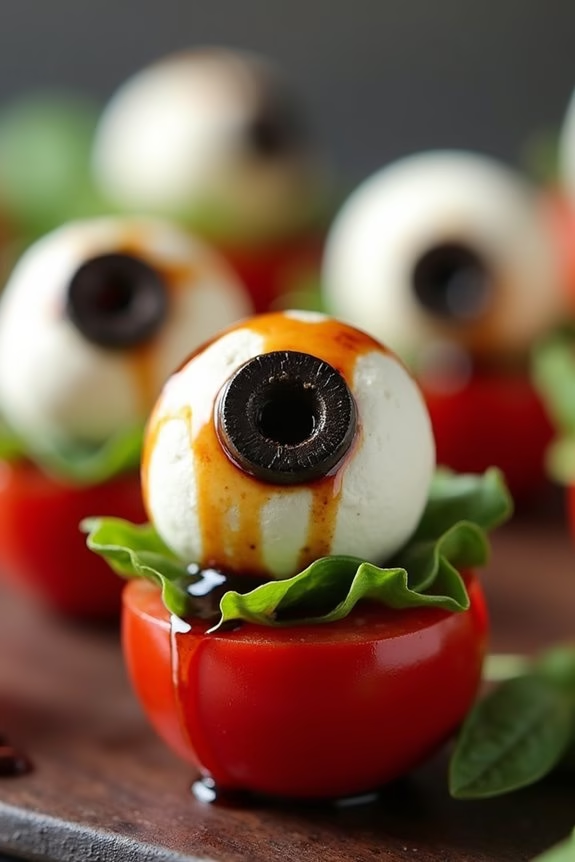
Get ready to spook your guests with these Monster Eyeball Caprese Bites, a hauntingly delicious and easy-to-make appetizer perfect for your Halloween gathering. This dish brings a playful twist to the classic Caprese salad by transforming basic ingredients into eerie monster eyeballs. The combination of fresh mozzarella balls, cherry tomatoes, and basil leaves, finished with a drizzle of balsamic glaze, makes for not only a visually striking dish but also a flavorful one.
These Monster Eyeball Caprese Bites are both fun and tasty, making them an excellent addition to your Halloween party spread. They’re easy to assemble, allowing you to spend less time in the kitchen and more time enjoying the festivities. This recipe serves 4-6 people, ensuring everyone gets a taste of these monstrously good bites.
Ingredients:
- 24 fresh mozzarella balls (bocconcini or ciliegine)
- 12 cherry tomatoes
- 24 black olive slices
- 24 fresh basil leaves
- 2 tablespoons balsamic glaze
- Salt and pepper to taste
- 24 toothpicks
Instructions:
- Prepare the Cherry Tomatoes: Begin by slicing each cherry tomato in half to create a flat surface for stability. This will serve as the base for the eyeballs.
- Assemble the Eyeballs: Take a mozzarella ball and place it on top of the cut side of a cherry tomato half. This forms the “white” of the eyeball.
- Add the Pupil: Place a black olive slice on top of each mozzarella ball. The olive slice will act as the pupil of the eyeball.
- Secure with Toothpicks: Insert a toothpick through the center of the olive slice, mozzarella ball, and into the cherry tomato to hold everything together. Make sure the toothpick is securely placed.
- Add Basil Leaves: Tuck a fresh basil leaf under each assembled eyeball, allowing it to slightly overlap the tomato base and mozzarella ball. This adds a pop of green and enhances the flavor.
- Season and Drizzle: Lightly sprinkle the assembled bites with salt and pepper. Finally, drizzle balsamic glaze over the top for a touch of sweetness and to complete the look.
Extra Tips:
For a more detailed and spooky appearance, use a small knife to carve small notches or veins into the mozzarella balls before adding the olives. This will enhance the “eyeball” effect.
If you prefer a more intense flavor, consider marinating the mozzarella balls in olive oil, garlic, and herbs for a few hours before assembling.
Remember to serve these bites chilled for the best flavor, and feel free to double the recipe for larger gatherings. Enjoy your Monster Eyeball Caprese Bites and have a spooktacular Halloween!
Bat Wings With Spicy Sauce

Bat Wings With Spicy Sauce is the perfect appetizer to set the Halloween mood, offering a deliciously spooky twist on traditional chicken wings. These wings are coated in a bold, spicy sauce that will leave your guests craving more. The dark, crispy exterior of the wings, reminiscent of bat wings, combined with the fiery kick of the sauce, makes it an exciting and thematic addition to your Halloween spread.
Whether you’re hosting a haunted house party or simply enjoying a night in, these Bat Wings With Spicy Sauce will surely be a hit.
The recipe is designed to serve 4-6 people, making it ideal for small gatherings or a family dinner. The preparation involves marinating the wings to infuse them with flavor, followed by baking or frying to achieve the desired crispiness. The spicy sauce, made with a blend of hot sauce, garlic, and other spices, coats the wings, providing an irresistible combination of heat and flavor.
Let’s plunge into the ingredients and steps required to create this spooky dish.
Ingredients:
- 2 pounds chicken wings
- 1/2 cup soy sauce
- 1/4 cup honey
- 1 tablespoon minced garlic
- 1 teaspoon black pepper
- 1 teaspoon smoked paprika
- 1/4 cup hot sauce
- 1/4 cup butter
- 1 tablespoon Worcestershire sauce
- 1/2 teaspoon cayenne pepper
- 1 tablespoon olive oil
- Salt to taste
Instructions:
1. Prepare the Marinade: In a large bowl, mix together soy sauce, honey, minced garlic, black pepper, smoked paprika, and olive oil. This mixture will serve as the marinade for your wings.
2. Marinate the Wings: Add the chicken wings to the bowl, making sure they’re fully coated with the marinade. Cover the bowl with plastic wrap and refrigerate for at least 2 hours, or overnight for better flavor infusion.
3. Preheat the Oven: When ready to cook, preheat your oven to 400°F (200°C). If you prefer frying, heat oil in a large skillet over medium-high heat.
4. Bake or Fry the Wings: For baking, line a baking sheet with aluminum foil and place a wire rack on top. Arrange the marinated wings on the rack and bake for 25-30 minutes, turning halfway through, until crispy and cooked through.
For frying, cook the wings in batches for about 8-10 minutes per side until golden brown and crispy.
5. Prepare the Spicy Sauce: In a saucepan over low heat, combine the hot sauce, butter, Worcestershire sauce, and cayenne pepper. Stir until the butter melts and the sauce is smooth.
6. Coat the Wings: Once the wings are cooked, transfer them to a large bowl. Pour the spicy sauce over the wings and toss until they’re evenly coated.
7. Serve: Arrange the wings on a platter and serve immediately, garnished with extra black pepper or a sprinkle of smoked paprika for added flair.
Extra Tips:
For an extra crispy texture, pat the wings dry with paper towels before marinating. This helps the skin to crisp up nicely when cooked.
If the sauce is too spicy for your taste, adjust the heat by reducing the amount of cayenne pepper or hot sauce. You can also serve the wings with a side of ranch or blue cheese dressing to mellow the heat.
Additionally, if baking, consider flipping the wings a couple of times during cooking to guarantee even crispiness on all sides.
Creepy Cheese Ball Pumpkins
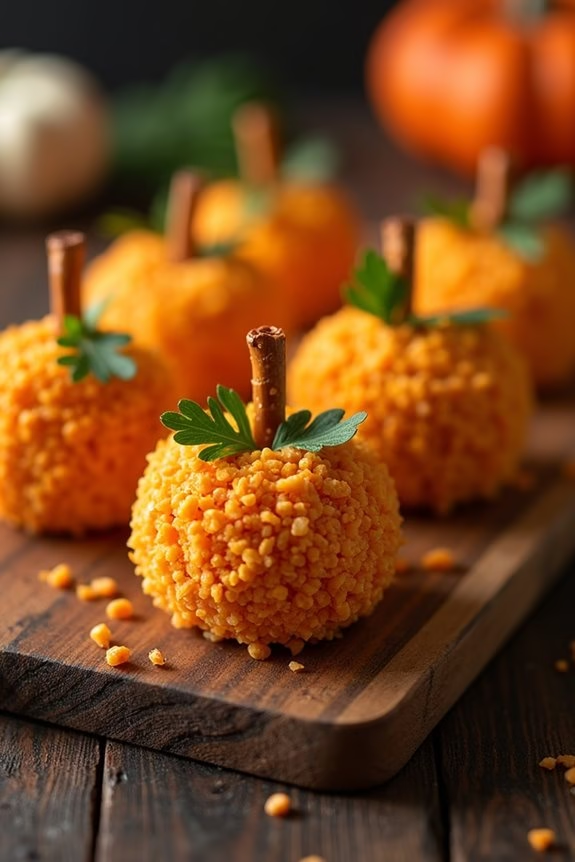
Creepy Cheese Ball Pumpkins are the perfect addition to your Halloween appetizer spread, combining both flavor and festive flair. This dish takes the classic cheese ball and transforms it into mini pumpkins, making them an ideal bite-sized treat for your spooky gathering. Made from a blend of cheeses and spices, these cheese balls are rolled in crushed nacho chips to give them their vibrant orange hue.
With pretzel stick stems and parsley leaves for decoration, these creepy cheese balls are bound to be a hit at your next Halloween party. Not only do Creepy Cheese Ball Pumpkins look incredible, but they’re also deliciously creamy with a hint of spice, thanks to the combination of cream cheese, cheddar cheese, and a touch of paprika.
They’re simple to prepare ahead of time, which makes them a convenient option for busy hosts. Serve them with an assortment of crackers or vegetable sticks for a complete appetizer experience that both kids and adults will enjoy. Here’s how to make Creepy Cheese Ball Pumpkins for a serving size of 4-6 people.
Ingredients:
- 8 oz cream cheese, softened
- 1 ½ cups shredded sharp cheddar cheese
- 1 teaspoon garlic powder
- 1 teaspoon onion powder
- ½ teaspoon smoked paprika
- Salt and pepper to taste
- 1 cup crushed nacho-flavored tortilla chips
- 8-10 pretzel sticks
- Fresh parsley leaves
Cooking Instructions:
- Prepare the Cheese Mixture: In a large mixing bowl, combine the softened cream cheese, shredded sharp cheddar cheese, garlic powder, onion powder, smoked paprika, salt, and pepper. Mix thoroughly until all ingredients are well incorporated and the mixture is smooth.
- Shape the Cheese Balls: Divide the cheese mixture into 8-10 equal portions. Roll each portion into a ball using your hands to create a smooth surface. If the mixture is too sticky, you can lightly coat your hands with oil or water.
- Coat with Crushed Chips: Place the crushed nacho-flavored tortilla chips in a shallow dish. Roll each cheese ball in the crushed chips, pressing gently to confirm they adhere and cover the entire surface of the cheese ball.
- Add Pumpkin Details: Insert a pretzel stick into the top of each cheese ball to create the pumpkin stem. Attach a small parsley leaf next to the pretzel stick to mimic the look of a pumpkin vine.
- Chill Before Serving: Arrange the finished cheese balls on a serving platter. Chill them in the refrigerator for at least 30 minutes before serving to allow them to firm up and the flavors to meld.
Extra Tips:
When making Creepy Cheese Ball Pumpkins, feel free to customize the flavorings by adding a pinch of cayenne pepper for extra heat or mixing in some finely chopped chives for an oniony kick.
If you want a more intense orange color, you can add a few drops of orange food coloring to the cheese mixture before shaping the balls. Additionally, these cheese balls can be made a day in advance and stored in the refrigerator, covered, until ready to serve, making them a stress-free option for entertaining.
Frankenstein Avocado Toasts
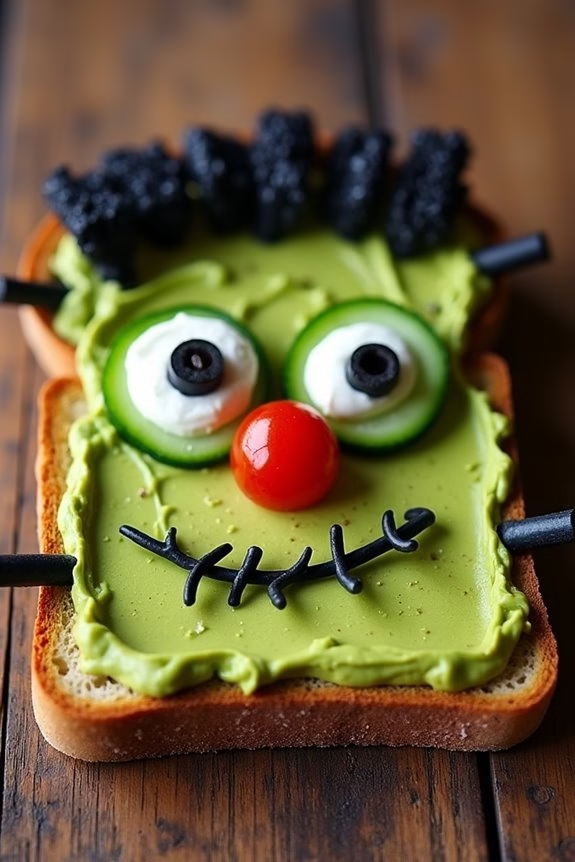
Frankenstein Avocado Toasts are a spooky and delightful twist on a classic breakfast favorite, perfect for Halloween gatherings. These toasts aren’t only visually appealing but also packed with flavor, offering a healthy and fun appetizer option for your festive celebration.
The creamy avocado base serves as the perfect canvas for creating Frankenstein’s face, while a variety of toppings bring the monster to life. This recipe is designed to serve 4-6 people, making it an ideal addition to your Halloween appetizer spread.
With a combination of fresh ingredients and creative garnishes, Frankenstein Avocado Toasts are bound to be a hit with both kids and adults alike. Follow the simple steps below to craft these ghoulishly good toasts.
Ingredients:
- 4-6 slices of whole-grain bread
- 2 ripe avocados
- 1 tablespoon lime juice
- Salt and pepper to taste
- Black olives
- Cherry tomatoes
- Sliced cucumbers
- Sliced radishes
- Fresh chives
- Cream cheese
Instructions:
- Prepare the Avocado Mixture: In a medium bowl, mash the ripe avocados with a fork until smooth. Stir in the lime juice, and season with salt and pepper to taste. Set aside.
- Toast the Bread: Lightly toast the slices of whole-grain bread until they’re golden brown and crispy. This will provide a sturdy base for your toppings.
- Spread the Avocado: Evenly spread the mashed avocado mixture over each slice of toasted bread, making sure there’s a smooth and even layer.
- Create Frankenstein’s Hair and Face: Use black olives to create Frankenstein’s hair by placing them along the top edge of the avocado-covered toast. For the eyes, place two slices of cucumber and then add a small dollop of cream cheese on each slice. Top the cream cheese with a small piece of black olive to create pupils.
- Add the Nose and Mouth: Slice a cherry tomato in half and place one half in the center of each toast to form the nose. For the mouth, cut thin strips of fresh chives and arrange them below the nose in a zigzag pattern.
- Finishing Touches: Use sliced radishes to create bolts by placing them on either side of the toast, mimicking Frankenstein’s iconic neck bolts.
Extra Tips: When choosing avocados, confirm they’re ripe enough to mash easily but not overripe, as this will affect the flavor and texture of the spread.
If the avocados are underripe, you can speed up the ripening process by placing them in a brown paper bag with a banana for a day or two. Additionally, to prevent the avocado spread from browning, keep it covered with plastic wrap, pressing the wrap directly against the surface of the mixture until ready to serve.
Finally, feel free to get creative with the toppings and personalize your Frankenstein faces to add more fun to your Halloween appetizer platter!
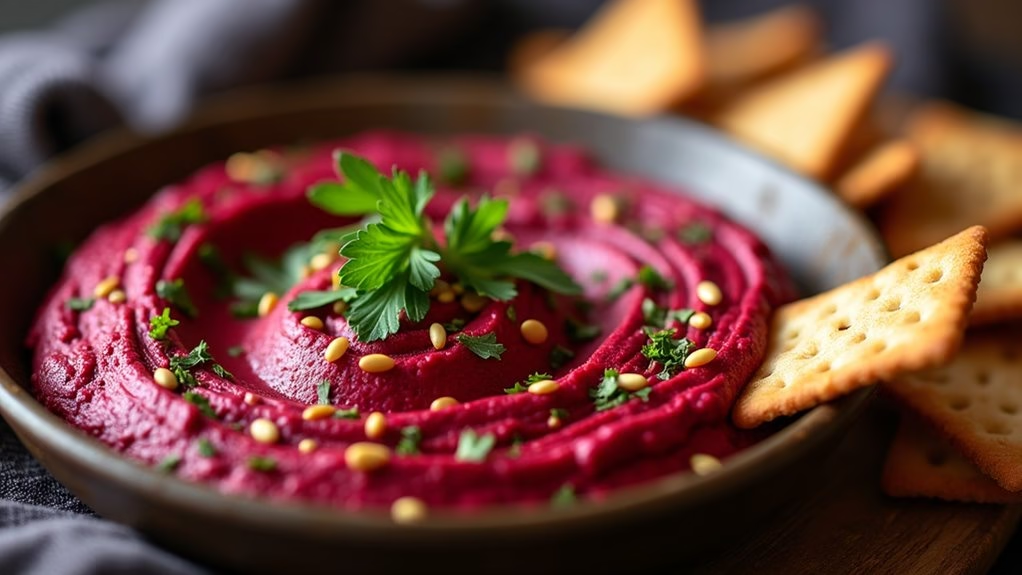
Dracula’s Bloody Beet Hummus
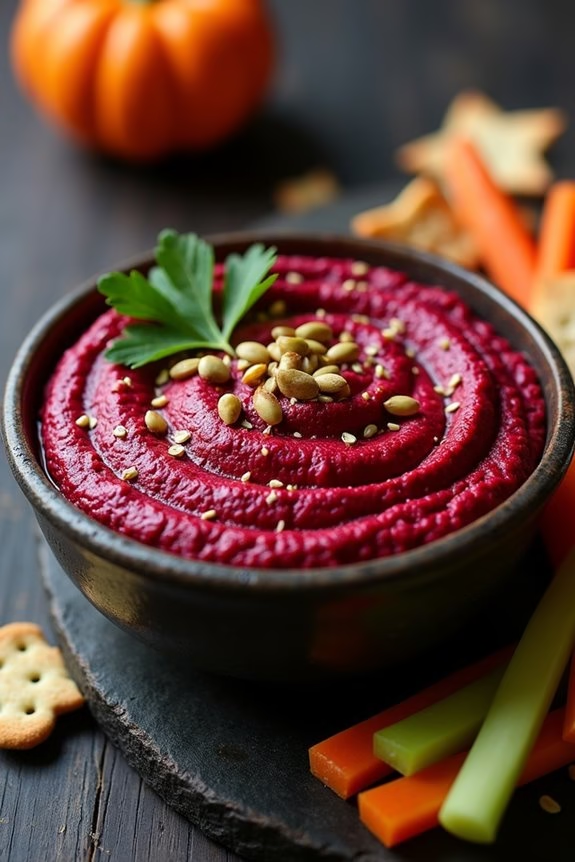
Dracula’s Bloody Beet Hummus is a perfect Halloween appetizer that combines the earthy sweetness of beets with the creamy texture of traditional hummus. This vibrant, blood-red dip not only fits the spooky theme of the holiday but also offers a healthy and delicious snack option for your Halloween gathering.
Serve it with a variety of dippers such as vegetable sticks, pita chips, or even spooky-shaped crackers to delight your guests. This hummus is easy to prepare and can be made ahead of time, leaving you free to enjoy the festivities.
The beets are roasted to enhance their sweetness and then blended with the classic hummus ingredients like chickpeas, tahini, and lemon juice. The result is a smooth, flavorful dip that’s both eye-catching and delectable. Whether you’re hosting a Halloween party or looking for a unique dish to contribute to a potluck, Dracula’s Bloody Beet Hummus is sure to be a hit.
Ingredients for 4-6 servings:
- 2 medium-sized beets
- 1 can (15 oz) chickpeas, drained and rinsed
- 2 tablespoons tahini
- 2 cloves garlic
- 3 tablespoons lemon juice
- 2 tablespoons olive oil
- 1 teaspoon cumin
- Salt to taste
- Black pepper to taste
- Water, as needed
- Optional garnish: fresh parsley, pumpkin seeds, or sesame seeds
Cooking Instructions:
- Preheat the Oven and Roast the Beets: Set your oven to 400°F (200°C). Wash the beets thoroughly and wrap them individually in aluminum foil. Place them on a baking sheet and roast for about 40-50 minutes until they’re tender and a knife easily pierces through them.
- Prepare the Beets: Allow the roasted beets to cool slightly. Once cool enough to handle, peel off the skins and cut the beets into chunks.
- Blend the Ingredients: In a food processor, combine the roasted beets, chickpeas, tahini, garlic, lemon juice, olive oil, and cumin. Blend until smooth. If the mixture is too thick, add water a tablespoon at a time until you reach your desired consistency.
- Season to Taste: Add salt and black pepper to the hummus, blending again to incorporate. Taste and adjust the seasoning if necessary.
- Serve: Transfer the beet hummus to a serving bowl. If desired, garnish with fresh parsley, pumpkin seeds, or sesame seeds for added texture and flavor. Serve with your choice of dippers.
Extra Tips:
To save time, you can roast the beets a day in advance and store them in the refrigerator until you’re ready to make the hummus. If you’re looking for a more intense garlic flavor, you can use roasted garlic instead of raw.
Additionally, if you prefer a spicier hummus, consider adding a pinch of cayenne pepper or a dash of hot sauce. For a smoother texture, peel the chickpeas by gently rubbing them between your fingers under running water to remove the skins before blending.