
As Halloween sneaks up on us, I’m always searching for treats that little ones will adore and parents can feel good about. Picture transforming everyday fruits and veggies into spooky creations like Monster Apple Bites or Creepy Carrot Fingers. These aren’t just delightful to whip up; they’re also deliciously guilt-free. Are you ready to explore a collection of creative, healthy Halloween snacks that perfectly blend festivity with nutrition? Let’s dive into these frightfully fun ideas together.
Monster Apple Bites

Monster Apple Bites are a fun and healthy Halloween treat that both kids and adults will enjoy. These creepy yet adorable snacks are perfect for Halloween parties, lunchboxes, or just a festive treat at home. Not only do they look spookily appetizing, but they’re also packed with nutrients, making them a guilt-free indulgence.
With a combination of apples, peanut butter, and seeds, these playful bites offer a delightful mix of flavors and textures. Making Monster Apple Bites is a simple and engaging activity that kids can help with, turning your kitchen into a Halloween workshop. The recipe involves crafting apple slices into ghoulish little mouths filled with peanut butter and sunflower seeds, with candy eyes peeking out.
This dish is perfect for serving 4-6 people, making it ideal for small gatherings or family snack time.
Ingredients:
- 3 large apples (any variety)
- 1 cup creamy peanut butter
- 1/2 cup sunflower seeds
- 1 small bag of candy eyes
- 1 tablespoon lemon juice
Instructions:
- Prepare the Apples: Begin by washing the apples thoroughly. Cut each apple into quarters to remove the core. Further slice each quarter into three wedges for a total of 12 wedges per apple.
- Prevent Browning: To keep the apple slices fresh and avert them from browning, brush each slice lightly with lemon juice. This is especially helpful if you plan to prepare them a little in advance.
- Create the Mouth: Take two apple wedges and spread a layer of peanut butter on one side of each slice. Make sure to use enough peanut butter so that the bites can hold together once assembled.
- Add the Teeth: Press sunflower seeds into the peanut butter along the outer edge of one of the apple wedges, mimicking sharp monster teeth. Position them at varying angles for a more monstrous appearance.
- Assemble the Bites: Place the second peanut butter-coated apple slice on top of the first slice with the sunflower seeds, creating a mouth-like structure. Confirm that both peanut butter sides are facing each other.
- Attach the Eyes: For the final touch, adhere candy eyes to the top of the apple using a small dab of peanut butter as glue. Place them in a playful manner to give each monster its unique personality.
Extra Tips:
For added variety, consider substituting peanut butter with almond butter or any nut-free spread, especially for allergy-friendly options.
Experiment with different seed types, such as pumpkin seeds, for the “teeth,” which can add a different texture and taste. You can also be creative with the eyes by using raisins or edible googly eyes for a different look.
If you’re preparing these for a party, make sure to keep them refrigerated until serving to maintain their freshness.
Spooky Celery Snakes

Spooky Celery Snakes are a fun and healthy Halloween treat that will delight kids and adults alike. These creepy-crawly snacks aren’t only visually appealing but also packed with nutrients, making them a perfect addition to any Halloween party. Made with fresh celery stalks, cream cheese, and colorful toppings, these snakes are as delicious as they’re spooky.
Whether you’re hosting a Halloween party or just looking for a creative snack to make with your children, Spooky Celery Snakes are sure to be a hit.
The beauty of this recipe lies in its simplicity and versatility. You can customize your snakes with a variety of toppings, allowing you to cater to different tastes and dietary needs. The combination of crunchy celery with creamy filling creates a delightful texture that kids will love. Plus, this recipe is a great way to sneak in some vegetables in a fun and appealing way.
Let’s plunge into the ingredients and steps needed to create these Spooky Celery Snakes for 4-6 people.
Ingredients:
- 6 large celery stalks
- 1 cup cream cheese
- 1 tablespoon mayonnaise
- 1 teaspoon lemon juice
- 1/2 teaspoon garlic powder
- 1/2 teaspoon onion powder
- 1/4 cup black olives, sliced
- 1/4 cup cherry tomatoes, halved
- 1/4 cup colorful bell peppers, diced
- 24 candy eyes or small round candies
- Salt and pepper to taste
Instructions:
- Prepare the Celery: Wash the celery stalks thoroughly under running water to remove any dirt. Pat them dry using a paper towel. Cut each stalk into 3-4 equal pieces, depending on the length of the stalks, to create the snake bodies.
- Make the Cream Cheese Filling: In a medium-sized bowl, combine cream cheese, mayonnaise, lemon juice, garlic powder, onion powder, salt, and pepper. Use a hand mixer or a spoon to blend the ingredients until smooth and creamy.
- Fill the Celery: Using a small spoon or a piping bag, fill the hollow part of each celery piece with the cream cheese mixture. Confirm the filling is slightly overfilled to create a fuller look for the snake bodies.
- Decorate the Snakes: Place two slices of black olives at one end of each celery piece to resemble eyes. Gently press a candy eye or small round candy into each olive slice for added effect. Use cherry tomatoes and diced bell peppers to create colorful patterns along the length of the celery snakes.
- Finalize the Decoration: Position the celery pieces on a platter to create a winding snake-like appearance. Adjust the toppings as needed to confirm they’re secure and visually appealing.
Extra Tips: When making Spooky Celery Snakes, let your creativity shine by playing with different colors and textures. You can substitute cream cheese with hummus or guacamole for a different flavor profile.
If you’re preparing these snakes ahead of time, keep them refrigerated and add the candy eyes just before serving to prevent them from melting. Encourage kids to help with the decorating process, turning this snack preparation into a fun Halloween activity.
Ghostly Banana Pops

Ghostly Banana Pops are a fun and healthy treat perfect for Halloween festivities, especially for kids. These whimsical snacks combine the natural sweetness of bananas with a creamy yogurt coat, while adding a spooky touch with chocolate chip eyes and mouths. Not only do they look adorable, but they also provide a nutritious option amidst the sugary overload that often accompanies Halloween.
These pops are easy to make, involve minimal ingredients, and can be prepared ahead of time, making them an ideal choice for busy parents hosting a Halloween party or simply looking for a festive snack.
The simplicity of Ghostly Banana Pops makes them a great cooking project to involve children in the kitchen. The process of dipping bananas in yogurt and decorating them with chocolate chips can be a delightful hands-on activity. Plus, it’s a sneaky way to get some fruit into their diet.
With some creativity, these banana pops can be adapted to suit various dietary preferences by choosing alternative coatings or decorations. Whether you’re planning a Halloween party or just want to surprise your little ones with a ghostly treat, these banana pops will surely bring smiles to their faces.
Ingredients (Serves 4-6):
- 3 large bananas
- 1 cup vanilla yogurt
- 1/2 cup mini chocolate chips
- 12 popsicle sticks or skewers
- Wax paper or parchment paper
Cooking Instructions:
- Prepare the Bananas: Peel the bananas and cut each one in half. You’ll have six pieces in total. Insert a popsicle stick or skewer into the cut end of each banana half, making sure it’s secure.
- Coat with Yogurt: Pour the vanilla yogurt into a shallow dish or bowl. Gently roll each banana half in the yogurt until it’s completely covered. You can use a spoon to help coat the banana evenly.
- Add the Ghostly Features: Place the yogurt-coated bananas on a tray lined with wax or parchment paper. Press two mini chocolate chips into the upper part of the banana to create eyes, and a third chip below them for a mouth.
- Freeze the Pops: Once all the bananas are decorated, transfer the tray to the freezer. Let the banana pops freeze for at least 2 hours, or until they’re completely frozen.
- Serve: Once frozen, remove the Ghostly Banana Pops from the freezer and serve immediately for a cool, spooky treat.
Extra Tips:
For an extra-special touch, consider using flavored yogurts, such as strawberry or chocolate, to coat the bananas for a different taste experience. If you want to make the pops even more festive, drizzle a bit of melted chocolate or sprinkles over the yogurt before freezing.
Make sure the bananas are ripe but firm, as overly ripe bananas mightn’t hold their shape well. To avoid sticking, make certain the wax paper is thoroughly laid out on the tray before placing the yogurt-coated bananas on it.
Witch’s Broomstick Snacks
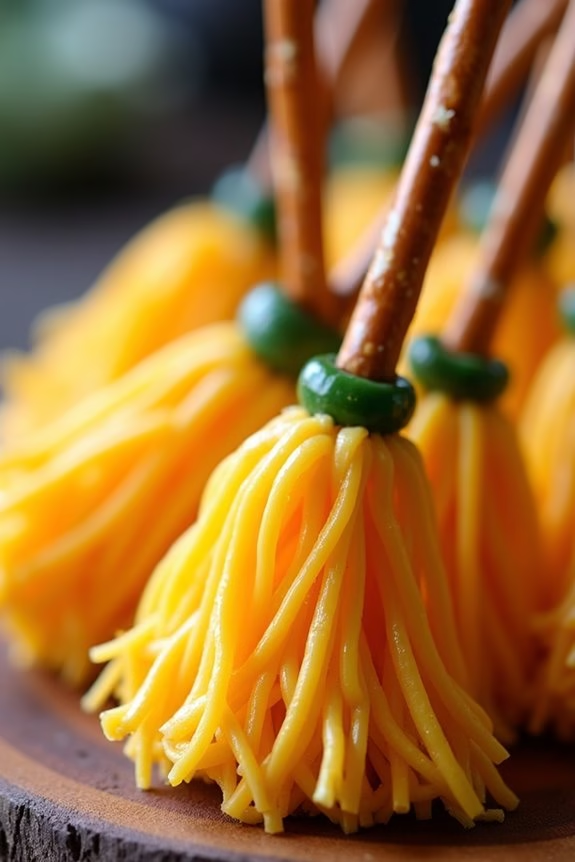
If you’re looking for a fun and creative Halloween treat that will delight both kids and adults, Witch’s Broomstick Snacks are the way to go. These savory snacks aren’t only adorable but also easy to make, making them perfect for a Halloween party or a fun snack time.
With a few simple ingredients, you can whip up these delightful broomsticks in no time, and they’re sure to be a hit with all the little witches and wizards in your life.
Witch’s Broomstick Snacks combine the whimsical spirit of Halloween with a tasty combination of cheese and crunchy pretzel sticks. Each “broomstick” features a pretzel stick handle and a shredded cheese broom, held together with a chive tie for an authentic look.
Not only are these snacks visually appealing, but they also offer a delicious blend of flavors and textures that everyone will enjoy.
Ingredients (serves 4-6 people):
- 12 pretzel sticks
- 6 string cheese sticks
- 12 fresh chives
Cooking Instructions:
- Prepare the Cheese: Start by cutting each string cheese stick in half to create two shorter pieces. This will form the broom’s bristles. Carefully peel downwards from the bottom of each piece to create the appearance of broom bristles, leaving about 1/2 inch at the top unpeeled to hold the bristles together.
- Assemble the Broomsticks: Insert a pretzel stick into the unpeeled end of each cheese piece. Gently press the pretzel stick into the cheese to guarantee it stays in place, forming the handle of the broomstick.
- Tie with Chives: Take one fresh chive and wrap it around the top of the peeled cheese bristles, just below the pretzel stick. This will give the appearance of a tied broom. You may need to trim the chive if it’s too long.
- Secure the Chives: Once the chive is wrapped around the cheese, tie it into a small knot or simply tuck the ends underneath to hold it in place. Confirm the chive is snug so it holds the cheese firmly around the pretzel stick.
- Serve: Arrange the Witch’s Broomstick Snacks on a platter and serve immediately. They can be served as is or alongside a Halloween-themed dip of your choice.
Extra Tips:
When making Witch’s Broomstick Snacks, it’s important to use fresh chives, as they’re more flexible and less likely to break when tying around the cheese. If the chives are too short, you can use two chives per broomstick to guarantee a secure tie.
Additionally, make sure the cheese isn’t too cold, as it can become brittle and difficult to peel. Allow the cheese to sit at room temperature for a few minutes before peeling for easier handling.
Enjoy these whimsical snacks as a festive addition to your Halloween gathering!
Jack-O’-Lantern Stuffed Peppers

Halloween is a time for fun and creativity, and what better way to celebrate than with a festive and delicious dish like Jack-O’-Lantern Stuffed Peppers? These adorable stuffed peppers aren’t only visually appealing but also packed with flavor and nutrition. By carving faces into the peppers just as you’d a pumpkin, you can create a dish that’s certain to delight children and adults alike.
These stuffed peppers are a wonderful way to incorporate vegetables into your Halloween spread while also keeping the spooky spirit alive. Perfect for a Halloween party or a family dinner, these Jack-O’-Lantern Stuffed Peppers are designed to serve 4-6 people. The recipe combines hearty ground turkey or beef with a mix of rice, vegetables, and spices, all encased within a carved bell pepper.
The peppers themselves become the show-stopping centerpiece of your meal, adding a pop of color and a playful twist to the traditional stuffed pepper. With minimal preparation and a baking time that allows you to focus on other Halloween festivities, this dish is as practical as it’s fun.
Ingredients for 4-6 Servings:
- 4-6 large orange bell peppers
- 1 pound ground turkey or beef
- 1 cup cooked rice
- 1 small onion, diced
- 2 cloves garlic, minced
- 1 cup canned diced tomatoes
- 1 cup shredded cheddar cheese
- 1 tablespoon olive oil
- 1 teaspoon Italian seasoning
- 1 teaspoon paprika
- Salt and pepper to taste
Cooking Instructions:
- Preheat Oven: Start by preheating your oven to 375°F (190°C) to make certain it’s ready for baking the peppers.
- Prepare Peppers: Carefully slice the tops off the bell peppers and remove the seeds and membranes inside. Using a small paring knife, carve jack-o’-lantern faces on one side of each pepper. Set them aside.
- Cook Filling: In a large skillet, heat the olive oil over medium heat. Add the diced onion and minced garlic, sautéing until the onion becomes translucent. Add the ground turkey or beef, breaking it apart with a spoon, and cook until browned.
- Mix in Remaining Ingredients: Stir in the cooked rice, canned diced tomatoes, Italian seasoning, paprika, salt, and pepper. Cook for an additional 5 minutes to allow the flavors to meld together.
- Stuff the Peppers: Carefully fill each carved pepper with the meat and rice mixture, pressing down gently to make sure they’re well-packed. Top each pepper with a sprinkle of shredded cheddar cheese.
- Bake: Place the stuffed peppers in a baking dish and cover with aluminum foil. Bake in the preheated oven for 25-30 minutes, or until the peppers are tender and the cheese is melted and bubbly.
- Serve: Remove from the oven and let cool slightly before serving. Enjoy your Jack-O’-Lantern Stuffed Peppers warm, with the fun jack-o’-lantern faces adding a festive touch!
Extra Tips:
To make the carving process easier, choose bell peppers that are relatively uniform in size and shape. When carving the faces, it can be helpful to sketch your design on the pepper with a toothpick first.
For added flavor, consider experimenting with different cheeses or adding a dash of hot sauce to the filling for a bit of heat. If you prefer a vegetarian option, substitute the meat with black beans or chickpeas.
These playful peppers make for a delightful addition to your Halloween menu, bringing both a creative and tasty element to the table.
Mummy Hot Dogs
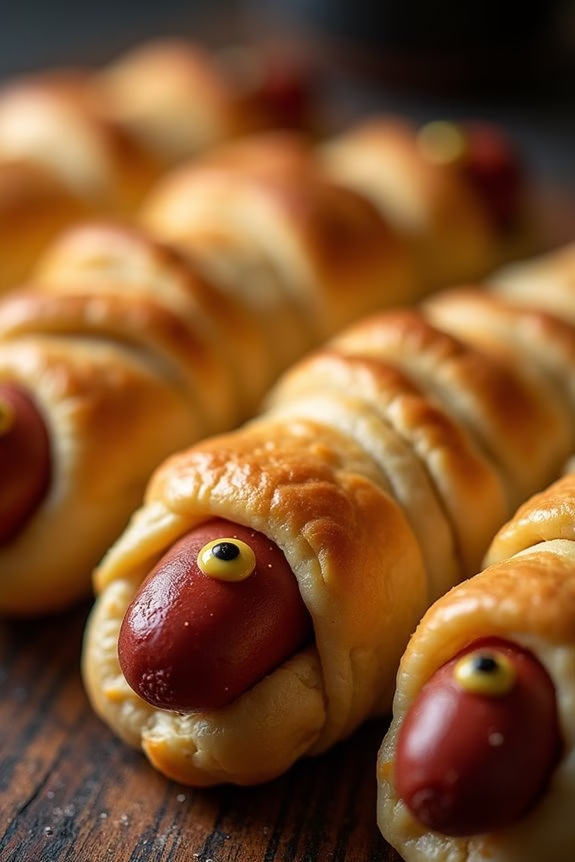
Creating Mummy Hot Dogs is a simple process that involves just a few ingredients and minimal preparation time. This makes them an ideal choice for busy parents looking to create a memorable Halloween experience.
Whether you’re hosting a Halloween party or just want to surprise your kids with a spooky snack, Mummy Hot Dogs are sure to be a hit.
Ingredients (Serves 4-6):
- 8 hot dogs
- 1 can of refrigerated crescent roll dough
- 1 tablespoon of mustard
- Cooking spray
- 16 small edible eyes (optional)
Cooking Instructions:
1. Preheat the Oven: Start by preheating your oven to 375°F (190°C). This guarantees the dough bakes evenly and results in perfectly cooked Mummy Hot Dogs.
2. Prepare the Dough: Open the can of crescent roll dough and unroll it onto a clean surface. Using a pizza cutter or knife, cut the dough into thin strips, approximately 1/4 inch wide. These will serve as the “bandages” for your mummies.
3. Wrap the Hot Dogs: Take each hot dog and wrap it with the dough strips, leaving a small gap at one end for the “face.” Overlap the strips slightly to give the appearance of mummy bandages.
Place the wrapped hot dogs on a baking sheet lightly sprayed with cooking spray.
4. Bake: Once all the hot dogs are wrapped, place the baking sheet in the preheated oven. Bake for 12-15 minutes or until the dough is golden brown and cooked through.
5. Add the Eyes: After removing the hot dogs from the oven, allow them to cool slightly. Use a small dab of mustard to attach two edible eyes at the exposed end of each hot dog to complete the mummy look.
Extra Tips:
For a healthier alternative, consider using turkey or chicken hot dogs. If you can’t find edible eyes, you can make them by using small dots of mustard or ketchup.
Be sure to supervise children when handling the hot dogs as they can be hot right out of the oven. If you want to add a little extra flavor, consider sprinkling some garlic powder or grated cheese over the dough before baking.
These Mummy Hot Dogs can be served with ketchup or mustard for dipping, making them even more fun and tasty for the kids.
Frankenstein Avocado Toast
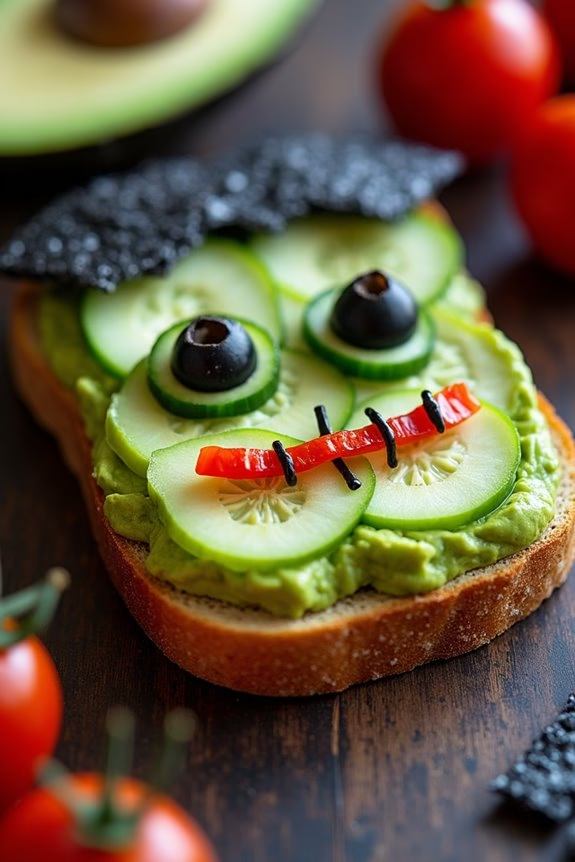
Frankenstein Avocado Toast is a fun and spooky treat perfect for Halloween, especially for kids who love a good themed snack. This dish not only looks creepy but is also packed with nutrients, making it a great choice for a Halloween party or a festive breakfast. The creamy avocado spread forms the base for our Frankenstein, while cleverly arranged toppings bring this iconic monster to life. With a combination of crunchy vegetables and wholesome bread, this ghoulish toast is both healthy and delicious.
Creating these Frankenstein Avocado Toasts is an engaging activity that can involve the little ones, allowing them to get creative with their food. Whether you’re hosting a Halloween party or just want to surprise your kids with a fun meal, these toasts are sure to be a hit. The ingredients are simple and the preparation is quick, making it an ideal choice for busy parents who want to add a bit of Halloween spirit to their meals.
Ingredients for 4-6 servings:
- 4-6 slices of whole-grain or sourdough bread
- 3 ripe avocados
- 1 tablespoon lime juice
- Salt and pepper to taste
- 1 red bell pepper
- 1 black olive
- 1 cucumber
- Handful of cherry tomatoes
- 1 sheet of nori (seaweed)
- Optional: 4-6 tablespoons of cream cheese
Cooking Instructions:
- Prepare the Avocado Spread: Cut the avocados in half, remove the pits, and scoop the flesh into a bowl. Add lime juice, salt, and pepper, then mash the mixture until smooth. If desired, mix in cream cheese for extra creaminess.
- Toast the Bread: Lightly toast the slices of bread until they’re golden brown and firm enough to hold the toppings without getting soggy.
- Spread the Avocado: Evenly spread the avocado mixture over each slice of toasted bread, creating a smooth, green canvas for your Frankenstein faces.
- Create Frankenstein’s Face: Slice the cucumber into thin rounds for the eyes and place two on each toast. Add a slice of black olive on top of each cucumber round to form the pupils.
- Add the Hair and Mouth: Cut the nori sheet into strips and arrange them on the top edge of the toast to resemble Frankenstein’s hair. Use additional nori strips or a small slice of red bell pepper to form a mouth.
- Finish with Bolts and Scars: Slice the cherry tomatoes in half and place them on the sides of the bread to mimic Frankenstein’s bolts. Add thin strips of red bell pepper for facial scars.
Extra Tips:
When making Frankenstein Avocado Toast, be sure to choose ripe avocados for the best texture and flavor. If you’re preparing the dish in advance, consider keeping the avocado spread separate and refrigerating it to prevent discoloration.
To make the nori strips easier to cut, use kitchen scissors. Encourage kids to get involved by letting them design their own monster faces with the toppings. This fun and interactive recipe not only allows for creativity but also makes for a memorable Halloween experience.
Eyeball Pasta Salad
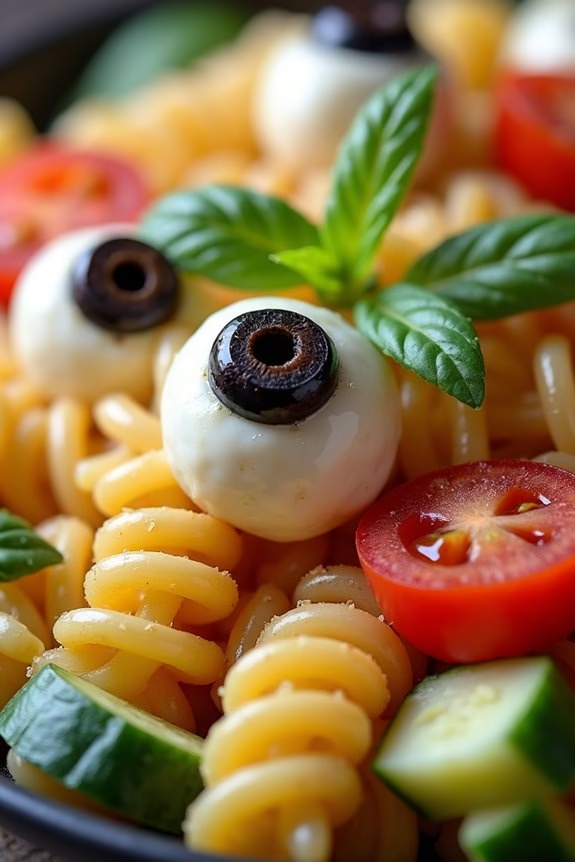
Halloween is a time for spooky fun, and what better way to add a touch of fright to your festivities than with a bowl of Eyeball Pasta Salad? This dish is designed with creativity in mind, offering a playful twist on a classic pasta salad by incorporating “eyeballs” made from mozzarella balls and olives.
This creepy yet delicious dish is perfect for kids who appreciate a good Halloween snack that’s both eerie and tasty. Eyeball Pasta Salad isn’t only a visual treat but also a flavorful experience. The pasta serves as the perfect base, allowing the fresh ingredients to shine through.
With the addition of cherry tomatoes, cucumbers, and a zesty dressing, this dish is a hit at any Halloween gathering. It’s easy to make and can be prepared in advance, making it a convenient option for busy parents looking to delight their little ghouls and goblins.
Ingredients (Serves 4-6):
- 12 ounces of rotini pasta
- 1 cup cherry tomatoes, halved
- 1 cucumber, diced
- 1 cup mini mozzarella balls
- 1 can (3.8 oz) of sliced black olives
- 1/4 cup Italian dressing
- Salt and pepper to taste
- Fresh basil leaves for garnish
Cooking Instructions:
- Cook the Pasta: Begin by bringing a large pot of salted water to a boil. Add the rotini pasta and cook according to the package instructions until al dente. Once cooked, drain and rinse the pasta under cold water to stop the cooking process and cool the pasta down.
- Prepare the Eyeballs: While the pasta is cooling, create the “eyeballs” by placing a sliced black olive on top of each mini mozzarella ball. Press gently to secure the olive in place. Set aside.
- Mix the Salad: In a large bowl, combine the cooled pasta, cherry tomatoes, and diced cucumber. Toss them together to guarantee even distribution.
- Add the Eyeballs: Carefully fold in the mozzarella and olive “eyeballs” into the pasta mixture. Be gentle to maintain the eyeball appearance.
- Dress the Salad: Pour the Italian dressing over the salad and toss everything together until well coated. Taste and season with salt and pepper as needed.
- Garnish and Serve: Transfer the salad to a serving bowl and garnish with fresh basil leaves. Serve immediately or refrigerate until ready to serve.
Extra Tips:
For an extra spooky touch, consider using colored pasta such as black or orange to enhance the Halloween theme. If you can’t find mini mozzarella balls, you can use regular-sized mozzarella balls and cut them in halves or quarters to fit the olive slices.
Be sure to mix the salad gently to prevent the “eyeballs” from falling apart. This dish can be made a day ahead, allowing the flavors to meld together beautifully, making it even more delicious when served.
Pumpkin Patch Grapes

Creating these little edible pumpkins involves minimal ingredients and time, making them an ideal last-minute addition to your Halloween menu. The key to achieving the pumpkin-like appearance is in the use of orange-colored candy melts, which coat the grapes entirely. This recipe is designed to serve 4-6 people, making it suitable for small gatherings or group activities. With just a few steps, you can transform ordinary grapes into a spooktacular treat that delights both the eyes and the taste buds.
Ingredients for 4-6 People:
- 2 cups of seedless green grapes
- 1 cup of orange candy melts
- 12 pretzel sticks
- Edible green icing or gel
Instructions:
- Prepare the Grapes: Wash the grapes thoroughly under cold water and then pat them dry with a paper towel. It’s important that the grapes are completely dry to guarantee the candy coating sticks properly.
- Melt the Candy: In a microwave-safe bowl, melt the orange candy melts according to the package instructions. Typically, this involves microwaving them in 30-second intervals, stirring each time, until the candy is smooth and completely melted.
- Coat the Grapes: Dip each grape into the melted candy using a fork or a toothpick to guarantee it’s fully coated. Allow any excess candy to drip off before placing the grape on a parchment-lined baking sheet.
- Create the Pumpkin Stem: Break the pretzel sticks into small pieces, about half an inch long. Insert a piece of pretzel into the top of each coated grape to resemble a pumpkin stem.
- Add the Leaf Detail: Using the edible green icing or gel, add a small leaf detail next to the pretzel stick on each grape to enhance the pumpkin appearance.
- Let Set: Allow the coated grapes to set at room temperature or place them in the refrigerator for quicker setting. Once the candy coating is firm, they’re ready to serve.
Extra Tips:
When melting the candy melts, be cautious not to overheat them, as this can cause the candy to seize. If you find the candy is too thick, add a teaspoon of vegetable shortening to thin it out.
For an extra touch, consider using different colored grapes to create a colorful pumpkin patch effect. Make sure to have extra pretzel sticks on hand in case some break during the stem insertion.
Enjoy your Pumpkin Patch Grapes as a fun and festive addition to your Halloween celebrations!
Cauldron Popcorn Mix

Ideal for a party or a cozy family movie night, this Halloween popcorn mix is easy to prepare and customize. The recipe allows room for creativity, so you can easily swap ingredients to match your favorite flavors or dietary needs. As you toss the ingredients together, you’ll find that the mix isn’t only simple to make but also a fun activity to involve the kids in, letting them craft their own spooky creation.
Ingredients for 4-6 servings:
- 8 cups of popped popcorn
- 1 cup of mini marshmallows
- 1 cup of candy corn
- 1 cup of pretzel sticks
- 1 cup of chocolate candies (such as M&Ms)
- 1/2 cup of roasted peanuts (optional)
- 1/2 cup of dried cranberries
- 1/2 cup of caramel sauce
- 1/4 cup of colorful sprinkles
Instructions:
- Pop the Popcorn: Begin by popping 8 cups of popcorn. You can use a stovetop, microwave, or air popper. Once popped, transfer the popcorn to a large mixing bowl, making sure it’s free of unpopped kernels.
- Combine Ingredients: Add the mini marshmallows, candy corn, pretzel sticks, chocolate candies, roasted peanuts (if using), and dried cranberries to the bowl with the popcorn. Gently mix everything together with a large spoon or your hands.
- Add the Caramel: Slowly drizzle the caramel sauce over the popcorn mixture, making certain of even coverage. Toss the mixture gently to coat the ingredients lightly with caramel.
- Decorate with Sprinkles: Sprinkle the colorful sprinkles over the entire mix to add a festive touch. Toss everything together one final time to distribute the sprinkles evenly.
- Serve: Transfer the mixture to a large serving bowl or individual “cauldrons” for an added Halloween effect. Enjoy immediately, or store in an airtight container for up to a day.
Extra Tips: To keep your Cauldron Popcorn Mix fresh and crunchy, make sure to store it in an airtight container if not serving immediately. You can also customize the mix by adding or substituting ingredients like gummy worms or chocolate chips for extra flavor.
If serving to children with allergies, verify all ingredients are safe for consumption, particularly checking the candy and nut options. Have fun with the presentation by using themed bowls or containers to enhance the Halloween spirit!
Creepy Carrot Fingers
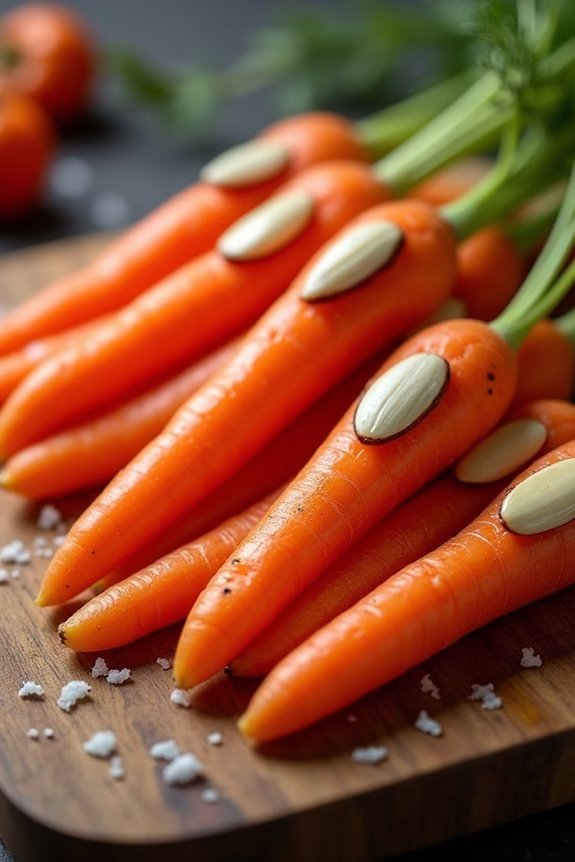
Halloween is a time for creative and spooky fun, especially when it comes to food. Creepy Carrot Fingers are a perfect treat to serve at your Halloween party, and they’re both healthy and easy to make. These eerie snacks will delight kids and adults alike, providing a nutritious option amidst the candy and sweets. Shaped like fingers with a ghoulish twist, they’re sure to be a hit with everyone.
The Creepy Carrot Fingers are made by cleverly transforming carrots into realistic-looking fingers, complete with almond slivers as fingernails. The natural color and shape of carrots make them the ideal base for this eerie dish. Not only are they visually striking, but these carrot fingers are also full of vitamins and minerals, ensuring a healthy addition to your Halloween festivities. They’re perfect for serving as an appetizer or a fun snack option during the spooky season.
Ingredients (Serving Size: 4-6 people):
- 6 large carrots
- 6 almond slivers
- 1/4 cup cream cheese or hummus (for adhesive)
- 1 tablespoon red food coloring (optional)
- 1 tablespoon olive oil
- Salt, to taste
Cooking Instructions:
- Prepare the Carrots: Begin by washing and peeling the carrots to remove any dirt and impurities. Trim the ends of the carrots, leaving one end rounded to resemble a fingertip.
- Shape the Fingers: Using a small paring knife, carve out a shallow nail bed on the rounded end of each carrot. This is where the almond sliver will be placed to resemble a fingernail.
- Attach the Fingernails: Spread a small amount of cream cheese or hummus onto the base of each almond sliver. Press the almond sliver firmly into the carved nail bed on each carrot to secure it in place.
- Add the Creepy Effect: If desired, apply a few drops of red food coloring around the base of the almond sliver to mimic a bloody effect. This step is optional but adds an extra spookiness to the fingers.
- Season and Serve: Lightly brush the carrots with olive oil and sprinkle with a pinch of salt for added flavor. Arrange the carrots on a platter, and your Creepy Carrot Fingers are ready to serve.
Extra Tips:
To make peeling and shaping the carrots easier, consider using pre-packaged baby carrots if you prefer smaller finger sizes. If you choose to add food coloring, be cautious as it can stain; consider using gloves while handling it.
For a vegan alternative, substitute the cream cheese with a plant-based option. These Creepy Carrot Fingers can be prepared a day in advance and stored in the refrigerator to save time on the day of your Halloween event.
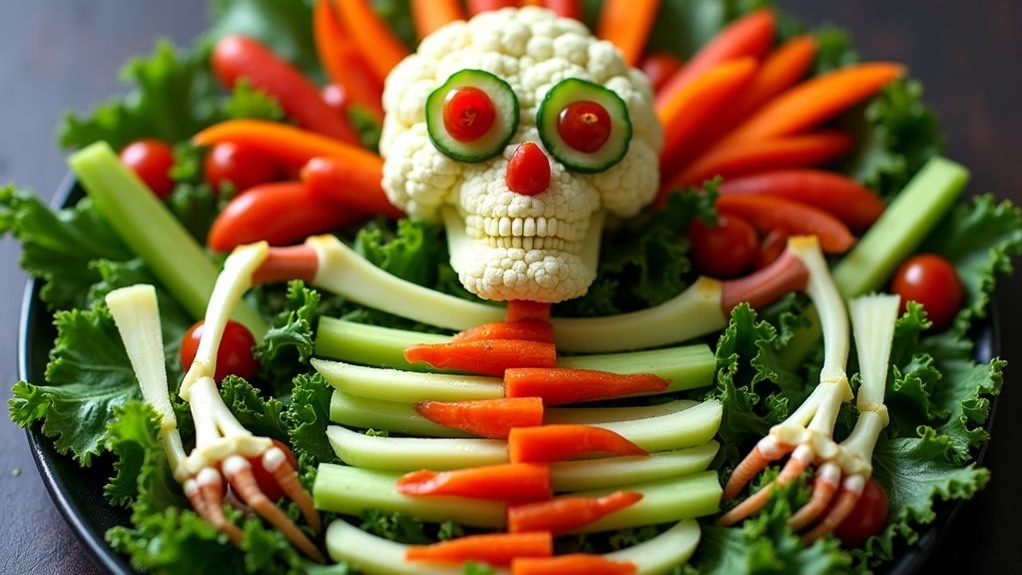
Skeleton Veggie Platter
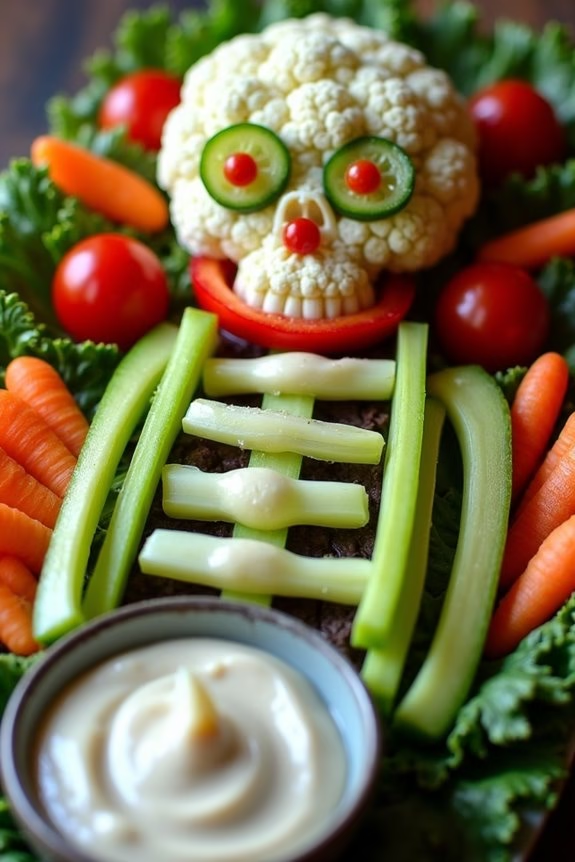
Celebrate Halloween in a fun and healthy way with a Skeleton Veggie Platter! This creative and nutritious dish transforms a variety of fresh vegetables into a spooktacular skeleton shape, perfect for delighting kids and adults alike at your Halloween party.
Not only does it serve as a festive centerpiece, but it also promotes kids to munch on some wholesome snacks amidst all the sugary treats. The Skeleton Veggie Platter is as easy to assemble as it’s eye-catching, making it a fantastic addition to your Halloween spread.
This recipe is designed to serve 4-6 people, providing a colorful assortment of veggies that can be dipped into a delicious ranch dressing or hummus. The key to success with this platter is to use a mix of vibrant colors and textures, creating a visually appealing and fun-to-eat arrangement.
Whether you’re hosting a party or simply want to surprise your family with a Halloween-themed snack, this platter is sure to be a hit.
Ingredients:
- 1 head of cauliflower
- 1 large cucumber
- 1 red bell pepper
- 1 yellow bell pepper
- 1 bunch of celery
- 1 bag of baby carrots
- 1 cup cherry tomatoes
- 1 small bunch of kale
- 1 cup of your favorite dip (ranch dressing or hummus)
Instructions:
- Prepare the Vegetables:
- Wash all the vegetables thoroughly. Pat them dry with a clean kitchen towel to remove excess moisture.
- Cut the cauliflower into small, bite-sized florets.
- Slice the cucumber into thin rounds.
- Cut the red and yellow bell peppers into strips, discarding the seeds and stems.
- Cut the celery into 3-inch sticks.
- Keep the baby carrots and cherry tomatoes whole.
- Assemble the Skeleton:
- Lay the kale leaves at the bottom of a large platter to serve as a base.
- Use the cauliflower florets to form the skull at the top of the platter. Arrange them in a round shape, leaving space for “eyes.”
- Slice two cucumber rounds and place them on the cauliflower to create eyes. Add a small piece of cherry tomato in the center of each cucumber slice for pupils.
- Use a red bell pepper strip to form a mouth below the eyes.
- Next, use the celery sticks to form the arms and legs of the skeleton.
- Arrange the bell pepper strips and cucumber rounds to form the ribs and spine.
- Place the baby carrots as the fingers and toes.
- Scatter cherry tomatoes around the platter for additional color and decoration.
- Serve:
- Place a bowl of your chosen dip at the bottom of the platter, near the skeleton’s “feet.”
- Serve immediately or cover with plastic wrap and refrigerate until ready to serve.
Extra Tips:
To make your Skeleton Veggie Platter even more festive, consider adding some edible eyes to the skeleton’s head, which can be found in most baking aisles.
You can also vary the vegetables based on personal preferences or dietary restrictions, such as using jicama for bones or adding broccoli for greenery. If you want to prepare ahead of time, chop the vegetables the night before and store them in airtight containers in the refrigerator.
Assembling the platter just before serving will promote the veggies to remain crisp and fresh.