

Halloween is just around the corner, and I’m so excited to share some treats that are both delightful and healthy. Picture yourself enjoying a spooky apple grin or savoring ghostly banana delights. These snacks turn ordinary fruits and veggies into festive fun without sacrificing flavor. Whether you’re hosting a party or enjoying a cozy night in, these ideas will enchant your taste buds. Ready to discover what’s next on the list?
Spooky Apple Bites
Halloween is a time for fun, costumes, and, of course, treats! However, indulging in too many sugary snacks can be less than ideal for our health. That’s where Spooky Apple Bites come in. This simple and healthy snack is perfect for adding a little fright to your festivities while keeping things nutritious.
With apples as the main ingredient, these bites aren’t only delicious but also packed with fiber and vitamins. Spooky Apple Bites are a creative way to transform an ordinary fruit into a creepy yet delightful treat. The combination of tart apples, nut butter, and seeds creates a tasty and satisfying snack that’s both wholesome and fun.
They’re easy to prepare, require minimal ingredients, and are sure to be a hit with both kids and adults at your Halloween gatherings. Let’s plunge into the recipe for this fang-tastic snack!
Ingredients for 4-6 servings:
- 3 medium tart apples (such as Granny Smith)
- 1/4 cup smooth peanut butter or almond butter
- 1/4 cup sunflower seeds or slivered almonds
- 1/4 cup strawberry or raspberry jam
- 12 small edible candy eyes (optional)
Cooking Instructions:
- Prepare the Apples:
- Wash and dry the apples thoroughly. Cut each apple into quarters, and then remove the core and seeds from each piece.
- Create the Mouths:
- Take each apple quarter and cut a wedge out of the skin side to create a mouth shape. Be careful not to cut too deep to avoid breaking the apple.
- Add the “Teeth”:
- Using a small spoon or butter knife, spread a thin layer of peanut butter or almond butter inside the cut-out wedge (the “mouth”). This will help the seeds stick and resemble teeth.
- Insert the Teeth:
- Place the sunflower seeds or slivered almonds into the peanut butter in a row to create the “teeth.” Make sure they’re evenly spaced for the best effect.
- Add the “Blood”:
- Use a small spoon to drizzle a little strawberry or raspberry jam around the edges of the mouth to resemble blood. This adds a spooky touch and a hint of sweetness.
- Attach the Eyes (Optional):
- For an extra eerie touch, use a dab of peanut butter to attach the candy eyes above the mouth on the apple’s skin.
- Serve:
- Arrange the Spooky Apple Bites on a platter and serve immediately. Enjoy your healthy Halloween snack!
Extra Tips:
To prevent the apples from browning, you can lightly brush them with lemon juice before assembling the bites. If you can’t find candy eyes, small raisins or chocolate chips can be used as a substitute.
When choosing nut butter, opt for a natural version without added sugars to keep the snack as healthy as possible. These Spooky Apple Bites are best enjoyed fresh, but if you need to make them ahead of time, store them in an airtight container in the refrigerator for up to a day.
Banana Ghosts

Banana Ghosts are a delightful and healthy Halloween snack that can be enjoyed by both children and adults. They’re perfect for those looking to indulge in the festive spirit without compromising on nutrition.
These ghostly treats are simple to make, requiring minimal ingredients, and can be prepared in just a few minutes. The creamy texture of bananas combined with a hint of chocolate makes them a crowd-pleaser at any Halloween gathering.
This recipe for Banana Ghosts is great for serving 4-6 people, making it ideal for small parties or family get-togethers. Not only are Banana Ghosts fun and easy to assemble, but they’re also an excellent way to encourage kids to eat more fruit. The playful design of the ghosts can be a fun activity for children, allowing them to get creative with their snacks.
Ingredients (Serving Size: 4-6 people):
- 3 large bananas
- 1/2 cup of mini chocolate chips
- 1/4 cup of regular-sized chocolate chips
- 6 wooden popsicle sticks
Instructions:
- Prepare the Bananas: Start by peeling the bananas. Cut each banana in half to create two shorter pieces that will form the body of the ghosts.
- Insert the Popsicle Sticks: Gently push a wooden popsicle stick into the flat end of each banana half. This will create a handle for holding the Banana Ghosts.
- Create the Eyes and Mouth: For the eyes, press two mini chocolate chips into the pointed end of each banana half. The flat side of the chocolate chips should be facing outwards to form the eyes.
- Make the Mouth: Use a regular-sized chocolate chip to create the mouth by pressing it into the banana below the eyes. Again, verify the flat side is facing outwards for a more defined look.
- Chill the Ghosts: Place the assembled Banana Ghosts on a tray lined with parchment paper. Put the tray in the refrigerator for at least 20 minutes to allow the ghosts to firm up. This will make them easier to handle and eat.
Extra Tips:
When making Banana Ghosts, make sure the bananas are ripe but still firm. Overripe bananas can be too soft and may not hold the popsicle sticks well.
If you want to prepare these treats in advance, you can freeze the assembled ghosts for a couple of hours, which will also add a reviving twist to the snack.
To prevent browning, you can lightly brush the banana with a bit of lemon juice before assembling. Additionally, feel free to experiment with different toppings or use edible markers to decorate the ghosts for added creativity.
Clementine Pumpkins

Looking for a fun and festive way to celebrate Halloween while keeping it healthy? Clementine Pumpkins are the perfect snack! These adorable, vibrant treats aren’t only easy to make but also pack a nutritious punch. With their natural sweetness and charming appearance, Clementine Pumpkins are bound to be a hit at any Halloween gathering, delighting both kids and adults alike.
This simple recipe requires minimal ingredients and effort, making it a great activity to involve little ones in the kitchen. Whether you’re preparing for a Halloween party or just looking to add some seasonal fun to your snack routine, these little pumpkins are a delightful choice. With a serving size fit for 4-6 people, you can easily scale the recipe up or down depending on the number of guests.
Ingredients for 4-6 People:
- 12 clementines
- 6 celery stalks
Cooking Instructions:
- Prepare the Clementines: Begin by peeling the clementines carefully, guaranteeing the segments remain intact to maintain the round shape, resembling a pumpkin.
- Prepare the Celery Stalks: Wash the celery stalks thoroughly and cut them into sticks approximately 1-2 inches long. These will serve as the pumpkin stems.
- Assemble the Pumpkins: Insert a piece of celery into the top of each peeled clementine. Adjust the celery to guarantee it stands upright, achieving the look of a pumpkin with a stem.
- Presentation: Arrange the Clementine Pumpkins on a platter or a festive tray. You can add some decorative Halloween-themed props around the dish to enhance the visual appeal.
Extra Tips:
For an added touch of creativity, consider using a black food-safe marker to draw jack-o’-lantern faces on the clementines before peeling them. This can add an extra layer of fun and personality to your snack.
Additionally, make sure the clementines are at room temperature before serving for the best flavor. If you’re preparing this dish in advance, keep the clementines and celery separate until just before serving to guarantee the celery remains crisp.
Veggie Skeleton Platter
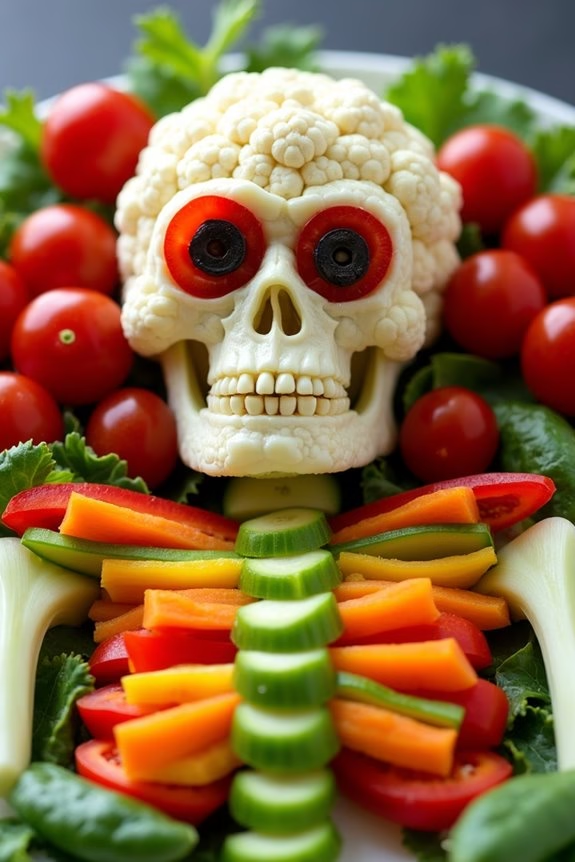
A Veggie Skeleton Platter is a fun and nutritious way to incorporate vegetables into your Halloween celebrations. This creative dish isn’t only visually appealing but also encourages kids and adults alike to enjoy their veggies in a playful manner.
The platter consists of a variety of fresh vegetables arranged in the shape of a skeleton, making it a perfect centerpiece for your Halloween party table. This dish is easy to prepare and can be customized to suit individual taste preferences by selecting different vegetables.
The Veggie Skeleton Platter serves 4-6 people, making it ideal for small gatherings. It’s a healthy option that provides a range of vitamins and minerals while also adding a splash of color to your Halloween festivities.
Ingredients:
- 1 head of cauliflower
- 1 bunch of celery
- 1 large cucumber
- 1 red bell pepper
- 1 yellow bell pepper
- 1 cup of baby carrots
- 1 cup of cherry tomatoes
- 1 cup of sugar snap peas
- 2 black olives
- 1 cup of hummus or your favorite veggie dip
Instructions:
- Prepare the Vegetables: Wash all the vegetables thoroughly. Break the cauliflower into florets, and slice the celery and cucumber into sticks. Cut the bell peppers into strips, and slice two rings from the red bell pepper for the skeleton’s eyes. Slice the black olives into rings.
- Assemble the Skeleton Head: On a large platter, arrange the cauliflower florets to form the skeleton’s head. Use the two red bell pepper rings for the eyes and place a black olive slice inside each ring for the pupils.
- Create the Body and Limbs: Lay out the celery sticks vertically to form the spine. Use the cucumber slices to form the ribs on either side of the spine. Arrange the bell pepper strips as the arms and legs, and use the baby carrots for the hands and feet.
- Add Finishing Touches: Place the cherry tomatoes as joints at the shoulders, elbows, and knees. Use sugar snap peas to fill in any gaps and add more color and texture to the platter.
- Serve with Dip: Place a bowl of hummus or your favorite veggie dip near the platter so guests can dip the veggies as they enjoy.
Extra Tips:
When creating the Veggie Skeleton Platter, feel free to get creative with the types of vegetables you use. You can substitute any of the veggies with your favorites or those that are in season.
For a more personalized touch, consider adding small cheese cubes or nuts for additional variety. To keep the veggies fresh and crisp, assemble the platter just before serving, and keep it covered with plastic wrap in the refrigerator if you prepare it a little in advance.
Enjoy your healthy and spooky creation!
Witch’s Broomsticks
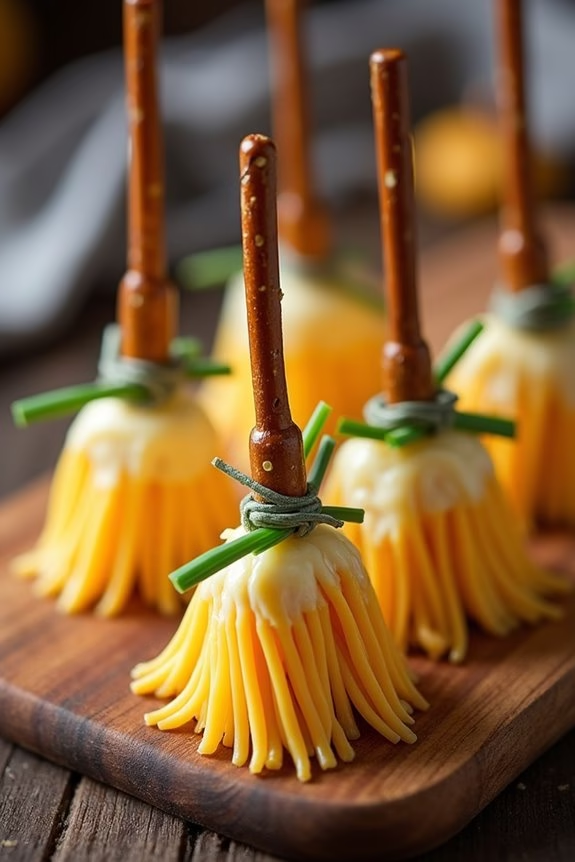
Witch’s Broomsticks are the perfect healthy Halloween snacks that combine creativity with nutrition. These whimsical treats aren’t only fun to make but also a delightful addition to any Halloween gathering.
Featuring simple ingredients, they provide a tasty balance of flavors and textures, making them an ideal choice for both kids and adults. With just a few steps and minimal preparation time, you can serve up these enchanting broomsticks that will be a hit at your Halloween party.
This recipe is designed to serve 4-6 people, allowing everyone to enjoy these delightful snacks. The recipe uses ingredients that are easily accessible, and the steps are straightforward, making it a great activity to do with kids or friends.
Whether you’re hosting a Halloween party or simply looking to add a spooky touch to your snack table, Witch’s Broomsticks are bound to impress.
Ingredients:
- 12 pretzel sticks
- 6 string cheese sticks
- 12 fresh chives
Instructions:
- Prepare the String Cheese: Unwrap the string cheese sticks and cut each one in half. You should have 12 smaller pieces of string cheese after cutting.
- Create the Broom Bristles: Take each half of the string cheese and use a paring knife to make several lengthwise cuts around one end, about halfway up, to create the appearance of broom bristles. Be careful not to cut all the way through.
- Assemble the Broomstick: Insert one end of a pretzel stick into the uncut end of each string cheese piece. Push it in gently to verify it holds without breaking the cheese.
- Secure with Chives: Wrap a piece of fresh chive around the top of the cheese where the pretzel meets the cheese, tying it gently to secure the cheese to the pretzel. This will enhance the broomstick appearance.
- Serve: Arrange the finished Witch’s Broomsticks on a serving platter. They can be served immediately or stored in the refrigerator until ready to serve.
Extra Tips:
To add a bit of variety, you can experiment with flavored string cheese or different types of pretzel sticks to suit your taste preferences.
If you find the chives difficult to tie, briefly soaking them in warm water will make them more pliable. Ascertain the cheese is cold when you start assembling, as it will be easier to cut and hold its shape.
Witch’s Broomsticks are best served fresh, but if you need to prepare them in advance, store them in an airtight container in the refrigerator to keep the cheese from drying out. Enjoy these fun and festive snacks as part of your Halloween celebrations!
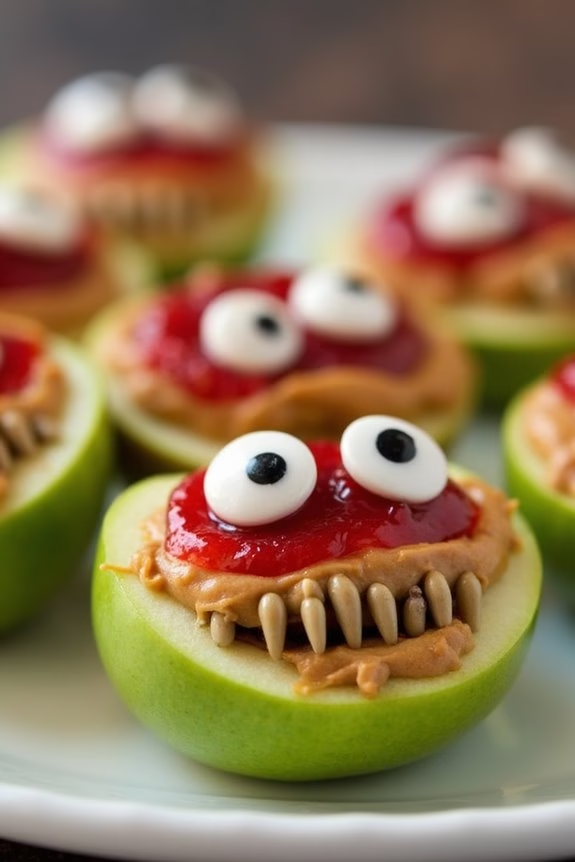
Monster Mouths

Monster Mouths are a fun and spooky treat that’s perfect for Halloween parties or a festive snack at home. These healthy snacks aren’t only delicious but also easy to prepare, making them a great activity for kids and adults alike. Using just a few simple ingredients, you can create edible monster mouths that are both visually impressive and nutritious.
Whether you’re hosting a Halloween gathering or just looking to add some spooky flair to your snack time, Monster Mouths are sure to be a hit. The beauty of Monster Mouths lies in their versatility and health benefits. They’re made using fresh fruits and nuts, providing a good source of vitamins, fiber, and healthy fats.
The combination of sweet apples, creamy peanut butter, and crunchy almonds creates a delightful texture and taste that appeals to all ages. Plus, making these monster-themed snacks is a creative way to encourage children to enjoy eating fruits. Now, let’s plunge into the recipe and create these monstrously delightful snacks.
Ingredients (Serves 4-6 people):
- 3 red apples
- 1/2 cup creamy peanut butter (or almond butter for nut allergies)
- 1/4 cup slivered almonds
- 1/4 cup mini marshmallows
- Lemon juice (optional)
Instructions:
- Prepare the Apples: Start by washing the apples thoroughly. Cut each apple into quarters and remove the core and seeds. Then, slice each quarter into three smaller wedges, giving you a total of 12 wedges per apple.
- Prevent Browning: To prevent the apple slices from browning, you can lightly brush them with lemon juice. This step is optional but recommended if you’re preparing the snacks in advance.
- Assemble the Monster Mouths: Take one apple wedge and spread a layer of peanut butter on one side. Place another apple wedge on top, peanut butter side down, to create a “mouth” shape. Repeat this process with the remaining apple wedges.
- Add the Teeth and Tongue: Insert slivered almonds into the peanut butter on one side of the “mouth” to create sharp monster teeth. You can randomly place the almonds to give each monster a unique and scary grin.
- Finish with Eyes: Finally, press a mini marshmallow onto the top of each apple “mouth” to serve as the monster’s eyes. You can secure them with a little dab of peanut butter if needed.
Extra Tips:
When making Monster Mouths, you can get creative with the ingredients. For a nut-free version, consider using sunflower seed butter instead of peanut butter.
For added fun, you can use edible food markers to draw pupils on the marshmallow eyes or substitute raisins for the eyes for a healthier option. Remember to prepare the Monster Mouths close to serving time if you prefer crisp apples, as they may soften slightly over time.
Enjoy these spooky yet nutritious snacks and have a monstrously good time!
Creepy Crudités
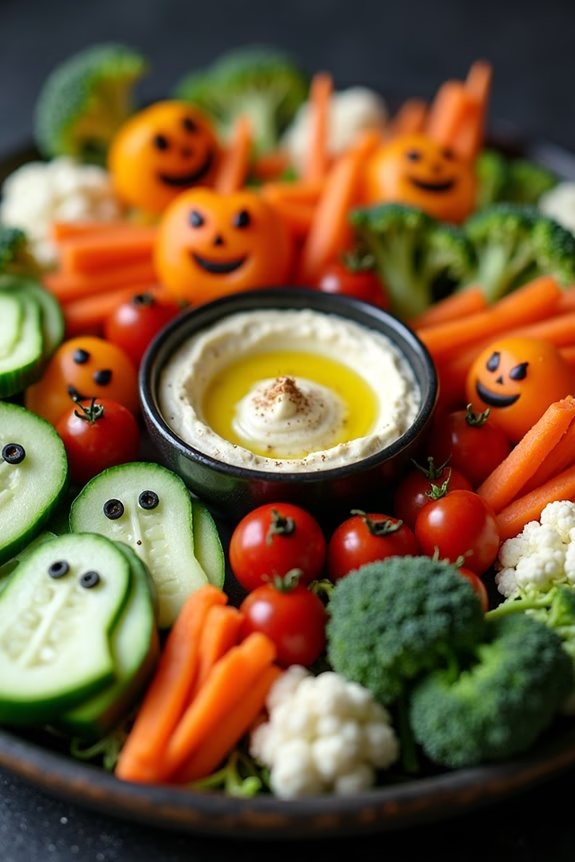
When Halloween rolls around, it’s easy to default to candy and sugary treats. However, for those of you looking to balance out the sweets with something healthy, “Creepy Crudités” is the perfect party platter to serve. This dish isn’t only fun and visually appealing, but it also provides a nutritious option amidst the candy corn and chocolate bars. By transforming basic vegetables into spooky shapes and figures, you can create a platter that’s both eye-catching and delicious.
To make this dish, you’ll need to select a variety of colorful vegetables that are easy to cut and shape. This recipe is designed to serve 4-6 people, making it ideal for a small gathering or to keep on hand as a snack throughout Halloween day. The key to successful Creepy Crudités is to use your imagination and creativity when arranging the vegetables, turning them into ghosts, witches, pumpkins, and other Halloween-themed shapes.
Ingredients (serving size of 4-6 people):
- 1 large cucumber
- 2 large carrots
- 1 red bell pepper
- 1 yellow bell pepper
- 1 bunch of celery
- 1 small cauliflower head
- 1 small broccoli head
- 1 cup cherry tomatoes
- 1 cup black olives
- 1 cup hummus (for dipping)
- 1 tablespoon olive oil
- Salt and pepper to taste
Cooking Instructions:
- Prepare the Vegetables:
- Wash all the vegetables thoroughly under cold water. Pat them dry with a clean kitchen towel.
- Create the Shapes:
- Slice the cucumber into thin rounds, then carve small triangles on one side to create ghost faces.
- Peel the carrots and slice them into sticks. Use a small knife to carve out jack-o’-lantern faces on the carrot sticks.
- Cut the red and yellow bell peppers in half, remove the seeds, and slice them into strips. Use the strips to form spooky shapes or letters on the platter.
- Slice the celery into sticks, and cut the broccoli and cauliflower into bite-sized florets.
- Assemble the Platter:
- Arrange the vegetables on a large platter, creating a spooky scene. You can use the cherry tomatoes as eyes, and place black olives as pupils.
- Fill a small bowl with hummus, drizzle with olive oil, and season with salt and pepper. Place the bowl in the center of the platter for dipping.
- Final Touches:
- Use any leftover vegetable pieces to fill in gaps and enhance the Halloween theme. Be creative with your designs to make the platter as festive as possible.
Extra Tips:
When preparing Creepy Crudités, remember that presentation is key. Take the time to arrange your vegetables thoughtfully; this will make the platter more appealing to both children and adults.
If you want to add an extra touch of flavor, consider using a variety of hummus flavors, such as roasted red pepper or garlic. You can also add small bowls of different dips like guacamole or ranch dressing to give guests more options.
Finally, use toothpicks to secure any intricate vegetable designs, making sure they stay in place until it’s time to serve.
Mummy Mini Pizzas

Mummy Mini Pizzas are a delightful and spooky twist on traditional mini pizzas, perfect for a Halloween snack that’s both fun and nutritious. These miniature pizzas are designed to resemble mummies, with gooey cheese bandages and spooky olive eyes, making them a hit with both kids and adults.
They’re not only visually appealing but also easy to make, using simple ingredients that can be customized to suit various dietary preferences.
These Mummy Mini Pizzas are an ideal party snack or family treat, allowing everyone to enjoy the festivities without compromising on health. By using whole grain English muffins or pita bread as the base, and topping with a variety of vegetables and low-fat cheese, these pizzas offer a balance of flavor and nutrition.
The recipe is straightforward, allowing for creativity in the kitchen while keeping preparation time to a minimum.
Ingredients (Serves 4-6):
- 6 whole grain English muffins or pita breads
- 1 cup pizza sauce
- 2 cups shredded mozzarella cheese
- 24 black olive slices
- 1 bell pepper (any color), sliced into thin strips
- Fresh basil leaves (optional, for garnish)
Cooking Instructions:
- Preheat the Oven: Begin by preheating your oven to 375°F (190°C) to guarantee it’s hot and ready for baking the mini pizzas.
- Prepare the Base: Split the English muffins or pita breads in half, arranging them on a large baking sheet. This forms the base for your mummy pizzas.
- Add the Sauce: Spoon approximately 1-2 tablespoons of pizza sauce onto each muffin or pita half, spreading it evenly to create a flavorful layer.
- Create the Mummy’s Wrap: Sprinkle shredded mozzarella cheese over the sauce in a crisscross pattern to resemble mummy bandages. Be sure to leave some gaps for the sauce to peek through.
- Add the Eyes: Place two black olive slices on each mini pizza to form the mummy’s eyes, giving them a spooky appearance.
- Decorate with Vegetables: Add thin strips of bell pepper strategically across the cheese to enhance the mummy look and provide a pop of color.
- Bake: Place the baking sheet in the preheated oven and bake for 10-12 minutes, or until the cheese is melted and bubbly.
- Garnish and Serve: Once baked, remove the pizzas from the oven and let them cool slightly. Garnish with fresh basil leaves, if desired, before serving.
Extra Tips:
When making Mummy Mini Pizzas, feel free to experiment with different toppings to cater to your guests’ tastes or dietary needs. For a gluten-free option, use gluten-free naan or cauliflower crusts.
If you prefer a bit of spice, consider adding a pinch of red pepper flakes to the sauce. These pizzas are best enjoyed fresh out of the oven, but they can also be reheated in a toaster oven for a quick snack the next day.
Make sure to keep an eye on the cheese as it melts to avoid over-browning, which can detract from the mummy’s appearance.
Ghostly Popcorn Balls

Ghostly Popcorn Balls are a fun and spooky treat perfect for celebrating Halloween in a healthy way. These delightful popcorn balls aren’t just visually appealing with their ghostly appearance, but they’re also a healthier alternative to traditional Halloween candies. Made with natural ingredients and free from artificial additives, Ghostly Popcorn Balls are a snack you can feel good about serving to both kids and adults at your Halloween gathering.
These popcorn balls are a creative twist on the classic treat, incorporating ingredients that add flavor without compromising on nutrition. By using honey or maple syrup instead of corn syrup, and incorporating natural food coloring for a ghostly effect, you can enjoy these treats guilt-free. The process is simple and fun, making it a perfect activity for engaging children in the kitchen. Whether you’re hosting a Halloween party or just looking for a festive snack, these Ghostly Popcorn Balls are sure to be a hit.
Ingredients for 4-6 People:
- 10 cups popped popcorn
- 1/2 cup honey or maple syrup
- 1/4 cup unsalted butter
- 1/2 teaspoon vanilla extract
- 1/4 teaspoon salt
- 1/4 cup white chocolate chips
- Natural food coloring (optional)
- Mini chocolate chips (for eyes)
- Small candy eyes (optional)
Cooking Instructions:
- Prepare the Popcorn: Start by popping your popcorn. You can use an air popper or pop it on the stovetop without oil to keep it healthy. Make sure you have about 10 cups of popped popcorn. Once popped, place the popcorn in a large mixing bowl and set aside.
- Make the Syrup: In a medium saucepan, combine the honey or maple syrup, unsalted butter, vanilla extract, and salt. Cook over medium heat, stirring frequently, until the butter has melted and the mixture is smooth. Let it simmer for about 2 minutes to slightly thicken.
- Add Color: If desired, add a few drops of natural food coloring to the syrup mixture to give your popcorn balls a ghostly hue. Stir well to distribute the color evenly.
- Coat the Popcorn: Pour the syrup mixture over the popcorn, stirring gently with a spatula to coat all the popcorn evenly. Be careful not to crush the popcorn as you mix.
- Shape the Balls: Let the popcorn mixture cool slightly, then with clean hands, form the coated popcorn into balls about the size of a tennis ball. If the mixture is too sticky, dampen your hands with a bit of water to make shaping easier.
- Decorate: Melt the white chocolate chips in a microwave-safe bowl, stirring every 30 seconds until smooth. Drizzle the melted chocolate over the popcorn balls for a ghostly effect. Press mini chocolate chips or candy eyes onto the balls to create ghost faces.
- Set and Serve: Allow the popcorn balls to set at room temperature until the chocolate hardens. Once set, serve them on a platter and watch them disappear!
Extra Tips:
To guarantee your Ghostly Popcorn Balls maintain their shape, make sure to cool the syrup slightly before pouring it over the popcorn. This will help it stick better and not become too soggy.
You can also experiment with different natural food colorings to create various shades of ghosts, or add some fun by mixing in a few Halloween-themed sprinkles before shaping the balls. For a nutty twist, try adding a handful of chopped nuts to the popcorn before coating it with the syrup. Enjoy your healthy Halloween treat!
Frankenstein Kiwi Pops
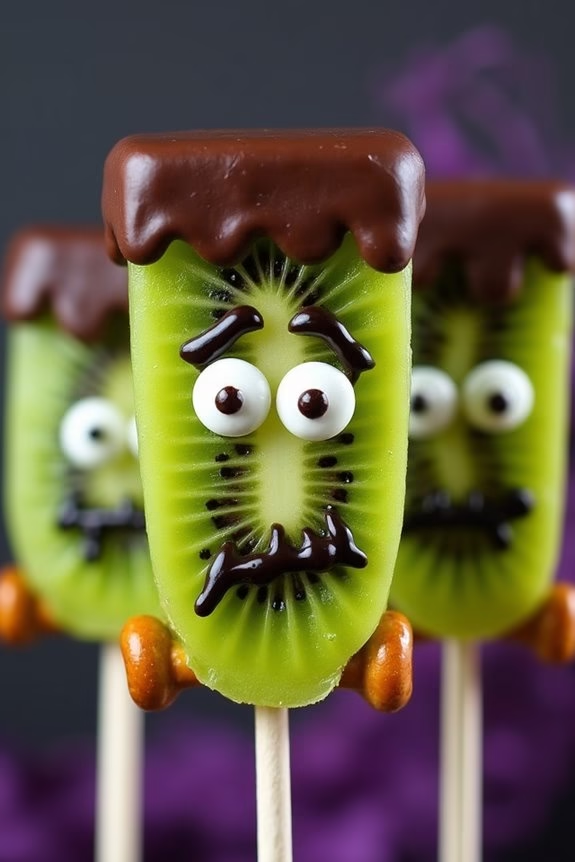
Frankenstein Kiwi Pops are a fun and healthy treat perfect for a Halloween party or a spooky snack. These vibrant green pops aren’t only easy to make, but they also offer a nutritious alternative to the usual sugary Halloween fare. With the natural sweetness and tanginess of kiwi paired with a few simple decorations, you can create a monster-themed snack that both kids and adults will love.
These pops aren’t only visually appealing but also packed with vitamins and antioxidants from the fresh fruit. The use of kiwi as the main ingredient gives these treats their signature green color, reminiscent of the famous Frankenstein monster. The pops are simple to assemble, making this a perfect recipe to involve kids in the kitchen, letting them express their creativity with the decorations.
Whether you’re hosting a Halloween gathering or looking for a festive snack, these Frankenstein Kiwi Pops are sure to impress.
Ingredients for 4-6 servings:
- 6 ripe kiwis
- 1 cup dark chocolate chips
- 12 candy eyes
- 24 pretzel sticks
- 12 popsicle sticks
- 1 tablespoon coconut oil (optional, for melting chocolate)
- Black decorating gel or icing
Instructions:
- Prepare the Kiwis: Peel the kiwis and cut each one into thick slices, approximately 1 inch thick. You should get about 2-3 slices from each kiwi, depending on their size.
- Insert Popsicle Sticks: Carefully insert a popsicle stick into the center of each kiwi slice, making sure that it’s secure but not piercing through the top.
- Melt the Chocolate: In a microwave-safe bowl, combine the dark chocolate chips and coconut oil (if using). Microwave in 20-second intervals, stirring in between, until the chocolate is smooth and fully melted.
- Decorate the Kiwis: Dip the top edge of each kiwi slice into the melted chocolate to create Frankenstein’s hair. Allow any excess chocolate to drip off before laying the pops flat on a parchment-lined tray.
- Add the Eyes: Before the chocolate hardens, place two candy eyes onto the chocolate-dipped section of each kiwi slice.
- Create the Bolts: Break the pretzel sticks in half and insert one on each side of the kiwi slice to resemble Frankenstein’s bolts.
- Draw the Mouth: Use the black decorating gel or icing to draw a mouth on each kiwi pop, giving your Frankenstein a spooky or funny expression.
- Chill the Pops: Place the tray of decorated kiwi pops in the refrigerator for about 30 minutes, allowing the chocolate to set and the pops to firm up.
- Serve and Enjoy: Once the chocolate has hardened, arrange the Frankenstein Kiwi Pops on a platter and serve chilled.
Extra Tips:
For the best results, choose firm but ripe kiwis to guarantee they hold their shape. If you’re short on time, you can skip the coconut oil, but it helps create a smoother chocolate coating.
Feel free to get creative with the decorations—use different colored gels for varied expressions or experiment with other edible decorations. If making these with kids, let them personalize each pop, making the activity a fun and engaging Halloween project.
Spider Deviled Eggs
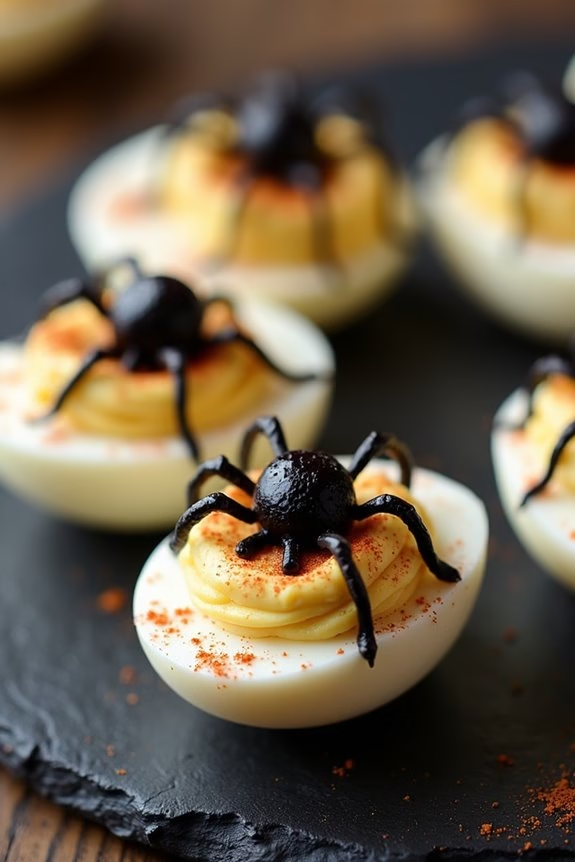
Spider Deviled Eggs are a creative and spooky twist on the traditional deviled egg, making them a perfect addition to any Halloween spread. These devilish delights not only taste fantastic, but they also bring a festive flair to the table with their creepy-crawly appearance.
Whether you’re hosting a Halloween party or just looking for a festive snack at home, Spider Deviled Eggs are bound to impress both kids and adults alike.
The beauty of Spider Deviled Eggs lies in their simplicity and the ease with which they can be made. With just a few ingredients, you can transform ordinary deviled eggs into a themed treat that fits perfectly within the Halloween spirit. The key to their unique appearance is using black olives to create the spider decorations, adding both flavor and visual appeal to the dish.
Ingredients (serving size: 4-6 people):
- 12 large eggs
- 1/2 cup mayonnaise
- 1 tablespoon Dijon mustard
- 1 teaspoon white vinegar
- Salt and pepper to taste
- Paprika for garnish
- 1 can (about 2.25 ounces) of whole black olives
Instructions:
- Boil the Eggs: Place the eggs in a large pot and cover them with cold water by about an inch. Bring the water to a boil over medium-high heat. Once boiling, remove the pot from heat, cover it with a lid, and let the eggs sit in the hot water for about 10-12 minutes.
- Cool and Peel: After the eggs have cooked, transfer them to a bowl of ice water to cool for at least 5 minutes. Once cooled, gently peel the shells off the eggs.
- Prepare the Filling: Cut each egg in half lengthwise and carefully remove the yolks, placing them in a separate bowl. Set the egg whites aside. Mash the yolks with a fork, then mix in the mayonnaise, Dijon mustard, vinegar, salt, and pepper until the mixture is smooth and creamy.
- Fill the Egg Whites: Spoon or pipe the yolk mixture back into the hollowed-out egg whites, filling each one generously.
- Create the Spiders: To make the spiders, slice some of the black olives in half for the spider bodies. Slice the remaining olives into thin strips for the legs. Place one olive half on top of each filled egg to form the spider’s body, then arrange the olive strips around it to resemble legs.
- Garnish and Serve: Lightly sprinkle paprika over the eggs for an added pop of color. Serve your Spider Deviled Eggs on a platter and enjoy the festive presentation.
Extra Tips: For the best results, verify your eggs are as fresh as possible, as fresher eggs tend to peel more easily after boiling. If you prefer a smoother filling, consider using a food processor to blend the yolk mixture.
Additionally, you can customize the filling by adding ingredients like chopped pickles or a dash of hot sauce for extra flavor. These deviled eggs can be made a day in advance and stored in the refrigerator, but wait to add the olive spiders until just before serving to keep them looking their best.
Pumpkin Hummus
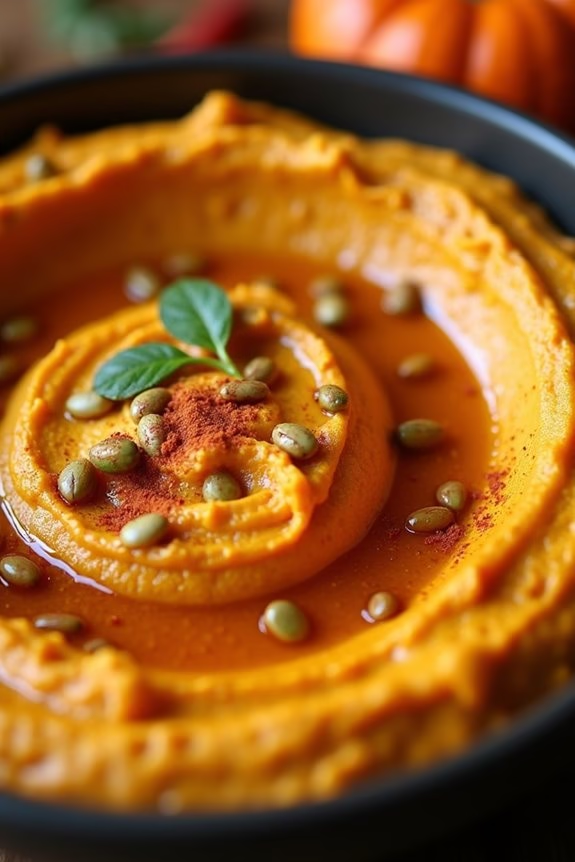
Pumpkin Hummus is a delightful and healthy twist on the traditional hummus, perfect for adding a festive touch to your Halloween spread. This nutritious snack combines the creamy texture of chickpeas with the rich, earthy flavor of pumpkin, making it both satisfying and seasonal. Its vibrant orange color and savory taste make it a perfect addition to your Halloween party platter, guaranteeing your guests enjoy a snack that’s both delicious and nutritious.
This recipe is designed to serve 4-6 people, making it ideal for a small gathering or family snack time. The ingredients are simple and easy to find, making this dish not only tasty but also convenient to prepare. With just a few steps, you can whip up this healthy treat that will surely impress your guests and provide them with a healthier alternative to the usual Halloween candies and sweets.
Ingredients:
- 1 can (15 oz) chickpeas, drained and rinsed
- 1 cup canned pumpkin puree
- 1/4 cup tahini
- 2 cloves garlic, minced
- 2 tablespoons olive oil
- 2 tablespoons lemon juice
- 1 teaspoon ground cumin
- 1/2 teaspoon smoked paprika
- Salt and pepper to taste
- Pumpkin seeds and a sprinkle of paprika for garnish (optional)
Instructions:
- Prepare the Chickpeas and Pumpkin: Start by draining and rinsing the chickpeas thoroughly under cold water to remove any excess liquid. This step is vital as it helps to achieve a smoother texture in the hummus. Add the drained chickpeas and pumpkin puree to a food processor.
- Add Flavorings: To the chickpea and pumpkin mixture, add the tahini, minced garlic, olive oil, lemon juice, ground cumin, and smoked paprika. These ingredients will infuse your hummus with rich, warm flavors that complement the pumpkin beautifully.
- Blend Until Smooth: Process the mixture on high speed until it becomes smooth and creamy. You may need to stop occasionally to scrape down the sides of the food processor to make sure everything is fully incorporated.
- Season to Taste: Once the mixture is smooth, taste it and add salt and pepper to your preference. Blend again briefly to distribute the seasoning evenly throughout the hummus.
- Serve and Garnish: Transfer the hummus to a serving bowl and, if desired, garnish with a drizzle of olive oil, a sprinkle of smoked paprika, and pumpkin seeds for an extra touch of flavor and presentation.
Extra Tips:
To achieve the creamiest hummus, consider peeling the chickpeas after rinsing them. This can be a bit time-consuming, but it will result in a noticeably smoother texture.
If you prefer a stronger pumpkin flavor, feel free to adjust the amount of pumpkin puree to suit your taste. Additionally, you can experiment with other spices such as nutmeg or cinnamon for a sweeter, more aromatic variation.
Finally, this hummus pairs beautifully with fresh veggies, pita chips, or even as a spread on sandwiches, making it a versatile addition to your Halloween festivities.
Candy Corn Fruit Parfaits

Candy Corn Fruit Parfaits are a delightful and healthy alternative to traditional Halloween treats. This vibrant and festive dessert mimics the colors of classic candy corn using layers of fresh fruit and creamy yogurt. Perfect for Halloween parties or a fun family dessert, these parfaits aren’t only visually appealing but also packed with nutrients.
They’re easy to prepare and can be customized with your favorite fruits and yogurt flavors. Each layer of the parfait represents the iconic candy corn colors: yellow, orange, and white. The bottom layer is typically made with juicy pineapple chunks, the middle with vibrant orange slices, and the top with creamy vanilla yogurt.
The combination of sweet and tangy fruits with the smooth yogurt creates a rejuvenating and satisfying treat. This recipe serves 4-6 people, making it ideal for small gatherings or as a special treat for your family.
Ingredients:
- 2 cups fresh pineapple chunks
- 2 cups orange segments (about 3-4 oranges)
- 2 cups vanilla yogurt
- 1 tablespoon honey (optional)
- 1 teaspoon vanilla extract (optional)
- Whipped cream (optional, for garnish)
- Halloween-themed sprinkles (optional, for garnish)
Instructions:
- Prepare the Fruits: Start by peeling and slicing the pineapple into small chunks. Peel the oranges and separate them into segments. Guarantee that all fruits are fresh and ripe for the best flavor.
- Mix the Yogurt: In a small bowl, mix the vanilla yogurt with honey and vanilla extract if desired. This step is optional but adds a touch of sweetness and enhances the vanilla flavor.
- Assemble the Parfaits: Take clear glasses or small bowls to showcase the layers. Begin by adding a layer of pineapple chunks to the bottom of each glass. Guarantee the layer is even for a balanced look.
- Add the Orange Layer: Next, add a layer of orange segments on top of the pineapple. Make sure the oranges are well-drained to prevent excess juice from diluting the yogurt.
- Top with Yogurt: Spoon the vanilla yogurt over the orange segments, smoothing it out to create a neat top layer. The yogurt should completely cover the fruit layers below.
- Garnish and Serve: If desired, top the parfaits with a dollop of whipped cream and a sprinkle of Halloween-themed sprinkles for added festive flair. Serve immediately or refrigerate until ready to eat.
Extra Tips:
To make the parfaits even more special, consider using clear decorative glasses to better showcase the colorful layers. You can also experiment by adding other fruits such as mango or peaches for varied flavors.
If you want to prepare these in advance, store the fruit and yogurt separately and assemble just before serving to maintain freshness. For a dairy-free version, substitute the yogurt with coconut yogurt or any plant-based alternative. Enjoy these Candy Corn Fruit Parfaits as a guilt-free treat this Halloween!
Cheesy Jack-O’-Lanterns
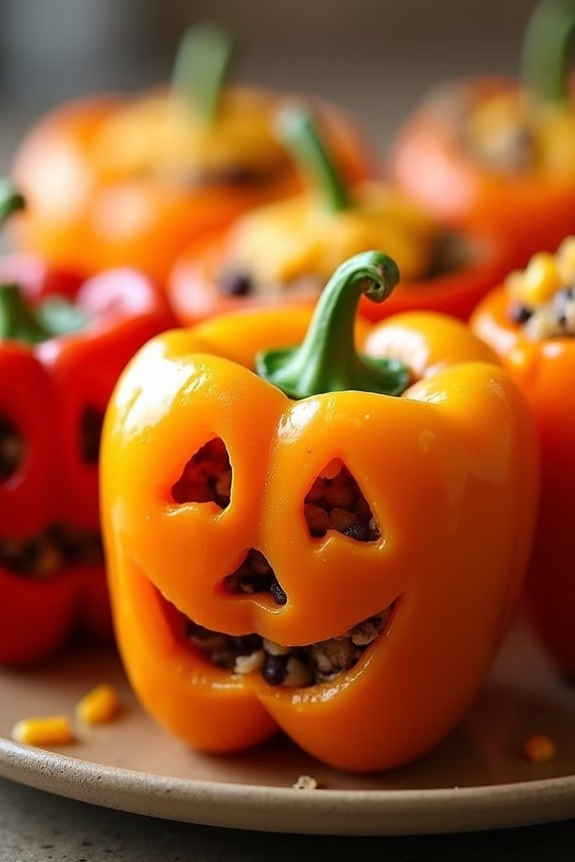
Cheesy Jack-O’-Lanterns are a delightful and nutritious way to add some festive flair to your Halloween celebrations. These savory snacks aren’t only fun to make but also provide a delicious alternative to sugary treats. Perfect for both kids and adults, Cheesy Jack-O’-Lanterns are made using bell peppers carved to resemble the iconic Halloween pumpkins, filled with a cheesy, hearty stuffing that’s both satisfying and nutritious. This recipe provides a creative twist on traditional stuffed peppers, making them an ideal choice for a Halloween party or a cozy family dinner.
The vibrant colors of the bell peppers not only make for a visually appealing dish but also pack a punch of vitamins and minerals. When combined with a cheesy filling of rice, beans, and spices, these Jack-O’-Lanterns become a wholesome, balanced meal. The best part is that they can be easily customized to suit different taste preferences, allowing you to experiment with various fillings and spices. Whether you’re a seasoned chef or a kitchen novice, this recipe offers a fun and engaging cooking experience.
Ingredients (serving size: 4-6 people):
- 6 medium-sized orange bell peppers
- 2 cups cooked brown rice
- 1 can (15 oz) black beans, drained and rinsed
- 1 cup corn kernels (fresh, frozen, or canned)
- 1 1/2 cups shredded cheddar cheese
- 1 teaspoon cumin
- 1 teaspoon smoked paprika
- Salt and pepper to taste
- 2 tablespoons olive oil
- Fresh cilantro for garnish (optional)
Cooking Instructions:
- Preheat the Oven: Begin by preheating your oven to 375°F (190°C). This will guarantee that it’s at the right temperature when it’s time to bake the stuffed peppers.
- Prepare the Bell Peppers: Carefully cut the tops off the bell peppers and remove the seeds and membranes from inside. Use a small knife to carve jack-o’-lantern faces into one side of each pepper, being careful not to cut too large holes that might cause the filling to spill out.
- Prepare the Filling: In a large mixing bowl, combine the cooked brown rice, black beans, corn kernels, 1 cup of shredded cheddar cheese, cumin, smoked paprika, salt, and pepper. Mix the ingredients thoroughly until everything is well combined.
- Stuff the Peppers: Using a spoon, carefully fill each carved bell pepper with the rice and bean mixture, pressing down gently to pack the filling. Leave a small space at the top of each pepper.
- Top with Cheese: Sprinkle the remaining 1/2 cup of shredded cheddar cheese over the top of the stuffed peppers.
- Bake the Peppers: Place the stuffed peppers in a baking dish and drizzle with olive oil. Cover the dish with aluminum foil and bake in the preheated oven for 25 minutes. Remove the foil and bake for an additional 10-15 minutes, or until the peppers are tender and the cheese is melted and bubbly.
- Garnish and Serve: Once the peppers are done baking, remove them from the oven and let them sit for a few minutes. Garnish with fresh cilantro if desired, and serve warm.
Extra Tips: For a spicier kick, consider adding chopped jalapeños or a dash of cayenne pepper to the filling. If you prefer a meatier version, you can add cooked ground turkey or beef to the mixture. To make this dish vegan, simply substitute the cheddar cheese with a plant-based cheese alternative.
Additionally, when carving the faces on the peppers, use a paring knife for more precise cuts. This dish can also be prepared a day in advance; just stuff the peppers and refrigerate until you’re ready to bake them.
Black Bean and Avocado Bats
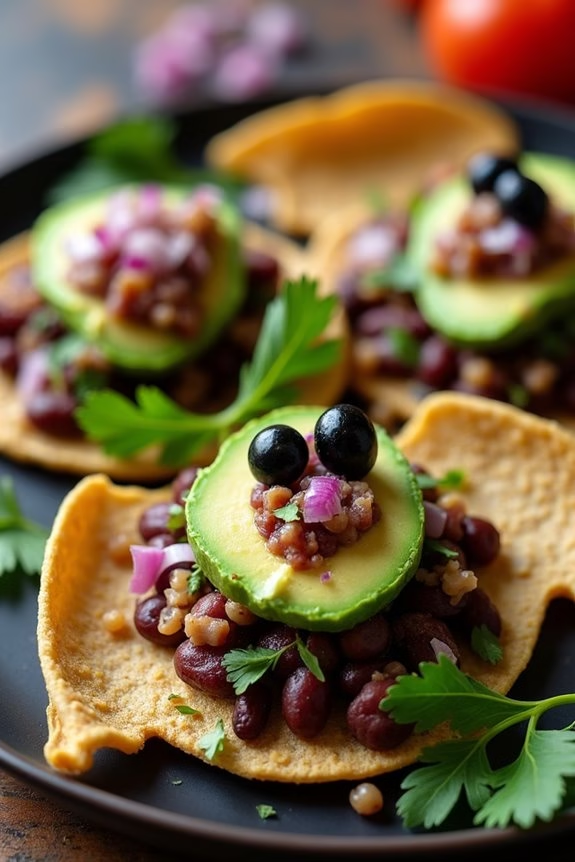
Looking for a spooky yet healthy snack to serve this Halloween? Search no further than Black Bean and Avocado Bats! These delightful, bat-shaped bites aren’t only festive but also packed with nutrients.
Black beans provide a hearty base full of protein and fiber, while creamy avocados add a dose of healthy fats. The combination isn’t only delicious but also satisfying, ensuring that your Halloween party has a touch of health without sacrificing any of the fun.
The recipe is simple to follow and can be whipped up in no time, making it perfect for busy hosts. With a serving size suitable for 4-6 people, these Black Bean and Avocado Bats are sure to be a hit at any gathering.
The dish’s vibrant colors and playful shapes will appeal to both kids and adults, making them a versatile addition to your Halloween spread.
Ingredients for 4-6 people:
- 2 ripe avocados
- 1 can (15 oz) black beans, drained and rinsed
- 1 tablespoon lime juice
- 1 teaspoon cumin
- Salt and pepper to taste
- 8-10 small whole wheat tortillas
- 1/4 cup chopped fresh cilantro
- 1/4 cup finely chopped red onion
- Black olives (for decoration)
- Bat-shaped cookie cutter
Cooking Instructions:
- Prepare the Avocado Mixture: In a medium bowl, mash the avocados with a fork until smooth. Add lime juice, cumin, salt, and pepper. Mix until well combined, then set aside.
- Prepare the Black Bean Mixture: In another bowl, mash the black beans with a fork or potato masher until slightly chunky. Add cilantro and red onion, mixing until combined.
- Assemble the Bats: Using the bat-shaped cookie cutter, cut out bat shapes from the whole wheat tortillas. Depending on the size of your cutter, you should get about 3-4 bats per tortilla.
- Fill the Bats: Spread a layer of the avocado mixture over each bat-shaped tortilla. Then, top with a layer of the black bean mixture.
- Garnish and Serve: Slice black olives into small rounds and use them to create eyes on each bat. Arrange the bats on a platter and serve immediately.
Extra Tips:
When making Black Bean and Avocado Bats, it’s important to choose ripe avocados for the best flavor and texture. If the avocados are a bit too firm, you can ripen them quickly by placing them in a paper bag with a banana or apple for a day.
To prevent the avocado mixture from browning, you can also cover it with plastic wrap pressed directly onto the surface to limit air exposure. For a spicier version, consider adding a pinch of cayenne pepper or a dash of hot sauce to the avocado mixture.
Enjoy your spooky and nutritious creation!