
When planning the ultimate Halloween bash, it’s so easy to get caught up in sugary treats. But let’s not forget about the savory goodies that can balance things out. Picture serving creepy-crawly cheese balls next to devilish eyeballs or a spooky spider pizza. These savory delights will wow your guests. Ready to make your party unforgettable?
Creepy-Crawly Cheese Ball

Looking for a spooky yet delicious treat to serve at your Halloween party? The Creepy-Crawly Cheese Ball is the perfect appetizer that combines flavor with fright! This eerie cheese ball combines creamy cheeses with savory spices and is dressed up with a creepy-crawly twist.
Shaped into a ball and adorned with edible decorations, this dish is sure to be a hit among both adults and children at your Halloween gathering. The Creepy-Crawly Cheese Ball isn’t only easy to make but also fun to assemble, allowing you to let your creativity run wild.
You can customize the level of creepiness by adding edible decorations such as pretzel sticks, black olives, and bell peppers to create spider legs and eyes. This dish serves 4-6 people, making it an ideal choice for an intimate gathering of friends and family.
Follow the recipe below to bring this ghoulish appetizer to life!
Ingredients (serves 4-6 people):
- 2 cups shredded sharp cheddar cheese
- 8 oz cream cheese, softened
- 1/4 cup sour cream
- 1/2 teaspoon garlic powder
- 1/2 teaspoon onion powder
- 1 teaspoon Worcestershire sauce
- 1/2 teaspoon hot sauce (optional)
- Salt and pepper to taste
- 1 cup crushed pretzels or crackers
- Black olives (for decoration)
- Red bell pepper (for decoration)
- Pretzel sticks (for decoration)
Instructions:
1. Combine Ingredients: In a large mixing bowl, combine the shredded cheddar cheese, softened cream cheese, sour cream, garlic powder, onion powder, Worcestershire sauce, and hot sauce if using.
Season with salt and pepper to taste. Mix until all ingredients are well combined and the mixture is smooth.
2. Form the Cheese Ball: Once the mixture is well combined, shape it into a ball using your hands. If the mixture is too soft, refrigerate it for about 30 minutes to firm up before shaping.
3. Coat the Cheese Ball: Roll the cheese ball in the crushed pretzels or crackers until it’s evenly coated. This will give the cheese ball a crunchy texture and a creepy appearance.
4. Decorate the Cheese Ball: Use black olives to create eyes and red bell pepper pieces for the mouth. Insert pretzel sticks into the sides of the cheese ball to form spider legs.
Be creative with your decoration to enhance the creepy-crawly theme.
5. Chill: Place the decorated cheese ball in the refrigerator for at least 1 hour to allow the flavors to meld and the cheese ball to firm up.
6. Serve: Before serving, let the cheese ball sit at room temperature for about 15 minutes to soften slightly, making it easier to spread. Serve with crackers, sliced vegetables, or additional pretzels.
Extra Tips:
For an even spookier presentation, consider using black food coloring to tint some of the cheese mixture before forming the ball, giving it a more eerie appearance.
You can also place the cheese ball on a platter lined with leafy greens to mimic a forest floor. If you’re hosting a larger party, simply double the ingredients to accommodate more guests.
Deviled Eyeballs

When it comes to creating a spooky spread for your Halloween party, Deviled Eyeballs should be at the top of your list. These creepy yet delicious treats won’t only freak out your guests but also delight their taste buds. The classic deviled egg is given a festive twist to resemble eerie eyeballs, making them the perfect addition to your Halloween food table.
With a bit of creativity and a few pantry staples, you can transform ordinary eggs into the star of your Halloween bash. Deviled Eyeballs aren’t only fun to make but also easy to prepare, guaranteeing you can whip them up in no time. This recipe serves 4-6 people, making it ideal for a small gathering.
Whether you’re throwing a full-fledged Halloween party or just a spooky get-together, these Deviled Eyeballs will certainly impress. Follow the steps below to create a dish that’s both ghastly and delectable.
Ingredients (serving size: 4-6 people):
- 6 large eggs
- 1/4 cup mayonnaise
- 1 teaspoon yellow mustard
- 1 teaspoon white vinegar
- Salt and pepper to taste
- Red food coloring
- 12 green olives with pimentos
- Paprika for garnish
Cooking Instructions:
- Boil the Eggs: Place the eggs in a single layer in a saucepan and add cold water until it covers the eggs by about an inch. Bring the water to a rolling boil over high heat. Once boiling, remove the saucepan from the heat, cover it, and let the eggs sit for 9-12 minutes.
- Prepare the Eggs: After the eggs have finished cooking, drain the hot water and transfer them to a bowl of ice water to cool completely. Once cooled, peel the eggs carefully to avoid any damage.
- Make the Filling: Cut each egg in half lengthwise and gently remove the yolks, placing them in a mixing bowl. Add mayonnaise, mustard, white vinegar, salt, and pepper to the yolks. Mash the mixture until smooth and creamy.
- Create the Eyeball Effect: Use a small spoon or piping bag to fill the egg whites with the yolk mixture. Place a green olive with a pimento in the center of each yolk-filled egg half to resemble an eyeball.
- Add the Bloodshot Effect: Dip a toothpick into red food coloring and draw thin lines from the olive to the edges of the yolk mixture to mimic the appearance of bloodshot eyes.
- Garnish and Serve: Lightly sprinkle paprika over the filled egg halves for added flavor and a touch of color. Arrange the Deviled Eyeballs on a serving platter and refrigerate until ready to serve.
Extra Tips:
When making Deviled Eyeballs, make sure that the eggs aren’t overcooked to prevent a rubbery texture. If you want a slightly tangier filling, you can adjust the vinegar and mustard to your liking.
Use a steady hand when applying the red food coloring to achieve a realistic bloodshot effect. For added spookiness, place the Deviled Eyeballs on a bed of lettuce or kale to give them an eerie presentation.
These tips will help you create the perfect Halloween treat that’s both visually striking and delicious.
Spooky Spider Pizza
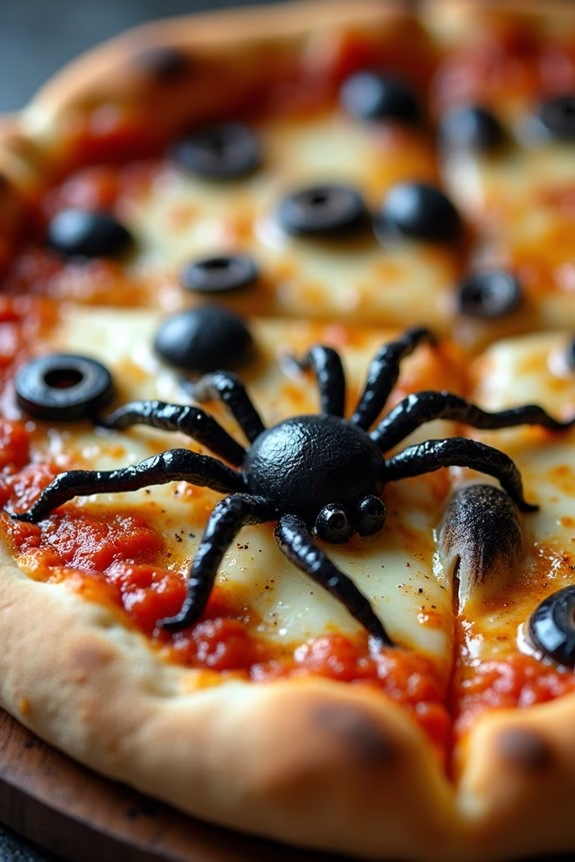
Transform your Halloween party into a spooky feast with this fun and delicious Spooky Spider Pizza. This recipe is perfect for adding a bit of eerie excitement to your menu while still being a treat for the taste buds.
The Spooky Spider Pizza isn’t only a visual delight with its creepy-crawly design, but it also offers a savory combination of flavors that will satisfy both kids and adults alike. Perfect for a crowd, this pizza will have your guests coming back for more, all while they admire your creative culinary skills.
This Halloween-themed pizza features a classic tomato sauce and mozzarella cheese base, topped with olives artfully arranged to resemble spiders. It’s an easy recipe that you can whip up in no time, making it ideal for hosting a party or a fun cooking activity with kids.
The recipe below serves 4-6 people, making it a great choice for small gatherings or family dinners. Whether you’re an experienced chef or a novice in the kitchen, this Spooky Spider Pizza is sure to become a Halloween tradition.
Ingredients (Serves 4-6):
- 1 pre-made pizza dough (or homemade if preferred)
- 1 cup pizza sauce
- 2 cups shredded mozzarella cheese
- 1/2 cup sliced black olives
- 1/4 cup whole black olives
- 1 tablespoon olive oil
- 1 teaspoon dried oregano
- 1/2 teaspoon garlic powder
- Salt and pepper to taste
Instructions:
- Preheat the Oven: Start by preheating your oven to 475°F (245°C). This guarantees that your pizza will bake evenly and have a crispy crust.
- Prepare the Dough: Roll out your pizza dough on a lightly floured surface to your desired thickness. Transfer the rolled-out dough onto a baking sheet or a pizza stone, and brush the edges with olive oil for extra crispiness.
- Add the Sauce and Cheese: Spread the pizza sauce evenly over the dough, leaving a small border around the edge. Sprinkle the shredded mozzarella cheese on top of the sauce, covering the pizza evenly.
- Create the Spider Toppings: To make the spider bodies, cut the whole black olives in half and place them on the pizza. Use sliced olives to form the spider legs, arranging them around the halves to resemble a spider.
- Season Your Pizza: Sprinkle the dried oregano, garlic powder, salt, and pepper over the top of your pizza for added flavor.
- Bake the Pizza: Place the pizza in the preheated oven and bake for 12-15 minutes, or until the cheese is bubbly and the crust is golden brown.
- Cool and Serve: Once baked, remove the pizza from the oven and let it cool for a few minutes. Cut into slices and serve your spooky creation to your guests.
Extra Tips:
For best results, verify that your oven is fully preheated before placing the pizza inside. If you prefer a thicker crust, allow the dough to rise for an additional 10-15 minutes after rolling it out.
Feel free to experiment with additional toppings, such as red bell peppers or mushrooms, to add more flavor and visual appeal to your Spooky Spider Pizza. Finally, if you’re making this recipe with kids, let them get creative with the spider designs for a fun and engaging cooking experience.
Mummified Sausage Rolls

Mummified Sausage Rolls are a fun and spooky treat that’s perfect for any Halloween party. These delightful snacks aren’t only easy to make but also deliciously addictive. Imagine plump sausages wrapped in flaky, golden puff pastry, resembling tiny mummies that are sure to be a hit with both kids and adults alike. The combination of savory sausage and buttery pastry makes for a mouthwatering appetizer that keeps everyone coming back for more.
The beauty of Mummified Sausage Rolls lies in their simplicity and the little effort needed to create such a festive dish. These rolls can be prepared ahead of time, which is a huge plus when you’re planning a Halloween party and juggling multiple tasks. With a few basic ingredients and some creativity, you can whip up these spooky bites in no time. Plus, they’re easy to customize with your favorite sausages or even a vegetarian option if you prefer.
Ingredients (Serves 4-6):
- 12 cocktail sausages or mini hot dogs
- 1 sheet of puff pastry (thawed if frozen)
- 1 egg, beaten
- 2 tablespoons of mustard or ketchup
- 24 edible candy eyes or small pieces of olives
Cooking Instructions:
- Preheat the Oven: Start by preheating your oven to 400°F (200°C). This will guarantee it’s hot enough to give your pastry a nice, golden finish.
- Prepare the Pastry: Unroll the puff pastry sheet on a lightly floured surface. Using a knife or pizza cutter, slice the pastry into thin strips about 1/4 inch wide. These will be used to wrap around the sausages.
- Wrap the Sausages: Take a cocktail sausage and start wrapping the pastry strips around it, leaving a small gap for the face. Continue wrapping until the sausage is covered with a few layers of pastry to resemble a mummy. Repeat this with all sausages.
- Brush with Egg Wash: Place the wrapped sausages on a baking sheet lined with parchment paper. Brush each mummy with the beaten egg to give them a lovely shine and help them brown evenly in the oven.
- Bake: Place the baking sheet in the preheated oven and bake for about 15-20 minutes, or until the pastry is puffed and golden brown.
- Add the Eyes: Once baked, remove the sausage rolls from the oven and allow them to cool slightly. Use a small dab of mustard or ketchup to adhere the edible candy eyes or olive pieces onto the mummies where you left space for the face.
- Serve: Arrange the Mummified Sausage Rolls on a platter and serve alongside a dipping sauce of mustard or ketchup if desired.
For the best results, verify your puff pastry is cold but pliable when you start wrapping; this will help it puff up and cook evenly. If you’re serving these at a party, prepare them a few hours ahead and bake just before guests arrive for a fresh, warm treat.
You can also consider using different types of sausages, such as chicken or vegetarian, to cater to diverse tastes. For a more dramatic effect, use a bit of food coloring in the egg wash to give your mummies a unique tint, adding an extra festive flair to your Halloween table.
Witch’s Brew Stew

This hearty stew isn’t only flavorful but also simple to prepare, making it an ideal choice for a gathering. The combination of fresh ingredients and aromatic herbs creates a robust flavor profile that’s as satisfying as it’s warming.
Whether you’re hosting a large Halloween bash or a smaller, more intimate get-together, Witch’s Brew Stew is sure to be a crowd-pleaser. The following recipe serves 4-6 people, making it perfect for sharing with your goblin and ghoul guests.
Ingredients
- 2 lbs beef stew meat, cut into 1-inch cubes
- 2 tablespoons olive oil
- 1 large onion, chopped
- 3 cloves garlic, minced
- 4 cups beef broth
- 1 cup red wine
- 2 tablespoons tomato paste
- 2 carrots, sliced
- 2 potatoes, diced
- 1 cup mushrooms, sliced
- 1 teaspoon dried thyme
- 1 teaspoon dried rosemary
- 2 bay leaves
- Salt and pepper to taste
- Fresh parsley, chopped (for garnish)
Cooking Instructions
- Prepare the Beef: In a large pot or Dutch oven, heat 1 tablespoon of olive oil over medium-high heat. Add the beef cubes in batches, searing them until browned on all sides. Remove the beef from the pot and set aside.
- Sauté the Aromatics: In the same pot, add the remaining tablespoon of olive oil. Add the chopped onion and sauté until it becomes translucent, about 5 minutes. Stir in the minced garlic and cook for another minute until fragrant.
- Deglaze the Pot: Pour in the red wine, scraping up any browned bits from the bottom of the pot. Let it simmer for about 2 minutes to reduce slightly.
- Build the Stew Base: Stir in the tomato paste, then return the beef to the pot. Pour in the beef broth, ensuring the meat is fully covered. Add the thyme, rosemary, bay leaves, salt, and pepper.
- Add the Vegetables: Bring the mixture to a boil, then reduce the heat to low. Stir in the carrots, potatoes, and mushrooms. Cover the pot and let the stew simmer for about 1.5 to 2 hours, or until the beef is tender.
- Finish and Serve: Remove the bay leaves. Taste and adjust seasoning if necessary. Ladle the stew into bowls and garnish with chopped fresh parsley. Serve warm.
Extra Tips
For a thicker stew, you can add a slurry of cornstarch and water towards the end of cooking. Simply mix 1 tablespoon of cornstarch with 2 tablespoons of cold water and stir it into the stew. Allow it to simmer for an additional 5 minutes to thicken.
For an added depth of flavor, try including a dash of Worcestershire sauce or a spoonful of balsamic vinegar. If you prefer a vegetarian version, replace the beef with hearty vegetables like butternut squash or lentils, and use vegetable broth instead.
Enjoy playing with the flavors to make this dish uniquely yours!
Ghostly Stuffed Peppers

Celebrate the spirit of Halloween with these delightfully spooky Ghostly Stuffed Peppers. They’re not only fun to look at but also a deliciously hearty meal that’s perfect for the occasion. Each pepper is carved to resemble a grinning ghost, complete with a savory filling that will satisfy the hungriest of ghouls. Imagine the delight on your guests’ faces as they dig into these eerie yet tasty treats.
This recipe offers a balanced blend of protein, grains, and vegetables, making it a wholesome meal for a Halloween gathering. The mix of ground beef, rice, and spices is encased in bell peppers, which are then baked to perfection. Whether you’re hosting a costume party or a cozy family dinner, these Ghostly Stuffed Peppers will be the centerpiece of your Halloween menu.
Ingredients (Serves 4-6):
- 6 large bell peppers (preferably orange or red)
- 1 tablespoon olive oil
- 1 medium onion, diced
- 2 cloves garlic, minced
- 1 pound ground beef or turkey
- 1 cup cooked rice
- 1 can (14.5 oz) diced tomatoes, drained
- 1 teaspoon Italian seasoning
- Salt and pepper to taste
- 1 cup shredded mozzarella cheese
- 1/4 cup chopped fresh parsley
Cooking Instructions:
- Preheat the Oven: Set your oven to 375°F (190°C) to guarantee it’s hot and ready for baking.
- Prepare the Peppers: Wash the bell peppers thoroughly. Cut the tops off and remove the seeds and membranes. Carefully carve ghostly faces into the sides of the peppers, using a small sharp knife. Be gentle to keep the peppers intact.
- Cook the Filling: Heat olive oil in a large skillet over medium heat. Add the diced onion and minced garlic, sautéing until the onion becomes translucent. Add the ground beef or turkey, cooking until browned. Drain any excess fat.
- Mix the Filling: In the skillet, combine the cooked rice, diced tomatoes, Italian seasoning, salt, and pepper. Stir well, allowing the mixture to heat through. Remove from heat and mix in half of the shredded mozzarella cheese.
- Stuff the Peppers: Carefully spoon the beef and rice mixture into each pepper, filling them to the top. Place the stuffed peppers upright in a baking dish.
- Bake the Peppers: Cover the dish with aluminum foil and bake in the preheated oven for 30 minutes. Remove the foil, sprinkle the remaining mozzarella cheese over the peppers, and bake for an additional 10-15 minutes until the cheese is melted and bubbly.
- Garnish and Serve: Remove the peppers from the oven and let them cool slightly. Sprinkle with fresh parsley before serving.
Extra Tips:
For a vegetarian version, substitute the ground meat with black beans or lentils. When carving the faces, use a small paring knife and be careful not to make the cuts too big, as this could cause the peppers to lose their shape.
Experiment with different types of cheese for varied flavor profiles; sharp cheddar or pepper jack can add a delightful twist. Finally, to keep the peppers standing upright, you might need to slice a little off the bottom to create a flat surface. Enjoy your ghostly creations!
Bat Wings With Dipping Sauce
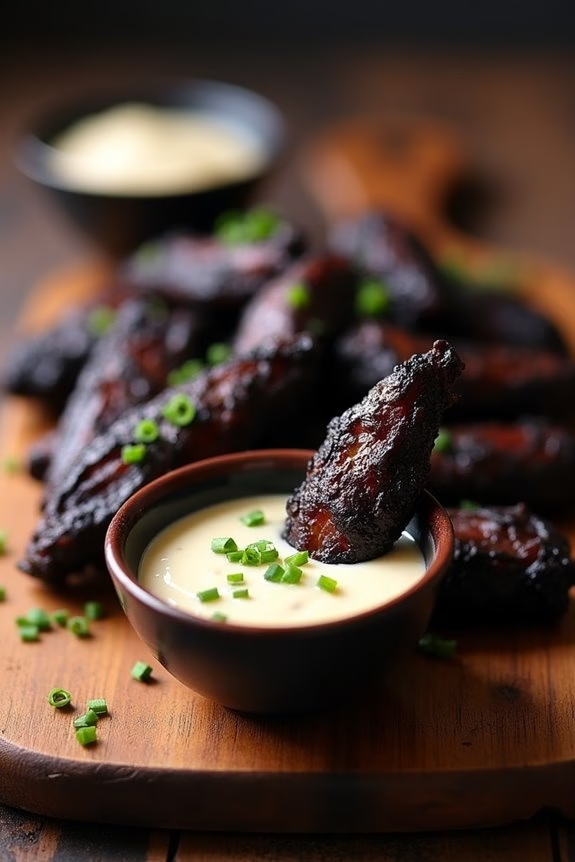
Transform your Halloween party table into a spooky spectacle with these delicious Bat Wings With Dipping Sauce. These savory, slightly spicy chicken wings aren’t only a hit for their taste but also for their eerie appearance that fits the Halloween theme perfectly.
The secret to these “bat wings” is the use of a dark marinade which gives them their signature blackened look, making them an ideal centerpiece for your Halloween spread. Paired with a creamy and tangy dipping sauce, these wings are sure to be a crowd-pleaser.
Whether you’re hosting a large gathering or an intimate celebration, this dish is perfect for serving 4-6 people. The preparation involves marinating the wings in a rich blend of soy sauce, balsamic vinegar, and spices, followed by roasting them to crispy perfection.
The accompanying dipping sauce combines sour cream, garlic, and fresh herbs to balance the bold flavors of the wings. Let’s plunge into the ingredients and instructions to create this spooky yet scrumptious dish.
Ingredients for Bat Wings With Dipping Sauce (Serves 4-6):
- 2 pounds chicken wings
- 1/2 cup soy sauce
- 1/4 cup balsamic vinegar
- 2 tablespoons olive oil
- 1 tablespoon honey
- 1 teaspoon smoked paprika
- 1 teaspoon garlic powder
- 1/2 teaspoon onion powder
- 1/2 teaspoon black pepper
- 1/4 teaspoon cayenne pepper
- 1/2 cup sour cream
- 2 tablespoons mayonnaise
- 1 tablespoon lemon juice
- 2 cloves garlic, minced
- 1 tablespoon chopped fresh chives
- Salt to taste
Cooking Instructions:
- Prepare the Marinade: In a large mixing bowl, combine the soy sauce, balsamic vinegar, olive oil, honey, smoked paprika, garlic powder, onion powder, black pepper, and cayenne pepper. Whisk the ingredients together until well blended.
- Marinate the Wings: Add the chicken wings to the marinade, making sure they’re fully coated. Cover the bowl with plastic wrap and refrigerate for at least 2 hours, or overnight for best results, to allow the flavors to infuse into the wings.
- Preheat the Oven: Set your oven to 400°F (200°C) and let it preheat. Line a baking sheet with aluminum foil and place a wire rack on top. This will help the wings cook evenly and become crispy.
- Bake the Wings: Arrange the marinated wings on the wire rack, ensuring they aren’t touching each other. Bake in the preheated oven for 35-40 minutes, flipping halfway through, until the wings are cooked through and have a dark, crispy exterior.
- Prepare the Dipping Sauce: While the wings are baking, mix the sour cream, mayonnaise, lemon juice, minced garlic, and chopped chives in a small bowl. Season with salt to taste. Refrigerate until ready to serve.
- Serve: Once the wings are done, remove them from the oven and allow them to cool slightly. Serve the bat wings with the chilled dipping sauce on the side for a deliciously spooky treat.
Extra Tips:
To achieve the deepest, darkest color for your “bat wings,” consider adding a few drops of black food coloring to the marinade. This will enhance the dramatic appearance, especially for a Halloween-themed presentation.
If you prefer a smokier flavor, consider grilling the wings instead of baking them. Confirm the wings are evenly spread out on the baking rack to avoid steaming, which can prevent them from getting crispy.
Finally, the dipping sauce can be customized with additional herbs or spices to suit your taste preferences.
Pumpkin-Shaped Cheese Crackers
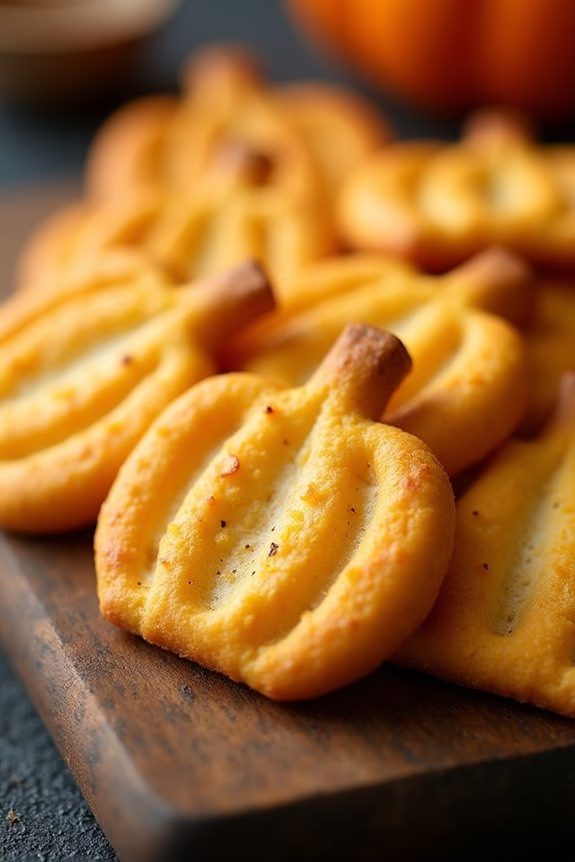
Halloween is the perfect time for themed snacks that are both fun and tasty. One delightful treat that fits the festive spirit is Pumpkin-Shaped Cheese Crackers. These savory crackers aren’t only adorable but also packed with cheesy goodness, making them a hit with both kids and adults at your Halloween party.
They’re shaped like little pumpkins, adding a touch of whimsy to your food spread and are surprisingly easy to make, even for those who aren’t seasoned bakers. These crackers are made using a simple dough infused with cheddar cheese, giving them a rich flavor that pairs perfectly with a variety of dips. The bright orange color of the cheese gives them a natural pumpkin hue without the need for artificial food coloring.
By using a small pumpkin-shaped cookie cutter, you can create the iconic Halloween shape, making these crackers a festive addition to your party. Whether you’re hosting a large gathering or a small family get-together, these Pumpkin-Shaped Cheese Crackers are bound to delight your guests.
Ingredients (Serves 4-6):
- 1 1/2 cups all-purpose flour
- 1/2 teaspoon salt
- 1/2 teaspoon paprika
- 1/4 teaspoon cayenne pepper (optional, for a little heat)
- 1/2 cup unsalted butter, cold and cubed
- 2 cups sharp cheddar cheese, shredded
- 3-4 tablespoons cold water
Cooking Instructions:
- Prepare the Dough: In a large mixing bowl, combine the all-purpose flour, salt, paprika, and cayenne pepper (if using). Mix well to guarantee the spices are evenly distributed throughout the flour.
- Incorporate the Butter: Add the cubed butter to the flour mixture. Using a pastry cutter or your fingers, work the butter into the flour until the mixture resembles coarse crumbs. The cold butter creates a tender, flaky texture in the crackers.
- Add the Cheese: Stir in the shredded cheddar cheese until it’s evenly distributed throughout the mixture. The cheese should be finely shredded to incorporate well into the dough.
- Form the Dough: Gradually add the cold water, one tablespoon at a time, mixing until the dough begins to come together. You may not need all the water; just enough to form a cohesive dough that holds together when pressed.
- Chill the Dough: Shape the dough into a disc, wrap it in plastic wrap, and refrigerate for at least 30 minutes. Chilling the dough makes it easier to handle and helps the crackers retain their shape during baking.
- Preheat the Oven: Preheat your oven to 350°F (175°C) and line a baking sheet with parchment paper or a silicone baking mat.
- Roll and Cut the Dough: On a lightly floured surface, roll out the chilled dough to about 1/8-inch thickness. Use a small pumpkin-shaped cookie cutter to cut out as many crackers as possible. Gather and reroll the scraps to cut out additional crackers.
- Bake the Crackers: Place the cut-out crackers on the prepared baking sheet, leaving a little space between each one. Bake in the preheated oven for 12-15 minutes, or until the edges are lightly golden. Keep an eye on them to verify they don’t over-bake.
- Cool and Serve: Remove the crackers from the oven and allow them to cool on the baking sheet for a few minutes before transferring them to a wire rack to cool completely. Serve them with your favorite dip or enjoy them on their own.
Extra Tips:
To guarantee your Pumpkin-Shaped Cheese Crackers are perfectly flaky and flavorful, be sure to use cold butter and cold water, as this helps create the right texture.
If you want to experiment with flavors, you can substitute the cheddar with another type of cheese like Parmesan or Gruyère for a different taste profile. Additionally, feel free to adjust the level of cayenne pepper to suit your heat preference, or omit it entirely if you’re serving a crowd that prefers milder snacks.
If you don’t have a pumpkin-shaped cutter, any small cookie cutter will work, but the pumpkin shape adds that special Halloween touch.
Monster Meatball Sliders
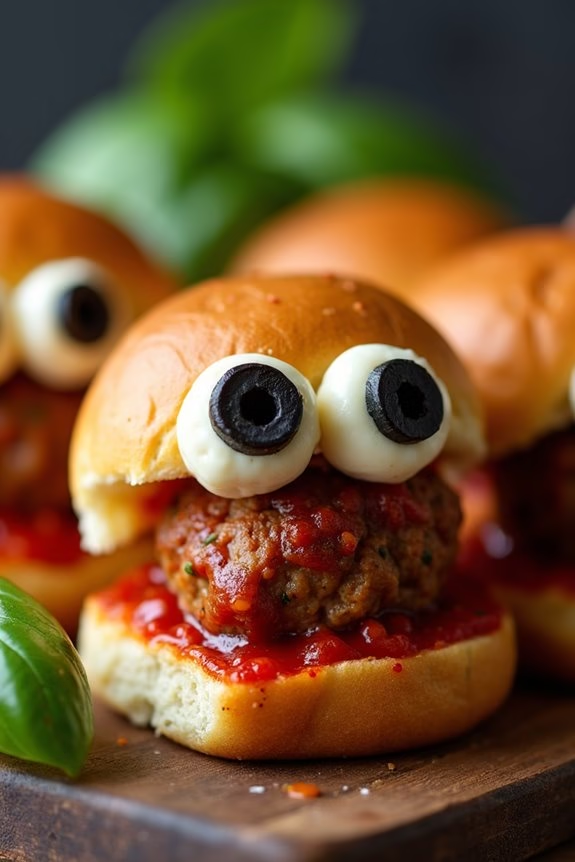
Get ready to thrill your guests this Halloween with Monster Meatball Sliders, a spooky twist on a classic favorite! These bite-sized, savory treats are perfect for adding a bit of frightful fun to your party table.
With succulent, flavorful meatballs tucked inside soft slider buns and adorned with eerie edible eyes, these sliders are sure to be a hit at your festive gathering. The Monster Meatball Sliders aren’t only delicious but also easy to assemble, making them an ideal choice for a busy Halloween night.
Whether you’re hosting a party or just looking for a fun family meal, these sliders will bring a smile to everyone’s face. This recipe serves 4-6 people, guaranteeing there’s plenty to go around for your hungry ghouls and goblins.
Ingredients:
- 1 pound ground beef
- 1/2 cup breadcrumbs
- 1/4 cup grated Parmesan cheese
- 1 large egg
- 2 cloves garlic, minced
- 1 teaspoon dried oregano
- 1 teaspoon salt
- 1/2 teaspoon black pepper
- 1 cup marinara sauce
- 8-10 slider buns
- 16-20 small mozzarella balls (bocconcini)
- 16-20 black olive slices
- Fresh basil leaves (optional, for garnish)
Cooking Instructions:
1. Preheat the Oven: Begin by preheating your oven to 375°F (190°C). This will guarantee it’s hot enough to cook the meatballs evenly.
2. Prepare the Meatball Mixture: In a large mixing bowl, combine the ground beef, breadcrumbs, Parmesan cheese, egg, minced garlic, oregano, salt, and pepper.
Mix everything together using your hands or a spoon until well combined.
3. Shape the Meatballs: Roll the meat mixture into small balls, about 1-1.5 inches in diameter. You should get approximately 16-20 meatballs from this mixture.
4. Bake the Meatballs: Place the meatballs on a baking sheet lined with parchment paper or lightly greased. Bake in the preheated oven for 20-25 minutes, or until they’re cooked through and browned.
5. Warm the Marinara Sauce****: While the meatballs are baking, heat the marinara sauce in a saucepan over medium heat until it’s hot and bubbly.
6. Assemble the Sliders: Once the meatballs are cooked, place them in the marinara sauce to coat. Then, place each meatball inside a slider bun.
Top each meatball with a mozzarella ball and secure it with a slice of black olive to create the “eyes,” using a toothpick if necessary to hold them in place.
7. Garnish and Serve: Optionally, add a fresh basil leaf to each slider for an extra pop of color and flavor. Serve immediately while warm.
Extra Tips:
For the best results, make sure not to overwork the meat mixture as it can make the meatballs tough. If you’re short on time, you can use store-bought meatballs, but homemade ones will give you better flavor and texture.
To make the sliders even spookier, you can use food coloring to tint the mozzarella balls green or red for a monstrous effect. Finally, if you have any leftover sliders, they can be stored in the refrigerator for up to two days and reheated in the oven. Enjoy your Halloween feast!
Haunted Jalapeño Poppers

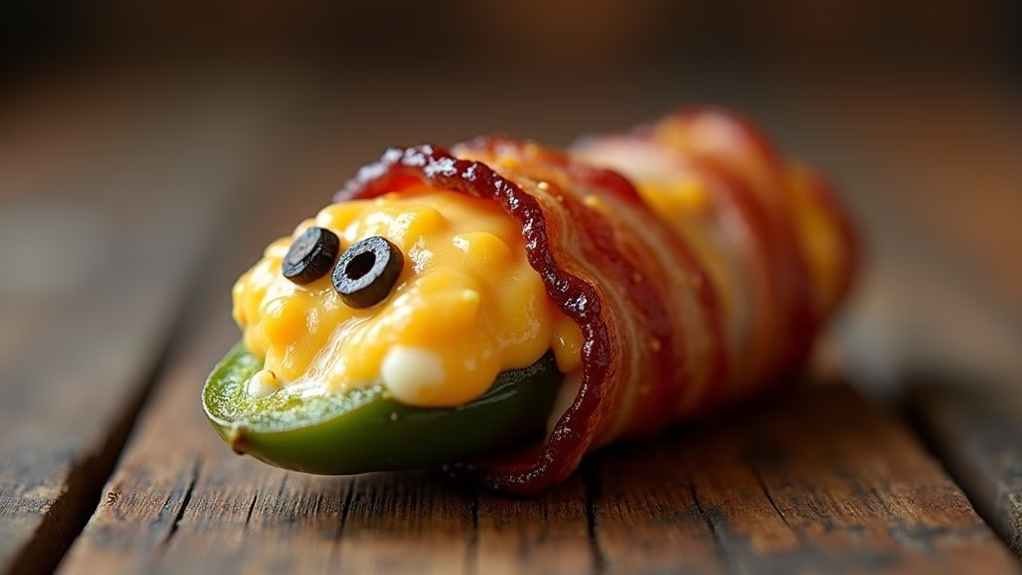
Haunted Jalapeño Poppers are the perfect spooky snack to spice up your Halloween party. This dish combines the classic flavors of jalapeño poppers with a haunting twist, thanks to a few fun and simple modifications.
These poppers are stuffed with a creamy, cheesy filling, wrapped in crispy bacon, and adorned with spooky decorations to delight and terrify your guests in equal measure. Whether you’re hosting a Halloween bash or just want to enjoy some festive flavors at home, these poppers are guaranteed to be a hit.
To create these frightfully delicious treats, you’ll start by hollowing out the jalapeños and filling them with a rich mixture of cream cheese, cheddar, and spices. The poppers are then wrapped in bacon and baked to crispy perfection.
For the finishing touch, use small pieces of sliced olives or edible eyes to give each popper a ghoulish face. These Haunted Jalapeño Poppers aren’t only a feast for the palate but also a visual treat that adds a playful element to your Halloween spread.
Ingredients (Serves 4-6):
- 12 large jalapeño peppers
- 8 oz cream cheese, softened
- 1 cup shredded cheddar cheese
- 1/2 teaspoon garlic powder
- 1/2 teaspoon onion powder
- 1/4 teaspoon smoked paprika
- 12 slices of bacon
- Black olives or edible candy eyes for decoration
- Salt and pepper to taste
Cooking Instructions:
- Prepare the Jalapeños: Begin by preheating your oven to 400°F (200°C). Cut each jalapeño pepper in half lengthwise and remove the seeds and membranes using a small spoon or knife. Be sure to wear gloves to protect your hands from the spicy oils.
- Make the Cheese Filling: In a mixing bowl, combine the softened cream cheese, shredded cheddar cheese, garlic powder, onion powder, smoked paprika, salt, and pepper. Mix until all ingredients are well incorporated and the filling is smooth.
- Stuff the Peppers: Using a small spoon, fill each jalapeño half with the cheese mixture, guaranteeing that the filling is slightly mounded over the top of the pepper for a generous bite.
- Wrap with Bacon: Take a slice of bacon and wrap it around each stuffed jalapeño half, securing the ends with toothpicks if necessary. Confirm the bacon is tightly wrapped to prevent it from unraveling during cooking.
- Bake the Poppers: Place the bacon-wrapped jalapeños on a baking sheet lined with parchment paper or a wire rack. Bake in the preheated oven for 20-25 minutes, or until the bacon is crispy and the cheese is bubbly.
- Decorate: Once out of the oven, let the poppers cool slightly. Add sliced olives or edible candy eyes to create spooky faces on each popper. Serve warm and enjoy!
Extra Tips:
When preparing Haunted Jalapeño Poppers, consider the spice level of your jalapeños. If you prefer a milder heat, look for larger peppers and thoroughly remove the seeds and membranes.
For an extra crispy texture, you can pre-cook the bacon for a few minutes before wrapping it around the peppers. If you’re short on time, you can also use pre-cooked bacon strips.
And remember, the spooky decorations are optional but add a fun Halloween flair that your guests will appreciate.