

Hosting a casual get-together is one of my favorite things to do!
There’s something so special about gathering friends around the kitchen island, sharing laughter, and enjoying delicious food together.
When I first started hosting, I was on the lookout for chicken appetizers that would impress without consuming my whole day in the kitchen.
That’s when I discovered a collection of fifteen must-try chicken recipes that are sure to be a hit!
From spicy buffalo wings to melt-in-your-mouth honey garlic chicken bites, your guests will be raving long after the last bite has been savored.
Spicy Buffalo Wings
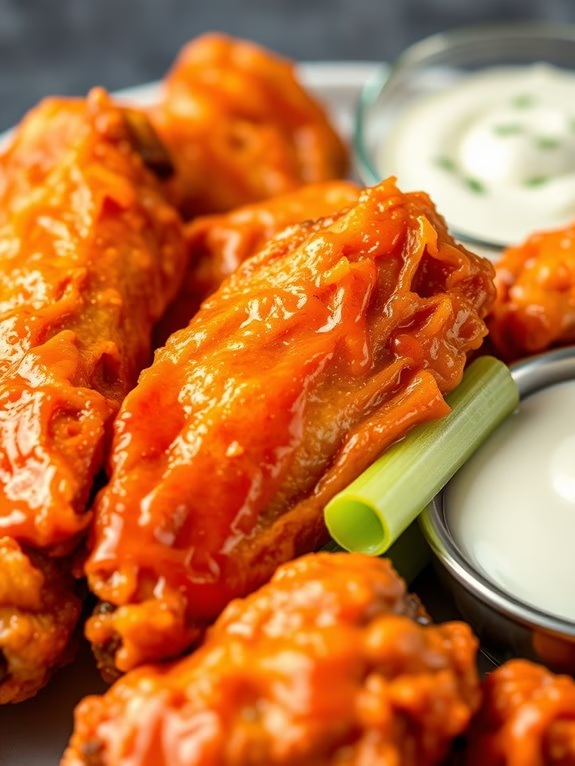
Spicy Buffalo Wings are a classic appetizer that never fails to please a crowd. The combination of crispy chicken wings coated in a tangy, spicy buffalo sauce is irresistible. These wings are perfect for game days, parties, or just a fun family dinner. The secret to great buffalo wings lies in the balance of flavors and guaranteeing the wings are crispy on the outside while juicy on the inside.
Buffalo wings are believed to have originated in Buffalo, New York, and have since become a staple in American cuisine. The spicy sauce, typically made from a blend of hot sauce and butter, gives the wings their signature heat and tang. This recipe will guide you through making delicious Spicy Buffalo Wings, guaranteeing they’re cooked to perfection and packed with flavor. The recipe serves 4-6 people, making it ideal for gatherings or a hearty appetizer.
Ingredients
- 3 pounds chicken wings, separated into drumettes and flats
- 1 tablespoon vegetable oil
- 1 teaspoon salt
- 1 teaspoon black pepper
- 1 cup all-purpose flour
- 1 cup hot sauce (such as Frank’s RedHot)
- 1/2 cup unsalted butter
- 1 tablespoon white vinegar
- 1/2 teaspoon garlic powder
- 1/4 teaspoon cayenne pepper (optional, for extra heat)
- Celery sticks and blue cheese dressing, for serving
Cooking Instructions
- Prepare the Wings: Preheat your oven to 400°F (200°C). Pat the chicken wings dry with paper towels. This step is essential for achieving a crispy texture. Once dry, place the wings in a large mixing bowl.
- Season and Coat: Drizzle the wings with vegetable oil and sprinkle with salt and black pepper. Toss to coat evenly. Next, add the flour to the bowl and toss until the wings are evenly coated with flour.
- Bake the Wings: Arrange the wings in a single layer on a baking sheet lined with parchment paper or a wire rack. Bake in the preheated oven for 45-50 minutes, flipping halfway through, until the wings are golden brown and crispy.
- Make the Buffalo Sauce: While the wings are baking, prepare the sauce. In a small saucepan over medium heat, combine the hot sauce, butter, white vinegar, garlic powder, and cayenne pepper (if using). Stir until the butter is melted and the sauce is smooth. Remove from heat.
- Toss the Wings in Sauce: Once the wings are crispy and cooked through, transfer them to a large bowl. Pour the buffalo sauce over the wings and toss until they’re fully coated.
- Serve and Enjoy: Serve the wings hot, with celery sticks and blue cheese dressing on the side for dipping.
Extra Tips
For extra crispy wings, you can double-bake them: After the initial baking, remove the wings, let them cool slightly, and then bake again for an additional 10-15 minutes. This will guarantee maximum crispiness.
If you prefer grilling, the wings can be grilled on medium-high heat for about 20-25 minutes, turning occasionally, before tossing them in the sauce.
Adjust the cayenne pepper to your taste preference to control the level of heat, and remember to serve immediately for the best flavor and texture.
Honey Garlic Chicken Bites
Honey Garlic Chicken Bites are a delightful and savory appetizer that combines the sweet taste of honey with the rich flavor of garlic. These bite-sized chicken pieces are perfect for any gathering, party, or simple family dinner. The dish isn’t only delicious but also incredibly easy to prepare, making it a great choice for both novice and experienced cooks.
With just a few simple ingredients, you can create a flavorful dish that will have your guests coming back for more. The succulent chicken pieces are first coated in a light flour mixture, giving them a crispy texture when fried to perfection. They’re then tossed in a mouthwatering honey garlic sauce, which adds a beautiful glaze and irresistible aroma.
The balance of sweet and savory flavors makes Honey Garlic Chicken Bites a crowd favorite. Whether served as an appetizer or a main course, these chicken bites are sure to be a hit.
Ingredients (Serving Size: 4-6 People)
- 1.5 pounds boneless, skinless chicken breasts
- 1 cup all-purpose flour
- 1 teaspoon salt
- 1 teaspoon black pepper
- 2 tablespoons olive oil
- 4 cloves garlic, minced
- 1/2 cup honey
- 1/4 cup soy sauce
- 1 tablespoon apple cider vinegar
- 1 tablespoon cornstarch
- 2 tablespoons water
- Optional: sesame seeds and chopped green onions for garnish
Cooking Instructions
- Prepare the Chicken: Begin by cutting the chicken breasts into bite-sized pieces. Confirm they’re uniformly sized to promote even cooking.
- Coat the Chicken: In a mixing bowl, combine the all-purpose flour, salt, and black pepper. Toss the chicken pieces in the flour mixture until they’re well-coated. Shake off any excess flour.
- Cook the Chicken: Heat the olive oil in a large skillet over medium-high heat. Add the coated chicken pieces to the skillet in a single layer. Cook for about 5-6 minutes, turning occasionally, until the chicken is golden brown and cooked through. Remove the chicken from the skillet and set aside.
- Make the Sauce: In the same skillet, reduce the heat to medium and add the minced garlic. Sauté for about 30 seconds until fragrant. Stir in the honey, soy sauce, and apple cider vinegar. Mix well and bring the sauce to a simmer.
- Thicken the Sauce: In a small bowl, mix the cornstarch with water to create a slurry. Gradually add the cornstarch slurry to the simmering sauce, stirring continuously until the sauce thickens to your desired consistency.
- Combine: Return the cooked chicken to the skillet. Toss the chicken in the sauce until each piece is well-coated and heated through.
- Serve: Transfer the honey garlic chicken bites to a serving platter. Garnish with sesame seeds and chopped green onions if desired. Serve immediately for the best texture and flavor.
Extra Tips
For extra crispiness, consider double-frying the chicken pieces. Fry them initially until they’re lightly golden, then remove them from the oil and let them rest for a few minutes. Return them to the skillet for a second fry until they reach a deeper golden brown. This method helps achieve an extra-crispy texture.
Additionally, for those who enjoy a bit of heat, a dash of red pepper flakes can be added to the sauce to give the chicken bites a spicy kick. Finally, confirm that the sauce thickens properly by stirring constantly after adding the cornstarch slurry to prevent lumps.
Crispy Chicken Tenders
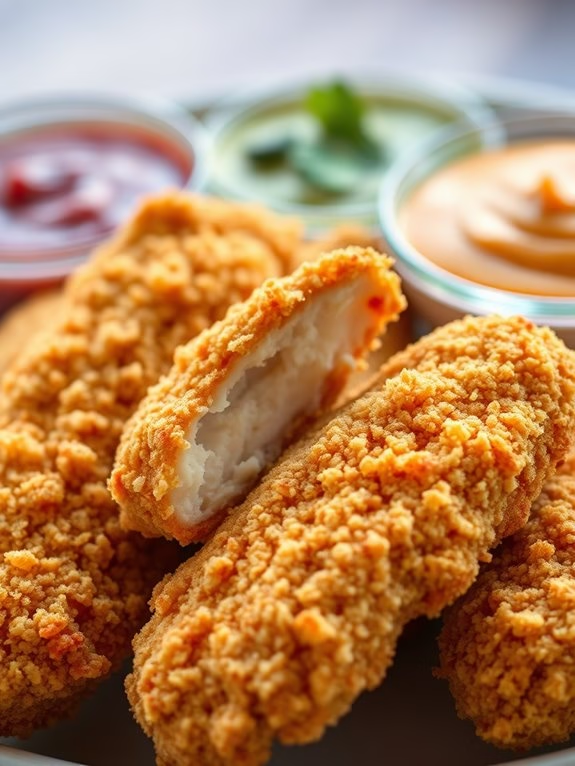
Crispy Chicken Tenders are a classic appetizer that’s loved by both kids and adults alike. Perfect for a game day snack or a casual dinner party, these tenders are certain to be a hit. The juicy chicken breast strips are coated in a well-seasoned breading and fried to perfection, resulting in a crunchy exterior that contrasts beautifully with the tender, flavorful chicken inside.
Serve them with your favorite dipping sauces for an irresistible treat. This recipe for Crispy Chicken Tenders is designed to serve 4-6 people, making it ideal for small gatherings or family meals. The process is straightforward and requires only a few simple ingredients that you may already have in your pantry.
With a few tips and tricks, you’ll be able to achieve the perfect crispy texture while keeping the chicken moist and juicy. Get ready for a delicious and satisfying dish that will leave everyone asking for seconds.
Ingredients:
- 1 ½ pounds of boneless, skinless chicken breasts
- 1 cup all-purpose flour
- 2 teaspoons salt
- 1 teaspoon black pepper
- 1 teaspoon garlic powder
- 1 teaspoon onion powder
- 1 teaspoon paprika
- 2 large eggs
- 1 cup buttermilk
- 2 cups panko breadcrumbs
- Vegetable oil, for frying
Cooking Instructions:
- Prepare the Chicken: Begin by cutting the chicken breasts into 1-inch wide strips. Confirm they’re all of similar size for even cooking.
- Season the Flour: In a shallow dish, combine the flour, salt, black pepper, garlic powder, onion powder, and paprika. Mix well to confirm even distribution of the seasoning.
- Set Up the Breading Station: In another bowl, whisk together the eggs and buttermilk. In a third shallow dish, pour the panko breadcrumbs. Arrange the flour mixture, egg mixture, and breadcrumbs in a line for easy breading.
- Bread the Chicken: Dredge each chicken strip first in the seasoned flour, shaking off any excess. Then, dip it into the egg mixture, allowing any excess to drip off. Finally, coat the chicken in the panko breadcrumbs, pressing gently to adhere the breadcrumbs to the chicken.
- Heat the Oil: In a large skillet or deep fryer, heat vegetable oil to 350°F (175°C). Confirm there’s enough oil to submerge the chicken strips completely.
- Fry the Chicken: Carefully add the breaded chicken strips to the hot oil, working in batches to avoid overcrowding the pan. Fry for 4-5 minutes, turning occasionally, until the chicken is golden brown and cooked through. The internal temperature should reach 165°F (75°C).
- Drain the Chicken: Once cooked, remove the chicken tenders from the oil and place them on a paper towel-lined plate to drain any excess oil.
Extra Tips:
For the crispiest chicken tenders, confirm the oil is at the right temperature before adding the chicken. Too low a temperature will result in greasy tenders, while too high can burn the breading before the chicken is cooked through.
If you prefer baking instead of frying, preheat your oven to 400°F (200°C) and bake the breaded chicken on a wire rack set over a baking sheet for 20-25 minutes, flipping halfway through. This method will still give you a crispy result with less oil.
Additionally, marinating the chicken in the buttermilk mixture for a few hours or overnight can enhance the flavor and tenderness.
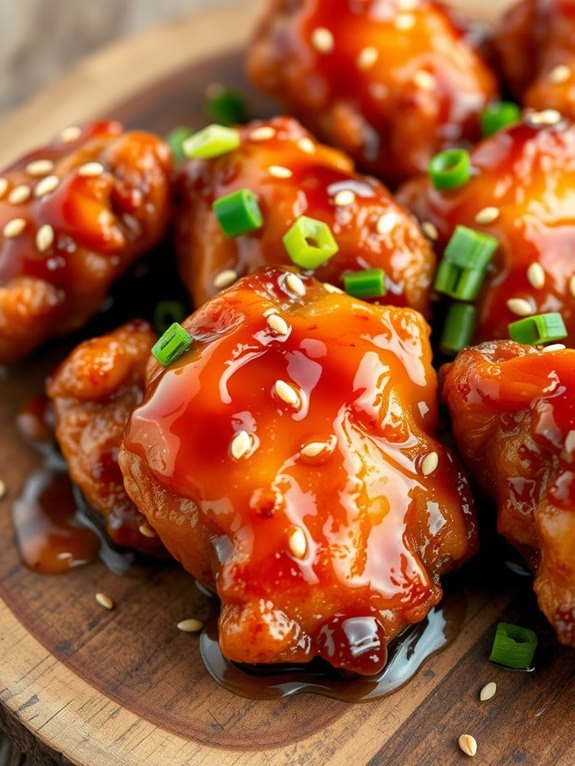
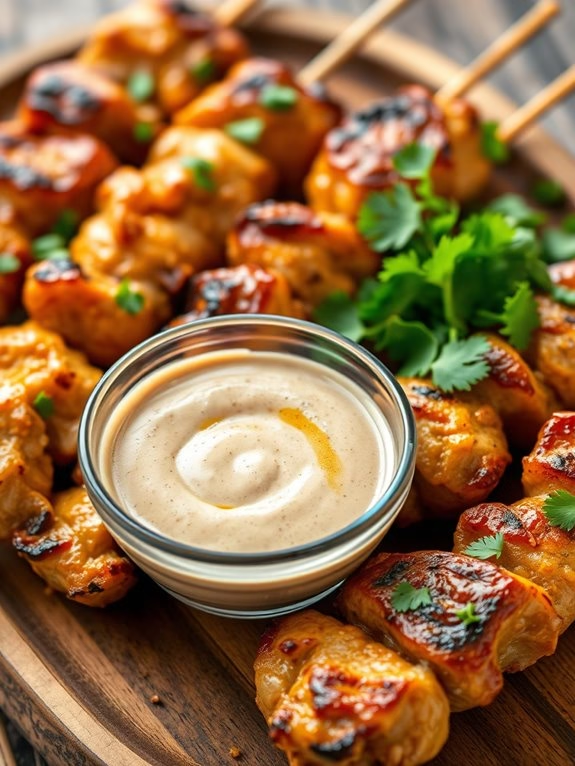
Teriyaki Chicken Skewers
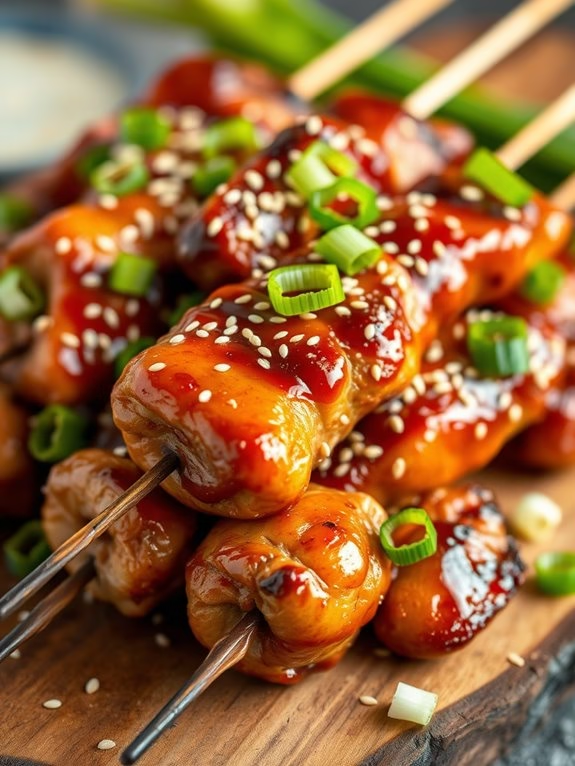
Teriyaki Chicken Skewers are a delightful and savory appetizer that brings together the rich flavors of teriyaki sauce with tender pieces of chicken. Perfect for parties or even a casual family dinner, these skewers are guaranteed to impress your guests with their delicious taste and appealing presentation.
The sweet and savory notes of the teriyaki sauce, combined with the smoky char from grilling, create a mouthwatering experience that will have everyone reaching for seconds.
Preparing these skewers isn’t only simple but also quite fun, as it involves a bit of hands-on assembly. The key to achieving the perfect balance of flavors lies in marinating the chicken, which allows it to absorb the teriyaki sauce’s essence fully.
Once marinated, the chicken is threaded onto skewers and grilled until juicy and slightly caramelized. This recipe serves 4-6 people, making it an excellent choice for small gatherings or a delightful addition to a larger spread of appetizers.
Ingredients for 4-6 servings:
- 2 pounds boneless, skinless chicken thighs
- 1 cup teriyaki sauce
- 2 tablespoons soy sauce
- 3 cloves garlic, minced
- 1 tablespoon ginger, freshly grated
- 2 tablespoons brown sugar
- 1 tablespoon sesame oil
- 1 tablespoon vegetable oil
- 1 tablespoon sesame seeds
- 4 green onions, sliced for garnish
- Wooden or metal skewers
Cooking Instructions:
- Prepare the Chicken: Start by cutting the chicken thighs into 1-inch cubes. This size guarantees they cook evenly and quickly on the skewers.
- Make the Marinade: In a medium bowl, combine the teriyaki sauce, soy sauce, minced garlic, grated ginger, brown sugar, sesame oil, and vegetable oil. Stir until the sugar dissolves and all ingredients are well mixed.
- Marinate the Chicken: Place the chicken cubes in a large resealable plastic bag or a shallow dish. Pour the marinade over the chicken, confirming all pieces are well coated. Seal the bag or cover the dish and refrigerate for at least 1-2 hours, or overnight for more intense flavor.
- Soak Wooden Skewers (if using): If using wooden skewers, soak them in water for at least 30 minutes before grilling to prevent burning.
- Preheat the Grill: When ready to cook, preheat your grill to medium-high heat. This temperature is ideal for achieving a nice char without overcooking the chicken.
- Assemble the Skewers: Thread the marinated chicken pieces onto the skewers, leaving a little space between each piece to guarantee even cooking.
- Grill the Skewers: Place the skewers on the preheated grill. Cook for about 4-5 minutes per side, or until the chicken is cooked through and has a nice char. Occasionally brush the skewers with the remaining marinade during grilling for extra flavor and moisture.
- Serve: Once cooked, remove the skewers from the grill. Garnish with sesame seeds and sliced green onions before serving.
Extra Tips:
For best results, consider making your own teriyaki sauce from scratch using soy sauce, mirin, sake, and sugar for a more authentic taste.
If you don’t have access to a grill, these skewers can also be cooked under a broiler in your oven. Simply place them on a baking sheet lined with foil and broil, turning once, until the chicken is cooked through.
Remember to keep an eye on them to prevent burning, as the sugars in the marinade can caramelize quickly. Enjoy your Teriyaki Chicken Skewers hot, as they tend to lose their juiciness when reheated.
Thai Chicken Satay
Thai Chicken Satay is a delectable appetizer that combines the savory flavors of marinated chicken with the richness of a creamy peanut sauce. Originating from Southeast Asia, this dish is a favorite at street fairs and in restaurant menus around the world. The chicken is typically marinated in a blend of spices and coconut milk, then skewered and grilled to perfection. The accompanying peanut sauce is both creamy and slightly sweet, complementing the spicy and aromatic flavors of the chicken.
This dish is perfect for serving as a starter at parties or as a part of a larger meal. It’s both flavorful and visually appealing, with the golden-brown grilled chicken skewers beautifully arranged on a platter. For a serving size of 4-6 people, this recipe will guarantee everyone gets a taste of these delicious skewers. Whether you’re hosting a dinner party or just looking to spice up a weeknight meal, Thai Chicken Satay is sure to impress.
Ingredients:
- 1 1/2 pounds boneless, skinless chicken thighs
- 1 cup coconut milk
- 2 tablespoons fish sauce
- 1 tablespoon soy sauce
- 1 tablespoon curry powder
- 2 teaspoons ground coriander
- 1 teaspoon ground cumin
- 1 tablespoon brown sugar
- 2 cloves garlic, minced
- 1 tablespoon vegetable oil
- Wooden skewers, soaked in water for at least 30 minutes
For the Peanut Sauce:
- 1 cup coconut milk
- 1/2 cup creamy peanut butter
- 2 tablespoons red curry paste
- 2 tablespoons brown sugar
- 1 tablespoon soy sauce
- 1 tablespoon lime juice
Cooking Instructions:
- Prepare the Chicken Marinade: In a large bowl, mix together the coconut milk, fish sauce, soy sauce, curry powder, ground coriander, ground cumin, brown sugar, minced garlic, and vegetable oil. Stir until the ingredients are well-combined.
- Marinate the Chicken: Cut the chicken thighs into thin strips, approximately 1 inch wide. Add the chicken strips to the marinade, making sure they’re fully coated. Cover the bowl with plastic wrap and refrigerate for at least 2 hours, allowing the flavors to penetrate the chicken.
- Prepare the Peanut Sauce: In a saucepan over medium heat, combine the coconut milk, peanut butter, red curry paste, brown sugar, soy sauce, and lime juice. Stir continuously until the sauce is smooth and begins to thicken. Remove from heat and set aside.
- Skewer the Chicken: Preheat your grill to medium-high heat. Thread the marinated chicken strips onto the soaked wooden skewers, ensuring the pieces are evenly distributed.
- Grill the Chicken: Place the skewers on the preheated grill. Cook each side for about 4-5 minutes, or until the chicken is fully cooked and has a nice char. Remove the skewers from the grill once done.
- Serve: Arrange the grilled chicken skewers on a serving platter. Pour the peanut sauce into a small bowl for dipping, and serve alongside the skewers.
Extra Tips:
When marinating the chicken, the longer you let it sit, the more flavorful it will be. If you have time, marinate the chicken overnight for the best results.
Additionally, when grilling, be careful not to overcook the chicken to prevent it from becoming dry. If you don’t have a grill, you can also cook the skewers in a grill pan on the stove.
Finally, for a touch of freshness, consider garnishing the dish with chopped fresh cilantro or a squeeze of lime juice before serving.
Lemon Pepper Drumettes

Lemon Pepper Drumettes are a delightful appetizer that combines the zesty tang of lemon with the aromatic punch of freshly cracked black pepper. These mini chicken drummettes are perfect for parties or casual get-togethers, offering a burst of flavor in every bite. The dish isn’t only simple to prepare but also a crowd-pleaser that can be served alongside a variety of dipping sauces, such as ranch or blue cheese, to complement its bold taste.
This recipe serves 4-6 people and involves a short marination period, allowing the flavors to infuse into the chicken. The drumettes are then baked to perfection, guaranteeing a crispy exterior while keeping the meat juicy and tender inside. Whether you’re hosting a game night or simply looking to try something new in the kitchen, these Lemon Pepper Drumettes are sure to satisfy everyone’s taste buds.
Ingredients:
- 2 pounds chicken drumettes
- 2 tablespoons lemon zest (from about 2 lemons)
- 1/4 cup lemon juice
- 2 teaspoons freshly cracked black pepper
- 2 tablespoons olive oil
- 1 teaspoon garlic powder
- 1 teaspoon onion powder
- 1 teaspoon salt
- 1/2 teaspoon paprika
- Fresh parsley, chopped for garnish (optional)
Instructions:
- Prepare the Chicken: Rinse the chicken drumettes under cold water and pat them dry with paper towels. This helps remove any excess moisture, which is essential for achieving a crispy skin.
- Marinate the Drumettes: In a large mixing bowl, combine the lemon zest, lemon juice, black pepper, olive oil, garlic powder, onion powder, salt, and paprika. Add the chicken drumettes to the bowl and toss well to verify each piece is evenly coated with the marinade. Cover the bowl with plastic wrap and refrigerate for at least 30 minutes, or up to 2 hours for a deeper flavor.
- Preheat the Oven: Preheat your oven to 400°F (200°C). Line a large baking sheet with parchment paper or aluminum foil for easy cleanup.
- Arrange the Drumettes: Remove the chicken from the marinade, allowing any excess to drip off, and arrange them in a single layer on the prepared baking sheet. Confirm the drumettes aren’t touching each other to allow for even cooking.
- Bake the Drumettes: Place the baking sheet in the preheated oven and bake for 25-30 minutes, flipping the drumettes halfway through cooking. This helps guarantee an even, golden-brown crispiness on both sides.
- Check for Doneness: Use a meat thermometer to check that the internal temperature of the drumettes has reached 165°F (75°C), confirming they’re fully cooked. If necessary, bake for an additional 5 minutes.
- Serve and Garnish: Once cooked, remove the drumettes from the oven and let them rest for a few minutes. Transfer to a serving platter and garnish with chopped fresh parsley if desired. Serve hot with your choice of dipping sauces.
Extra Tips:
For even more flavor, consider adding a teaspoon of Dijon mustard to the marinade for a subtle kick. If you prefer an extra-crispy finish, you can broil the drumettes for 1-2 minutes after baking. Just be sure to watch them closely to prevent burning.
Additionally, you can prepare the marinade the night before and let the drumettes marinate overnight to save time and enhance the flavor even further.
BBQ Chicken Sliders
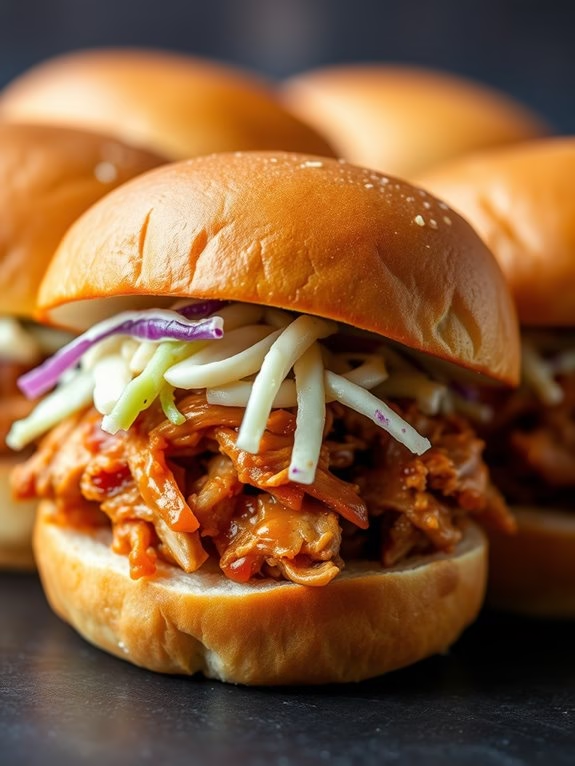
BBQ Chicken Sliders make for the perfect appetizer, combining the smoky flavors of barbecue sauce with tender, shredded chicken, all nestled between soft slider buns. These sliders aren’t only delicious but also incredibly easy to prepare, making them a hit at any gathering.
Whether you’re hosting a backyard barbecue, a game day party, or simply a family dinner, these sliders are sure to impress your guests with their savory taste and delightful presentation.
The secret to these scrumptious sliders lies in the slow-cooked chicken that absorbs the rich flavors of the barbecue sauce, resulting in a melt-in-your-mouth experience. Paired with crispy coleslaw and served on buttery slider buns, this dish strikes the perfect balance between sweet, tangy, and savory.
Ready to add a new favorite to your appetizer lineup? Here’s how you can whip up a batch of BBQ Chicken Sliders for a serving size of 4-6 people.
Ingredients:
- 2 lbs boneless, skinless chicken breasts
- 1 1/2 cups barbecue sauce
- 1 tablespoon olive oil
- 1 teaspoon garlic powder
- 1 teaspoon onion powder
- Salt and pepper to taste
- 12 slider buns
- 1 cup coleslaw mix
- 1/4 cup mayonnaise
- 1 tablespoon apple cider vinegar
- 1 tablespoon honey
Cooking Instructions:
- Prepare the Chicken: Season the chicken breasts with garlic powder, onion powder, salt, and pepper. Heat olive oil in a large skillet over medium heat. Add the chicken breasts and sear on each side for about 2-3 minutes until browned.
- Slow Cook the Chicken: Transfer the seared chicken breasts to a slow cooker. Pour the barbecue sauce over the chicken, making certain they’re fully covered. Cover the slow cooker and cook on low for 4-5 hours or on high for 2-3 hours, until the chicken is tender and easily shredded.
- Shred the Chicken: Once the chicken is fully cooked, remove it from the slow cooker and use two forks to shred it into bite-sized pieces. Return the shredded chicken to the slow cooker and mix it with the barbecue sauce to guarantee even coating.
- Prepare the Coleslaw: In a medium bowl, combine the coleslaw mix, mayonnaise, apple cider vinegar, and honey. Mix well until the coleslaw is evenly coated. Refrigerate until ready to use.
- Assemble the Sliders: Slice the slider buns in half. Place a generous portion of the shredded BBQ chicken on the bottom half of each bun. Top with a spoonful of coleslaw and then place the top bun over the coleslaw to complete the slider.
- Serve and Enjoy: Arrange the assembled sliders on a serving platter and serve immediately while warm. Enjoy the delightful combination of flavors and textures!
Extra Tips:
To save time, you can prepare the chicken and coleslaw a day in advance and store them separately in the refrigerator. When ready to serve, simply reheat the chicken in the slow cooker or on the stovetop, and assemble the sliders.
Additionally, feel free to customize your sliders by adding pickles, cheese, or jalapeños for an extra kick. If you’re looking to add more flavor, consider using a smoked barbecue sauce or incorporating spices like smoked paprika into the chicken seasoning.
Chicken Cheese Balls
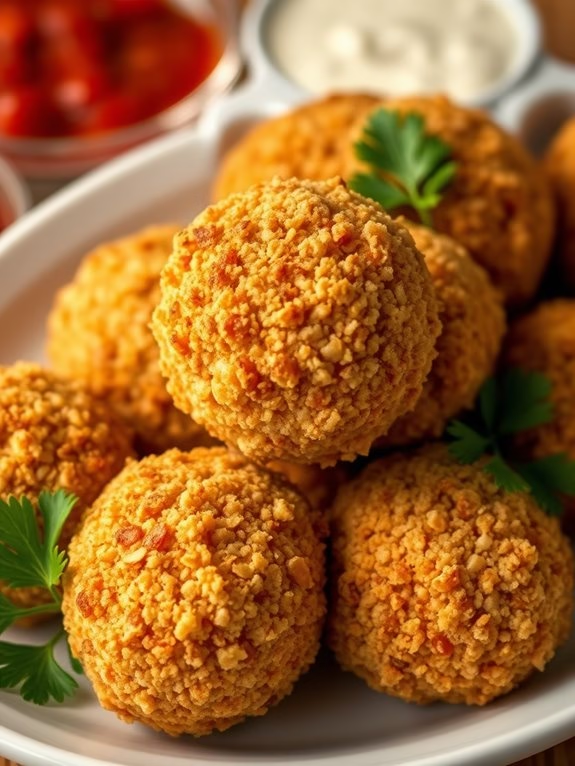
Chicken Cheese Balls are a delightful appetizer that combines the savory flavors of chicken with the creamy texture of cheese. Perfect for parties or family gatherings, these bite-sized treats are certain to satisfy both kids and adults alike. The outer crust is crispy and golden brown, while the inside remains juicy and cheesy, making them an irresistible addition to any appetizer spread.
The preparation of Chicken Cheese Balls is relatively simple, and with a few basic ingredients, you can whip up a batch in no time. This dish can be served with a variety of dipping sauces, such as marinara, ranch, or spicy aioli, to cater to different taste preferences. Whether you’re planning a casual get-together or a more formal event, Chicken Cheese Balls are a versatile option that’s certain to please your guests.
Ingredients for 4-6 servings:
- 500 grams of boneless chicken breast
- 1 cup of grated cheddar cheese
- 1 tablespoon of garlic powder
- 1 teaspoon of onion powder
- 1 teaspoon of black pepper
- 1 tablespoon of chopped fresh parsley
- Salt to taste
- 1 cup of all-purpose flour
- 2 eggs
- 2 cups of breadcrumbs
- Oil for deep frying
Cooking Instructions:
- Prepare the Chicken Mixture: Begin by boiling the boneless chicken breast in a pot of salted water until cooked through. Once cooked, let it cool slightly and then shred it using a fork or your hands.
- Mix Ingredients: In a large mixing bowl, combine the shredded chicken, grated cheddar cheese, garlic powder, onion powder, black pepper, chopped parsley, and salt. Mix until all ingredients are evenly distributed throughout the chicken.
- Form the Balls: Take a small amount of the chicken mixture and roll it into a ball about the size of a golf ball. Repeat with the remaining mixture until all are formed.
- Coat the Balls: Set up a breading station with three bowls: one with all-purpose flour, another with beaten eggs, and the last with breadcrumbs. Roll each chicken ball in flour, dip it in the egg, and then coat it with breadcrumbs. Confirm each ball is evenly coated.
- Heat the Oil: In a deep frying pan, heat oil over medium-high heat. The oil should be hot enough for frying but not smoking.
- Fry the Cheese Balls: Carefully place the coated chicken cheese balls into the hot oil, a few at a time, to avoid overcrowding. Fry them until they’re golden brown and crispy on the outside, about 3-4 minutes per batch.
- Drain and Serve: Remove the fried balls from the oil and place them on a plate lined with paper towels to drain any excess oil. Serve hot with your choice of dipping sauce.
Extra Tips:
For an even more decadent and cheesy flavor, consider adding small cubes of mozzarella cheese in the center of each ball before coating and frying.
Confirm your oil is at the right temperature by testing with a small piece of bread; it should brown in about 60 seconds. If the oil is too hot, the balls may burn on the outside before fully cooking inside.
Also, be sure to use freshly grated cheese for a creamier texture and better melting.
Baked Chicken Empanadas
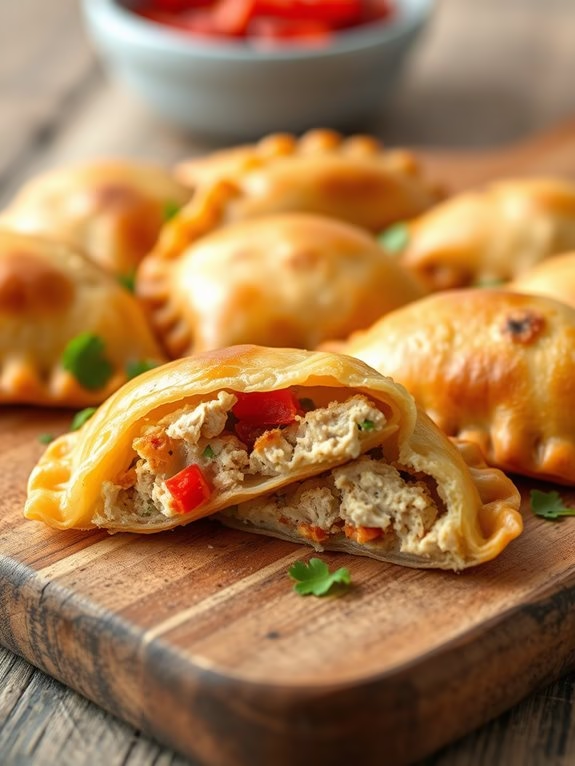
Baked Chicken Empanadas are a delightful appetizer that combines a savory filling with a perfectly crisp and golden pastry shell. Originating from Latin American cuisine, these empanadas are a popular choice for parties, potlucks, or as a satisfying snack. The filling is made with seasoned chicken, vegetables, and spices, providing a burst of flavor with each bite.
Baking the empanadas instead of frying them makes this dish a healthier option, while still retaining all the deliciousness that empanadas are known for.
To create these scrumptious Baked Chicken Empanadas, the dough is prepared from scratch or can be made using store-bought pastry for convenience. The filling is made by cooking chicken breast until tender, then shredding it before mixing with sautéed onions, bell peppers, garlic, and a blend of spices. Once the filling is ready, it’s placed in the center of each dough circle, sealed, and baked until golden brown. This recipe yields 12 empanadas, perfect for serving 4-6 people.
Ingredients:
- 2 cups all-purpose flour
- 1/2 teaspoon salt
- 1/2 cup unsalted butter, chilled and diced
- 1/3 cup cold water
- 2 tablespoons olive oil
- 1 medium onion, finely chopped
- 1 red bell pepper, finely chopped
- 2 garlic cloves, minced
- 1 pound chicken breast, cooked and shredded
- 1 teaspoon ground cumin
- 1 teaspoon smoked paprika
- 1/2 teaspoon chili powder
- Salt and pepper to taste
- 1/4 cup chopped fresh cilantro
- 1 egg, beaten (for egg wash)
Instructions:
1. Prepare the Dough: In a large bowl, combine the flour and salt. Add the diced butter and mix with your fingers or a pastry cutter until the mixture resembles coarse crumbs. Gradually stir in the cold water until the dough comes together.
Form into a ball, wrap in plastic, and refrigerate for at least 30 minutes.
2. Cook the Filling: Heat the olive oil in a large skillet over medium heat. Add the chopped onion and bell pepper, cooking until softened, about 5 minutes. Stir in the garlic and cook for another minute.
Add the shredded chicken, cumin, smoked paprika, chili powder, salt, and pepper. Cook for another 5 minutes, stirring occasionally. Remove from heat and mix in the cilantro. Allow to cool slightly.
3. Assemble Empanadas: Preheat the oven to 400°F (200°C) and line a baking sheet with parchment paper. Roll out the dough on a floured surface to about 1/8-inch thickness. Cut into 4-inch circles using a cookie cutter or a glass.
Place a heaping tablespoon of the chicken mixture in the center of each circle.
4. Seal and Bake: Fold the dough over the filling to form a half-moon shape. Press the edges together with a fork to seal. Place empanadas on the prepared baking sheet and brush with the beaten egg.
Bake in the preheated oven for 20-25 minutes, or until golden brown.
5. Cool and Serve: Remove the empanadas from the oven and let them cool slightly before serving. These empanadas are delicious warm or at room temperature.
Extra Tips:
For a flakier crust, ascertain that the butter is well-chilled before incorporating it into the flour. If you prefer a spicier filling, you can add a chopped jalapeño or increase the amount of chili powder.
Leftover empanadas can be stored in an airtight container in the refrigerator for up to 3 days and reheated in the oven to maintain their crispness. If you choose to use store-bought pastry, look for puff pastry or pie crust dough for similar results.
Jalapeño Chicken Poppers
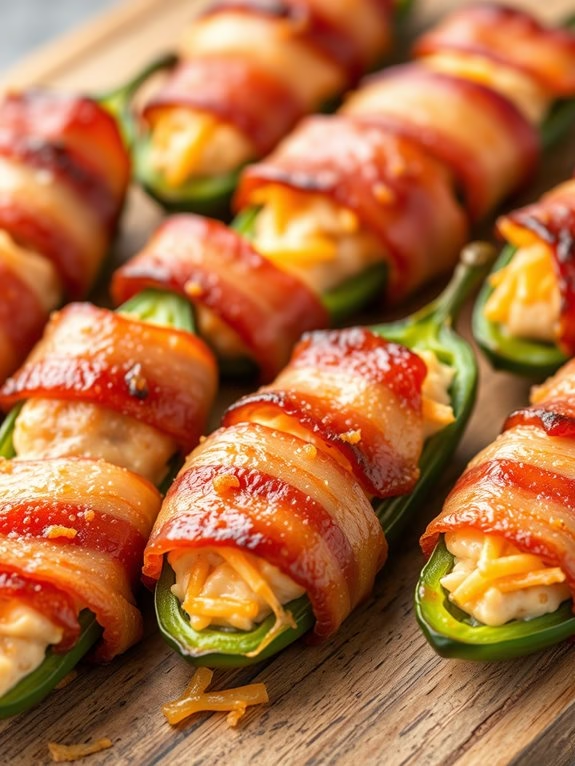
Jalapeño Chicken Poppers are a delightful and spicy appetizer that’s sure to be a hit at any gathering. Combining the rich flavors of chicken, cream cheese, and jalapeños, these poppers are wrapped in crispy bacon and baked to perfection. They offer a perfect balance of heat and creaminess, making them a favorite for those who enjoy a little kick in their appetizers.
Whether you’re hosting a party or simply looking for a delicious snack, these poppers are sure to impress. This recipe is designed to serve 4-6 people, making it ideal for small gatherings or family dinners. Each popper is packed with flavor and provides a satisfying taste that will leave your guests wanting more.
The preparation time is minimal, and the cooking process is straightforward, allowing you to enjoy these delicious bites without too much effort. Follow the steps below to create your own batch of Jalapeño Chicken Poppers.
Ingredients:
- 12 fresh jalapeños
- 1 pound boneless, skinless chicken breast
- 8 ounces cream cheese, softened
- 1 cup shredded cheddar cheese
- 1 teaspoon garlic powder
- 1 teaspoon onion powder
- Salt and pepper to taste
- 12 strips of bacon
- Toothpicks
Cooking Instructions:
- Preparation: Preheat your oven to 375°F (190°C). Line a baking sheet with aluminum foil or parchment paper for easy cleanup.
- Prepare the Jalapeños: Wash the jalapeños thoroughly. Cut each jalapeño in half lengthwise and remove the seeds and membranes. If you prefer less heat, make sure to remove all the seeds.
- Cook the Chicken: Season the chicken breasts with salt, pepper, garlic powder, and onion powder. Cook them in a skillet over medium heat until fully cooked and no longer pink inside. Allow the chicken to cool before shredding it into small pieces.
- Make the Filling: In a medium-sized bowl, combine the shredded chicken, softened cream cheese, and cheddar cheese. Mix until well blended.
- Stuff the Jalapeños: Using a spoon, fill each jalapeño half with the chicken and cheese mixture. Make sure each jalapeño is generously filled.
- Wrap with Bacon: Take a strip of bacon and wrap it around the stuffed jalapeño, securing it with a toothpick. Repeat this process for all jalapeño halves.
- Bake: Place the wrapped jalapeños on the prepared baking sheet. Bake in the preheated oven for 20-25 minutes or until the bacon is crispy and the cheese is melted and bubbly.
- Serve: Remove the jalapeño poppers from the oven and let them cool slightly before serving. Enjoy them warm for the best flavor.
Extra Tips: For a smokier flavor, consider using smoked bacon or adding a drop of liquid smoke to the chicken and cheese mixture. If you want to reduce the spiciness, you can soak the jalapeños in cold water for about 30 minutes before preparing them.
Additionally, feel free to experiment with different cheeses like mozzarella or pepper jack for a unique twist. Remember to use gloves when handling jalapeños to avoid any irritation from the chili oils.
Garlic Parmesan Wings
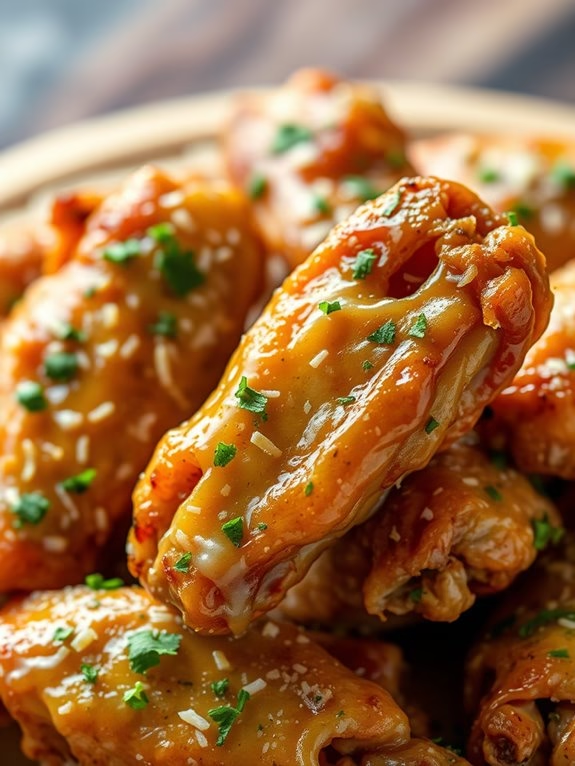
Garlic Parmesan Wings are a delicious and savory appetizer perfect for any gathering or a casual night in. These wings are coated in a mouthwatering blend of garlic and Parmesan cheese, offering a burst of flavor with every bite. The combination of crispy chicken skin and a cheesy, garlicky topping makes this dish a favorite among wing enthusiasts.
Whether you’re hosting a game night or simply craving something tasty, Garlic Parmesan Wings are certain to please. This recipe is designed to serve 4-6 people, making it an ideal choice for small parties or family dinners. The preparation is straightforward and requires a handful of ingredients that come together to create a flavorful, satisfying dish.
With these Garlic Parmesan Wings, you’ll enjoy a perfect balance of crispy, tender chicken and a rich, savory coating that will have everyone reaching for seconds.
Ingredients:
- 3 pounds of chicken wings
- 1/2 cup of unsalted butter
- 4 cloves of garlic, minced
- 1 cup of grated Parmesan cheese
- 2 tablespoons of chopped fresh parsley
- 1 teaspoon of salt
- 1/2 teaspoon of black pepper
- 1 teaspoon of onion powder
- 1 teaspoon of paprika
- Olive oil spray
Cooking Instructions:
- Preheat the Oven: Preheat your oven to 400°F (200°C). This temperature will guarantee that the wings become crispy while maintaining juiciness inside.
- Prepare the Baking Sheet: Line a large baking sheet with aluminum foil or parchment paper for easy cleanup. Place a wire rack on top of the baking sheet to allow air circulation around the wings, which helps them cook evenly.
- Season the Wings: In a large bowl, toss the chicken wings with salt, black pepper, onion powder, and paprika to evenly coat them. The spices will add an extra layer of flavor to the wings.
- Bake the Wings: Arrange the seasoned wings on the wire rack in a single layer. Lightly spray the wings with olive oil to promote crispiness. Bake in the preheated oven for 35-40 minutes, turning them halfway through, until they’re golden brown and crispy.
- Prepare the Garlic Parmesan Sauce: While the wings are baking, melt the unsalted butter in a small saucepan over medium heat. Add the minced garlic and cook for 1-2 minutes until fragrant. Remove from heat and stir in the grated Parmesan cheese and chopped parsley until well combined.
- Coat the Wings: Once the wings are cooked, remove them from the oven and place them in a large bowl. Pour the garlic Parmesan sauce over the wings and toss them well to confirm each wing is evenly coated in the sauce.
- Serve: Arrange the coated wings on a serving platter and garnish with extra Parmesan cheese and parsley if desired. Serve hot with your choice of dipping sauce on the side.
Extra Tips:
For the crispiest wings, make sure they’re thoroughly dried before seasoning. Pat them dry with paper towels to remove excess moisture. You can also prepare the wings in an air fryer for an even crisper texture, adjusting the cooking time accordingly.
If you prefer a spicier kick, consider adding a pinch of cayenne pepper to the seasoning mix. Finally, always let the wings rest for a few minutes after coating them in the sauce, allowing the flavors to meld perfectly.
Chicken Lettuce Wraps
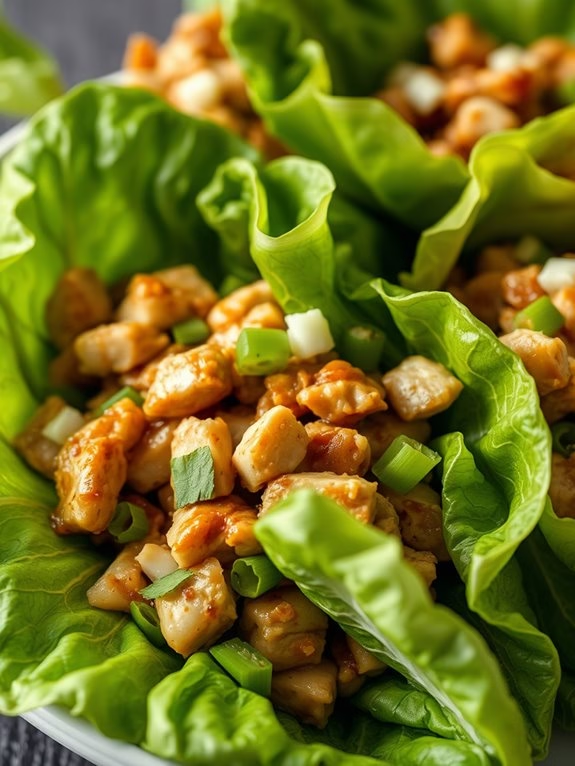
Chicken Lettuce Wraps are a delicious and healthy appetizer that’s perfect for any gathering or family meal. With its savory filling wrapped in crisp lettuce leaves, this dish offers a revitalizing and satisfying combination of textures and flavors. The wraps aren’t only easy to make but also quick to assemble, making them an ideal choice for those who want a tasty appetizer without spending too much time in the kitchen.
This recipe combines tender ground chicken with a variety of vegetables and Asian-inspired seasonings to create a flavorful filling. The addition of hoisin and soy sauce provides a savory depth, while fresh ginger and garlic add an aromatic touch. This filling is then wrapped in crisp lettuce leaves, offering a crunchy contrast that perfectly complements the rich flavors of the chicken mixture. Ideal for serving 4-6 people, this dish is sure to be a crowd-pleaser at any event.
Ingredients (for 4-6 servings):
- 1 pound ground chicken
- 1 tablespoon vegetable oil
- 1 medium onion, finely chopped
- 2 cloves garlic, minced
- 1 tablespoon fresh ginger, grated
- 1 can (8 ounces) water chestnuts, drained and chopped
- 1/2 cup hoisin sauce
- 2 tablespoons soy sauce
- 1 tablespoon rice vinegar
- 1 tablespoon sesame oil
- 2 green onions, thinly sliced
- Salt and pepper to taste
- 1 head of butter lettuce or iceberg lettuce, leaves separated
- Optional: Sriracha sauce for serving
Cooking Instructions:
- Prepare the Chicken: Heat the vegetable oil in a large skillet over medium-high heat. Add the ground chicken and cook, stirring frequently, until it’s no longer pink and cooked through, about 5-7 minutes. Break up any large chunks with a wooden spoon.
- Add Aromatics: Reduce the heat to medium and add the chopped onion, minced garlic, and grated ginger to the skillet with the chicken. Cook for another 3-4 minutes, stirring often, until the onion is translucent and fragrant.
- Incorporate Vegetables: Stir in the chopped water chestnuts, ensuring they’re evenly distributed throughout the chicken mixture. Cook for another 2 minutes.
- Season the Filling: Add the hoisin sauce, soy sauce, rice vinegar, and sesame oil to the skillet. Stir well to combine all the ingredients, allowing the flavors to meld together, and cook for an additional 2-3 minutes. Season with salt and pepper to taste.
- Finish with Green Onions: Remove the skillet from the heat and stir in the sliced green onions. This will add a fresh and slightly pungent flavor to the filling.
- Assemble the Wraps: To serve, spoon approximately 2-3 tablespoons of the chicken mixture onto each lettuce leaf. If desired, top with a drizzle of Sriracha sauce for an extra kick of heat.
Extra Tips:
When preparing Chicken Lettuce Wraps, it’s important to select the right type of lettuce. Butter lettuce or iceberg lettuce are ideal choices due to their sturdy yet flexible leaves, which are capable of holding the filling without tearing easily.
If you prefer an even crispier texture, consider chilling the lettuce leaves in the refrigerator before serving. Additionally, you can customize the filling by adding other vegetables, such as shredded carrots or bell peppers, for added color and nutrition.
Finally, if you like a bit more spice, feel free to experiment with adding chili paste or flakes to the chicken mixture while cooking.
Sweet Chili Chicken Bites
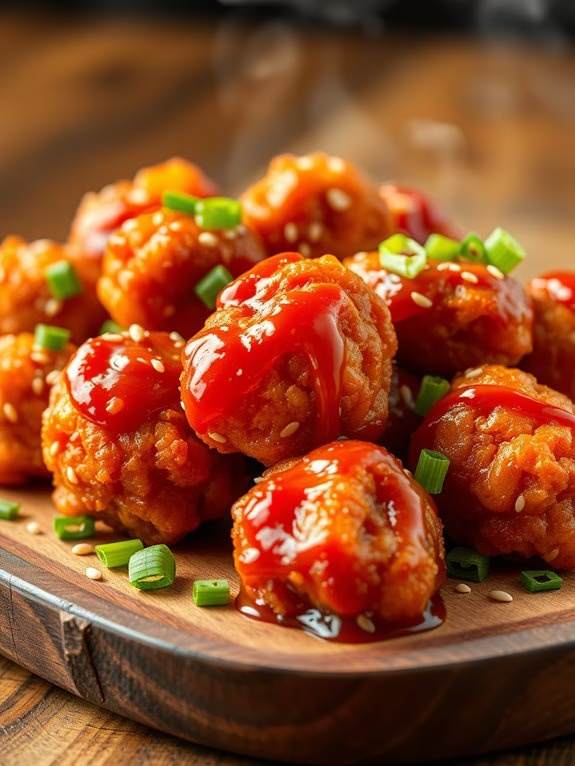
Sweet Chili Chicken Bites are the perfect appetizer for any gathering, combining the tantalizing heat of chili with a subtle sweetness that creates an irresistible flavor. These bite-sized delights are easy to prepare and are certain to be a hit at your next party or family dinner. The crispy exterior gives way to juicy, tender chicken inside, all coated in a delicious sweet chili sauce that will leave your taste buds wanting more.
This recipe is designed to serve 4-6 people and can be easily adjusted for larger gatherings. The preparation involves marinating the chicken for optimum flavor, then coating it in a crispy batter before frying it to golden perfection. Finally, the chicken bites are tossed in a homemade sweet chili sauce that adds just the right amount of heat. Follow the steps below for a dish that’s certain to become a favorite.
Ingredients:
- 1.5 pounds of boneless, skinless chicken breasts
- 1 cup of all-purpose flour
- 1/2 cup of cornstarch
- 2 large eggs
- 1 teaspoon of garlic powder
- 1 teaspoon of paprika
- 1 teaspoon of salt
- 1/2 teaspoon of black pepper
- Vegetable oil for frying
- 1 cup of sweet chili sauce
- 2 tablespoons of honey
- 1 tablespoon of soy sauce
- 1 tablespoon of lime juice
- Chopped green onions for garnish
- Sesame seeds for garnish
Cooking Instructions:
- Prepare the Chicken: Cut the chicken breasts into bite-sized pieces. In a bowl, season the chicken with salt, black pepper, garlic powder, and paprika. Mix well to guarantee the chicken is evenly coated with the spices.
- Set Up Your Breading Station: In one bowl, beat the eggs until fully mixed. In another bowl, combine the flour and cornstarch. This will be your breading station.
- Coat the Chicken: Dip each piece of chicken into the egg mixture, then dredge it in the flour-cornstarch mixture, guaranteeing each piece is well-coated. Shake off any excess flour.
- Heat the Oil: Pour enough vegetable oil into a large skillet or deep fryer to cover the chicken pieces. Heat the oil to 350°F (175°C).
- Fry the Chicken: Carefully add the coated chicken pieces to the hot oil, frying in batches if necessary. Cook for about 5-6 minutes, or until they’re golden brown and cooked through. Remove the chicken and drain on paper towels to remove excess oil.
- Prepare the Sauce: In a separate saucepan, combine the sweet chili sauce, honey, soy sauce, and lime juice. Heat the mixture over medium heat, stirring occasionally, until it begins to simmer.
- Toss the Chicken in Sauce: Once the sauce is ready, add the fried chicken pieces to the saucepan. Toss the chicken in the sauce until each piece is evenly coated.
- Garnish and Serve: Transfer the chicken bites to a serving platter. Sprinkle with chopped green onions and sesame seeds for garnish. Serve immediately.
Extra Tips:
For an even crispier coating, double-dip the chicken by repeating the egg and flour mixture steps once more.
When frying, guarantee the oil is at the correct temperature; too low, and the chicken will absorb oil and become soggy, too high, and it may burn.
If you prefer a spicier kick, add a pinch of red pepper flakes to the sweet chili sauce.
These Sweet Chili Chicken Bites can also be prepared ahead of time and reheated in the oven just before serving to maintain their crispiness.
Mediterranean Chicken Meatballs
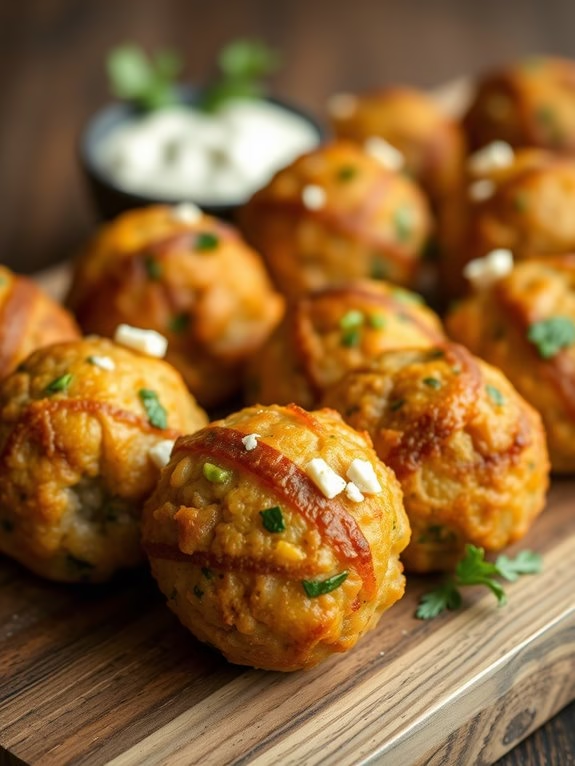
Mediterranean Chicken Meatballs are a delightful and flavorful appetizer that brings the taste of the Mediterranean straight to your kitchen. These meatballs are infused with a blend of fresh herbs, spices, and tangy feta cheese, making them a perfect choice for a family gathering or a casual dinner with friends.
Their tender texture and aromatic profile make them a crowd-pleaser that pairs wonderfully with a variety of dips, including tzatziki or hummus. This recipe is designed to serve 4-6 people, providing enough meatballs to satisfy everyone at the table.
The combination of ground chicken with Mediterranean flavors like oregano, parsley, and lemon zest creates a harmonious dish that’s both healthy and delicious. Serve these meatballs as a standalone appetizer or as part of a larger spread featuring other Mediterranean-inspired dishes.
Ingredients:
- 1 pound ground chicken
- 1/2 cup breadcrumbs
- 1/4 cup crumbled feta cheese
- 1/4 cup finely chopped fresh parsley
- 2 cloves garlic, minced
- 1 teaspoon dried oregano
- 1 teaspoon lemon zest
- 1/2 teaspoon salt
- 1/4 teaspoon black pepper
- 1 large egg
- 2 tablespoons olive oil for frying
- Optional: tzatziki or hummus for serving
Instructions:
1. Prepare the Mixture: In a large mixing bowl, combine the ground chicken, breadcrumbs, feta cheese, parsley, garlic, oregano, lemon zest, salt, pepper, and egg. Mix thoroughly until all ingredients are well incorporated and the mixture is uniform.
2. Shape the Meatballs: Using your hands, form the mixture into small meatballs, about 1 to 1.5 inches in diameter. You should have approximately 20-24 meatballs, depending on the size.
3. Preheat the Pan: Heat the olive oil in a large skillet over medium heat. Confirm the oil is hot enough by dropping a small piece of the mixture into the oil; it should sizzle immediately.
4. Cook the Meatballs: Add the meatballs to the skillet in batches, making sure not to overcrowd the pan. Cook the meatballs for about 4-5 minutes on each side, or until they’re golden brown and cooked through.
Use a spatula or tongs to turn them gently to avoid breaking.
5. Drain and Serve: Once cooked, transfer the meatballs to a plate lined with paper towels to drain any excess oil. Serve warm with tzatziki or hummus on the side, if desired.
Extra Tips:
For a healthier option, consider baking the meatballs instead of frying them. Preheat your oven to 400°F (200°C) and place the meatballs on a baking sheet lined with parchment paper.
Bake for 20-25 minutes, or until golden brown and cooked through. Additionally, you can experiment with other herbs such as mint or dill to add a different twist to the flavor profile.
Finally, to guarantee the meatballs stay moist, avoid over-mixing the ingredients and don’t compact the meatballs too tightly when shaping them.
Chicken Avocado Roll-Ups
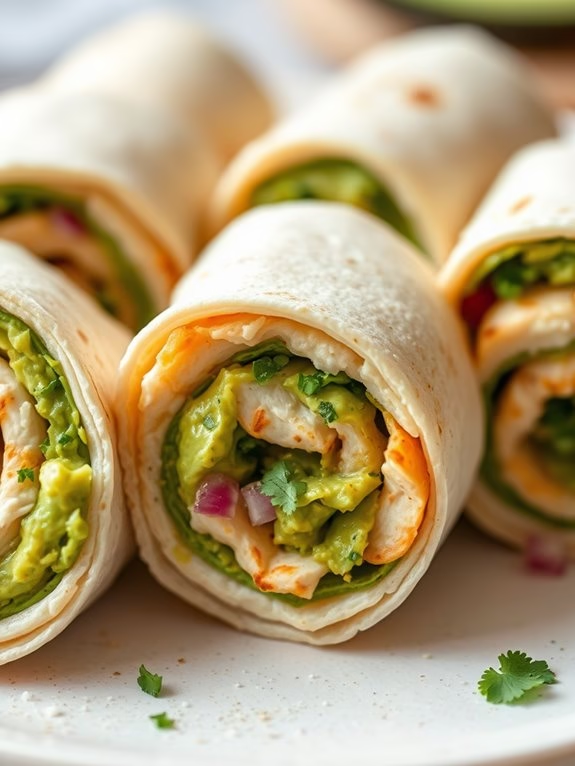
Chicken Avocado Roll-Ups are a delightful and nutritious appetizer that combines the creamy texture of avocado with the juicy, tender taste of chicken. Perfect for parties, family gatherings, or as a simple snack, these roll-ups are bound to impress your guests with their flavorful filling and easy-to-handle size. The combination of fresh ingredients makes for a revitalizing bite, while the chicken provides a satisfying, protein-packed base.
Whether you’re a seasoned cook or a beginner in the kitchen, this recipe is accessible and fun to make. The key to a great Chicken Avocado Roll-Up is in the balance of flavors and textures. The creamy avocado pairs perfectly with the seasoned chicken, and a hint of lime juice adds a zesty flair that brightens up the whole dish.
These roll-ups aren’t only delicious but also visually appealing, with their vibrant green color and neatly rolled presentation. They can be prepared ahead of time and stored in the refrigerator, making them a convenient option for entertaining.
Ingredients (Serves 4-6):
- 2 large chicken breasts
- Salt and pepper, to taste
- 1 tablespoon olive oil
- 2 ripe avocados
- Juice of 1 lime
- 1/2 cup chopped fresh cilantro
- 1/4 cup chopped red onion
- 1/2 teaspoon garlic powder
- 6 large flour tortillas
Cooking Instructions:
- Prepare the Chicken: Season the chicken breasts with salt and pepper on both sides. In a large skillet, heat the olive oil over medium-high heat. Once the oil is hot, add the chicken breasts and cook for about 6-7 minutes on each side or until fully cooked and golden brown. Remove the chicken from the skillet and let it cool before slicing it into thin strips.
- Prepare the Avocado Mixture: While the chicken is cooling, prepare the avocado filling. In a medium bowl, mash the avocados until smooth. Add the lime juice, chopped cilantro, red onion, and garlic powder. Mix until all ingredients are well combined and the mixture is creamy and smooth.
- Assemble the Roll-Ups: Lay out the flour tortillas on a clean surface. Spread a generous amount of the avocado mixture evenly over each tortilla. Place a few strips of chicken on top of the avocado mixture. Roll each tortilla tightly and secure with a toothpick if necessary.
- Slice and Serve: Once all tortillas are rolled, use a sharp knife to slice each roll-up into 1-inch pieces. Arrange the pieces on a platter for serving. Enjoy your Chicken Avocado Roll-Ups immediately or refrigerate until ready to serve.
Extra Tips: For a bit of extra flavor, you can add a sprinkle of your favorite cheese to the avocado mixture before rolling up the tortillas. If you prefer a spicier kick, consider adding a dash of hot sauce or a few slices of jalapeño to the mixture.
To guarantee the roll-ups hold their shape, chill them in the refrigerator for about 30 minutes before slicing. This will make them firmer and easier to cut. If you’re preparing these roll-ups for a picnic or outdoor event, consider wrapping them tightly in plastic wrap to keep them fresh until serving.