
I have to admit, I used to overlook canned chicken.
But let me tell you, it has saved my dinner plans more times than I can count.
After a busy day, realizing I forgot to defrost the chicken is a situation we can all relate to, right?
That’s when my beloved canned chicken comes to the rescue!
With these 14 delicious recipes, from zesty Buffalo Chicken Dip to cozy Chicken Pot Pie, you’ll discover how versatile and tasty canned chicken can be.
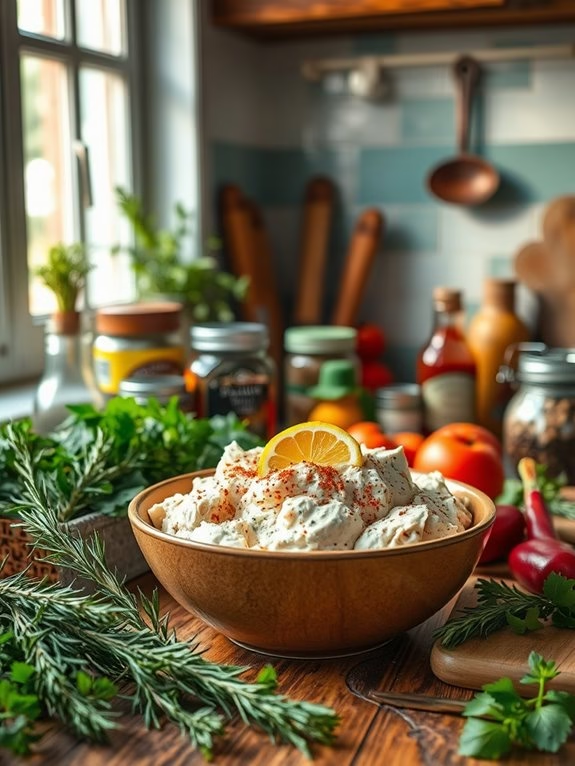
Classic Chicken Salad
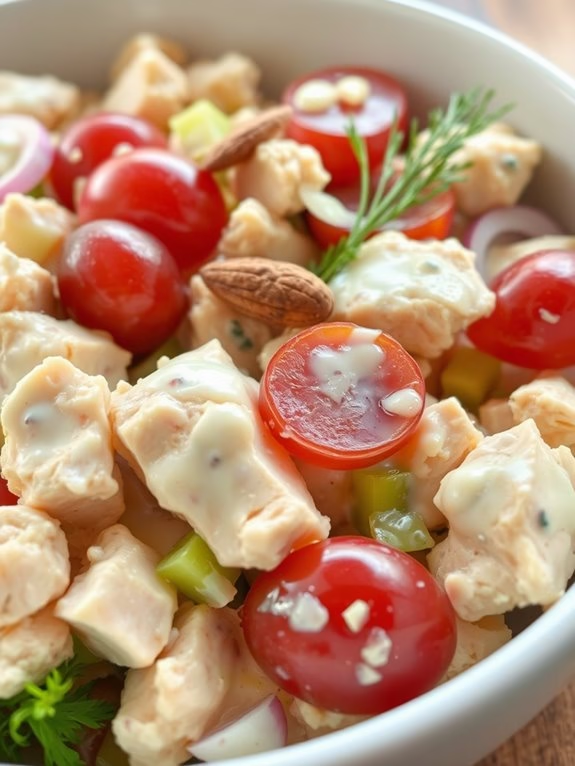
Canned chicken offers a convenient way to whip up a delicious and satisfying classic chicken salad. This recipe is perfect for a quick lunch, picnic, or light dinner. The creamy, tangy dressing combined with tender chicken, crunchy celery, and sweet grapes creates a harmonious blend of flavors and textures.
It’s a versatile dish that can be served in a variety of ways, whether in a sandwich, on a bed of greens, or with crackers. This classic chicken salad isn’t only easy to prepare but also highly customizable. Feel free to add your favorite nuts for extra crunch or some herbs for brightness.
The key to a great chicken salad is balancing the different ingredients to create a creamy yet invigorating dish. The recipe below serves 4-6 people, making it perfect for family gatherings or meal prep for the week.
Ingredients:
- 2 cans of chicken (12.5 oz each), drained
- 1 cup mayonnaise
- 2 tablespoons Dijon mustard
- 1 tablespoon lemon juice
- 1 cup celery, finely chopped
- 1/2 cup red grapes, halved
- 1/4 cup red onion, finely chopped
- Salt and pepper to taste
- Optional: 1/4 cup sliced almonds or walnuts
- Optional: 1 tablespoon fresh dill or parsley, chopped
Cooking Instructions:
- Prepare the Ingredients: Begin by draining the canned chicken thoroughly. Once drained, transfer the chicken to a large mixing bowl and use a fork to break up any large chunks.
- Mix the Dressing: In a separate bowl, combine the mayonnaise, Dijon mustard, and lemon juice. Stir until smooth and well blended.
- Combine the Ingredients: Add the finely chopped celery, halved grapes, and red onion to the bowl with the chicken. Pour the dressing over the mixture and gently stir until all ingredients are evenly coated.
- Season the Salad: Season the chicken salad with salt and pepper to taste. If you’re using nuts or herbs, fold them into the mixture at this stage, ensuring even distribution.
- Chill and Serve: Cover the bowl and refrigerate the chicken salad for at least 30 minutes to allow the flavors to meld. Serve chilled, either on bread for sandwiches, over a bed of lettuce, or with crackers.
Extra Tips:
For the best flavor, let the chicken salad sit in the refrigerator for a few hours before serving. This resting time allows the flavors to meld and develop fully.
Additionally, if you prefer a lighter option, consider substituting half of the mayonnaise with Greek yogurt for a tangy twist. Finally, always taste and adjust the seasoning before serving, as canned chicken can vary in saltiness.
Chicken Alfredo Bake
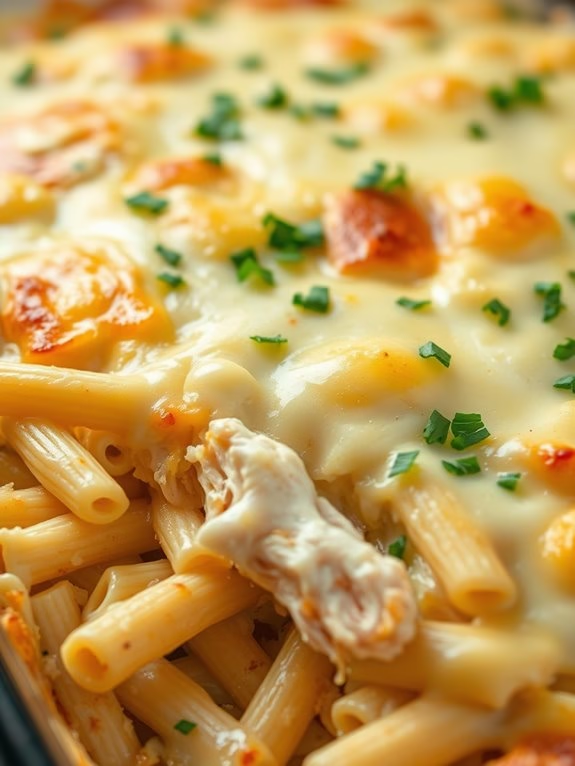
Chicken Alfredo Bake is a comforting and creamy pasta dish that combines tender canned chicken with rich Alfredo sauce, melted cheese, and perfectly cooked pasta. This dish is perfect for a cozy dinner at home and is sure to please the entire family.
Its creamy texture and savory flavors make it an irresistible meal that’s easy to prepare, making it ideal for busy weeknights. With just a few simple ingredients, you can create a delicious and satisfying meal that everyone will love.
This Chicken Alfredo Bake is a versatile dish that allows you to add your favorite vegetables or spices to customize it to your taste. The convenience of using canned chicken makes it quick to prepare without sacrificing flavor.
Whether you’re a novice or an experienced cook, you’ll find this recipe straightforward and rewarding. The end result is a warm, gooey, and delicious bake that will have everyone coming back for seconds.
Ingredients (serves 4-6):
- 12 ounces penne pasta
- 2 cups cooked and shredded canned chicken
- 2 cups Alfredo sauce
- 1 cup grated Parmesan cheese
- 1 cup shredded mozzarella cheese
- 1 teaspoon garlic powder
- 1 teaspoon Italian seasoning
- 1 tablespoon olive oil
- Salt and pepper to taste
- Fresh parsley, chopped (optional, for garnish)
Cooking Instructions:
- Preheat and Prepare Pasta: Preheat your oven to 375°F (190°C). Cook the penne pasta according to the package instructions until al dente. Drain and set aside.
- Combine Ingredients: In a large mixing bowl, combine the cooked pasta, canned chicken, Alfredo sauce, half of the Parmesan cheese, and half of the mozzarella cheese. Add the garlic powder, Italian seasoning, salt, and pepper. Mix well to ascertain all ingredients are evenly coated with the sauce.
- Assemble the Dish: Lightly grease a 9×13 inch baking dish with olive oil. Pour the pasta mixture into the dish, spreading it evenly. Sprinkle the remaining Parmesan and mozzarella cheese over the top.
- Bake: Place the baking dish in the preheated oven and bake for 25-30 minutes, or until the cheese is bubbly and golden brown.
- Garnish and Serve: Remove the dish from the oven and let it cool for a few minutes. Garnish with fresh parsley if desired. Serve warm and enjoy!
Extra Tips:
For a more flavorful Chicken Alfredo Bake, consider adding vegetables like broccoli, spinach, or mushrooms. Simply sauté them in olive oil before mixing them with the pasta.
If you prefer a spicier dish, add a pinch of red pepper flakes to the sauce mixture. Additionally, using a combination of different cheeses, such as cheddar or Gouda, can add a unique twist to the traditional recipe.
Remember to taste and adjust the seasoning before baking to ascertain the dish is perfectly seasoned to your liking.
Buffalo Chicken Dip

Buffalo Chicken Dip is a delicious, creamy, and spicy appetizer that’s perfect for game days, parties, or any gathering. This popular dip combines the flavors of buffalo wing sauce with tender shredded chicken and a blend of cheeses to create a mouthwatering dish that’s certain to be a hit with everyone.
The best part is that it’s easy to make and can be prepared in advance, allowing you to spend more time enjoying the company of your guests. Using canned chicken makes this recipe even more convenient without sacrificing flavor.
The dip is typically served warm, either baked in the oven or heated on the stovetop, and is perfect for scooping up with tortilla chips, celery sticks, or crusty bread. The combination of spicy, tangy, and creamy flavors guarantees that this Buffalo Chicken Dip will become a staple at your gatherings.
Ingredients for 4-6 servings:
- 2 cans (12.5 oz each) of canned chicken, drained
- 8 oz cream cheese, softened
- 1/2 cup ranch dressing
- 1/2 cup buffalo wing sauce
- 1 cup shredded cheddar cheese
- 1/2 cup crumbled blue cheese
- 1/4 cup chopped green onions (optional)
Cooking Instructions:
- Preheat the Oven: Preheat your oven to 350°F (175°C) to guarantee that it’s hot and ready for baking the dip.
- Mix Ingredients: In a large mixing bowl, combine the softened cream cheese, ranch dressing, and buffalo wing sauce. Stir until well blended and smooth.
- Add Chicken and Cheeses: Add the drained canned chicken, shredded cheddar cheese, and crumbled blue cheese to the mixture. Stir until all the ingredients are evenly combined.
- Transfer to Baking Dish: Spoon the mixture into a baking dish, spreading it out evenly. You can use an 8×8-inch dish or a similar size that accommodates the dip.
- Bake the Dip: Place the baking dish in the preheated oven and bake for 20-25 minutes, or until the dip is hot and bubbly.
- Garnish and Serve: Remove the dish from the oven and let it cool slightly. If desired, sprinkle chopped green onions on top for added flavor and color. Serve the dip warm with tortilla chips, celery sticks, or bread.
Extra Tips:
For a smoother dip, make sure that the cream cheese is fully softened before mixing. You can leave it at room temperature for about 30 minutes or microwave it for a few seconds.
If you prefer a spicier dip, add extra buffalo wing sauce to taste. This dip can also be made in a slow cooker by combining all ingredients and cooking on low for 2-3 hours, stirring occasionally.
If you’re making this dip ahead of time, prepare it up to the baking step and refrigerate. When ready to serve, bake as directed, adding a few extra minutes to the cooking time if needed.
Chicken Tortilla Soup
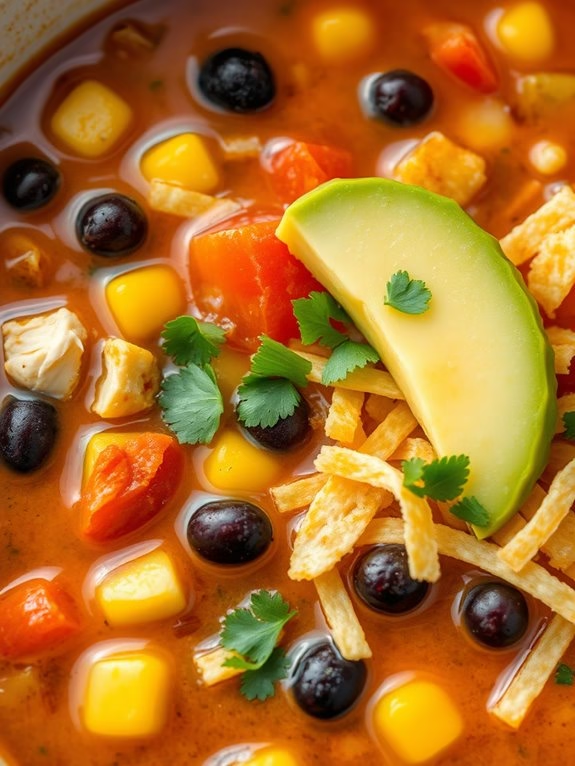
Chicken Tortilla Soup is a comforting and flavorful dish that’s perfect for any time of the year. This soup combines the rich taste of chicken with the zest of Mexican spices, all enhanced by a medley of vegetables. Using canned chicken makes this recipe incredibly convenient, allowing you to whip up a delicious meal in no time.
This dish isn’t only hearty but also loaded with nutrients, making it a wholesome choice for family dinners or gatherings. The soup is traditionally topped with crispy tortilla strips, which provide a delightful contrast to the warm and spicy broth. You can customize the toppings to suit your preferences—avocado, cheese, and cilantro all make wonderful additions.
Whether you’re a seasoned cook or a beginner, this Chicken Tortilla Soup recipe is straightforward and forgiving, allowing you to adjust the flavors to your liking. Serve it with a side of crusty bread or a fresh salad for a complete meal.
Ingredients for 4-6 Servings:
- 2 cans (12.5 oz each) of canned chicken, drained
- 1 tablespoon olive oil
- 1 medium onion, diced
- 3 cloves garlic, minced
- 1 jalapeño, seeded and chopped
- 1 teaspoon ground cumin
- 1 teaspoon chili powder
- 1/2 teaspoon smoked paprika
- 1 (14.5 oz) can diced tomatoes with green chilies
- 1 (15 oz) can black beans, drained and rinsed
- 4 cups chicken broth
- 1 cup frozen corn
- Salt and pepper to taste
- Juice of 1 lime
- Tortilla strips for garnish
- Optional toppings: shredded cheese, avocado slices, chopped fresh cilantro
Cooking Instructions:
- Heat the Oil: In a large pot, heat the olive oil over medium heat. Once hot, add the diced onion and sauté until soft and translucent, about 5 minutes.
- Add Aromatics: Stir in the minced garlic and chopped jalapeño, cooking for another minute until fragrant.
- Season the Base: Add the cumin, chili powder, and smoked paprika to the pot, stirring well to coat the onions and garlic. Cook for an additional minute to toast the spices.
- Build the Soup: Add the canned chicken, diced tomatoes with green chilies, black beans, chicken broth, and corn. Stir everything together to combine.
- Simmer the Soup: Bring the mixture to a boil, then reduce the heat to low. Cover the pot and let the soup simmer for about 20 minutes, allowing the flavors to meld.
- Season to Taste: Before serving, stir in the lime juice and season with salt and pepper according to your taste preferences.
- Serve: Ladle the soup into bowls, and top with tortilla strips and any optional toppings you desire, such as shredded cheese, avocado, or cilantro.
Extra Tips:
For an added layer of flavor, consider roasting the jalapeño before adding it to the soup. You can do this by placing it under a broiler until the skin chars, then peeling it once it cools.
Adjust the spice level by using more or less jalapeño or by adding a pinch of cayenne pepper. If you prefer a thicker soup, you can mash some of the black beans before adding them to the pot.
This recipe is versatile, so feel free to experiment with other ingredients like bell peppers or zucchini. Enjoy your hearty and satisfying Chicken Tortilla Soup!
Chicken Stuffed Peppers
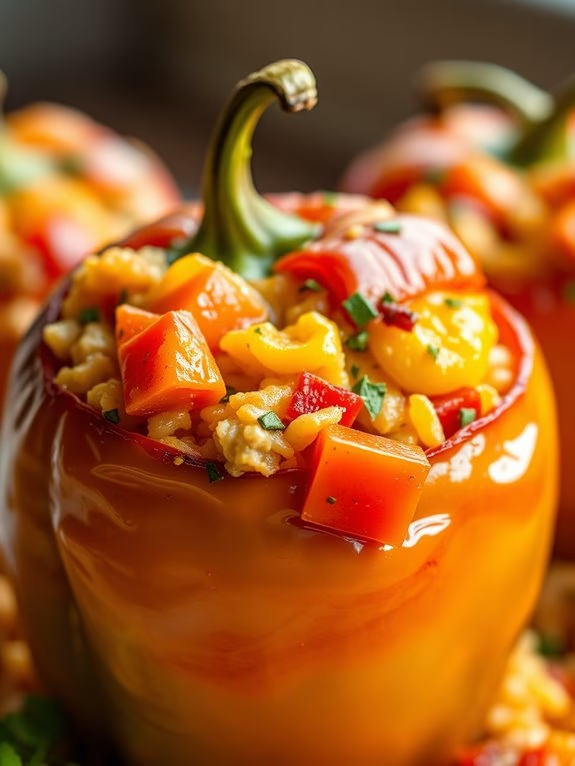
Chicken Stuffed Peppers are a delightful and nutritious meal that combines the convenience of canned chicken with vibrant bell peppers. This dish is perfect for busy weeknights when you want something hearty yet easy to prepare. The filling is a savory mixture of canned chicken, rice, and spices, all nestled in sweet bell peppers that become tender and flavorful as they bake. Together, these ingredients create a comforting and satisfying meal that everyone in the family will love.
This recipe is designed to serve 4-6 people, making it an excellent choice for a family dinner or a small gathering with friends. The bell peppers act as a natural serving vessel, making both preparation and clean-up a breeze. If you’re looking for a delicious and practical way to use canned chicken, these Chicken Stuffed Peppers are a fantastic option.
Ingredients:
- 6 large bell peppers (any color)
- 2 cans (12.5 oz each) of canned chicken, drained
- 1 cup cooked rice
- 1 cup shredded cheddar cheese
- 1 can (15 oz) diced tomatoes, drained
- 1 small onion, finely chopped
- 2 cloves garlic, minced
- 1 tablespoon olive oil
- 1 teaspoon dried oregano
- 1 teaspoon paprika
- Salt and pepper to taste
- Fresh parsley for garnish (optional)
Cooking Instructions:
- Preheat the Oven: Preheat your oven to 375°F (190°C). This will guarantee that your peppers bake evenly and the filling gets thoroughly heated.
- Prepare the Peppers: Cut the tops off the bell peppers and remove the seeds and membranes. Arrange the peppers upright in a baking dish. If they don’t stand up straight, you can slice a small piece off the bottom to create a flat surface.
- Sauté the Vegetables: In a large skillet, heat the olive oil over medium heat. Add the chopped onion and garlic, sautéing for about 3-4 minutes until the onion becomes translucent.
- Mix the Filling: Add the drained canned chicken, cooked rice, diced tomatoes, oregano, paprika, salt, and pepper to the skillet. Stir everything together and let it cook for about 5 minutes, allowing the flavors to meld.
- Stuff the Peppers: Spoon the chicken and rice mixture into each bell pepper, filling them generously. Top each pepper with a sprinkle of shredded cheddar cheese.
- Bake the Peppers: Cover the baking dish with foil and bake in the preheated oven for 30 minutes. Remove the foil and bake for an additional 10 minutes, or until the cheese is melted and bubbly.
- Garnish and Serve: Once done, remove the peppers from the oven and let them cool for a few minutes. Garnish with fresh parsley before serving, if desired.
Extra Tips:
For added flavor, consider using a variety of colored bell peppers, as they offer a slight difference in sweetness. If you prefer a bit of heat, you can add a pinch of cayenne pepper or a diced jalapeño to the filling mixture.
Make sure to drain the canned chicken and tomatoes well to avoid a soggy filling. These stuffed peppers can be made ahead of time and stored in the fridge, making them an ideal meal prep option. Simply reheat them in the oven before serving.
BBQ Chicken Pizza
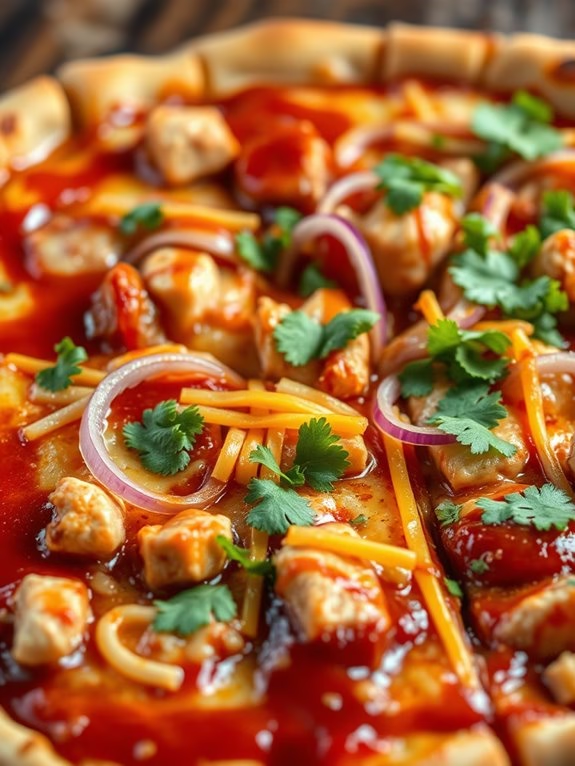
BBQ Chicken Pizza is a delicious and easy-to-make dish that combines the tangy sweetness of barbecue sauce with the savory taste of chicken, all on a crispy pizza crust. This recipe is perfect for a casual dinner or a gathering with friends and family.
Using canned chicken makes the preparation quick and convenient, allowing you to enjoy a homemade pizza without spending hours in the kitchen. The combination of flavors and textures in this pizza is sure to satisfy your cravings and impress your guests.
This recipe serves 4-6 people and features a thin, crispy crust topped with a generous layer of barbecue sauce, tender pieces of canned chicken, and a mix of cheeses. Additional toppings like red onions and cilantro add freshness and a burst of color to the pizza.
Whether you’re a pizza enthusiast or just looking for a new way to enjoy BBQ chicken, this recipe won’t disappoint. Let’s plunge into the ingredients and steps needed to create this mouthwatering BBQ Chicken Pizza.
Ingredients:
- 1 pre-made pizza crust (12 inches)
- 1 cup barbecue sauce
- 2 cups canned chicken, drained and shredded
- 1 1/2 cups mozzarella cheese, shredded
- 1/2 cup cheddar cheese, shredded
- 1/4 cup red onion, thinly sliced
- 2 tablespoons fresh cilantro, chopped
- 1 tablespoon olive oil
Instructions:
- Preheat the Oven: Begin by preheating your oven to 425°F (220°C). If using a pizza stone, place it in the oven while it preheats to guarantee a crispy crust.
- Prepare the Pizza Crust: Brush the pre-made pizza crust with olive oil to prevent it from becoming soggy once the toppings are added.
- Spread the Sauce: Evenly spread the barbecue sauce over the pizza crust, leaving a small border around the edges for the crust.
- Add the Chicken: Distribute the shredded canned chicken evenly over the barbecue sauce. Make sure the chicken is well-drained to avoid excess moisture on the pizza.
- Layer the Cheese: Sprinkle the mozzarella cheese over the top of the chicken, followed by the cheddar cheese. Confirm the cheese covers the entire pizza for a nice, gooey texture.
- Add Onions and Bake: Scatter the thinly sliced red onions over the cheese. Place the pizza in the preheated oven and bake for 12-15 minutes, or until the cheese is melted and bubbly, and the crust is golden brown.
- Garnish and Serve: Once baked, remove the pizza from the oven and sprinkle the chopped cilantro on top. Allow the pizza to cool for a few minutes before slicing and serving.
Extra Tips:
For an extra crispy crust, consider baking the pizza directly on a pizza stone or a preheated baking sheet. If you prefer a spicier kick, add a pinch of red pepper flakes or jalapeño slices to the toppings before baking.
Additionally, if you have leftover pizza, it can be stored in the refrigerator for up to three days and reheated in the oven for peak freshness. Remember, the key to a great BBQ Chicken Pizza is balancing the flavors of the sauce and cheese, so feel free to adjust the amounts to your taste preference.
Chicken Quesadillas
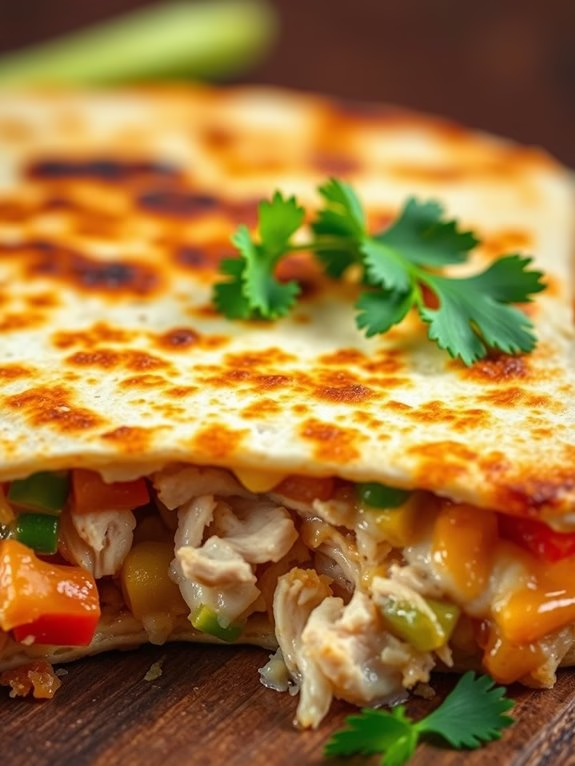
Canned chicken quesadillas are a quick and easy meal solution that doesn’t compromise on flavor. Perfect for busy weeknights or when you need to whip up something delicious in a hurry, these quesadillas take full advantage of the convenience of canned chicken. With a melty cheese filling, a hint of spice, and a crispy exterior, they’re sure to become a favorite in your household.
These quesadillas aren’t only simple to make but also quite versatile. You can customize them with your favorite cheeses and toppings, making them ideal for pleasing a crowd. Whether you’re preparing dinner for your family or hosting a casual get-together, these quesadillas can be easily doubled or tripled to accommodate more guests.
Serve them with salsa, sour cream, or guacamole for a complete meal that everyone will love.
Ingredients for 4-6 servings:
- 2 cans of chicken (12.5 oz each), drained
- 2 cups shredded Mexican blend cheese
- 1/2 cup diced onions
- 1/2 cup diced bell peppers
- 1/4 cup chopped fresh cilantro
- 1 tsp cumin
- 1 tsp chili powder
- 8 large flour tortillas
- 2 tbsp vegetable oil
- Salt and pepper to taste
Cooking Instructions:
1. Prepare the Filling: In a medium bowl, combine the drained canned chicken, shredded cheese, diced onions, diced bell peppers, and chopped cilantro. Add cumin, chili powder, salt, and pepper. Mix everything thoroughly until well combined.
2. Assemble the Quesadillas: Lay out four tortillas on a flat surface. Evenly distribute the chicken and cheese mixture over each tortilla, spreading it out to the edges. Place the remaining tortillas on top to form a sandwich.
3. Cook the Quesadillas: Heat a large skillet over medium heat and add 1/2 tablespoon of vegetable oil. Once the oil is hot, carefully place one quesadilla in the skillet. Cook for 3-4 minutes on each side, or until the tortillas are golden brown and the cheese is melted.
Repeat this process with the remaining quesadillas, adding more oil to the pan as needed.
4. Serve: Once cooked, transfer the quesadillas to a cutting board. Use a pizza cutter or sharp knife to slice each quesadilla into wedges. Serve immediately with your choice of salsa, sour cream, or guacamole.
Extra Tips:
For an even crispier quesadilla, lightly brush the outside of each tortilla with oil before cooking. If you want to add a smoky flavor, consider adding a dash of smoked paprika to the chicken mixture.
If you prefer less spice, reduce the amount of chili powder, or omit it entirely. Additionally, you can add other fillings such as cooked corn, black beans, or sliced jalapeños to enhance the flavor and texture.
Creamy Chicken Pasta
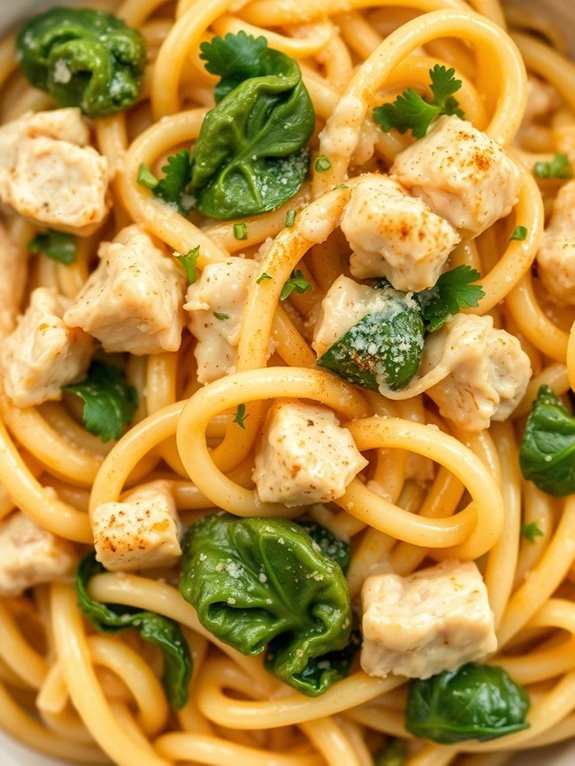
Creamy Chicken Pasta is a deliciously comforting dish that combines tender canned chicken with a rich, creamy sauce, all tossed together with your favorite pasta. It’s an ideal recipe for busy weeknights, as it comes together quickly and doesn’t require a lot of preparation. The canned chicken offers a convenient protein source, cutting down on cooking time without sacrificing flavor or texture. This dish is perfect for a family meal, serving 4-6 people, and is sure to be a hit with both kids and adults alike.
The creamy sauce, made from a blend of cream cheese and Parmesan, coats each pasta strand beautifully, ensuring every bite is packed with savory goodness. With the addition of garlic, spinach, and a hint of nutmeg, this dish offers a delightful balance of flavors that will satisfy even the most discerning palate. Serve it with a side of garlic bread or a crisp green salad for a complete meal that’s both nourishing and indulgent.
Ingredients for 4-6 servings:
- 12 ounces of pasta (penne or fettuccine recommended)
- 2 tablespoons olive oil
- 1 can (12.5 ounces) of chicken, drained
- 2 cloves garlic, minced
- 1 cup heavy cream
- 4 ounces cream cheese
- 1 cup grated Parmesan cheese
- 2 cups fresh spinach
- 1/2 teaspoon ground nutmeg
- Salt and pepper to taste
- Fresh parsley, chopped (optional, for garnish)
Cooking Instructions:
- Cook the Pasta: Begin by bringing a large pot of salted water to a boil. Add the pasta and cook according to package instructions until al dente. Drain the pasta, reserving about 1 cup of pasta water, and set aside.
- Prepare the Sauce: In a large skillet, heat the olive oil over medium heat. Add the minced garlic and sauté for about 1 minute, until fragrant.
- Add Chicken and Cream: Stir in the drained canned chicken, breaking it up with a spoon. Pour in the heavy cream, followed by the cream cheese, and stir until the cream cheese is melted and the mixture is smooth.
- Incorporate the Cheese: Gradually add the Parmesan cheese, stirring constantly until fully incorporated. If the sauce is too thick, add a bit of the reserved pasta water to reach the desired consistency.
- Season and Add Spinach: Season the sauce with nutmeg, salt, and pepper. Add the spinach and cook for another 2-3 minutes, until the spinach is wilted.
- Combine with Pasta: Add the cooked pasta to the skillet, tossing to coat the pasta evenly with the sauce. Allow it to cook together for about 2 minutes, so the flavors meld.
- Garnish and Serve: Remove from heat and garnish with freshly chopped parsley, if desired. Serve immediately.
Extra Tips:
When making Creamy Chicken Pasta, be sure to reserve some of the pasta water before draining the pasta. This starchy water can be a lifesaver, helping to adjust the sauce’s consistency if it becomes too thick.
Additionally, feel free to experiment with different types of pasta; penne and fettuccine work wonderfully, but any pasta you have on hand will do. If you want to add an extra layer of flavor, consider sprinkling a little lemon zest on top before serving for a revitalizing zing.
Enjoy your creamy, hearty pasta dish with those you love!
Chicken Caesar Wraps
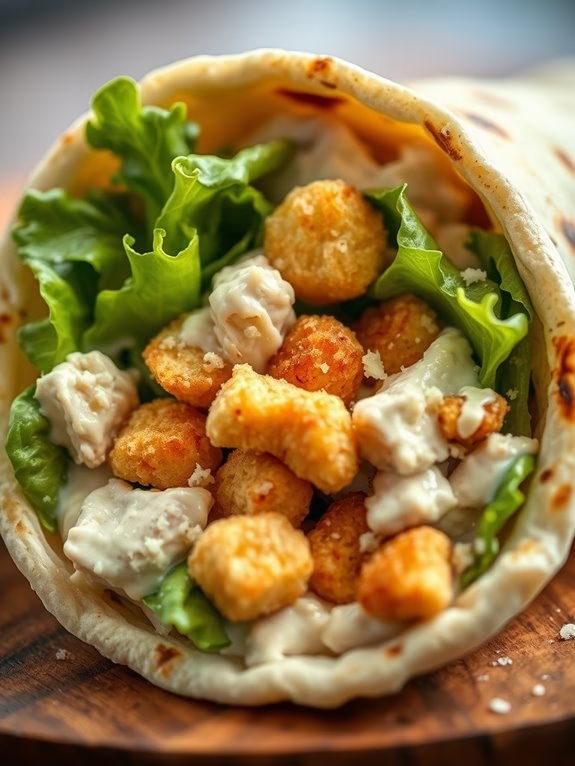
Chicken Caesar Wraps are a delightful and easy-to-make meal that combines the classic flavors of a Caesar salad with the convenience of a handheld wrap. This dish is perfect for a quick lunch or a light dinner and is sure to be a hit with the whole family. Using canned chicken makes the preparation fast and simple, without sacrificing flavor or quality. The combination of creamy Caesar dressing, crisp romaine lettuce, and tender chicken all wrapped in a soft tortilla creates a satisfying and delicious meal.
These wraps are also incredibly versatile. You can customize them by adding your favorite ingredients, such as sliced avocado, cherry tomatoes, or crispy bacon bits, to suit your personal taste. This recipe serves 4-6 people, making it ideal for a family gathering or a small party. Whether you’re looking for a healthy meal option or just something different to try, Chicken Caesar Wraps are a great choice.
Ingredients for 4-6 servings:
- 2 cans (12.5 ounces each) of canned chicken, drained
- 6 large flour tortillas
- 1 cup Caesar dressing
- 1/2 cup grated Parmesan cheese
- 4 cups chopped romaine lettuce
- 1/2 cup croutons
- Salt and pepper to taste
Cooking Instructions:
- Prepare the Chicken: Open the canned chicken and drain any excess liquid. Place the chicken in a large mixing bowl and use a fork to break it apart, ensuring there are no large chunks.
- Mix the Filling: Add the Caesar dressing, grated Parmesan cheese, salt, and pepper to the chicken in the bowl. Mix everything together until the chicken is well-coated with the dressing and cheese.
- Assemble the Wraps: Lay a tortilla flat on a clean surface. Spoon a generous portion of the chicken mixture onto the center of the tortilla. Top with a handful of chopped romaine lettuce and a sprinkle of croutons.
- Wrap It Up: Fold the sides of the tortilla over the filling, then roll it up tightly from the bottom to form a wrap. Repeat this process for the remaining tortillas and filling.
- Serve and Enjoy: Cut the wraps in half if desired, and serve immediately. For a warm wrap, you can briefly grill each wrap on a hot skillet for about 1-2 minutes on each side until lightly browned.
Extra Tips:
If you prefer a more robust flavor, consider adding a squeeze of lemon juice or a dash of Worcestershire sauce to the chicken mixture.
For a healthier option, you can use whole wheat tortillas and opt for a low-fat Caesar dressing.
Additionally, to keep the wraps from getting soggy, assemble them just before serving. If you need to prepare them in advance, keep the filling and lettuce separate and combine them right before making the wraps.
Chicken and Rice Casserole
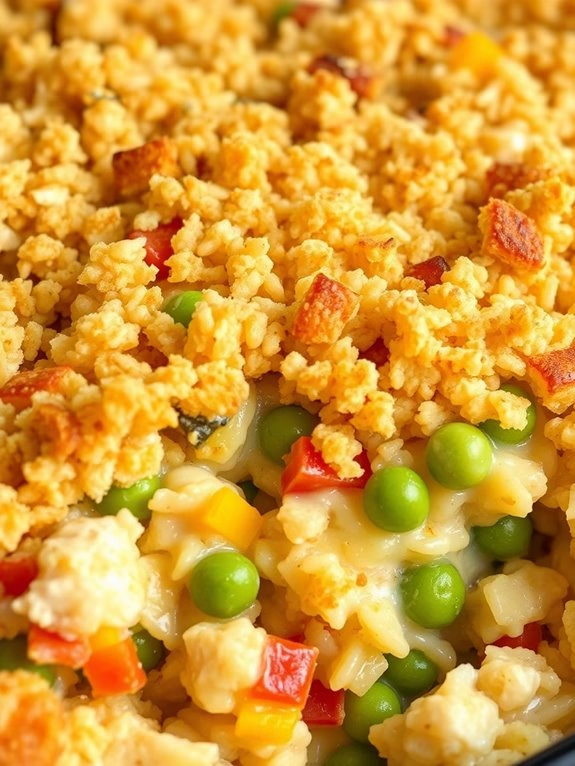
Canned Chicken and Rice Casserole is a comforting and hearty dish that’s perfect for a family meal. This recipe is quick to prepare, making it a great choice for busy weeknights. By using canned chicken, you save time without sacrificing flavor. The chicken blends seamlessly with the creamy sauce and tender rice, creating a deliciously satisfying meal.
The casserole is baked to perfection, with a crispy breadcrumb topping that adds a delightful texture contrast. The ingredients used in this recipe are simple and likely already in your pantry, making it an economical choice as well. This recipe serves 4-6 people, ideal for a small gathering or a family dinner.
Ingredients:
- 2 cans (12.5 oz each) of canned chicken, drained
- 1 cup of uncooked white rice
- 2 cups of chicken broth
- 1 can (10.5 oz) of cream of mushroom soup
- 1 cup of shredded cheddar cheese
- 1 cup of frozen peas
- 1/2 cup of diced onions
- 1/2 cup of diced bell peppers
- 1/2 teaspoon of garlic powder
- 1/2 teaspoon of salt
- 1/4 teaspoon of black pepper
- 1 cup of breadcrumbs
- 2 tablespoons of melted butter
Cooking Instructions:
1. Preheat the Oven: Begin by preheating your oven to 350°F (175°C) to prepare it for baking the casserole.
2. Prepare the Baking Dish: Lightly grease a 9×13 inch baking dish with cooking spray or butter to prevent sticking.
3. Cook the Rice: In a medium saucepan, bring the chicken broth to a boil. Add the uncooked rice, reduce the heat to low, cover, and simmer for about 15 minutes until the rice is tender. Set aside.
4. Mix the Casserole Ingredients: In a large mixing bowl, combine the drained canned chicken, cooked rice, cream of mushroom soup, shredded cheddar cheese, frozen peas, diced onions, and diced bell peppers.
Mix in the garlic powder, salt, and black pepper until everything is evenly incorporated.
5. Transfer to Baking Dish: Pour the mixture into the prepared baking dish and spread it out evenly.
6. Prepare the Breadcrumb Topping: In a small bowl, combine the breadcrumbs with melted butter. Sprinkle this mixture evenly over the top of the casserole.
7. Bake the Casserole: Place the casserole in the preheated oven and bake for 25-30 minutes, or until the top is golden brown and the casserole is heated through.
8. Serve: Allow the casserole to cool slightly before serving. This helps the flavors settle and makes it easier to cut into portions.
Extra Tips:
For an added layer of flavor, consider adding a teaspoon of Italian seasoning to the casserole mixture. You can also experiment with other canned soups such as cream of chicken or cream of celery to switch up the flavor profile.
If you prefer a spicier dish, include some diced jalapeños or a dash of cayenne pepper. Finally, to make this dish even more nutritious, you can add other vegetables like chopped carrots or broccoli florets.
Enjoy your meal with a side salad or some crusty bread to round out the experience.
Thai Chicken Lettuce Cups
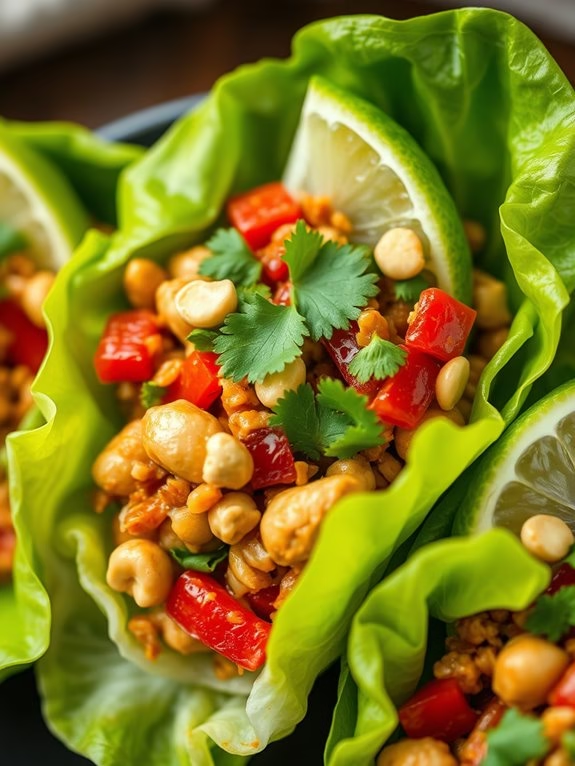
Thai Chicken Lettuce Cups are a delightful and healthy dish that brings a burst of flavor to your table. This dish combines the savory taste of canned chicken with the invigorating crunch of lettuce and the aromatic spices of Thai cuisine. It’s quick and easy to prepare, making it perfect for a light lunch, dinner, or even a tasty appetizer at a gathering.
The lettuce cups not only add a unique presentation but also make this dish gluten-free and low in carbohydrates. The key to these Thai Chicken Lettuce Cups is in the balance of flavors—sweet, salty, sour, and spicy—all harmoniously combined to create a vibrant and satisfying meal.
The use of canned chicken makes this recipe incredibly convenient without sacrificing taste. You can customize the heat level to your liking by adjusting the amount of chili used, making it suitable for everyone at the table. With a serving size of 4-6 people, this recipe guarantees that there’s plenty to go around, leaving everyone feeling satisfied and delighted.
Ingredients:
- 2 cans of chicken (12.5 oz each), drained
- 1 tablespoon vegetable oil
- 3 cloves garlic, minced
- 1 small onion, finely chopped
- 1 red bell pepper, finely diced
- 1/4 cup soy sauce
- 2 tablespoons fish sauce
- 2 tablespoons lime juice
- 1 tablespoon brown sugar
- 1 teaspoon chili flakes (adjust to taste)
- 1/4 cup chopped fresh cilantro
- 1/4 cup chopped fresh mint
- 1 head of butter or iceberg lettuce, leaves separated
- 1/4 cup chopped peanuts (optional)
- Lime wedges, for serving
Instructions:
- Prepare the Chicken Mixture: Heat the vegetable oil in a large pan over medium heat. Add the minced garlic and chopped onion, sautéing them until the onion becomes translucent and fragrant, about 2-3 minutes.
- Cook the Vegetables: Add the red bell pepper to the pan and continue to sauté for another 2-3 minutes until the pepper is tender-crisp.
- Incorporate the Chicken: Stir in the drained canned chicken, breaking it apart gently with a spoon. Cook until the chicken is heated through, about 3-4 minutes.
- Season the Mixture: Pour in the soy sauce, fish sauce, lime juice, and sprinkle the brown sugar and chili flakes over the mixture. Stir well to guarantee all ingredients are evenly distributed and the chicken is well-coated with the sauce.
- Finish with Herbs: Remove the pan from heat and stir in the chopped cilantro and mint, mixing thoroughly to incorporate the fresh herbs into the chicken mixture.
- Assemble the Lettuce Cups: Arrange the lettuce leaves on a serving platter. Spoon the chicken mixture evenly into the center of each lettuce leaf.
- Garnish and Serve: Sprinkle the chopped peanuts on top of the chicken mixture if using. Serve the lettuce cups with lime wedges on the side for an extra zesty kick.
Extra Tips:
To guarantee the lettuce cups hold their shape, choose sturdy lettuce like butter or iceberg. You can also chill the lettuce leaves in the refrigerator before filling them to keep them crisp.
If you prefer a more intense flavor, let the chicken mixture sit for 10-15 minutes before serving to allow the flavors to meld together. For a vegetarian version, substitute the canned chicken with crumbled tofu or chickpeas.
Adjust the amount of chili flakes according to your heat preference, and feel free to add additional vegetables such as shredded carrots or bean sprouts for extra crunch and nutrition.
Chicken Enchiladas

Canned chicken enchiladas are a quick and delicious way to enjoy the flavors of this classic Mexican dish without spending hours in the kitchen. Utilizing canned chicken not only saves time but also guarantees that you have a protein-rich ingredient ready to go at any moment.
These enchiladas are perfect for a weekday dinner or a family gathering, offering a satisfying meal that everyone will love. The creamy, cheesy filling combined with the tangy enchilada sauce creates a mouthwatering experience that’s sure to become a favorite in your household.
This recipe serves 4-6 people and includes a blend of spices and ingredients that elevate the taste of canned chicken to a new level. The assembly process is straightforward, making it an excellent option for both novice and experienced cooks alike.
With a few pantry staples and some fresh garnishes, you can whip up these enchiladas in no time, allowing you more time to relax and enjoy your meal with loved ones.
Ingredients:
- 2 cans (12.5 oz each) of canned chicken, drained
- 1 can (10 oz) of enchilada sauce
- 1 can (4 oz) of diced green chilies
- 1 cup of sour cream
- 1 cup of shredded cheddar cheese
- 1 cup of shredded Monterey Jack cheese
- 1 medium onion, finely chopped
- 1 teaspoon of ground cumin
- 1 teaspoon of garlic powder
- 8-10 flour tortillas
- Salt and pepper to taste
- Fresh cilantro, chopped (for garnish)
- Sliced jalapeños (optional, for garnish)
Cooking Instructions:
- Preheat the Oven: Preheat your oven to 350°F (175°C) to make sure it’s ready for baking the enchiladas.
- Prepare the Filling: In a large mixing bowl, combine the canned chicken, half of the cheddar and Monterey Jack cheeses, diced green chilies, sour cream, chopped onion, cumin, garlic powder, salt, and pepper. Mix well to guarantee the ingredients are evenly distributed.
- Assemble the Enchiladas: Lay out the flour tortillas on a clean surface. Spoon a generous amount of the chicken mixture down the center of each tortilla. Roll the tortillas tightly and place them seam-side down in a greased baking dish.
- Add the Sauce: Pour the enchilada sauce evenly over the rolled tortillas, making sure they’re well-covered. Sprinkle the remaining cheddar and Monterey Jack cheeses over the top.
- Bake: Place the baking dish in the preheated oven and bake for 25-30 minutes, or until the cheese is melted and bubbly and the enchiladas are heated through.
- Garnish and Serve: Once baked, remove the enchiladas from the oven and let them cool for a few minutes. Garnish with chopped cilantro and sliced jalapeños if desired. Serve hot and enjoy!
Extra Tips:
For a spicier version, you can add a dash of cayenne pepper or use hot enchilada sauce. Feel free to experiment with other toppings like avocado slices or a dollop of guacamole for added flavor.
If you have time, try making your own enchilada sauce for a more personalized touch. Finally, verify that the canned chicken is well-drained to prevent the filling from becoming too watery.
Teriyaki Chicken Stir-Fry
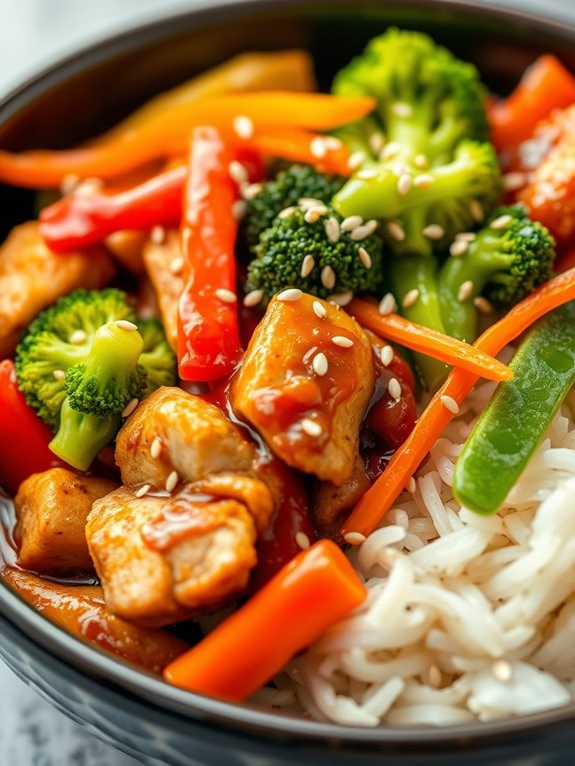
Teriyaki Chicken Stir-Fry is a quick and delightful dish that brings the flavors of Asia right to your kitchen. This dish combines the savory and sweet notes of teriyaki sauce with the tenderness of canned chicken, making it an easy and convenient meal option for busy weeknights.
With the addition of crisp vegetables, this stir-fry not only bursts with flavor but also provides a nutritious boost to your dinner table. Canned chicken is an excellent pantry staple to have on hand for quick meals, and when paired with a homemade teriyaki sauce, it elevates the dish to new heights.
Stir-frying is a fast cooking technique that seals in the flavors and keeps the vegetables vibrant and crunchy. This Teriyaki Chicken Stir-Fry can be served over rice or noodles, making it a versatile meal option for 4-6 people.
Ingredients (serving size: 4-6 people):
- 2 cans of chicken (12.5 oz each), drained
- 1/2 cup teriyaki sauce
- 2 tablespoons soy sauce
- 1 tablespoon cornstarch
- 2 tablespoons vegetable oil
- 1 red bell pepper, sliced
- 1 yellow bell pepper, sliced
- 1 cup broccoli florets
- 1 cup snap peas
- 1 carrot, julienned
- 2 cloves garlic, minced
- 1 teaspoon ginger, minced
- 4 green onions, sliced
- Sesame seeds for garnish
- Cooked rice or noodles, for serving
Cooking Instructions:
- Prepare the Sauce: In a small bowl, mix the teriyaki sauce, soy sauce, and cornstarch. Stir until the cornstarch is fully dissolved and set aside.
- Heat the Oil: In a large skillet or wok, heat the vegetable oil over medium-high heat until shimmering.
- Sauté Aromatics: Add the minced garlic and ginger to the skillet. Stir-fry for about 30 seconds until fragrant.
- Cook Vegetables: Add the sliced red and yellow bell peppers, broccoli, snap peas, and julienned carrots to the skillet. Stir-fry for about 3-5 minutes, or until the vegetables are tender-crisp.
- Add Chicken: Stir in the drained canned chicken and cook for an additional 2 minutes, breaking up any large chunks and mixing well with the vegetables.
- Combine Sauce and Ingredients: Pour the prepared teriyaki sauce mixture over the chicken and vegetables. Stir well to coat all ingredients evenly and cook for another 2-3 minutes, allowing the sauce to thicken.
- Finish with Green Onions: Add the sliced green onions and give the stir-fry a final toss.
- Serve: Remove from heat. Garnish with sesame seeds and serve immediately over cooked rice or noodles.
Extra Tips:
To enhance the flavor of your stir-fry, you can add a splash of rice vinegar or a dash of chili flakes for some heat. If you prefer a thicker sauce, increase the cornstarch slightly, but remember to dissolve it well in the sauce mixture before adding it to the pan.
Be sure to have all your ingredients prepped and ready before you start cooking, as stir-frying is a fast process that requires constant attention to prevent burning. Enjoy experimenting with different vegetables based on what’s in season or what you have on hand.
Chicken Pot Pie

Canned Chicken Pot Pie offers a delightful and convenient twist on the classic comfort dish, making it perfect for both busy weeknights and leisurely weekends. This version utilizes canned chicken, which not only reduces preparation time but also guarantees that the dish is budget-friendly while still delivering robust flavors. The creamy filling, packed with tender chicken, vibrant vegetables, and a luscious sauce, is enveloped in a golden, flaky crust that will have your family coming back for seconds.
This recipe is designed to serve 4-6 people, making it an ideal choice for a family meal or a small gathering. With just a few pantry staples and frozen vegetables, you can create a homemade pot pie that rivals any traditional version. Whether you’re an experienced cook or a novice in the kitchen, this recipe’s straightforward steps will guide you to a delicious and satisfying meal.
Ingredients:
- 2 cans (12.5 oz each) of canned chicken, drained
- 1 cup frozen peas and carrots
- 1 cup frozen corn
- 1 small onion, chopped
- 2 garlic cloves, minced
- 1/3 cup unsalted butter
- 1/3 cup all-purpose flour
- 1/2 teaspoon salt
- 1/4 teaspoon black pepper
- 1/4 teaspoon dried thyme
- 1 3/4 cups chicken broth
- 2/3 cup milk
- 2 (9-inch) unbaked pie crusts
- 1 egg, beaten (for egg wash)
Instructions:
- Preheat Oven: Preheat your oven to 425°F (220°C) to confirm it’s hot and ready for baking the pie.
- Sauté Vegetables: In a large skillet over medium heat, melt the butter. Add the chopped onion and minced garlic, sautéing until the onion becomes translucent, about 3-4 minutes.
- Create the Roux: Sprinkle the flour over the sautéed onions and garlic, stirring constantly for about 1 minute to cook the flour. This will thicken the sauce.
- Add Liquid Ingredients: Gradually whisk in the chicken broth and milk, ensuring no lumps form. Continue to cook and stir until the mixture starts to thicken and bubble.
- Season the Sauce: Stir in the salt, black pepper, and dried thyme, adjusting seasonings to taste.
- Mix in Chicken and Vegetables: Add the drained canned chicken, frozen peas and carrots, and frozen corn. Stir everything together until well combined and heated through.
- Prepare the Pie Crust: Place one of the unbaked pie crusts into a 9-inch pie dish. Pour the chicken and vegetable filling into the crust, spreading it evenly.
- Top with Second Crust: Place the second pie crust over the filling. Trim any excess dough, and crimp the edges to seal. Cut several slits in the top crust to allow steam to escape.
- Apply Egg Wash: Brush the top crust with the beaten egg to give it a glossy finish.
- Bake the Pie: Place the pie in the preheated oven and bake for 30-35 minutes, or until the crust is golden brown and the filling is bubbly.
- Cool and Serve: Allow the pie to cool for about 10 minutes before slicing. This helps the filling set and makes serving easier.
Extra Tips:
For a richer flavor, consider adding a splash of white wine when adding the chicken broth. If you prefer a thicker filling, you can slightly increase the flour amount in the roux.
Also, feel free to customize the vegetables according to your preference or what you have on hand. To confirm a perfectly cooked crust, cover the edges with aluminum foil halfway through baking if they start to brown too quickly.
Enjoy your homemade Canned Chicken Pot Pie with a side salad or steamed vegetables for a complete meal.