
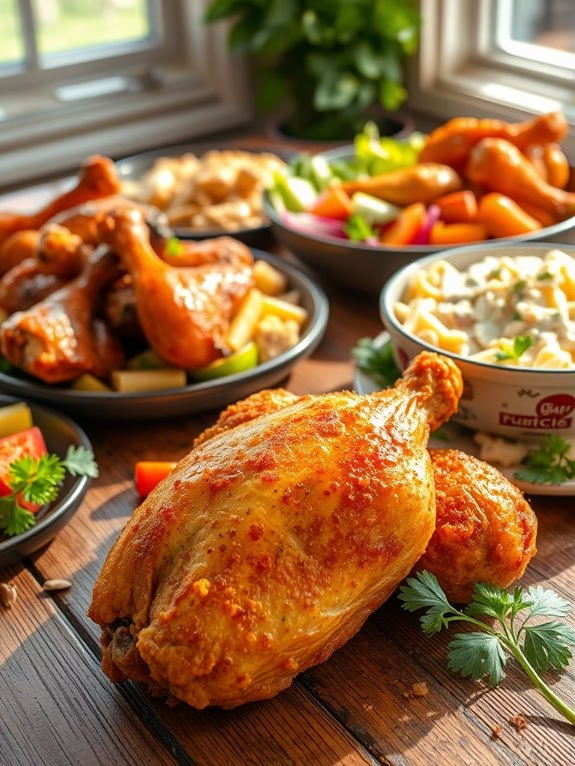
Lunchtime just got a major upgrade with these 13 yummy chicken recipes!
From crispy BBQ Chicken Quesadillas that ooze cheesy goodness to refreshing Chicken Caesar Salads drizzled with tangy dressing, there’s something here for everyone.
I love using lunchtime as an opportunity to get creative in the kitchen—like when I made Spicy Chicken Tacos for a family gathering, and they were an absolute hit!
These recipes are packed with flavor and perfect for any occasion, be it a cozy meal at home or a fun picnic with friends.
Let’s transform your lunch into a delicious culinary adventure!
Classic Chicken Caesar Salad
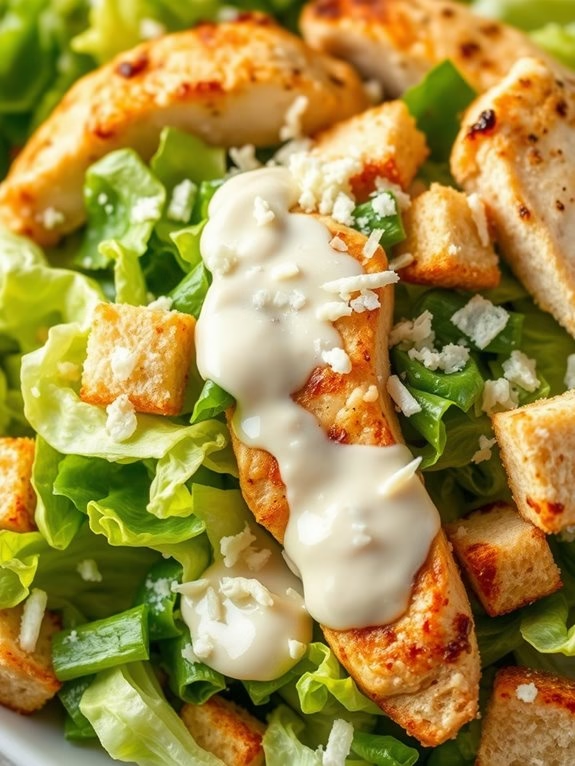
Classic Chicken Caesar Salad is a timeless dish that blends the savory flavors of grilled chicken with the crispness of fresh romaine lettuce, all tossed in a creamy Caesar dressing. This salad is perfect for a light yet satisfying lunch, offering a balance of protein and greens that can be enjoyed by everyone.
With its origins tracing back to a famous Tijuana restaurant, the Caesar salad has become a staple in many households, and adding chicken only enhances its appeal, making it a hearty meal option.
This recipe for Classic Chicken Caesar Salad serves 4 to 6 people, making it ideal for family gatherings or a casual lunch with friends. The preparation involves marinating and grilling chicken breasts to perfection, and combining them with crunchy croutons, Parmesan cheese, and a homemade Caesar dressing. The result is a revitalizing and flavorful dish that will leave your taste buds delighted.
Ingredients (serving size: 4-6 people):
- 4 boneless, skinless chicken breasts
- 2 tablespoons olive oil
- Salt and pepper to taste
- 2 large heads of romaine lettuce
- 1 cup croutons
- 1/2 cup grated Parmesan cheese
- 1 cup Caesar dressing
- 2 cloves garlic, minced
- Juice of 1 lemon
Cooking Instructions:
- Prepare the Chicken: Begin by seasoning the chicken breasts with olive oil, salt, and pepper. Confirm the chicken is evenly coated for peak flavor.
- Marinate the Chicken: In a bowl, combine the minced garlic and lemon juice. Add the seasoned chicken breasts and let them marinate for at least 30 minutes in the refrigerator. This allows the flavors to penetrate the meat.
- Grill the Chicken: Preheat your grill to medium-high heat. Once ready, place the marinated chicken breasts on the grill. Cook each side for about 6-7 minutes or until the chicken is thoroughly cooked and has nice grill marks. Remove from the grill and let it rest for a few minutes before slicing.
- Prepare the Lettuce: While the chicken is resting, wash and chop the romaine lettuce into bite-sized pieces. Place the lettuce in a large salad bowl.
- Assemble the Salad: Add the croutons and Parmesan cheese to the salad bowl with the lettuce. Pour the Caesar dressing over the salad and toss gently to confirm everything is well coated.
- Add the Chicken: Slice the grilled chicken breasts into thin strips and lay them on top of the salad. Give the salad a gentle toss to mix the chicken with the dressed salad.
- Serve: Divide the salad into individual plates or serve it in a large bowl for everyone to help themselves. Enjoy!
Extra Tips:
To enhance the flavor of your Classic Chicken Caesar Salad, consider making your own croutons by toasting cubes of baguette with olive oil, garlic powder, and a sprinkle of salt in the oven.
Additionally, if you have more time, making your own Caesar dressing from scratch can add a personal touch to the salad. Always remember to taste the dressing before mixing it with the salad to adjust the seasoning according to your preference.
Spicy Chicken Tacos
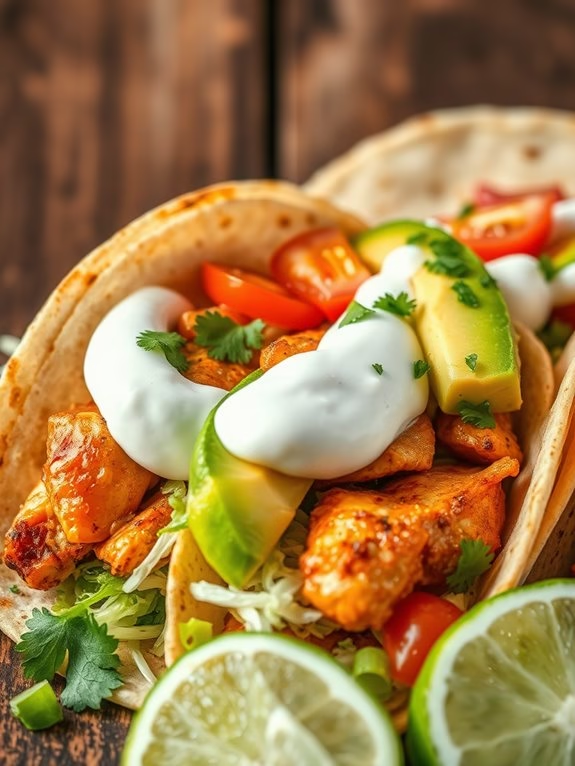
Spicy Chicken Tacos are a delightful and fiery twist on the classic taco dish, perfect for a zesty lunch that will awaken your taste buds. This dish combines the heat of spices with the tenderness of chicken, all wrapped up in a soft or crunchy tortilla. The flavor profile is enhanced with fresh toppings like cilantro, lime, and a creamy sauce to balance the heat.
Whether you’re cooking for family or friends, these tacos are sure to impress with their vibrant flavors and satisfying textures. The key to making memorable Spicy Chicken Tacos lies in the marinade, which infuses the chicken with bold flavors before it’s cooked to perfection.
Once the chicken is ready, it’s paired with a variety of toppings that provide freshness and a touch of coolness to complement the spice. This recipe is designed to serve 4-6 people, making it ideal for a family meal or small gathering. With every bite, you’ll enjoy a harmonious blend of heat, freshness, and savory goodness.
Ingredients:
- 1.5 pounds of boneless, skinless chicken thighs
- 2 tablespoons olive oil
- 2 tablespoons lime juice
- 1 tablespoon chili powder
- 1 teaspoon cumin
- 1 teaspoon smoked paprika
- 1/2 teaspoon garlic powder
- 1/2 teaspoon onion powder
- 1/4 teaspoon cayenne pepper
- Salt and pepper to taste
- 8-10 small corn or flour tortillas
- 1 cup shredded lettuce
- 1/2 cup diced tomatoes
- 1/4 cup chopped fresh cilantro
- 1/2 cup sour cream
- 1 avocado, sliced
- Lime wedges for serving
Cooking Instructions:
- Marinate the Chicken: In a large bowl, combine the olive oil, lime juice, chili powder, cumin, smoked paprika, garlic powder, onion powder, cayenne pepper, salt, and pepper. Mix well. Add the chicken thighs to the bowl and coat them evenly with the marinade. Cover and refrigerate for at least 30 minutes, or up to 2 hours for a deeper flavor.
- Cook the Chicken: Preheat a grill or a skillet over medium-high heat. Once hot, place the marinated chicken on the grill or skillet. Cook for about 5-7 minutes on each side, or until the chicken is cooked through and has a nice char. Remove from heat and let it rest for a few minutes before slicing into thin strips.
- Prepare the Toppings: While the chicken is cooking, prepare the toppings. Shred the lettuce, dice the tomatoes, chop the cilantro, and slice the avocado. Set these aside for assembling the tacos.
- Warm the Tortillas: In a dry skillet over medium heat, warm the tortillas for about 30 seconds on each side, or until they’re pliable and lightly toasted.
- Assemble the Tacos: Place a few strips of cooked chicken on each tortilla. Top with shredded lettuce, diced tomatoes, a few slices of avocado, and a sprinkle of cilantro. Add a dollop of sour cream and a squeeze of lime juice to each taco for added flavor.
- Serve: Serve the tacos immediately, accompanied by extra lime wedges for those who like an additional zing of citrus.
Extra Tips: For an extra kick, you can add sliced jalapeños to the toppings or mix some hot sauce into the sour cream. If you prefer a milder version, reduce the amount of cayenne pepper in the marinade.
To enhance the flavors even more, consider grilling the tortillas slightly for a smoky taste. Enjoy your Spicy Chicken Tacos with a side of rice or beans for a complete meal.
Honey Garlic Chicken Wraps
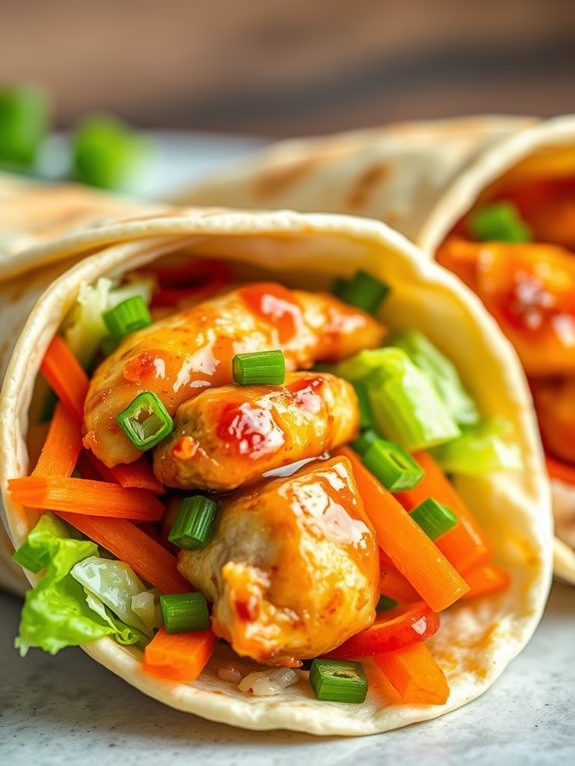
Honey Garlic Chicken Wraps are a delightful and versatile meal option that perfectly blends sweet and savory flavors. They make for a satisfying lunch, whether you’re at home or packing them for a picnic. The tender chicken is marinated in a honey garlic sauce, which infuses the meat with a rich, aromatic flavor profile.
When paired with fresh vegetables and wrapped in a soft tortilla, this dish offers a balanced meal that’s both nutritious and delicious. Ideal for serving 4-6 people, Honey Garlic Chicken Wraps are easy to prepare and customize according to your taste preferences. You can add your choice of vegetables or even sprinkle some cheese for an extra layer of flavor.
The wraps are best served warm, allowing the flavors to meld together beautifully. Whether you’re cooking for your family or entertaining guests, this recipe is sure to be a hit.
Ingredients:
- 1.5 lbs boneless, skinless chicken breasts
- 1/3 cup honey
- 1/4 cup soy sauce
- 2 tablespoons olive oil
- 4 garlic cloves, minced
- 1 teaspoon ground ginger
- Salt and pepper to taste
- 6 large flour tortillas
- 1 cup shredded lettuce
- 1 cup sliced bell peppers
- 1 cup shredded carrots
- 1/2 cup chopped green onions
- Optional: 1/2 cup shredded cheese
Cooking Instructions:
- Prepare the Marinade: In a medium bowl, whisk together honey, soy sauce, olive oil, minced garlic, ground ginger, salt, and pepper. This will serve as the marinade for the chicken, providing it with a rich and sweet flavor.
- Marinate the Chicken: Place the chicken breasts in a resealable plastic bag or shallow dish. Pour the marinade over the chicken, making sure each piece is fully coated. Seal the bag or cover the dish and refrigerate for at least 30 minutes, allowing the flavors to infuse the meat.
- Cook the Chicken: Preheat a large skillet over medium-high heat. Remove the chicken from the marinade, letting any excess drip off, and place it in the skillet. Cook for about 6-7 minutes on each side, or until the chicken is cooked through and no longer pink in the center. Remove the chicken from the skillet and let it rest for a few minutes before slicing.
- Assemble the Wraps: Lay out the tortillas and evenly distribute the shredded lettuce, bell peppers, carrots, and green onions across each one. Place the sliced chicken on top of the veggies. If desired, sprinkle some shredded cheese over the chicken.
- Wrap and Serve: Roll the tortillas tightly around the fillings, tucking in the sides as you go to form a wrap. Serve immediately while warm, or wrap in foil if you’re planning to take them on the go.
Extra Tips:
For an enhanced flavor, consider grilling the chicken breasts instead of pan-frying. This adds a smoky element that pairs wonderfully with the honey garlic marinade.
If you prefer a spicier kick, add a pinch of red pepper flakes to the marinade. Additionally, make sure your tortillas are warmed before wrapping, as this makes them more pliable and less likely to tear.
Finally, feel free to experiment with different vegetables or even add avocado for a creamy texture.
Creamy Chicken Alfredo Pasta
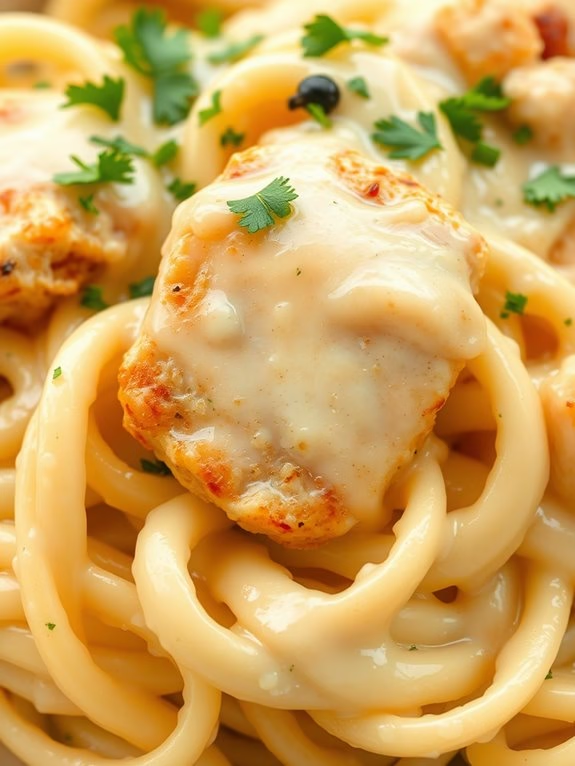
Creamy Chicken Alfredo Pasta is a classic Italian-American dish that combines tender chicken pieces with a rich and creamy Alfredo sauce, served over perfectly cooked pasta. This dish is a favorite for lunch because it’s both filling and delicious, offering a satisfying blend of flavors and textures. The creaminess of the sauce complements the savory chicken, while the pasta provides a comforting base.
Perfect for a family meal or a gathering with friends, this dish is sure to please everyone at the table.
To make this dish, you’ll start by cooking the pasta and preparing the chicken. The Alfredo sauce is the star of the show, made from a blend of butter, cream, and Parmesan cheese. The key to achieving the perfect sauce is to cook it slowly and gently until it reaches a smooth, velvety consistency. Once the sauce is ready, you’ll combine it with the cooked pasta and chicken, allowing the flavors to meld together.
This recipe serves 4-6 people, making it ideal for a modest-sized group.
Ingredients:
- 1 pound of fettuccine pasta
- 2 tablespoons olive oil
- 1 pound boneless, skinless chicken breasts, cut into strips
- Salt and pepper to taste
- 4 tablespoons unsalted butter
- 4 cloves garlic, minced
- 2 cups heavy cream
- 1 cup grated Parmesan cheese
- 1/2 teaspoon garlic powder
- 1/4 teaspoon nutmeg
- Fresh parsley, chopped, for garnish
Cooking Instructions:
- Cook the Pasta: In a large pot of boiling salted water, cook the fettuccine according to the package instructions until al dente. Drain and set aside.
- Prepare the Chicken: While the pasta is cooking, heat olive oil in a large skillet over medium-high heat. Season the chicken strips with salt and pepper. Add the chicken to the skillet and cook until golden brown and cooked through, about 5-7 minutes. Remove the chicken from the skillet and set aside.
- Make the Alfredo Sauce: In the same skillet, melt butter over medium heat. Add minced garlic and sauté for about 1 minute until fragrant. Pour in the heavy cream, stirring continuously. Bring the mixture to a gentle simmer, then reduce the heat to low.
- Add Cheese and Seasonings: Gradually whisk in the Parmesan cheese until it melts completely. Add garlic powder and nutmeg, stirring to combine. Let the sauce simmer gently for a few minutes until it thickens slightly.
- Combine Ingredients: Add the cooked pasta and chicken back into the skillet with the Alfredo sauce. Toss everything together until the pasta and chicken are well coated with the sauce. Adjust seasoning with additional salt and pepper if needed.
- Serve: Transfer the Creamy Chicken Alfredo Pasta to a serving dish. Garnish with freshly chopped parsley for added flavor and a pop of color. Serve warm.
Extra Tips:
To guarantee your Creamy Chicken Alfredo Pasta is as delicious as possible, be sure to use freshly grated Parmesan cheese, as it melts more smoothly into the sauce than pre-grated varieties.
If the sauce becomes too thick, you can thin it out by adding a small amount of the reserved pasta cooking water or additional cream. Additionally, consider experimenting with different pasta types, such as linguine or penne, for a variation on the classic dish.
BBQ Chicken Quesadillas

BBQ Chicken Quesadillas are a delicious and satisfying option for lunch that combines the smoky flavors of barbecue with the cheesy goodness of a quesadilla. This dish is perfect for those who enjoy a balance between savory and slightly sweet tastes, making it a hit with both adults and kids alike.
The melted cheese and tender BBQ chicken are sandwiched between crispy tortillas, making every bite a delightful experience. Not only is it a treat for your taste buds, but it’s also quick and easy to prepare, which is ideal for a mid-day meal.
Perfect for serving 4-6 people, BBQ Chicken Quesadillas are versatile and can be customized with your favorite ingredients. You can add veggies like bell peppers or onions for extra flavor and nutrition, or keep it simple with just the chicken and cheese.
Served hot with a side of salsa, sour cream, or guacamole, these quesadillas are bound to become a staple in your lunch rotation. Whether you’re making them for a family lunch or a casual get-together with friends, they’re sure to be a crowd-pleaser.
Ingredients:
- 2 cups cooked and shredded chicken
- 1 cup BBQ sauce
- 8 large flour tortillas
- 2 cups shredded cheese (cheddar or a Mexican blend)
- 1/2 cup sliced red onion (optional)
- 1/4 cup chopped fresh cilantro (optional)
- Cooking spray or oil for greasing
Cooking Instructions:
- Prepare the Chicken: In a large bowl, mix the shredded chicken with the BBQ sauce until well combined. If you prefer a more intense BBQ flavor, feel free to add more sauce according to your taste.
- Assemble the Quesadillas: Lay out the tortillas on a clean surface. On one half of each tortilla, spread about 1/4 cup of the BBQ chicken mixture. Sprinkle a generous amount of shredded cheese over the chicken. If you’re using red onions and cilantro, add those as well.
- Fold and Secure: Fold the tortillas in half, pressing gently to secure the filling inside. Make sure the filling is evenly distributed so that each bite is flavorful.
- Cook the Quesadillas: Heat a large skillet over medium heat and lightly coat with cooking spray or oil. Place the folded quesadillas in the skillet, cooking them in batches if necessary. Cook for 2-3 minutes on each side, or until the tortillas are golden brown and the cheese has melted.
- Serve: Remove the quesadillas from the skillet and let them cool slightly. Cut each quesadilla into wedges using a sharp knife or pizza cutter. Serve warm with your choice of salsa, sour cream, or guacamole on the side.
Extra Tips:
For best results, confirm your skillet is properly heated before adding the quesadillas to prevent them from becoming soggy. If you prefer a crispier texture, opt for a cast-iron skillet for even cooking.
You can also experiment with different cheeses or add extras like jalapeños for a bit of heat. If you have leftover BBQ chicken, it can be stored in the fridge for up to three days and used for quick and easy meal prep.
Lemon Herb Grilled Chicken
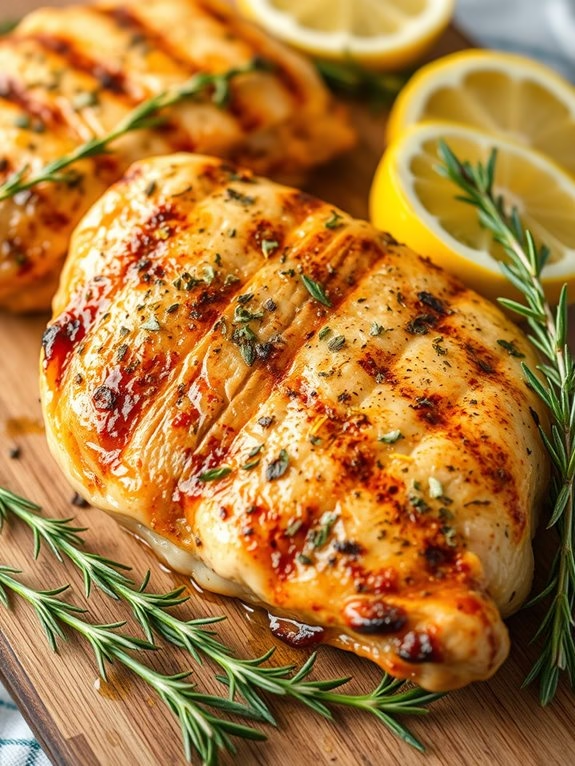
Lemon Herb Grilled Chicken is a delightful dish that combines the zesty freshness of lemon with the aromatic flavors of herbs, making it a perfect choice for a light and flavorful lunch. This recipe brings out the best in chicken by infusing it with a marinade that not only tenderizes the meat but also imparts a burst of summery taste. Grilled to perfection, this dish is ideal for a family gathering or a casual lunch with friends, offering a healthy and satisfying meal option.
In this recipe, the chicken is marinated in a blend of lemon juice, olive oil, garlic, and a variety of fresh herbs such as thyme and rosemary. The marinade not only enhances the flavor of the chicken but also guarantees it remains moist and juicy during grilling. The grilling process adds a smoky char that complements the bright and aromatic notes of the marinade. Serve this Lemon Herb Grilled Chicken alongside a fresh salad or steamed vegetables for a complete and nutritious meal that’s sure to impress.
Ingredients for 4-6 servings:
- 4 boneless, skinless chicken breasts
- 1/4 cup olive oil
- Juice of 2 lemons
- Zest of 1 lemon
- 3 cloves garlic, minced
- 1 tablespoon fresh thyme leaves
- 1 tablespoon fresh rosemary, chopped
- Salt and pepper to taste
- Lemon wedges, for serving
- Fresh herbs, for garnish
Cooking Instructions:
- Prepare the Marinade: In a medium bowl, combine olive oil, lemon juice, lemon zest, minced garlic, fresh thyme, and rosemary. Season the mixture with salt and pepper to taste. Whisk everything together until well combined.
- Marinate the Chicken: Place the chicken breasts in a large resealable plastic bag or shallow dish. Pour the marinade over the chicken, guaranteeing each piece is well coated. Seal the bag or cover the dish, and refrigerate for at least 1 hour, or up to 4 hours for more intense flavor.
- Preheat the Grill: About 15 minutes before you’re ready to cook, preheat your grill to medium-high heat. This will guarantee the grill grates are nice and hot, helping to achieve a good sear on the chicken.
- Grill the Chicken: Remove the chicken from the marinade, letting any excess drip off. Place the chicken breasts on the grill. Cook for about 5-7 minutes on each side, or until the internal temperature reaches 165°F (75°C) and the chicken is nicely charred.
- Rest and Serve: Once cooked, remove the chicken from the grill and let it rest for 5 minutes. This allows the juices to redistribute throughout the meat. Serve the chicken with lemon wedges and a sprinkle of fresh herbs for garnish.
Extra Tips:
When grilling chicken, it’s essential to keep a close eye on the cooking time to prevent it from drying out. Using a meat thermometer can help guarantee that the chicken is cooked to the perfect temperature.
Additionally, if you don’t have a grill, you can use a grill pan on the stovetop or bake the chicken in the oven at 400°F (200°C) for about 20-25 minutes. For an extra layer of flavor, consider adding a pinch of red pepper flakes to the marinade for a subtle kick.
Asian Chicken Lettuce Cups
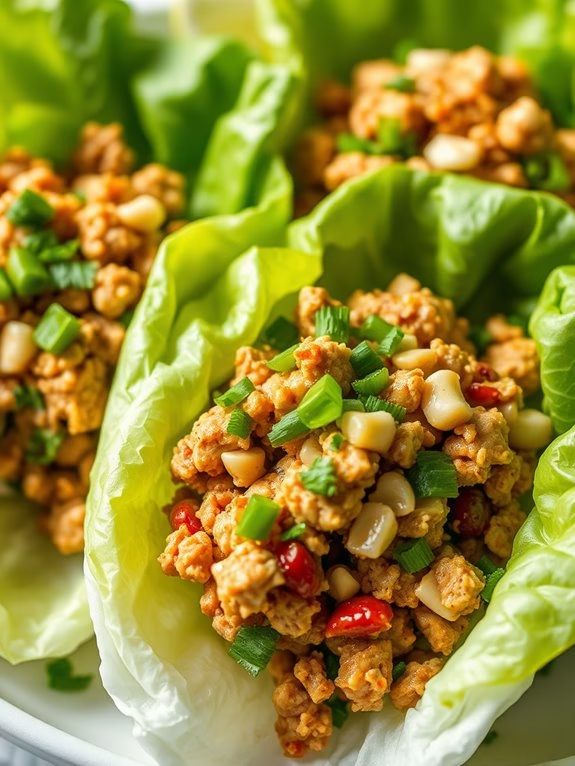
Asian Chicken Lettuce Cups are a delightful and healthy lunchtime option that combines bold flavors and a satisfying crunch. This dish is inspired by the vibrant and aromatic ingredients commonly found in Asian cuisine, offering a revitalizing alternative to traditional sandwiches or wraps. The key components include tender, flavorful chicken, crisp lettuce leaves, and a medley of fresh vegetables and herbs that come together to create a symphony of flavors in every bite.
Perfect for a light lunch or appetizer, Asian Chicken Lettuce Cups aren’t only delicious but also quick and easy to prepare. This recipe serves 4-6 people and is ideal for those looking to enjoy a meal that’s both nutritious and full of flavor. The chicken is seasoned with a combination of soy sauce, ginger, and garlic, then cooked to perfection before being nestled into lettuce leaves with an array of toppings.
Whether you’re hosting a casual lunch or simply looking for a quick and healthy meal option, these lettuce cups are sure to please.
Ingredients for 4-6 servings:
- 1 1/2 pounds ground chicken
- 2 tablespoons vegetable oil
- 3 cloves garlic, minced
- 1 tablespoon fresh ginger, grated
- 1/4 cup soy sauce
- 2 tablespoons hoisin sauce
- 1 tablespoon rice vinegar
- 1 tablespoon sesame oil
- 1 teaspoon sriracha or chili paste (optional for heat)
- 1 cup water chestnuts, chopped
- 1/2 cup green onions, sliced
- 1/4 cup cilantro, chopped
- 1 head of butter or iceberg lettuce, leaves separated and washed
- 1/4 cup roasted peanuts, chopped (optional)
- Lime wedges for serving
Cooking Instructions:
- Prepare the Ingredients: Begin by washing and separating the lettuce leaves. Set them aside to dry while you prepare the chicken filling. Chop the water chestnuts, green onions, and cilantro, and set them aside.
- Cook the Chicken: Heat the vegetable oil in a large skillet over medium-high heat. Add the ground chicken and cook, breaking it apart with a wooden spoon, until it’s browned and cooked through, about 5-7 minutes.
- Add Aromatics: Stir in the minced garlic and grated ginger, cooking for an additional 1-2 minutes until fragrant.
- Season the Chicken: Lower the heat to medium, then add the soy sauce, hoisin sauce, rice vinegar, sesame oil, and sriracha (if using). Mix well to combine all the flavors.
- Incorporate Vegetables: Stir in the chopped water chestnuts and half of the sliced green onions. Cook for another 2-3 minutes until everything is heated through. Remove from heat and add the chopped cilantro.
- Assemble the Lettuce Cups: Lay a few lettuce leaves on a serving platter. Spoon a generous amount of the chicken mixture onto each leaf. Garnish with the remaining green onions, chopped peanuts, and a squeeze of lime juice.
- Serve: Serve the lettuce cups immediately with lime wedges on the side for an extra burst of revitalization.
Extra Tips:
When preparing Asian Chicken Lettuce Cups, it’s important to choose lettuce leaves that are sturdy enough to hold the filling without tearing. Butter lettuce is a popular choice due to its soft yet durable leaves, but iceberg lettuce can also provide a nice crunch.
For added convenience, prepare the chicken mixture in advance, and simply reheat it before assembling the cups. Additionally, feel free to adjust the level of spiciness by modifying the amount of sriracha or chili paste to suit your taste preferences.
Mediterranean Chicken Pita
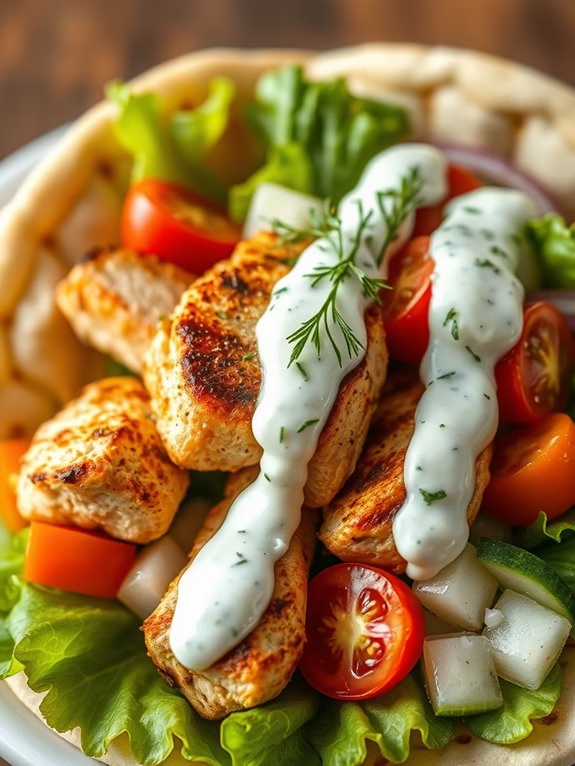
Mediterranean Chicken Pita is a delightful and invigorating lunch option that brings together the vibrant flavors of the Mediterranean. This dish combines tender, marinated chicken with crisp vegetables and creamy tzatziki sauce, all wrapped up in a soft pita bread.
It’s not only delicious but also a healthy choice, providing a good balance of protein, vegetables, and carbs. Perfect for a quick lunch or a light dinner, this Mediterranean Chicken Pita is sure to become a favorite in your meal rotation.
The recipe features a blend of traditional Mediterranean spices that elevate the flavor of the chicken, making it juicy and flavorful. The addition of fresh vegetables like cucumber, tomatoes, and lettuce adds a revitalizing crunch, while the tzatziki sauce adds a creamy, tangy element that ties all the components together.
This recipe is designed to serve 4-6 people, making it ideal for a family meal or a small gathering with friends. Let’s plunge into the ingredients and steps to prepare this mouthwatering dish.
Ingredients (serving size: 4-6 people):
- 1.5 pounds boneless, skinless chicken breasts
- 4 whole wheat pita breads
- 1 cup Greek yogurt
- 2 tablespoons olive oil
- 2 tablespoons lemon juice
- 3 cloves garlic, minced
- 1 tablespoon dried oregano
- 1 teaspoon ground cumin
- 1 teaspoon smoked paprika
- Salt and pepper to taste
- 1 cucumber, diced
- 1 cup cherry tomatoes, halved
- 1/2 red onion, thinly sliced
- 2 cups mixed lettuce leaves
- 1/4 cup fresh dill, chopped
Cooking Instructions:
- Marinate the Chicken: In a large bowl, combine the olive oil, lemon juice, minced garlic, dried oregano, ground cumin, smoked paprika, salt, and pepper. Mix well to create a marinade. Add the chicken breasts to the marinade, confirming they’re well coated. Cover and refrigerate for at least 1 hour, or overnight for best results.
- Prepare the Tzatziki Sauce: While the chicken is marinating, prepare the tzatziki sauce. In a medium bowl, mix the Greek yogurt with half of the chopped dill, a pinch of salt, and pepper. Add a small splash of lemon juice for extra tang, if desired. Stir until well combined and refrigerate until ready to use.
- Cook the Chicken: Preheat a grill or skillet over medium-high heat. Remove the chicken from the marinade and cook for about 5-7 minutes on each side, or until the chicken is cooked through and has nice grill marks. Once done, remove from heat and let it rest for a few minutes before slicing it thinly.
- Assemble the Pitas: Warm the pita breads on the grill or in the oven for a few minutes until they’re soft and pliable. To assemble, place a handful of mixed lettuce leaves on each pita, followed by a generous portion of sliced chicken. Top with diced cucumber, cherry tomatoes, and sliced red onion.
- Add the Sauce and Serve: Drizzle the prepared tzatziki sauce over the top of the assembled pita. Garnish with the remaining fresh dill. Fold or wrap the pita to enclose the filling and serve immediately.
Extra Tips: To enhance the flavors, consider adding a sprinkle of feta cheese or olives for an authentic Mediterranean touch. If you want to save time, you can prepare the marinade and tzatziki sauce a day before.
Additionally, verify the chicken is evenly cooked and not overdone to keep it juicy. For a vegetarian alternative, replace the chicken with grilled eggplant or zucchini.
Chicken Avocado Sandwich
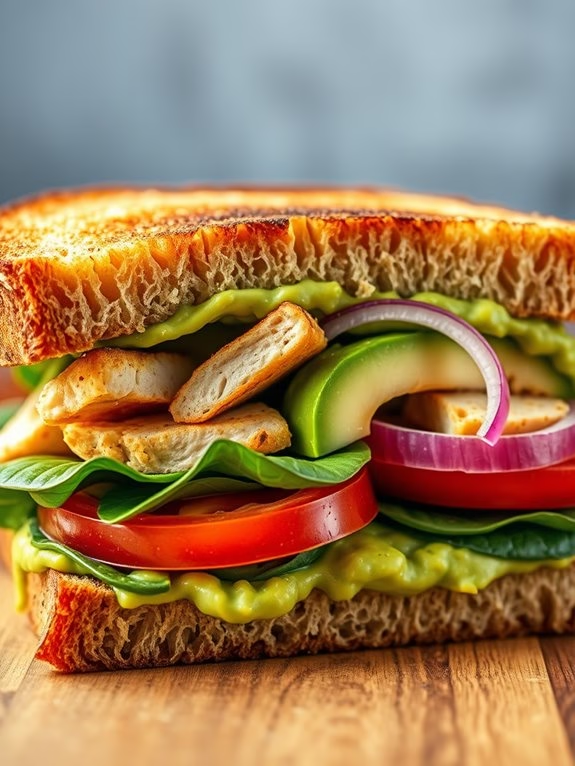
The Chicken Avocado Sandwich is a delightful and nutritious option for lunch that combines the tender juiciness of chicken with the creamy richness of avocado. This sandwich is perfect for a mid-day meal that satisfies hunger while providing essential nutrients. The melding of flavors from the savory chicken, ripe avocado, and a hint of lime makes this sandwich a crowd-pleaser, whether you’re serving it at a family gathering or a casual lunch with friends.
It’s easy to prepare and can be customized with your favorite toppings to suit everyone’s tastes. This recipe is designed to serve 4-6 people, making it ideal for a small group or family. Packed with protein and healthy fats, the Chicken Avocado Sandwich not only tastes delicious but is also a balanced meal. The choice of using whole-grain bread adds an extra layer of texture and nutritional value.
The addition of fresh vegetables and herbs enhances the freshness and overall appeal of the dish. Whether you’re a novice cook or an experienced chef, this recipe is straightforward and can be prepared with ease.
Ingredients:
- 4 boneless, skinless chicken breasts
- 2 tablespoons olive oil
- Salt and pepper to taste
- 1 teaspoon garlic powder
- 1 teaspoon paprika
- 8 slices whole-grain bread
- 2 ripe avocados
- 1 tablespoon lime juice
- 1/2 cup mayonnaise
- 1 small red onion, thinly sliced
- 1 cup fresh spinach leaves
- 1 medium tomato, sliced
- Optional: sliced cheese of your choice
Cooking Instructions:
- Prepare the Chicken: Start by seasoning the chicken breasts with salt, pepper, garlic powder, and paprika. Confirm that both sides are well-coated with the seasoning.
- Cook the Chicken: Heat the olive oil in a large skillet over medium heat. Once the oil is hot, add the chicken breasts. Cook them for about 6-7 minutes on each side, or until they’re golden brown and cooked through. The internal temperature should reach 165°F (75°C). Remove from the heat and let them rest for a few minutes before slicing them into thin strips.
- Prepare the Avocado Spread: While the chicken is cooking, mash the avocados in a bowl. Add lime juice and a pinch of salt to the mashed avocado and mix until smooth. This will be used as a spread for the sandwich.
- Assemble the Sandwich: Toast the slices of whole-grain bread if desired. Spread a layer of mayonnaise on one side of each slice of bread. On four slices, layer the sliced chicken, followed by a generous spread of the avocado mixture. Add slices of red onion, spinach leaves, and tomato. Top with the remaining slices of bread.
- Final Touches: If you prefer, you can add a slice of cheese to each sandwich. Serve immediately, and enjoy your Chicken Avocado Sandwich while it’s fresh.
Extra Tips:
When preparing the Chicken Avocado Sandwich, confirm the avocados are ripe to achieve a creamy texture. You can check ripeness by gently pressing on the avocado – it should yield slightly.
Additionally, for an extra zesty flavor, consider adding a sprinkle of lime zest to the avocado spread. To save time, the chicken can be grilled instead of pan-fried, or even cooked ahead of time and stored in the refrigerator.
Toasting the bread can add a satisfying crunch to your sandwich. If you want a spicier kick, consider adding a few slices of jalapeño to the sandwich.
Thai Chicken Curry Soup
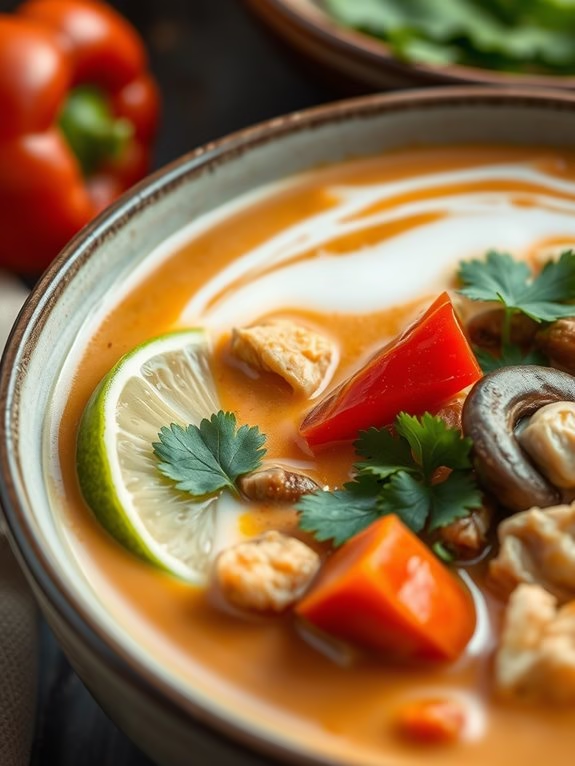
Thai Chicken Curry Soup is a delightful fusion of flavors that encapsulates the essence of Thai cuisine. This dish combines tender pieces of chicken with rich coconut milk, aromatic curry paste, and a medley of fresh vegetables and herbs. The result is a comforting and savory soup that’s both hearty and light, perfect for a lunch that will transport you to the bustling streets of Thailand.
The balance of spice, sweetness, and tanginess is key in this dish, making it not only a feast for the taste buds but also a satisfying meal that will warm your soul.
The soup’s vibrant flavors come from a combination of spices and ingredients that are staples in Thai cooking. The use of red curry paste provides a kick of heat, while coconut milk adds a creamy texture that mellows the spice. Fresh vegetables like bell peppers and mushrooms contribute both color and texture, while lime juice and fish sauce add the necessary tang and umami.
A garnish of fresh cilantro and Thai basil elevates the dish with an aromatic freshness that completes the experience. This recipe serves 4-6 people, making it perfect for a family lunch or a small gathering with friends.
Ingredients:
- 1 tablespoon vegetable oil
- 1 onion, sliced
- 2 cloves garlic, minced
- 1 tablespoon fresh ginger, minced
- 2 tablespoons red curry paste
- 1 pound boneless chicken thighs, cut into bite-sized pieces
- 3 cups chicken broth
- 1 can (14 ounces) coconut milk
- 1 tablespoon fish sauce
- 1 tablespoon sugar
- 1 red bell pepper, sliced
- 1 cup mushrooms, sliced
- 1 cup snap peas
- 2 tablespoons lime juice
- Salt, to taste
- Fresh cilantro, for garnish
- Thai basil leaves, for garnish
- Lime wedges, for serving
Cooking Instructions:
- Prepare the Base: In a large pot, heat the vegetable oil over medium heat. Add the sliced onion, minced garlic, and ginger. Sauté for about 3-4 minutes until the onion becomes translucent and the mixture is fragrant.
- Incorporate Curry Paste: Add the red curry paste to the pot, stirring frequently for 1-2 minutes to cook off the raw taste and to allow the flavors to meld with the onion mixture.
- Cook the Chicken: Add the chicken pieces to the pot, stirring to coat them with the curry paste mixture. Cook for about 5 minutes, until the chicken is browned on the outside.
- Build the Soup: Pour in the chicken broth and coconut milk, stirring well to combine. Bring the mixture to a gentle simmer.
- Season the Soup: Stir in the fish sauce and sugar, making sure they’re well integrated into the soup. Adjust seasoning with salt if necessary.
- Add Vegetables: Add the red bell pepper, mushrooms, and snap peas to the pot. Simmer for another 10-15 minutes, or until the vegetables are tender and the chicken is cooked through.
- Finish with Lime: Just before serving, stir in the lime juice. Taste and adjust seasoning if needed.
- Serve: Ladle the soup into bowls, garnishing each serving with fresh cilantro and Thai basil leaves. Serve with lime wedges on the side for an extra burst of citrus.
Extra Tips: When making Thai Chicken Curry Soup, feel free to adjust the level of spice by varying the amount of red curry paste to suit your taste. If you prefer a spicier dish, you can add sliced chili peppers or a dash of chili powder.
For a more robust flavor, consider making the soup a day in advance, allowing the ingredients to meld overnight. Always use fresh ingredients, especially the herbs, to guarantee the best flavor and aroma. Finally, be mindful of the salt content, as both fish sauce and curry paste contain sodium; taste as you go and adjust accordingly.
Chicken Caprese Salad
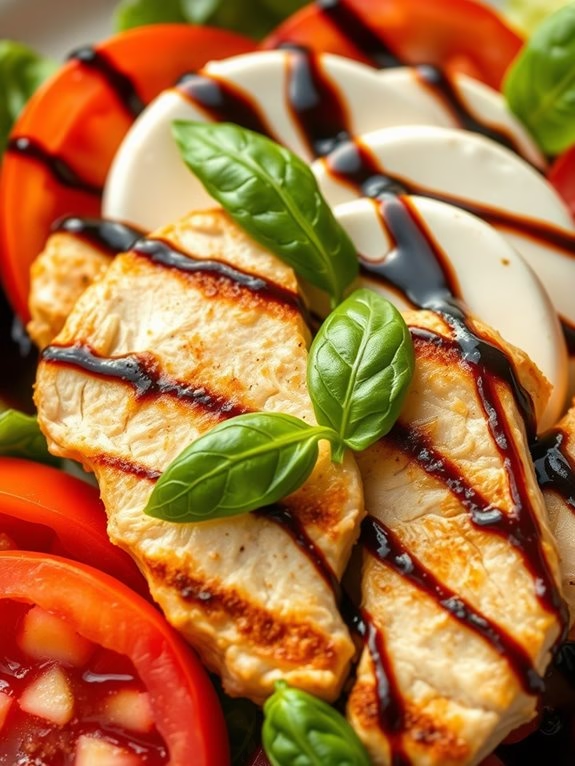
Chicken Caprese Salad is a delightful and invigorating dish that brings together the classic flavors of a traditional Caprese salad — tomatoes, mozzarella, and basil — with tender, grilled chicken breast. This recipe is perfect for a light lunch or an elegant starter, offering a balance of creamy mozzarella, juicy tomatoes, aromatic basil, and succulent chicken.
It’s a vibrant dish that not only pleases the palate but also makes for a beautiful presentation on any table. The combination of fresh ingredients drizzled with a balsamic glaze gives this salad a touch of sweetness and acidity that enhances the overall flavor profile.
It’s a dish that can be easily prepared in advance, making it an excellent choice for hosting a gathering or for a simple family meal. Whether enjoyed on its own or paired with a crusty piece of bread, Chicken Caprese Salad is sure to become a favorite in your lunch rotation.
Ingredients for 4-6 servings:
- 4 boneless, skinless chicken breasts
- 3 tablespoons olive oil
- Salt and pepper to taste
- 2 teaspoons Italian seasoning
- 3 large ripe tomatoes, sliced
- 12 ounces fresh mozzarella cheese, sliced
- 1 cup fresh basil leaves
- 1/4 cup balsamic glaze
- 2 tablespoons lemon juice
- Mixed salad greens (optional)
Cooking Instructions:
- Prepare the Chicken: Begin by preheating a grill or grill pan over medium-high heat. Rub the chicken breasts with 2 tablespoons of olive oil, then season both sides with salt, pepper, and Italian seasoning.
- Grill the Chicken: Place the chicken on the grill and cook for about 6-7 minutes on each side, or until the internal temperature reaches 165°F (75°C). Once done, remove from the grill and allow them to rest for 5 minutes before slicing.
- Assemble the Salad: On a large serving platter or individual plates, arrange a bed of mixed salad greens if using. Layer the sliced tomatoes, mozzarella, and basil leaves alternately in an overlapping pattern.
- Add the Chicken: Slice the grilled chicken breasts into strips and arrange them over the assembled salad.
- Drizzle with Dressing: In a small bowl, whisk together the remaining tablespoon of olive oil and lemon juice. Drizzle this mixture over the salad, followed by the balsamic glaze.
- Serve: Serve the salad immediately, garnished with additional fresh basil leaves if desired.
Extra Tips:
For best results, use high-quality, fresh ingredients, as they truly make a difference in the taste of the dish. You can prepare the chicken a day in advance and refrigerate it, but make sure to bring it to room temperature before serving.
If you don’t have a grill, you can also cook the chicken in a skillet over medium heat. For added flavor, consider marinating the chicken for a few hours in a mixture of balsamic vinegar, olive oil, garlic, and herbs before grilling.
Finally, adjust the amount of balsamic glaze to your preference, as some might prefer a more pronounced sweet-tangy flavor.
Teriyaki Chicken Rice Bowl
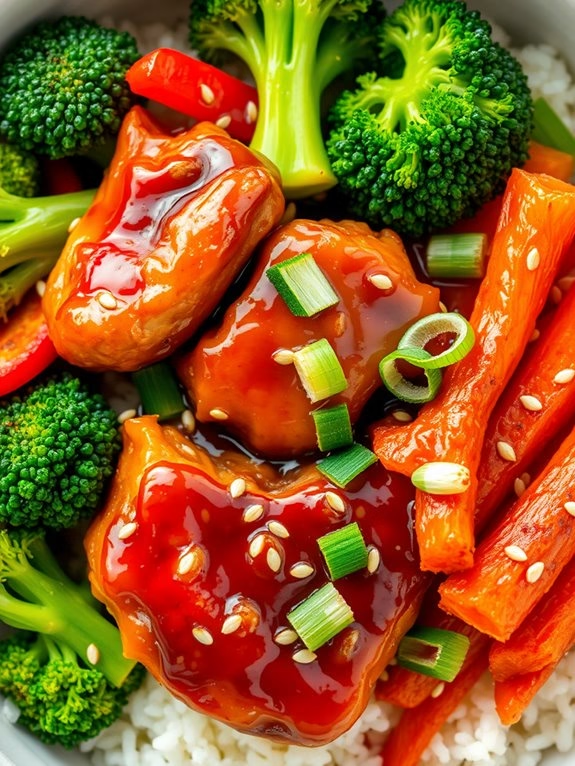
The teriyaki chicken rice bowl is a delicious and satisfying dish that’s perfect for lunch. This recipe combines savory teriyaki chicken with fluffy rice and a variety of fresh vegetables, making it a nutritious and well-balanced meal. The key to this dish is the homemade teriyaki sauce, which infuses the chicken with a rich and tangy flavor. This recipe serves 4 to 6 people, making it an excellent choice for a family lunch or a small gathering.
To prepare the teriyaki chicken rice bowl, start by marinating the chicken in a flavorful blend of soy sauce, mirin, and other ingredients that create a perfect harmony of sweet and savory notes. The chicken is then cooked to a golden brown and served over a bed of steamed rice. Fresh vegetables such as broccoli, bell peppers, and carrots add color and texture to the dish, while a sprinkling of sesame seeds and sliced green onions enhance its visual appeal and taste.
Ingredients (Serves 4-6):
- 1.5 pounds boneless, skinless chicken thighs
- 1 cup soy sauce
- 1/2 cup mirin
- 1/3 cup honey
- 2 tablespoons rice vinegar
- 1 tablespoon sesame oil
- 4 garlic cloves, minced
- 1 tablespoon fresh ginger, grated
- 4 cups cooked white or brown rice
- 2 cups broccoli florets
- 1 red bell pepper, sliced
- 1 carrot, julienned
- 2 tablespoons sesame seeds
- 2 green onions, sliced
Cooking Instructions:
- Prepare the Marinade: In a large bowl, combine the soy sauce, mirin, honey, rice vinegar, sesame oil, minced garlic, and grated ginger. Mix well to guarantee the honey dissolves completely.
- Marinate the Chicken: Place the chicken thighs in the bowl with the marinade, making sure they’re fully submerged. Cover and refrigerate for at least 30 minutes, or up to 2 hours for a deeper flavor.
- Cook the Chicken: Heat a large skillet over medium-high heat. Remove the chicken from the marinade (reserve the marinade) and place it in the hot skillet. Cook for about 5-7 minutes on each side, or until the chicken is fully cooked and has a nice golden brown color. Remove the chicken from the skillet and let it rest.
- Prepare the Sauce: In a small saucepan, bring the reserved marinade to a boil. Reduce the heat to low and let it simmer for about 5 minutes, or until the sauce thickens slightly.
- Cook the Vegetables: In the same skillet used for the chicken, add a splash of water and the broccoli, bell pepper, and carrot. Stir-fry the vegetables for about 4-5 minutes, or until they’re tender-crisp.
- Assemble the Bowl: Slice the cooked chicken into bite-sized pieces. Divide the cooked rice into bowls, top with sliced chicken, and spoon over the thickened teriyaki sauce. Add the stir-fried vegetables on the side.
- Garnish and Serve: Sprinkle each bowl with sesame seeds and sliced green onions. Serve immediately while the dish is warm.
Extra Tips:
For the best results, use fresh chicken thighs as they tend to stay juicier compared to chicken breasts. If you’re short on time, you can use store-bought teriyaki sauce, but making your own allows for better control over the sweetness and saltiness.
To save time, prepare the rice and vegetables while the chicken is marinating. If you prefer a spicier dish, add a pinch of red pepper flakes to the marinade. Finally, feel free to customize the vegetables to suit your taste or to use whatever you have on hand.
Buffalo Chicken Stuffed Peppers
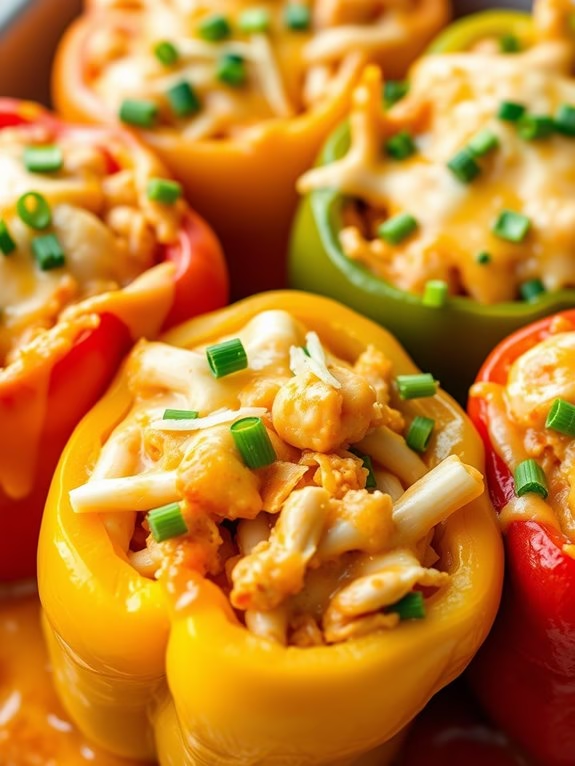
Buffalo Chicken Stuffed Peppers are a delightful twist on the classic stuffed pepper recipe, adding a spicy kick that’s certain to please anyone who loves the flavors of buffalo chicken wings. This dish combines the hearty texture of bell peppers with a filling made from shredded chicken, buffalo sauce, and a mix of cheeses for a creamy, zesty experience. Perfect for a satisfying lunch, these stuffed peppers are both nutritious and versatile, allowing for adjustments based on personal tastes and dietary needs.
Not only are Buffalo Chicken Stuffed Peppers easy to prepare, but they also make for a visually appealing meal that can be served for any casual gathering or family lunch. The vibrant colors of the bell peppers contrast beautifully with the creamy filling, while the spicy buffalo sauce provides a flavorful punch. This recipe can be easily doubled or halved, making it a flexible option for different serving sizes, but here is how you can make it to serve 4-6 people.
Ingredients:
- 3 large bell peppers (any color)
- 2 cups cooked and shredded chicken breast
- 1 cup buffalo sauce
- 1 cup shredded cheddar cheese
- 1 cup shredded mozzarella cheese
- 1/2 cup cream cheese, softened
- 1/4 cup chopped green onions
- 1 teaspoon garlic powder
- Salt and pepper to taste
- 1 tablespoon olive oil
Cooking Instructions:
- Preheat and Prepare: Preheat your oven to 375°F (190°C). While the oven is heating, cut the bell peppers in half lengthwise and remove the seeds and membranes. Lightly brush the outside of the peppers with olive oil and place them cut side up in a baking dish.
- Prepare the Filling: In a large mixing bowl, combine the shredded chicken, buffalo sauce, cheddar cheese, mozzarella cheese, cream cheese, chopped green onions, garlic powder, salt, and pepper. Mix until all ingredients are well combined and the mixture is creamy.
- Stuff the Peppers: Spoon the buffalo chicken mixture into each bell pepper half, pressing down gently to make certain they’re fully stuffed. Distribute the filling evenly among the peppers.
- Bake the Peppers: Place the stuffed peppers in the preheated oven and bake for 25-30 minutes, or until the peppers are tender and the cheese is melted and bubbly.
- Garnish and Serve: Once baked, remove the peppers from the oven and let them cool slightly. Garnish with additional chopped green onions if desired. Serve warm, and enjoy the spicy, cheesy flavors.
Extra Tips: For added flavor, you can sprinkle some blue cheese crumbles on top of the peppers before baking. If you prefer a milder taste, adjust the amount of buffalo sauce to suit your preference. This dish can also be prepared ahead of time by stuffing the peppers and refrigerating them until ready to bake, making it a convenient option for meal prep.
Additionally, using a variety of colorful bell peppers not only adds to the visual appeal but also introduces subtle differences in flavor.