

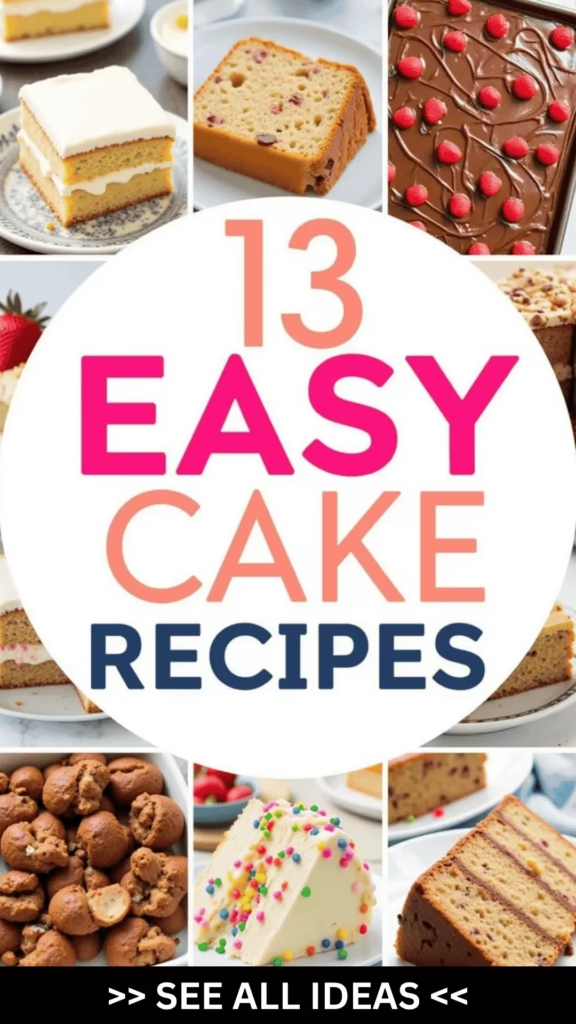
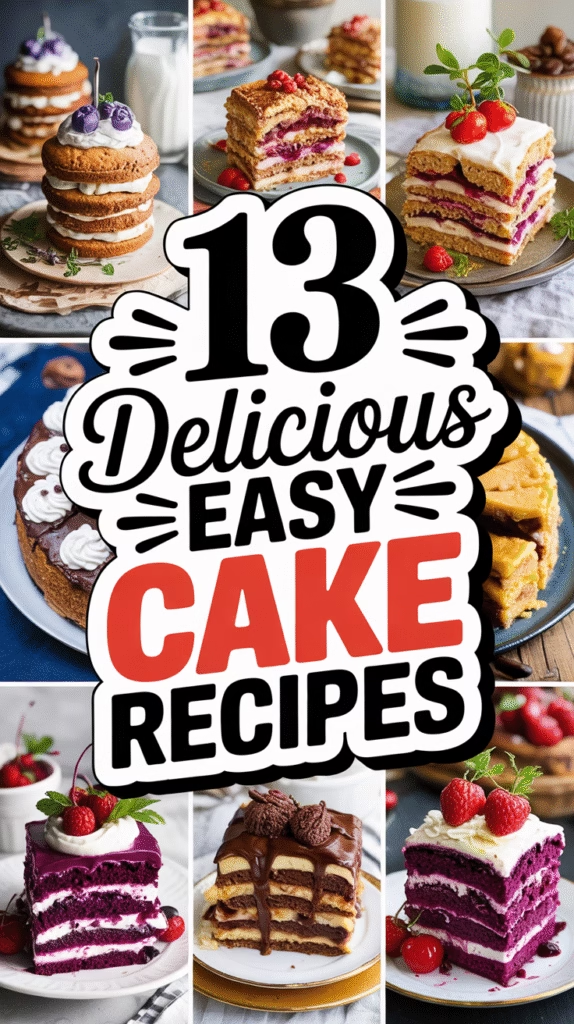
Gathering with loved ones calls for something special, and what better way to delight than with a scrumptious cake?
From the comforting scent of a Classic Chocolate Cake to the effortless charm of a Quick Carrot Cake, there’s a recipe for every occasion.
I still cherish the moment when a Lemon Drizzle Cake I baked became the star of the table with its refreshing zest.
These recipes offer not just simplicity, but a joyful experience from mixing bowl to oven.
Curious to uncover the secrets of a no-bake cheesecake or a Red Velvet Delight?
Let’s embark on this sweet journey together.
Classic Chocolate Cake
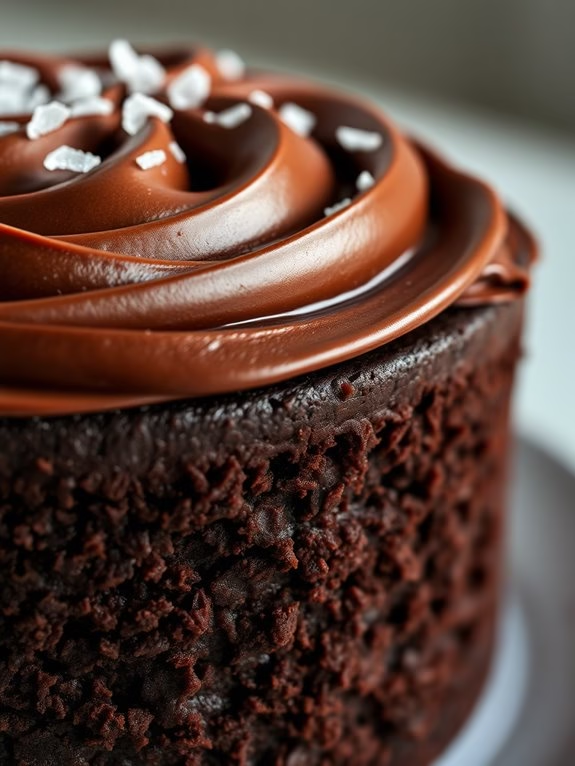
Classic Chocolate Cake
Indulge in the rich, moist, and decadent flavors of a Classic Chocolate Cake, a timeless dessert that never fails to impress. Perfect for birthdays, celebrations, or simply a treat-yourself moment, this cake combines the deep taste of cocoa with a light, fluffy texture that melts in your mouth.
Whether you’re a seasoned baker or a beginner in the kitchen, this recipe is straightforward and will guide you to create a cake that’s both delicious and visually appealing. This Classic Chocolate Cake recipe is designed to serve 4-6 people, making it ideal for a small gathering or a family dessert.
The use of simple, easy-to-find ingredients means you can whip up this delightful cake without a hassle. The key to achieving the perfect cake lies in following each step carefully, guaranteeing that each component is mixed and baked to perfection for a truly satisfying dessert experience.
Ingredients for Classic Chocolate Cake (Serves 4-6):
- 1 and 3/4 cups all-purpose flour
- 3/4 cup unsweetened cocoa powder
- 2 cups granulated sugar
- 1 and 1/2 teaspoons baking powder
- 1 and 1/2 teaspoons baking soda
- 1 teaspoon salt
- 2 large eggs
- 1 cup whole milk
- 1/2 cup vegetable oil
- 2 teaspoons vanilla extract
- 1 cup boiling water
Instructions:
- Preheat the Oven: Begin by preheating your oven to 350°F (175°C). Grease and flour two 9-inch round cake pans to prevent the cake from sticking.
- Mix Dry Ingredients: In a large mixing bowl, sift together the flour, cocoa powder, sugar, baking powder, baking soda, and salt. This guarantees that the dry ingredients are well combined and free of lumps.
- Combine Wet Ingredients: In another bowl, beat the eggs, then add the milk, vegetable oil, and vanilla extract. Mix these ingredients until they’re well incorporated and smooth.
- Blend Wet and Dry Ingredients: Gradually add the wet mixture to the dry ingredients, mixing on medium speed until the batter is smooth and well combined. Be careful not to overmix as this can toughen the cake.
- Add Boiling Water: Carefully stir in the boiling water. The batter will be quite thin, but this is normal and will result in a moist cake.
- Bake: Divide the batter evenly between the two prepared cake pans. Bake in the preheated oven for 30-35 minutes, or until a toothpick inserted into the center of the cakes comes out clean.
- Cool: Allow the cakes to cool in the pans for about 10 minutes. Then, remove them from the pans and let them cool completely on a wire rack.
- Frost and Serve: Once the cakes are completely cooled, frost with your favorite chocolate frosting. Slice and serve to your delighted guests.
Extra Tips:
To guarantee the best possible outcome for your Classic Chocolate Cake, make sure all your ingredients are at room temperature before you begin. This helps the ingredients blend more seamlessly, leading to a smoother batter.
Additionally, when adding the boiling water, pour it in slowly and mix gently to avoid splashing, which guarantees the batter maintains its consistency. Finally, for an extra touch, consider adding a sprinkle of sea salt on top of the frosting to enhance the chocolate flavor and add a subtle, sophisticated contrast.
Lemon Drizzle Cake
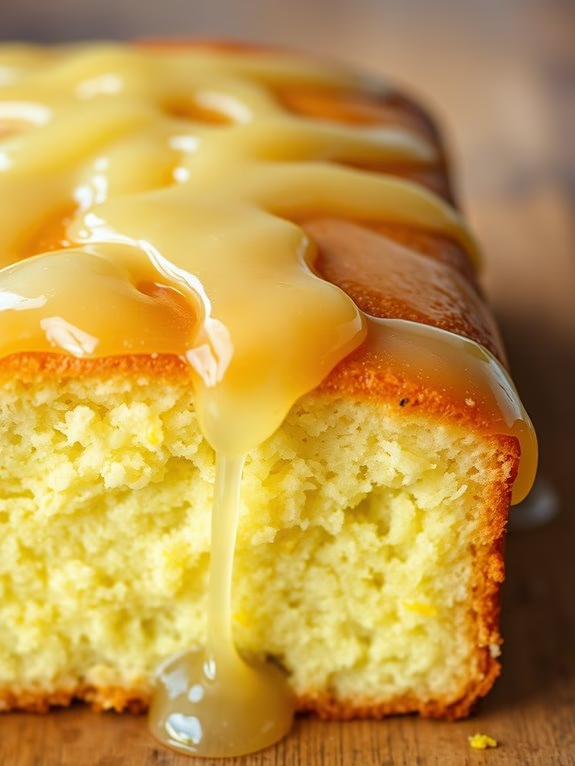
Lemon Drizzle Cake is a delightful dessert that combines the zesty flavor of lemons with the sweet, moist texture of a traditional cake. This cake is perfect for a revitalizing afternoon treat or a light dessert after a hearty meal. The lemon drizzle adds a tangy sweetness that beautifully complements the soft, buttery cake underneath.
Whether you’re a seasoned baker or a novice in the kitchen, this easy recipe will guide you through creating a delicious Lemon Drizzle Cake that your family and friends are sure to love.
This recipe is designed to serve 4-6 people, making it an ideal choice for small gatherings or family dinners. The ingredients are simple and likely already in your pantry, and the preparation process is straightforward, guaranteeing that even those new to baking can achieve a successful result.
The combination of fresh lemon juice and zest in both the cake and the drizzle guarantees a burst of citrus flavor in every bite. With a few simple steps, you’ll have a beautifully glazed cake that’s as pleasing to the eyes as it’s to the palate.
Ingredients:
- 225g unsalted butter, softened
- 225g caster sugar
- 4 large eggs
- 225g self-raising flour
- 2 lemons, zested
- 1 lemon, juiced
- 85g icing sugar
Cooking Instructions:
- Preheat the Oven: Begin by preheating your oven to 180°C (350°F) or Gas Mark 4. This guarantees the oven is at the right temperature when you place the cake in, promoting even cooking.
- Prepare the Cake Batter: In a large mixing bowl, cream together the softened butter and caster sugar until the mixture is light and fluffy. This can be done using an electric mixer or by hand with a wooden spoon.
- Add the Eggs: Beat the eggs into the butter and sugar mixture one at a time, guaranteeing each egg is fully incorporated before adding the next. This helps to maintain the mixture’s smooth texture.
- Incorporate Dry Ingredients: Gently fold in the self-raising flour using a spatula or spoon. Be careful not to overmix, as this can result in a dense cake.
- Add Lemon Zest: Stir in the zest of the two lemons, guaranteeing it’s evenly distributed throughout the batter. This will infuse the cake with a strong lemony flavor.
- Bake the Cake: Pour the batter into a greased and lined 20cm cake tin, smoothing the top with a spatula. Bake in the preheated oven for 40-45 minutes, or until a skewer inserted into the center comes out clean.
- Prepare the Drizzle: While the cake is baking, mix the juice of one lemon with the icing sugar in a small bowl until smooth. This will form the lemon drizzle.
- Drizzle the Cake: Once the cake is baked, remove it from the oven and allow it to cool in the tin for about 10 minutes. Then, carefully remove it from the tin and place it on a wire rack. Prick the top of the cake with a skewer or fork and pour the lemon drizzle over the top, allowing it to soak in.
- Cool and Serve: Allow the cake to cool completely before slicing and serving. This will guarantee the drizzle has fully set and the cake is at its best texture.
Extra Tips:
For best results, guarantee all your ingredients are at room temperature before beginning, as this helps them to combine more smoothly. You can adjust the sweetness of the drizzle by adding more or less icing sugar, depending on your preference.
If you like a more intense lemon flavor, consider adding a bit more lemon zest or juice. Finally, for an extra touch of elegance, you can garnish the cake with thin lemon slices or a sprinkle of powdered sugar just before serving. Enjoy your Lemon Drizzle Cake with a hot cup of tea or coffee for a perfect pairing.
Vanilla Bean Sponge
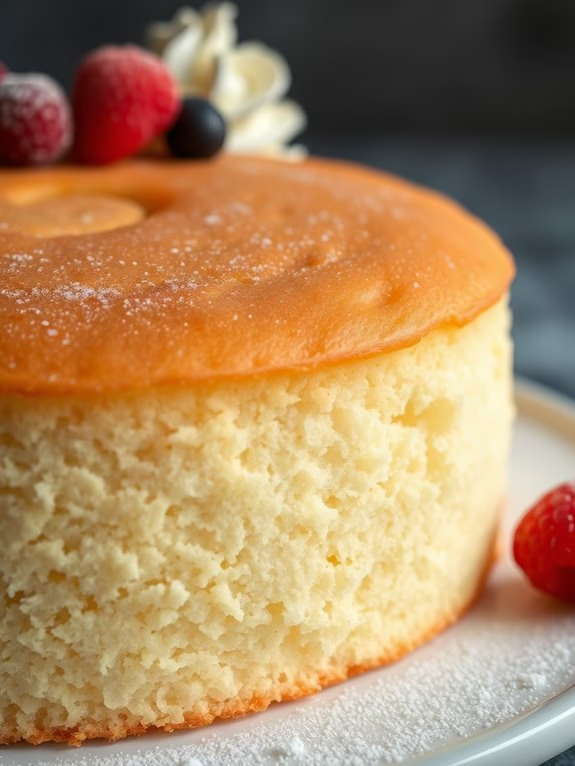
Vanilla Bean Sponge Cake
Vanilla Bean Sponge Cake is a classic and elegant dessert that brings a touch of sophistication to any occasion. Its light and airy texture, combined with the rich and aromatic flavor of vanilla bean, makes it a delightful treat for both the eyes and the palate. Perfect for birthdays, celebrations, or just a sweet indulgence, this cake is sure to impress your family and friends with its simplicity and taste.
This recipe is designed to serve 4-6 people, making it ideal for small gatherings or intimate dinners. The key to achieving the perfect sponge cake is in the preparation and careful handling of the ingredients. By following these steps, you’ll be able to create a moist and fluffy Vanilla Bean Sponge Cake that will become a favorite in your dessert repertoire.
Ingredients:
- 4 large eggs
- 1 cup granulated sugar
- 1 cup all-purpose flour
- 1/4 cup unsalted butter, melted
- 1 vanilla bean, seeds scraped, or 1 tablespoon vanilla bean paste
- 1/2 teaspoon baking powder
- 1/4 teaspoon salt
- 1/4 cup milk
Cooking Instructions:
- Preheat and Prep: Preheat your oven to 350°F (175°C). Grease and line the bottom of a 9-inch round cake pan with parchment paper to guarantee easy removal of the cake later.
- Beat Eggs and Sugar: In a large mixing bowl, beat the eggs and granulated sugar together with an electric mixer on high speed for about 8-10 minutes, or until the mixture is thick, pale, and tripled in volume. This step is essential for incorporating air into the batter, which gives the cake its signature light texture.
- Add Vanilla: Gently fold in the vanilla bean seeds or vanilla bean paste into the egg mixture using a spatula. Be careful not to deflate the batter as you incorporate the vanilla.
- Sift Dry Ingredients: In a separate bowl, sift together the all-purpose flour, baking powder, and salt. Sifting helps to aerate the flour and guarantees even distribution throughout the batter.
- Combine Wet and Dry Ingredients: Gradually fold the dry ingredients into the egg mixture, one-third at a time. Use a gentle folding motion to maintain the volume of the batter.
- Incorporate Milk and Butter: In a small saucepan, heat the milk and melted butter together until warm, but not boiling. Pour this mixture along the side of the bowl into the batter, folding gently until fully incorporated.
- Bake the Cake: Pour the batter into the prepared cake pan and smooth the top with a spatula. Bake in the preheated oven for 25-30 minutes, or until a toothpick inserted into the center comes out clean and the top is golden brown.
- Cool and Serve: Allow the cake to cool in the pan for about 10 minutes before transferring it to a wire rack to cool completely. Once cooled, the cake can be served as is or garnished with a dusting of powdered sugar, fresh berries, or a dollop of whipped cream.
Extra Tips:
For the fluffiest sponge cake, make sure your eggs are at room temperature before you begin. This helps them whip up to their maximum volume.
Additionally, when folding the ingredients, be as gentle as possible to avoid deflating the batter. If using vanilla extract instead of vanilla bean, use high-quality pure vanilla extract for the best flavor.
Finally, if you’re looking to add a bit more flair, consider layering the cake with a simple vanilla buttercream or a fresh fruit compote for added texture and taste.
Red Velvet Delight
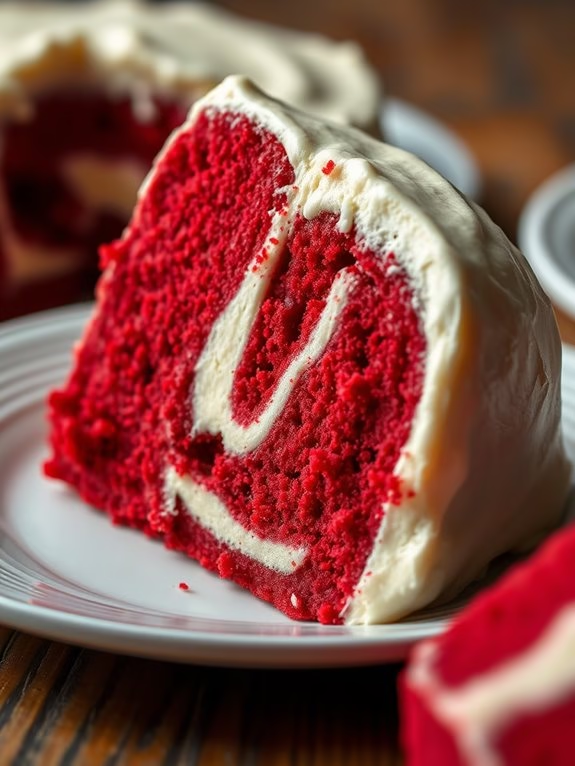
Red Velvet Delight
Red Velvet Delight is a classic cake that never goes out of style. Its rich, velvety texture and vibrant red color make it a standout at any gathering. The combination of cocoa and buttermilk gives it a unique flavor, while the cream cheese frosting adds a tangy sweetness that complements the cake perfectly.
Whether you’re celebrating a special occasion or simply want to indulge in a delicious homemade dessert, Red Velvet Delight is guaranteed to impress your family and friends.
This recipe is designed to serve 4-6 people, making it ideal for small gatherings or family dinners. The ingredients are straightforward and easy to find, guaranteeing that you can whip up this delightful cake with minimal fuss. So, put on your apron, preheat your oven, and get ready to create a cake that’s as beautiful as it’s delicious.
Ingredients:
- 2 ½ cups all-purpose flour
- 1 ½ cups granulated sugar
- 1 teaspoon baking soda
- 1 teaspoon salt
- 1 teaspoon cocoa powder
- 1 ½ cups vegetable oil
- 1 cup buttermilk, room temperature
- 2 large eggs, room temperature
- 2 tablespoons red food coloring
- 1 teaspoon vanilla extract
- 1 teaspoon white vinegar
- 1 ½ teaspoons baking soda
- Cream cheese frosting (store-bought or homemade)
Cooking Instructions:
- Preheat the Oven: Set your oven to 350°F (175°C) and grease two 9-inch round cake pans. Line the bottoms with parchment paper for easy removal.
- Mix Dry Ingredients: In a medium bowl, sift together the flour, baking soda, salt, and cocoa powder. This guarantees that everything is well combined and free of lumps.
- Combine Wet Ingredients: In a large mixing bowl, beat the sugar and oil together until well combined. Add the eggs, one at a time, mixing well after each addition. Stir in the food coloring and vanilla extract until the mixture is smooth and red.
- Incorporate Buttermilk and Vinegar: Gradually add the dry ingredients to the wet mixture, alternating with the buttermilk. Begin and end with the dry ingredients. Stir in the vinegar until just combined. Be careful not to overmix.
- Bake the Cakes: Pour the batter evenly into the prepared cake pans. Bake for 25-30 minutes or until a toothpick inserted into the center comes out clean. Let the cakes cool in the pans for about 10 minutes, then turn them out onto a wire rack to cool completely.
- Frost the Cake: Once the cakes are completely cool, spread cream cheese frosting on the top of one layer. Place the second layer on top and spread frosting over the top and sides of the entire cake. Smooth it out with a spatula.
Extra Tips:
For a truly velvety texture, make sure your ingredients are at room temperature before starting. This helps everything blend smoothly and evenly.
If you want to add a little extra flair, consider garnishing the top of the cake with toasted pecans or a light dusting of cocoa powder.
Also, if you find that your cake layers are domed, level them off with a serrated knife before frosting for a professional look. Enjoy your Red Velvet Delight!
Quick Carrot Cake
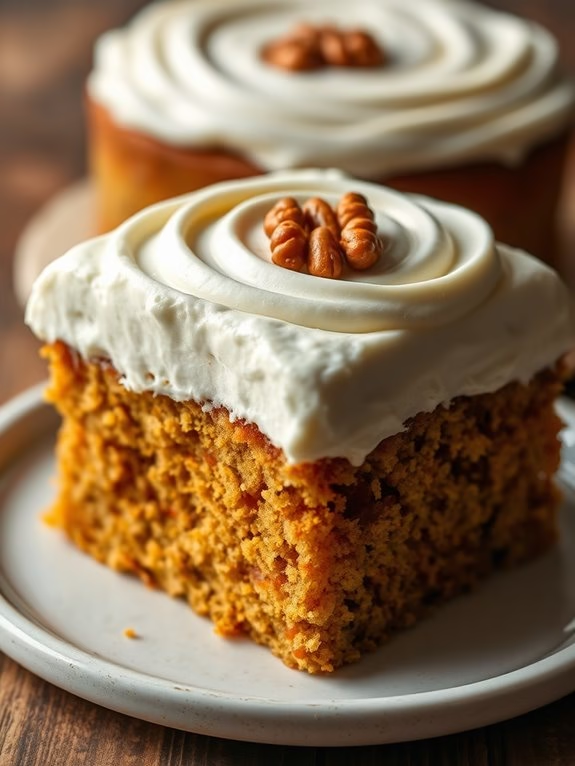
Quick Carrot Cake is a delightful dessert that combines the earthy sweetness of carrots with the warm, aromatic spices of cinnamon and nutmeg. Perfect for a last-minute bake, this cake is both simple and scrumptious, making it a great choice for any occasion, be it a family gathering or a cozy afternoon treat.
Its moist texture and rich flavor are complemented by a luscious cream cheese frosting, which adds a tangy contrast to the sweetness of the cake.
This recipe is designed to serve 4-6 people, making it ideal for small gatherings or for enjoying leftovers over a couple of days. Whether you’re an experienced baker or a novice in the kitchen, this Quick Carrot Cake recipe is easy to follow and guaranteed to impress. So grab your mixing bowl and get ready to whip up this delicious treat in no time!
Ingredients:
- 1 cup all-purpose flour
- 1 cup granulated sugar
- 1/2 cup vegetable oil
- 2 large eggs
- 1 teaspoon vanilla extract
- 1 teaspoon baking powder
- 1/2 teaspoon baking soda
- 1/2 teaspoon salt
- 1 teaspoon ground cinnamon
- 1/4 teaspoon ground nutmeg
- 1 1/2 cups grated carrots
- 1/2 cup chopped walnuts (optional)
- 1/2 cup raisins (optional)
- 1/2 cup unsalted butter, softened (for frosting)
- 8 oz cream cheese, softened (for frosting)
- 2 cups powdered sugar (for frosting)
- 1 teaspoon vanilla extract (for frosting)
Cooking Instructions:
- Preheat your oven to 350°F (175°C). Grease and flour an 8-inch round cake pan, or line it with parchment paper to prevent sticking.
- Mix dry ingredients: In a medium bowl, whisk together the flour, baking powder, baking soda, salt, cinnamon, and nutmeg until well combined.
- Prepare wet ingredients: In a large mixing bowl, beat together the sugar, eggs, and vegetable oil until the mixture is smooth and creamy. Add the vanilla extract and mix well.
- Combine mixtures: Gradually add the dry ingredients to the wet ingredients, mixing just until incorporated. Fold in the grated carrots, walnuts, and raisins, if using, making certain they’re evenly distributed throughout the batter.
- Bake the cake: Pour the batter into the prepared cake pan. Smooth the top with a spatula and bake in the preheated oven for 30-35 minutes, or until a toothpick inserted into the center comes out clean.
- Cool and frost: Allow the cake to cool in the pan for about 10 minutes before transferring it to a wire rack. Once completely cooled, prepare the frosting by beating together the butter, cream cheese, powdered sugar, and vanilla extract until smooth and fluffy. Spread the frosting evenly over the top and sides of the cake.
- Serve and enjoy: Slice the cake into pieces and serve. Enjoy this delightful dessert with a cup of tea or coffee.
Extra Tips:
To enhance the flavor of this Quick Carrot Cake, you can toast the walnuts before adding them to the batter; this brings out their natural oils and adds a deeper nutty flavor.
If you prefer a less sweet frosting, you can reduce the amount of powdered sugar according to your taste. Additionally, for an extra moist cake, consider adding a tablespoon of crushed pineapple to the batter.
Finally, make sure the cake is completely cooled before frosting to prevent the frosting from melting. Enjoy your baking!
Simple Banana Bread
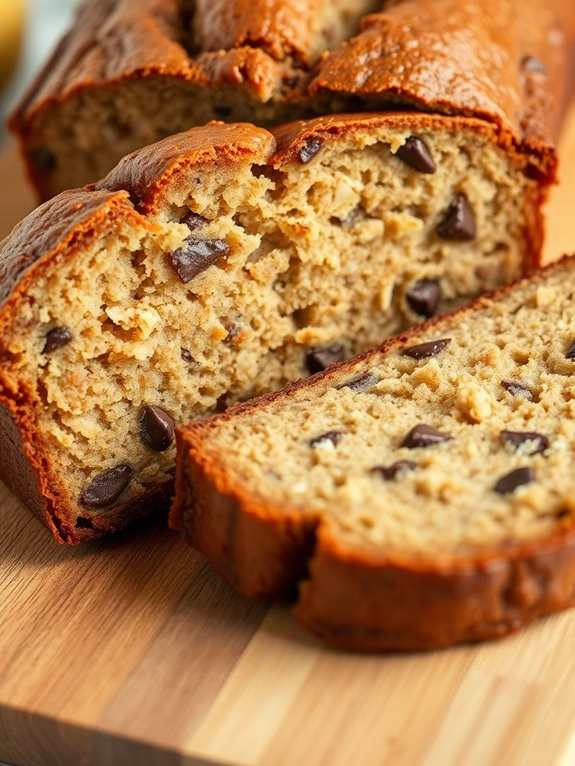
Simple Banana Bread****
Banana bread is a classic, comforting treat that’s both delicious and easy to make. This simple banana bread recipe is perfect for beginners and seasoned bakers alike. It requires minimal ingredients and just a few basic steps to create a moist, flavorful loaf that’s ideal for breakfast, a snack, or dessert.
The sweet aroma of bananas and vanilla wafting through your kitchen will make it hard to wait until it’s cooled enough to slice!
This recipe yields a loaf that serves 4 to 6 people, making it perfect for a family gathering or simply enjoying throughout the week. You can even customize it by adding nuts, chocolate chips, or dried fruits to suit your taste preferences. Whether you enjoy it plain or with a touch of butter, this banana bread is sure to become a staple in your baking repertoire.
Ingredients:
- 3 ripe bananas
- 1/3 cup melted butter
- 1 teaspoon baking soda
- Pinch of salt
- 3/4 cup sugar
- 1 large egg, beaten
- 1 teaspoon vanilla extract
- 1 1/2 cups all-purpose flour
Cooking Instructions:
- Preheat the Oven: Start by preheating your oven to 350°F (175°C). This guarantees that the oven is at the right temperature when you’re ready to bake, which is essential for even cooking.
- Prepare the Pan: Lightly grease a 4×8-inch loaf pan with butter or non-stick spray. This will help prevent the banana bread from sticking to the pan once baked.
- Mash the Bananas: In a mixing bowl, use a fork to mash the ripe bananas until smooth. Make sure there are no large lumps left, as this will affect the texture of the bread.
- Mix Wet Ingredients: Add the melted butter to the mashed bananas and stir well. Then, mix in the sugar, beaten egg, and vanilla extract until everything is well combined.
- Add Dry Ingredients: Sprinkle the baking soda and a pinch of salt over the banana mixture, and mix well. Gradually add the flour, stirring until the batter is smooth and there are no streaks of flour remaining.
- Pour into Pan: Pour the batter into the prepared loaf pan, using a spatula to spread it evenly.
- Bake: Place the pan in the preheated oven and bake for about 60 minutes, or until a toothpick inserted into the center of the loaf comes out clean.
- Cool and Serve: Once baked, remove the banana bread from the oven and let it cool in the pan for about 10 minutes. Then, transfer it to a wire rack to cool completely before slicing.
Extra Tips:
For the best results, use ripe bananas with plenty of brown spots as they’re sweeter and more flavorful. If your bananas aren’t ripe enough, you can speed up the ripening process by placing them in a brown paper bag for a day or two.
Additionally, consider adding a handful of your favorite mix-ins, such as chopped walnuts or chocolate chips, to add texture and extra flavor to your banana bread. Remember to store any leftovers in an airtight container at room temperature to keep the bread fresh for a few days.
Easy Pineapple Upside-Down
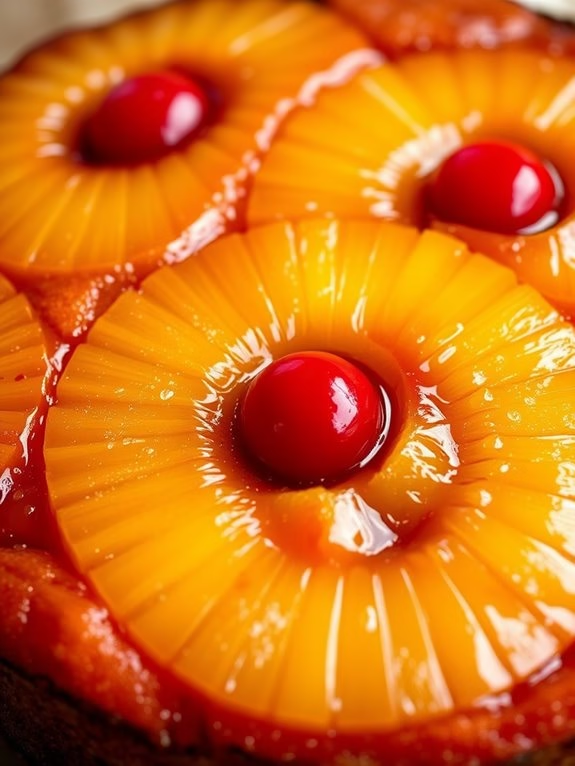
Easy Pineapple Upside-Down Cake
Pineapple Upside-Down Cake is a classic dessert that combines the sweet and tangy flavor of pineapple with a rich, buttery cake. This easy-to-make recipe will guide you through preparing a moist and delicious cake that’s certain to impress.
Perfect for a family gathering or a special occasion, this cake is visually stunning with caramelized pineapple rings and maraschino cherries adorning the top. The best part is that you can have this delightful treat ready in just over an hour!
This recipe serves 4-6 people, making it ideal for a small gathering or a weeknight treat. The ingredients are simple and likely already on hand in your pantry. With a few basic steps, you’ll be able to create an impressive dessert that’s as pleasing to the eye as it’s to the palate.
Ingredients
- 1/4 cup butter
- 2/3 cup packed brown sugar
- 1 can (20 oz) sliced pineapple in juice, drained, juice reserved
- 9 maraschino cherries without stems, drained
- 1 1/3 cups all-purpose flour
- 1 cup granulated sugar
- 1 1/2 teaspoons baking powder
- 1/2 teaspoon salt
- 1/3 cup butter, softened
- 3/4 cup milk
- 1 teaspoon vanilla extract
- 1 large egg
Cooking Instructions
1. Prepare the Topping: Preheat your oven to 350°F (175°C). In a 9-inch round cake pan, melt 1/4 cup of butter in the oven. Once melted, remove the pan from the oven and sprinkle 2/3 cup of packed brown sugar evenly over the melted butter.
2. Arrange the Pineapple and Cherries: Place the drained pineapple slices on top of the brown sugar mixture, making sure they’re evenly spaced. Place a maraschino cherry in the center of each pineapple slice and arrange additional cherries around the slices if desired.
3. Make the Cake Batter: In a medium bowl, mix 1 1/3 cups of all-purpose flour, 1 cup of granulated sugar, 1 1/2 teaspoons of baking powder, and 1/2 teaspoon of salt. Add 1/3 cup of softened butter, 3/4 cup of milk, 1 teaspoon of vanilla extract, and 1 large egg to the dry ingredients.
Beat with an electric mixer on low speed for 30 seconds, then on medium speed for 2 minutes, scraping the sides of the bowl occasionally.
4. Combine and Bake: Pour the batter over the arranged pineapple and cherries in the cake pan, spreading it evenly. Bake in the preheated oven for 40 to 45 minutes or until a toothpick inserted in the center comes out clean.
5. Cool and Invert the Cake: Allow the cake to cool in the pan for about 5 minutes. Run a knife around the edge of the pan to loosen the cake. Place a heatproof serving plate upside down on top of the pan and turn the plate and pan over.
Leave the pan over the cake for about 5 minutes so the brown sugar topping can drizzle over the cake.
6. Serve: Once the pan is removed, serve the cake warm or at room temperature. Enjoy your delicious creation!
Extra Tips
For best results, verify the butter is fully melted before adding the brown sugar to create a smooth caramel-like topping.
If you prefer a slightly more moist cake, you can add a couple of tablespoons of the reserved pineapple juice to the cake batter. Adjust the number of cherries based on your preferences for added sweetness and color.
This cake is also delicious with a dollop of whipped cream or a scoop of vanilla ice cream on the side.
Moist Coconut Cake
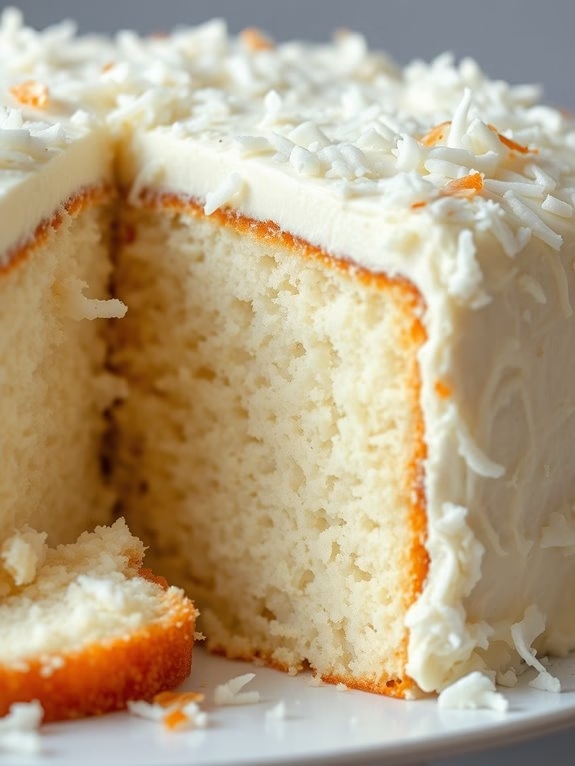
Moist Coconut Cake is a delightful dessert that brings the tropical flavor of coconut to your table in the form of a soft, fluffy cake. This recipe combines the fragrant aroma of coconut with a moist and tender crumb, making it a perfect treat for any occasion.
Whether you’re a fan of coconut or simply looking to try something new, this cake is bound to satisfy your sweet tooth. The rich coconut flavor is enhanced by a creamy coconut frosting that adds an extra layer of indulgence.
This cake is perfect for serving at parties, family gatherings, or simply enjoying as a sweet treat with your afternoon coffee. It serves 4-6 people, making it ideal for small gatherings or family desserts. With a few simple ingredients and straightforward instructions, you can whip up this delicious cake in no time.
Ingredients:
- 1 1/2 cups all-purpose flour
- 1 1/2 teaspoons baking powder
- 1/2 teaspoon baking soda
- 1/2 teaspoon salt
- 1/2 cup unsalted butter, softened
- 1 cup granulated sugar
- 2 large eggs
- 1 teaspoon vanilla extract
- 1 cup coconut milk
- 1 cup sweetened shredded coconut
For the Frosting:
- 1/2 cup unsalted butter, softened
- 3 cups powdered sugar
- 1/4 cup coconut milk
- 1 teaspoon vanilla extract
- 1 cup sweetened shredded coconut
Instructions:
- Preheat the Oven and Prepare the Pan: Preheat your oven to 350°F (175°C). Grease and flour a 9-inch round cake pan, then set it aside.
- Mix Dry Ingredients: In a medium bowl, whisk together the flour, baking powder, baking soda, and salt. This guarantees that the dry ingredients are evenly distributed throughout the batter.
- Cream Butter and Sugar: In a large bowl, beat the softened butter and granulated sugar with an electric mixer on medium speed until light and fluffy, about 3-4 minutes.
- Add Eggs and Vanilla: Beat in the eggs one at a time, making sure each is fully incorporated before adding the next. Mix in the vanilla extract.
- Combine Wet and Dry Ingredients: Gradually add the dry ingredients to the wet ingredients, alternating with the coconut milk. Start and end with the dry ingredients, mixing until just combined.
- Fold in Coconut: Gently fold in the shredded coconut with a spatula until evenly distributed throughout the batter.
- Bake the Cake: Pour the batter into the prepared cake pan and smooth the top with a spatula. Bake for 30-35 minutes, or until a toothpick inserted into the center of the cake comes out clean.
- Cool the Cake: Allow the cake to cool in the pan for 10 minutes, then transfer it to a wire rack to cool completely.
- Prepare the Frosting: In a medium bowl, beat the softened butter until creamy. Gradually add the powdered sugar, coconut milk, and vanilla extract, beating until smooth and fluffy.
- Frost the Cake: Once the cake is completely cool, spread the frosting evenly over the top and sides of the cake. Press the shredded coconut gently into the frosting for decoration.
Extra Tips:
To enhance the coconut flavor, you can toast the shredded coconut before adding it to the cake batter and as a topping. Simply spread the coconut on a baking sheet and bake at 350°F (175°C) for 5-7 minutes, stirring occasionally, until golden brown.
Be sure to watch it closely to prevent burning. Additionally, using coconut extract instead of vanilla extract can intensify the coconut taste. When frosting the cake, make sure it’s completely cooled to avoid melting the frosting.
Enjoy your Moist Coconut Cake with a scoop of vanilla ice cream for an added touch of indulgence!
No-Bake Cheesecake
No-Bake Cheesecake
Indulge in the creamy, luscious delight of a No-Bake Cheesecake, an effortless dessert that requires no oven time and is perfect for any occasion. This recipe is ideal for those who love the rich flavor of traditional cheesecake but are looking for a simpler, quicker method.
With a buttery graham cracker crust and a smooth, velvety cream cheese filling, this cheesecake will satisfy your sweet tooth without the fuss of baking.
This No-Bake Cheesecake serves 4-6 people and is perfect for a dinner party or family gathering. It’s a versatile dessert that can be topped with your favorite fruits, chocolate shavings, or a drizzle of caramel sauce to make it even more special.
This easy recipe requires only a few simple ingredients and can be prepared in advance, making it a convenient option for any occasion.
Ingredients:
- 1 1/2 cups graham cracker crumbs
- 1/4 cup granulated sugar
- 1/2 cup unsalted butter, melted
- 16 oz cream cheese, softened
- 1 cup powdered sugar
- 1 teaspoon vanilla extract
- 1 cup heavy whipping cream
- Optional toppings: fresh fruit, chocolate sauce, caramel sauce
Instructions:
- Prepare the Crust: In a medium-sized bowl, combine the graham cracker crumbs and granulated sugar. Pour in the melted butter and mix until the crumbs are evenly coated and the mixture resembles wet sand.
- Form the Crust: Press the graham cracker mixture firmly into the bottom of a 9-inch springform pan, creating an even layer. Use the back of a spoon or the bottom of a glass to compact the crust. Place in the refrigerator to chill while you prepare the filling.
- Make the Filling: In a large mixing bowl, beat the softened cream cheese with an electric mixer until smooth and creamy. Gradually add the powdered sugar and continue to beat until fully combined. Stir in the vanilla extract.
- Whip the Cream: In a separate bowl, whip the heavy cream until stiff peaks form. Gently fold the whipped cream into the cream cheese mixture using a spatula, being careful not to deflate the cream.
- Assemble the Cheesecake: Spoon the cream cheese filling over the prepared crust, spreading it evenly with a spatula. Smooth the top with the back of a spoon.
- Chill: Cover the cheesecake with plastic wrap and refrigerate for at least 4 hours, or until the filling is set. For best results, chill it overnight.
- Serve: Before serving, remove the cheesecake from the springform pan and transfer it to a serving plate. Add any desired toppings, such as fresh fruit or sauces, just before serving.
Extra Tips:
To guarantee the cheesecake sets properly, make sure to use full-fat cream cheese and allow it to soften at room temperature before mixing. This will help achieve a smooth, creamy texture.
For a more stable filling, chill the mixing bowl and beaters before whipping the heavy cream. If you want to experiment with flavors, consider adding lemon zest for a citrusy twist or a tablespoon of instant coffee for a mocha-flavored cheesecake.
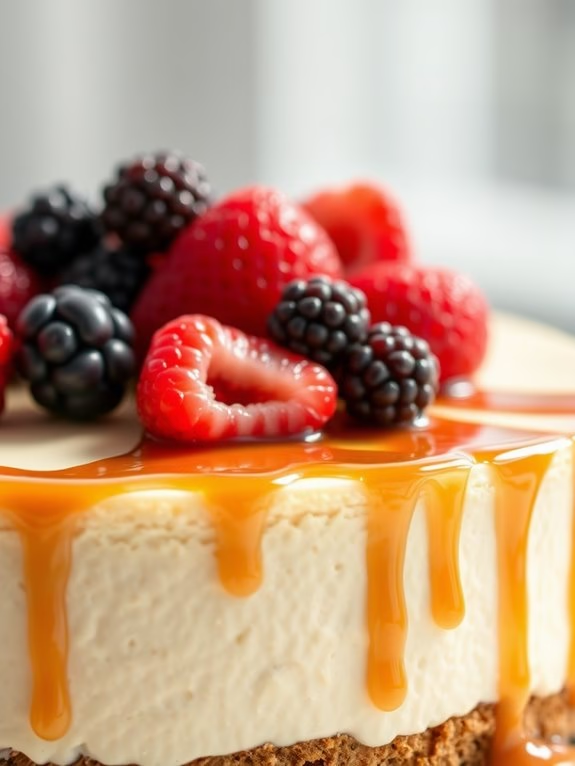
Berry Burst Cake
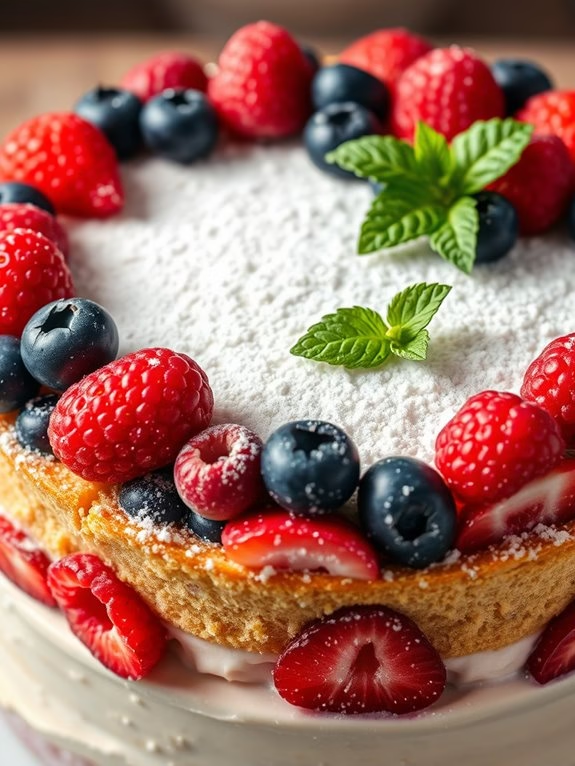
Berry Burst Cake is a delightful dessert that combines the tangy freshness of berries with a moist and tender cake. Perfect for any occasion, this cake brings a burst of flavor with every bite, making it a favorite among berry lovers.
With a simple yet elegant presentation, it’s an ideal option for both casual gatherings and formal events, leaving your guests impressed and satisfied.
This recipe is designed to serve 4-6 people, making it perfect for a family dinner or a small party. The combination of blueberries, raspberries, and strawberries creates a vibrant and colorful look, while the light vanilla sponge cake provides the perfect canvas for the fruits to shine.
Follow this easy recipe to create your own Berry Burst Cake and indulge in its fruity goodness.
Ingredients:
- 1 cup all-purpose flour
- 1 teaspoon baking powder
- 1/2 teaspoon baking soda
- 1/4 teaspoon salt
- 1/2 cup unsalted butter, softened
- 1 cup granulated sugar
- 2 large eggs
- 1 teaspoon vanilla extract
- 1/2 cup buttermilk
- 1/2 cup blueberries
- 1/2 cup raspberries
- 1/2 cup diced strawberries
- Powdered sugar (for dusting)
- Fresh mint leaves (optional, for garnish)
Instructions:
- Preheat the Oven: Begin by preheating your oven to 350°F (175°C). Grease a 9-inch round cake pan and line the bottom with parchment paper to prevent sticking.
- Mix the Dry Ingredients: In a medium bowl, whisk together the flour, baking powder, baking soda, and salt. Set this mixture aside for later use.
- Cream Butter and Sugar: In a large mixing bowl, beat the softened butter and granulated sugar together using an electric mixer until light and fluffy, about 3-4 minutes.
- Add Eggs and Vanilla: Add the eggs one at a time to the butter mixture, beating well after each addition. Stir in the vanilla extract.
- Combine Wet and Dry Ingredients: Gradually add the dry ingredient mixture to the butter mixture, alternating with the buttermilk. Begin and end with the flour mixture, mixing just until combined.
- Fold in Berries: Gently fold in the blueberries, raspberries, and diced strawberries into the batter, making sure they’re evenly distributed.
- Bake the Cake: Pour the batter into the prepared cake pan. Smooth the top with a spatula and bake in the preheated oven for 25-30 minutes, or until a toothpick inserted into the center comes out clean.
- Cool and Serve: Allow the cake to cool in the pan for 10 minutes before transferring it to a wire rack to cool completely. Once cooled, dust with powdered sugar and garnish with fresh mint leaves if desired.
Extra Tips:
For the best results, use fresh berries when they’re in season to guarantee maximum flavor and juiciness. If fresh berries aren’t available, frozen berries can be used, but be sure to thaw and drain them well to prevent excess moisture in the cake.
Additionally, to enhance the presentation, consider adding a dollop of whipped cream or a scoop of vanilla ice cream on the side when serving. Enjoy your Berry Burst Cake fresh for the best taste, but it can be stored in an airtight container for up to two days.
Almond Flour Cake
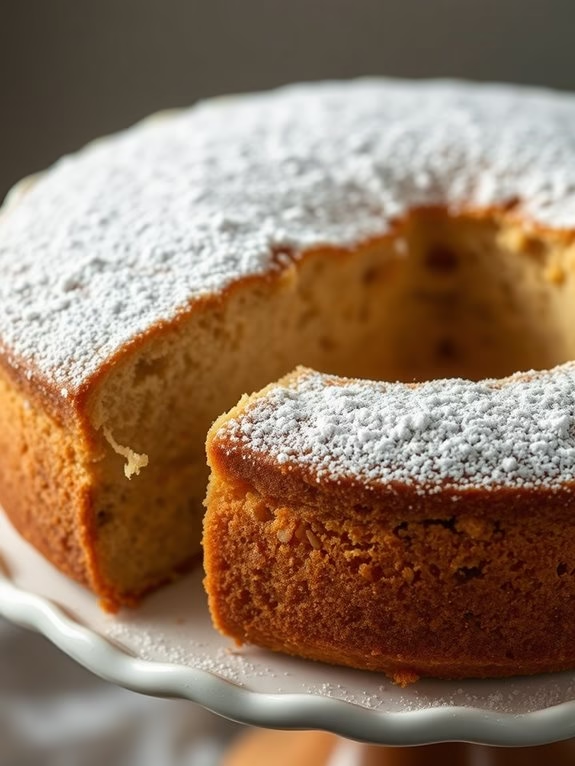
Almond Flour Cake
Almond Flour Cake is a delightful dessert that combines the subtle nutty taste of almond flour with the sweetness of sugar and the richness of butter. This cake isn’t just gluten-free but also incredibly moist and flavorful, making it an excellent choice for any occasion.
Whether you’re catering to a family gathering or simply treating yourself, this cake is sure to satisfy your sweet tooth while offering a unique texture that sets it apart from traditional flour-based cakes.
Perfect for serving 4-6 people, this cake is both simple to prepare and adaptable to variations such as adding fruits or chocolate chips. The use of almond flour not only provides a healthier alternative to regular flour but also enhances the overall taste profile.
With a handful of basic ingredients and straightforward steps, you’ll have this delicious cake ready in no time, leaving you more time to enjoy it with your loved ones.
Ingredients:
- 2 cups almond flour
- 1/2 cup granulated sugar
- 1/4 cup unsalted butter, softened
- 3 large eggs
- 1 teaspoon vanilla extract
- 1/2 teaspoon baking powder
- 1/4 teaspoon salt
- Powdered sugar for dusting (optional)
Instructions:
- Preheat the Oven: Begin by preheating your oven to 350°F (175°C). This guarantees that your cake bakes evenly and develops a nice golden brown crust.
- Prepare the Cake Pan: Lightly grease a 9-inch round cake pan with butter or non-stick spray, and line the bottom with parchment paper. This will help prevent the cake from sticking and make it easier to remove once baked.
- Mix Dry Ingredients: In a medium-sized bowl, combine the almond flour, baking powder, and salt. Stir them together to evenly distribute the baking powder and salt throughout the almond flour.
- Cream Butter and Sugar: In a separate large bowl, beat the softened butter and granulated sugar together using an electric mixer on medium speed until light and fluffy, about 3-4 minutes.
- Add Eggs and Vanilla: Add the eggs, one at a time, to the butter-sugar mixture, beating well after each addition. Then, mix in the vanilla extract until fully incorporated.
- Combine Wet and Dry Ingredients: Gradually add the dry ingredients to the wet mixture, folding gently with a spatula until just combined. Be careful not to overmix, as this can affect the cake’s texture.
- Pour Batter into Pan: Pour the batter into the prepared cake pan and spread it evenly with a spatula to guarantee an even bake.
- Bake the Cake: Place the cake in the preheated oven and bake for 25-30 minutes, or until a toothpick inserted into the center comes out clean. The top should be a light golden brown.
- Cool and Serve: Allow the cake to cool in the pan for about 10 minutes before transferring it to a wire rack to cool completely. Once cooled, dust with powdered sugar if desired before serving.
Extra Tips:
For an added flavor boost, consider incorporating a teaspoon of almond extract alongside the vanilla. If you prefer a fruit-infused cake, gently fold in a cup of fresh berries into the batter before baking.
Remember to not rush the creaming process of the butter and sugar; this step is vital for a light and airy cake texture. If your almond flour is clumpy, sift it before mixing to guarantee a smooth batter.
Coffee Walnut Cake

Coffee Walnut Cake is a delightful treat that combines the rich flavors of coffee with the nutty taste of walnuts. This cake is perfect for an afternoon tea or as a dessert to impress your friends and family. The texture is moist and fluffy, while the aroma of coffee makes it irresistible. With a creamy coffee-flavored frosting, this cake is bound to become a favorite for any coffee lover.
Ideal for serving 4-6 people, this Coffee Walnut Cake recipe is both simple and satisfying. To make this cake, you’ll need a few basic ingredients, and the process is straightforward enough for novice bakers. The combination of ground walnuts in the batter adds a delicious crunch and enhances the cake’s flavor. Topped with a luscious coffee buttercream, this cake is a perfect balance of sweetness and coffee bitterness.
Ingredients:
- 1 cup unsalted butter, softened
- 1 cup granulated sugar
- 2 large eggs
- 2 tablespoons instant coffee granules
- 2 tablespoons hot water
- 1 ½ cups all-purpose flour
- 1 teaspoon baking powder
- ¼ teaspoon salt
- ½ cup walnuts, finely chopped
- ¼ cup milk
For the Frosting:
- ½ cup unsalted butter, softened
- 1 ½ cups powdered sugar
- 1 tablespoon instant coffee granules
- 1 tablespoon hot water
- ½ cup walnuts, roughly chopped (for decoration)
Cooking Instructions:
- Preheat the Oven: Begin by preheating your oven to 350°F (175°C). Grease and line two 8-inch round cake pans with parchment paper.
- Mix Coffee and Water: In a small bowl, dissolve the 2 tablespoons of instant coffee granules in 2 tablespoons of hot water. Stir until completely dissolved and set aside to cool.
- Cream Butter and Sugar: In a large mixing bowl, cream together the softened butter and granulated sugar until light and fluffy. This should take about 3-4 minutes using an electric mixer.
- Add Eggs and Coffee: Gradually add the eggs to the butter mixture, one at a time, beating well after each addition. Then, add the cooled coffee mixture and mix until well combined.
- Combine Dry Ingredients: In another bowl, sift together the flour, baking powder, and salt. Gently fold the dry ingredients into the wet mixture, alternating with the milk, until just combined. Avoid over-mixing.
- Add Walnuts: Gently fold in the finely chopped walnuts until evenly distributed throughout the batter.
- Bake the Cake: Divide the batter evenly between the prepared cake pans and smooth the tops. Bake for 25-30 minutes, or until a toothpick inserted into the center comes out clean. Allow the cakes to cool in the pans for 10 minutes, then transfer to a wire rack to cool completely.
- Prepare the Frosting: For the frosting, dissolve 1 tablespoon of instant coffee granules in 1 tablespoon of hot water. In a bowl, beat the softened butter until smooth, then gradually add the powdered sugar and coffee mixture. Beat until the frosting is light and fluffy.
- Assemble the Cake: Place one cake layer on a serving plate and spread a layer of frosting over the top. Place the second cake layer on top and frost the top and sides of the cake. Decorate with roughly chopped walnuts.
Extra Tips:
To guarantee your Coffee Walnut Cake is perfectly moist, be careful not to over-bake it. Check the cake after 25 minutes and use a toothpick to test for doneness.
Also, make sure the coffee you use is of good quality, as it greatly impacts the flavor of the cake. If you prefer a stronger coffee taste, you can increase the coffee granules slightly.
For an added touch, drizzle some melted chocolate over the top of the cake before serving.
Funfetti Celebration Cake
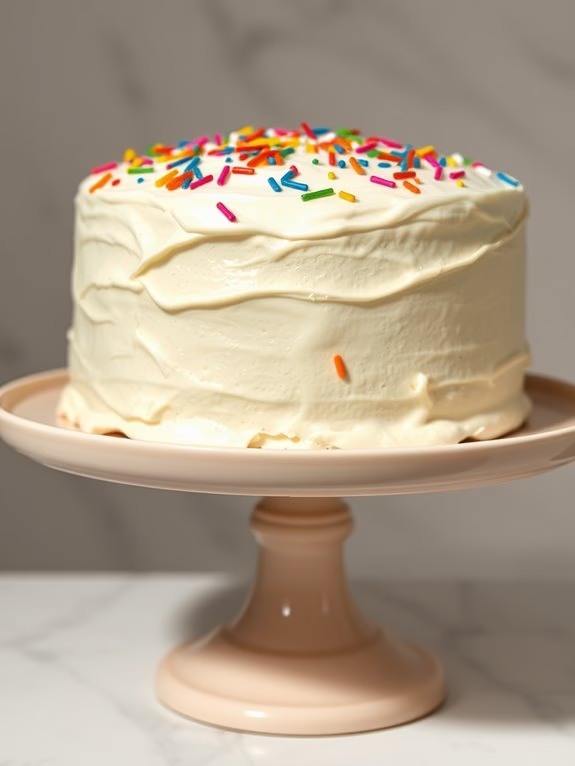
Funfetti Celebration Cake
There’s nothing quite like a Funfetti Celebration Cake to bring joy to any occasion. With its vibrant sprinkles and delightful vanilla flavor, this cake is sure to be a hit among both kids and adults. Whether you’re celebrating a birthday, an anniversary, or just want to add some cheer to your day, this cake’s colorful appearance and fluffy texture make it the perfect choice.
It’s easy to make and even more fun to eat! This recipe will guide you through making a Funfetti Celebration Cake that serves 4-6 people. The cake is made with a simple vanilla batter that’s speckled with rainbow sprinkles, guaranteeing that each slice is bursting with color. Topped with a creamy vanilla buttercream frosting, this cake is a deliciously festive treat.
Gather your ingredients, preheat your oven, and let’s get ready to bake a cake that’s as fun as it’s tasty!
Ingredients:
- 1 ½ cups all-purpose flour
- 1 cup granulated sugar
- ½ cup unsalted butter, softened
- ½ cup milk
- 2 large eggs
- 1 ½ teaspoons baking powder
- ½ teaspoon vanilla extract
- ¼ teaspoon salt
- ½ cup rainbow sprinkles
For the frosting:
- 1 cup unsalted butter, softened
- 3 cups powdered sugar
- 2 teaspoons vanilla extract
- 2-3 tablespoons milk
- Extra rainbow sprinkles for decoration
Cooking Instructions:
- Preheat the Oven: Begin by preheating your oven to 350°F (175°C). Grease and flour a 9-inch round cake pan, or line it with parchment paper to prevent sticking.
- Prepare the Batter: In a large bowl, cream together the softened butter and granulated sugar until light and fluffy. This should take about 3-4 minutes with an electric mixer. Add the eggs one at a time, mixing well after each addition. Stir in the vanilla extract.
- Mix Dry Ingredients: In a separate bowl, whisk together the flour, baking powder, and salt. Gradually add the dry ingredients to the wet ingredients, alternating with the milk, starting and ending with the flour mixture. Mix until just combined.
- Add Sprinkles: Gently fold in the rainbow sprinkles with a spatula, being careful not to overmix as this can cause the sprinkles to bleed their color into the batter.
- Bake the Cake: Pour the batter into the prepared cake pan and smooth the top with a spatula. Bake in the preheated oven for 25-30 minutes, or until a toothpick inserted into the center comes out clean. Let the cake cool in the pan for about 10 minutes, then transfer to a wire rack to cool completely.
- Make the Frosting: While the cake cools, prepare the frosting. In a bowl, beat the softened butter until creamy. Gradually add the powdered sugar, mixing well after each addition. Stir in the vanilla extract and 2 tablespoons of milk. If the frosting is too thick, add an additional tablespoon of milk to reach your desired consistency.
- Frost the Cake: Once the cake is completely cooled, spread the frosting evenly over the top and sides of the cake using a spatula. Decorate with extra rainbow sprinkles on top for a festive finish.
Extra Tips:
When making the Funfetti Celebration Cake, it’s important to use room-temperature ingredients for a smoother batter and better mixing.
Be cautious not to overmix once you’ve added the sprinkles, as they can lose their vibrant colors if overworked. If you’re short on time, the cake can be baked a day in advance and stored, unfrosted, in an airtight container.
Frosting the cake just before serving will guarantee it’s fresh and delicious. Enjoy your colorful creation!