
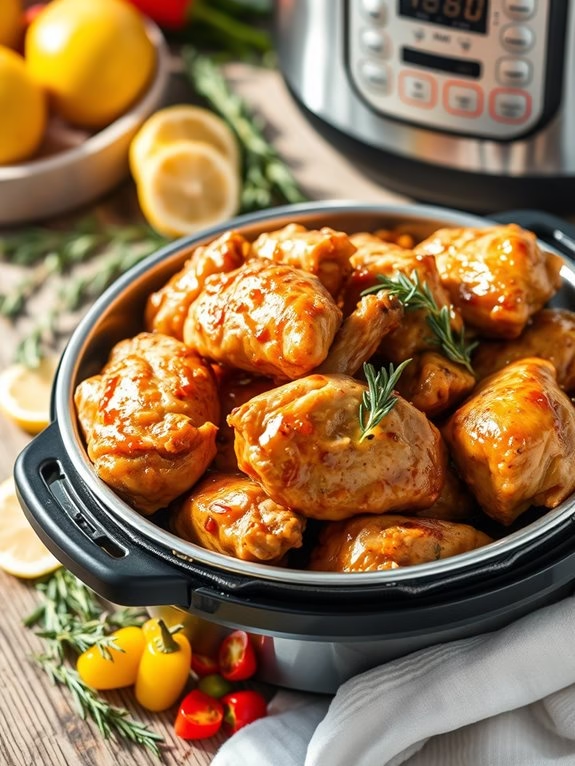
I’ve found a collection of Instant Pot chicken recipes that will make your weeknight dinners a breeze and packed with flavor.
From creamy Chicken Alfredo to zesty Lemon Garlic Chicken, these dishes can be ready in no time.
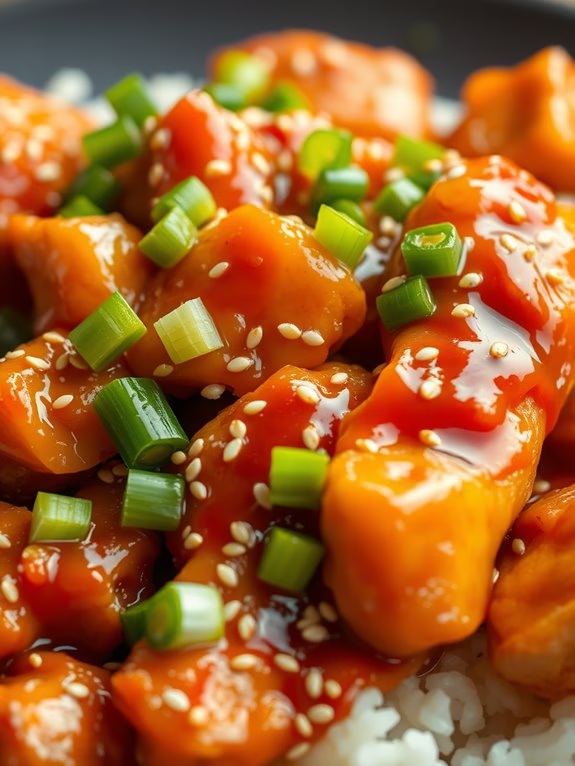
Each recipe, whether it’s spicy Buffalo Chicken or savory Teriyaki Chicken Bowls, promises easy cleanup and delicious taste.
Plus, they’re flexible enough for any dietary needs with room for marination and ingredient tweaks.
Ready to make mealtime simpler and tastier? Let’s get cooking!
Classic Chicken and Rice

Cooking a delicious and comforting meal doesn’t have to be a time-consuming task, thanks to the Instant Pot. One of the most beloved dishes that you can effortlessly whip up is Classic Chicken and Rice. This one-pot meal isn’t only quick to prepare but also packed with flavors that make it a family favorite.
The chicken turns out tender and juicy, while the rice absorbs all the rich and savory flavors, creating a delightful harmony. Perfect for a weeknight dinner or a cozy family gathering, this dish is sure to please everyone at the table.
Using the Instant Pot for this recipe means you can achieve all the depth and warmth of a traditional chicken and rice dish in a fraction of the time. The pressure cooking process infuses the rice with the essence of chicken, herbs, and spices, while maintaining the integrity and moistness of the chicken pieces.
Plus, with minimal cleanup required, you can spend more time enjoying your meal and less time worrying about the aftermath in the kitchen. Let’s explore making this comforting classic with ease.
Ingredients (Serves 4-6):
- 2 tablespoons olive oil
- 1 medium onion, chopped
- 2 garlic cloves, minced
- 1 ½ pounds boneless, skinless chicken thighs
- 1 teaspoon salt
- ½ teaspoon black pepper
- 1 teaspoon paprika
- 1 teaspoon dried thyme
- 1 cup long-grain white rice
- 2 cups chicken broth
- 1 cup frozen peas
- 1 carrot, diced
- ½ cup chopped fresh parsley
- Lemon wedges for serving (optional)
Cooking Instructions:
- Sauté the Aromatics: Set your Instant Pot to the ‘Sauté’ function and add the olive oil. Once the oil is hot, add the chopped onion and minced garlic. Sauté for about 2-3 minutes until the onion becomes translucent and fragrant.
- Brown the Chicken: Season the chicken thighs with salt, black pepper, paprika, and dried thyme. Add them to the pot and brown each side for about 2-3 minutes. This step is essential for locking in the flavors.
- Add Rice and Broth: Cancel the ‘Sauté’ function. Add the rice, chicken broth, diced carrot, and frozen peas to the pot. Stir everything together, making sure the rice is submerged in the liquid.
- Pressure Cook: Secure the Instant Pot lid and verify the valve is set to ‘Sealing’. Select ‘Pressure Cook’ or ‘Manual’ on high pressure and set the timer for 8 minutes.
- Release Pressure: Once the cooking cycle is complete, let the pressure release naturally for 10 minutes, then carefully quick release any remaining pressure by turning the valve to ‘Venting’.
- Finish the Dish: Open the lid and gently fluff the rice with a fork. Stir in the chopped parsley for freshness. Taste and adjust seasoning if necessary.
- Serve: Serve the chicken and rice hot, garnished with lemon wedges for an added burst of flavor if desired.
Extra Tips:
For this recipe, you can substitute boneless, skinless chicken breasts for thighs if you prefer. Just be mindful of the cooking time as chicken breasts might cook slightly faster.
If you’re looking to add more vegetables, consider incorporating bell peppers or mushrooms, which pair beautifully with the flavors in this dish.
To make the meal even more nutritious, you can opt to use brown rice, but remember to adjust the cooking time as brown rice generally requires a longer cooking period in the Instant Pot.
Enjoy your meal with a fresh side salad or steamed vegetables for a complete, wholesome dinner.
Spicy Buffalo Chicken
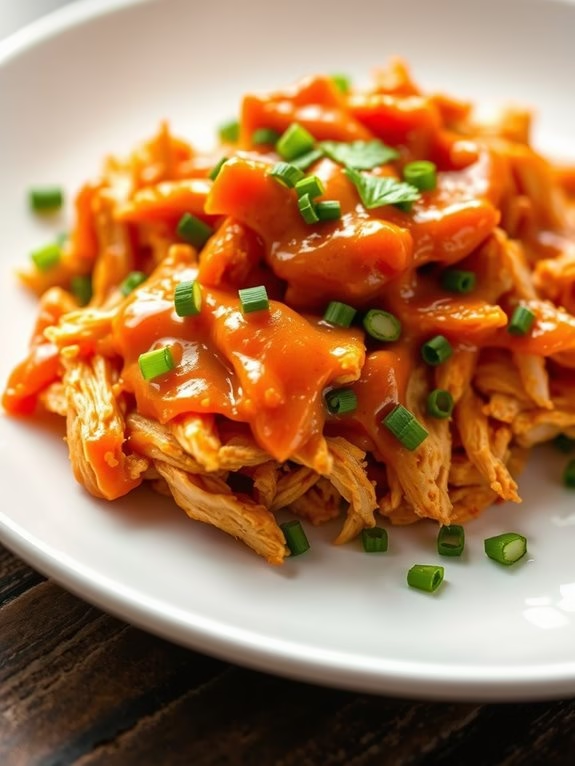
The Instant Pot is a game-changer when it comes to making quick and flavorful meals, and Spicy Buffalo Chicken is no exception. This dish combines the rich, tangy flavors of buffalo sauce with tender, juicy chicken, creating a meal that’s perfect for weeknight dinners or game-day gatherings.
The beauty of using an Instant Pot is that it cuts down the cooking time considerably while locking in all the flavors, ensuring that every bite is packed with deliciousness.
Whether you’re serving it as a main course with sides like celery sticks and carrot slices or using it as a filling for sandwiches and wraps, Spicy Buffalo Chicken is a versatile dish that caters to different preferences. The recipe serves 4-6 people, making it ideal for family meals or small parties. With just a few steps, you can have a mouthwatering dish ready in no time, all thanks to the efficiency of the Instant Pot.
Ingredients for 4-6 Servings:
- 2 pounds of boneless, skinless chicken breasts
- 1 cup of buffalo sauce
- 1/2 cup of chicken broth
- 1 tablespoon of unsalted butter
- 1 teaspoon of garlic powder
- 1 teaspoon of onion powder
- 1/2 teaspoon of paprika
- 1/2 teaspoon of salt
- 1/4 teaspoon of black pepper
- Optional: chopped green onions or parsley for garnish
Cooking Instructions:
- Prepare the Chicken: Begin by patting the chicken breasts dry with paper towels. This will help the spices adhere better. Season the chicken breasts with garlic powder, onion powder, paprika, salt, and black pepper on both sides.
- Set Up the Instant Pot: Select the sauté setting on the Instant Pot and add the butter. Once the butter has melted, add the seasoned chicken breasts and sear them for about 2-3 minutes on each side until they’re lightly browned. This step helps to seal in the flavors.
- Add Liquid Ingredients: Cancel the sauté setting and pour the chicken broth into the pot, ensuring you scrape off any brown bits from the bottom. This step is essential to prevent the “Burn” notice. Then, add the buffalo sauce over the chicken breasts.
- Pressure Cook: Secure the lid of the Instant Pot and set the valve to the sealing position. Select the Pressure Cook (Manual) setting and adjust the timer to 10 minutes. Once the cooking cycle is complete, allow the pressure to naturally release for 5 minutes before performing a quick release for any remaining pressure.
- Shred and Serve: Carefully open the Instant Pot lid. Use two forks to shred the chicken directly in the pot, mixing it well with the sauce. Taste and adjust seasoning if necessary. Garnish with chopped green onions or parsley if desired, and serve hot.
Extra Tips:
For a creamier version of this dish, consider adding a few tablespoons of cream cheese or ranch dressing to the sauce after shredding the chicken. This not only adds richness but also balances the heat from the buffalo sauce.
If you prefer a milder flavor, you can reduce the amount of buffalo sauce or choose a milder version. This dish pairs well with blue cheese dressing on the side for dipping, and it can also be served in lettuce wraps for a low-carb option.
Creamy Chicken Alfredo

Creamy Chicken Alfredo is a classic Italian-American dish that combines tender chicken with a rich and creamy Alfredo sauce, served over a bed of pasta. This dish is perfect for a comforting family dinner or a special occasion meal. The Instant Pot makes this recipe even more convenient by reducing cooking time and infusing the flavors seamlessly, allowing you to enjoy a delicious homemade meal without spending hours in the kitchen.
Using an Instant Pot to prepare Creamy Chicken Alfredo not only speeds up the cooking process but also guarantees the chicken is tender and juicy. The pressure cooking method helps to lock in flavors, making the dish exceptionally tasty. The creamy sauce is made with a blend of Parmesan cheese and heavy cream, resulting in a luscious texture that coats the pasta beautifully. With simple ingredients and easy steps, this dish is sure to become a favorite in your household.
Ingredients (Serves 4-6):
- 1.5 pounds of boneless, skinless chicken breasts
- 2 tablespoons olive oil
- 1 teaspoon salt
- 1/2 teaspoon black pepper
- 4 cloves garlic, minced
- 2 cups chicken broth
- 1 cup heavy cream
- 8 ounces fettuccine pasta
- 1 cup grated Parmesan cheese
- 2 tablespoons chopped fresh parsley (optional)
Cooking Instructions:
- Prepare the Chicken: Start by seasoning the chicken breasts with salt and black pepper on both sides.
- Sauté the Chicken: Set your Instant Pot to the ‘Sauté’ function. Add the olive oil and let it heat up for about a minute. Place the chicken breasts in the pot and brown them for 2-3 minutes on each side. Remove the chicken and set it aside.
- Sauté the Garlic: Add the minced garlic to the pot and sauté it for about 30 seconds until fragrant. Be careful not to let it burn.
- Add the Liquid: Pour in the chicken broth and use a wooden spoon to scrape any browned bits from the bottom of the pot. This adds flavor to the sauce.
- Cook the Pasta and Chicken: Break the fettuccine in half and add it to the pot, followed by the browned chicken breasts. Confirm the pasta is submerged in the liquid. Close the lid, set the Instant Pot to ‘Manual’ or ‘Pressure Cook’ on high for 7 minutes.
- Release Pressure: Once the cooking cycle is complete, perform a quick release of the pressure. Open the lid carefully.
- Thicken the Sauce: Remove the chicken breasts from the pot and slice them into strips. Set the Instant Pot back to ‘Sauté’ and stir in the heavy cream and Parmesan cheese. Stir continuously for about 3-5 minutes until the sauce thickens.
- Combine and Serve: Add the sliced chicken back into the pot and mix everything together until the chicken is well coated with the sauce. Serve the Creamy Chicken Alfredo garnished with chopped fresh parsley if desired.
Extra Tips:
For a lighter version of this dish, you can substitute half-and-half for the heavy cream, although this may affect the creaminess of the sauce.
It’s important to use freshly grated Parmesan cheese, as pre-shredded cheese may not melt as smoothly.
If you find the sauce too thick, you can add a splash of reserved pasta water to reach your desired consistency.
Finally, always verify the pasta is fully submerged in the broth before cooking to prevent any undercooked pasta.
Enjoy your deliciously creamy Instant Pot Chicken Alfredo!
Lemon Garlic Chicken

Lemon Garlic Chicken is a delightful dish that blends the zesty brightness of lemon with the savory aroma of garlic, creating a meal that’s both invigorating and comforting. This recipe utilizes the Instant Pot to guarantee the chicken is perfectly cooked and infused with flavor in a fraction of the time it would take using traditional methods.
Perfect for a weeknight dinner or a special gathering, this dish pairs wonderfully with a side of vegetables or a fresh salad.
When cooked in an Instant Pot, the chicken remains juicy and tender, while the lemon and garlic create a luscious sauce that coats each piece. This recipe is designed to serve between 4 to 6 people, making it ideal for families or small dinner parties.
Let’s explore the ingredients and steps needed to create this delicious meal.
Ingredients:
- 4-6 boneless, skinless chicken breasts
- 2 tablespoons olive oil
- Salt and pepper to taste
- 1 teaspoon dried oregano
- 1 teaspoon dried thyme
- 6 cloves garlic, minced
- 1 cup chicken broth
- 1/2 cup freshly squeezed lemon juice (approximately 2 lemons)
- 1 lemon, sliced
- 2 tablespoons butter
- 2 tablespoons fresh parsley, chopped (optional for garnish)
Cooking Instructions:
- Prepare the Chicken: Season the chicken breasts on both sides with salt, pepper, oregano, and thyme.
- Sauté the Garlic: Set the Instant Pot to the “Sauté” setting and add olive oil. Once the oil is hot, add the minced garlic and sauté for about 1 minute until fragrant.
- Brown the Chicken: Add the seasoned chicken breasts to the pot, browning each side for about 2-3 minutes. This step helps lock in the flavors and gives the chicken a golden color. You may need to do this in batches if your pot isn’t large enough.
- Add the Liquid Ingredients: Pour in the chicken broth and lemon juice. Use a wooden spoon to scrape up any browned bits from the bottom of the pot to enhance the flavor.
- Pressure Cook: Place lemon slices on top of the chicken. Secure the lid on the Instant Pot and set the valve to the “Sealing” position. Select the “Pressure Cook” or “Manual” setting and set the timer for 10 minutes.
- Natural Release: Once the cooking cycle is complete, allow the pressure to release naturally for 10 minutes before carefully turning the valve to the “Venting” position for a quick release of any remaining pressure.
- Finish the Sauce: Open the lid and remove the chicken breasts. Switch the pot back to the “Sauté” setting and add butter to the sauce. Stir until the butter is melted and the sauce is slightly thickened. Return the chicken to the pot, spooning the sauce over it.
- Garnish and Serve: Transfer the chicken to a serving platter, drizzle with the sauce, and garnish with fresh parsley if desired.
Extra Tips:
For an even richer flavor, consider marinating the chicken in the lemon juice, garlic, oregano, and thyme for about 30 minutes before cooking.
If you prefer a thicker sauce, you can mix a teaspoon of cornstarch with a tablespoon of water and stir it into the sauce while it simmers after pressure cooking.
Additionally, this dish pairs beautifully with a side of steamed asparagus or roasted potatoes for a complete meal.
Teriyaki Chicken Bowls
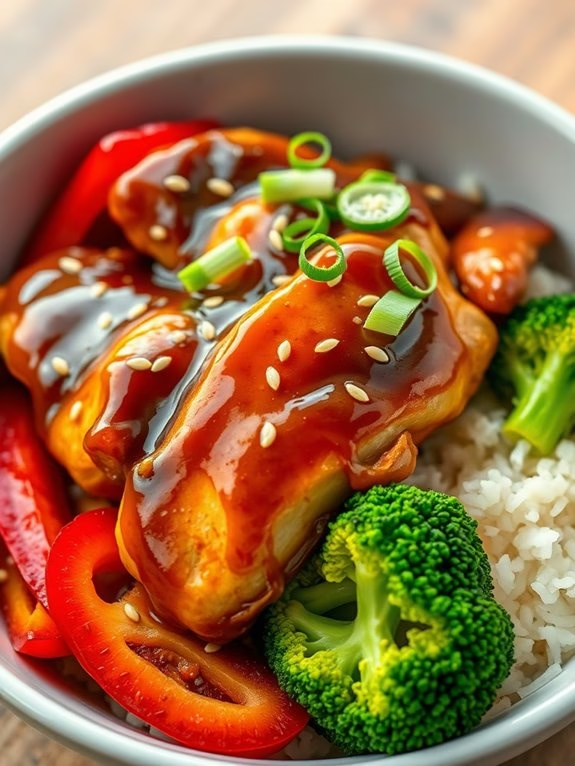
Teriyaki Chicken Bowls are a delicious and satisfying meal that you can easily prepare using your Instant Pot. This dish combines tender, juicy chicken with a savory teriyaki sauce, served over a bed of steamed rice and accompanied by colorful vegetables.
It’s a perfect option for a quick weeknight dinner or a meal prep solution that will keep you satisfied throughout the week. The magic of the Instant Pot guarantees that you get a perfectly cooked dish in a fraction of the time it would normally take.
This recipe is designed to serve 4-6 people, making it an ideal choice for family dinners or small gatherings. The Instant Pot greatly reduces the cooking time, allowing you to enjoy this flavorful dish without spending hours in the kitchen.
Whether you’re a seasoned cook or new to using an Instant Pot, this Teriyaki Chicken Bowls recipe is straightforward and guaranteed to impress.
Ingredients (Serving Size: 4-6 people):
- 1 ½ pounds of boneless, skinless chicken thighs
- 1 cup low-sodium soy sauce
- 1/2 cup water
- 1/4 cup rice vinegar
- 1/4 cup honey
- 1/4 cup brown sugar
- 2 tablespoons grated fresh ginger
- 3 cloves garlic, minced
- 2 tablespoons cornstarch
- 2 tablespoons water
- 2 cups jasmine rice
- 3 cups water (for rice)
- 2 cups broccoli florets
- 1 red bell pepper, sliced
- 1 tablespoon sesame seeds
- 2 green onions, sliced
Cooking Instructions:
- Prepare the Chicken: Cut the chicken thighs into bite-sized pieces. This allows the chicken to cook evenly and soak up more of the teriyaki flavors.
- Make the Sauce: In a bowl, mix the soy sauce, 1/2 cup of water, rice vinegar, honey, brown sugar, grated ginger, and minced garlic. Stir until the honey and sugar dissolve.
- Cook the Chicken in the Instant Pot: Add the chicken pieces and the sauce mixture to the Instant Pot. Seal the lid and set the valve to the sealing position. Select the ‘Poultry’ or ‘Manual’ setting and set the timer for 10 minutes.
- Prepare the Rice: While the chicken is cooking, rinse the jasmine rice under cold water until the water runs clear. Combine the rice and 3 cups of water in a separate pot and cook according to the package instructions or until the rice is fluffy.
- Release Pressure: Once the chicken is done, allow the pressure to release naturally for 5 minutes, then perform a quick release. Carefully remove the lid once all the pressure has been released.
- Thicken the Sauce: Set the Instant Pot to ‘Sauté’ mode. In a small bowl, mix the cornstarch and 2 tablespoons of water to create a slurry. Stir the slurry into the chicken and sauce mixture in the Instant Pot, and cook for 2-3 minutes until the sauce thickens.
- Steam the Vegetables: Add the broccoli florets and red bell pepper slices to the Instant Pot, stirring to combine. Cook for an additional 3-4 minutes until the vegetables are tender-crisp.
- Assemble the Bowls: Serve the teriyaki chicken and vegetables over the cooked jasmine rice. Sprinkle with sesame seeds and sliced green onions for garnish.
Extra Tips:
For an extra layer of flavor, consider marinating the chicken in the teriyaki sauce for 30 minutes before cooking. If you prefer a spicier kick, add a teaspoon of sriracha or chili flakes to the sauce mixture.
Additionally, feel free to substitute or add different vegetables such as snap peas or carrots based on your preference. To save time, you can also use pre-cut vegetables.
Finally, if you’re looking to make the dish gluten-free, make sure you use gluten-free soy sauce or tamari.
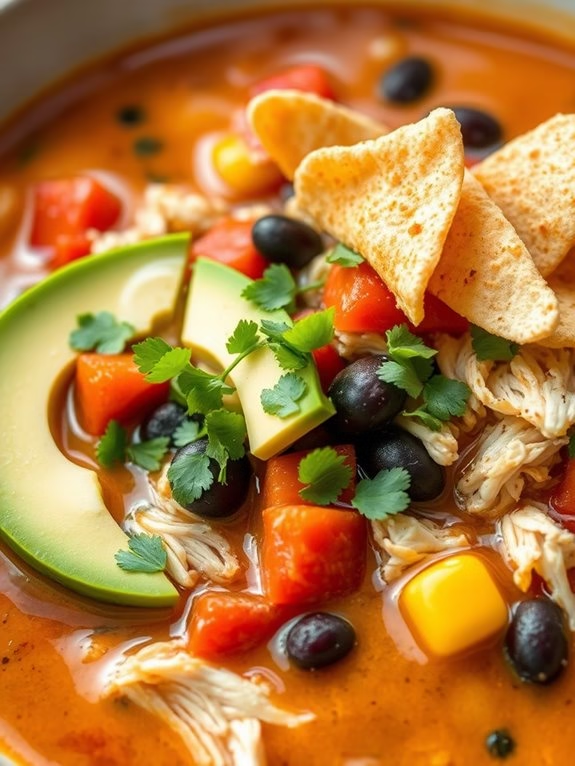
Chicken Tortilla Soup
Chicken Tortilla Soup is a flavorful and hearty dish that combines tender chicken, savory broth, and a blend of spices, all brought together in the convenience of an Instant Pot. This comforting soup is perfect for a quick weeknight meal or a cozy weekend lunch.
With its vibrant colors and rich flavors, it’s sure to become a family favorite. The Instant Pot method not only speeds up the cooking process but also enhances the flavors, making it a go-to option for busy cooks who still want to enjoy a homemade meal.
Ideal for serving 4-6 people, this Chicken Tortilla Soup is thickened with corn tortillas, which dissolve into the soup, adding a unique texture and depth of flavor.
Garnished with crispy tortilla strips, avocado, cheese, and fresh cilantro, this dish can be customized to suit your taste preferences. Whether you prefer it mild or spicy, this recipe is versatile and can be easily adjusted to match your desired level of heat and flavor.
Ingredients:
- 1 tablespoon olive oil
- 1 medium onion, chopped
- 3 cloves garlic, minced
- 1 bell pepper, diced
- 1 jalapeño, seeded and diced
- 1 teaspoon ground cumin
- 1 teaspoon chili powder
- 1 teaspoon paprika
- 6 cups chicken broth
- 1 (14.5-ounce) can diced tomatoes
- 1 (15-ounce) can black beans, drained and rinsed
- 1 cup corn kernels (fresh, frozen, or canned)
- 2 boneless, skinless chicken breasts
- 6 corn tortillas, torn into pieces
- Salt and pepper, to taste
- Juice of 1 lime
- Fresh cilantro, chopped
- Avocado, sliced (optional)
- Shredded cheese (optional)
- Tortilla strips or chips (optional)
Instructions:
- Sauté Vegetables: Set your Instant Pot to the ‘Sauté’ function and add the olive oil. Once the oil is hot, add the chopped onion, garlic, bell pepper, and jalapeño. Sauté for about 3-4 minutes until the vegetables are softened and fragrant.
- Add Spices: Stir in the ground cumin, chili powder, and paprika. Cook for an additional minute, allowing the spices to toast and release their flavors.
- Add Broth and Main Ingredients: Pour in the chicken broth, diced tomatoes, black beans, and corn. Stir to combine all the ingredients evenly.
- Add Chicken and Tortillas: Place the chicken breasts on top of the mixture and scatter the torn corn tortillas into the pot. The tortillas will dissolve and thicken the soup as it cooks.
- Pressure Cook: Seal the Instant Pot lid and set it to ‘Pressure Cook’ (or ‘Manual’) on high for 15 minutes. Once the cooking cycle is complete, allow the pressure to release naturally for about 10 minutes, then perform a quick release for any remaining pressure.
- Shred Chicken: Carefully open the lid, remove the chicken breasts, and shred them using two forks. Return the shredded chicken to the pot and stir the soup to combine.
- Season and Garnish: Season the soup with salt, pepper, and lime juice to taste. Stir in freshly chopped cilantro. Serve hot, garnished with avocado slices, shredded cheese, and tortilla strips if desired.
Extra Tips:
For an extra depth of flavor, try roasting the corn kernels before adding them to the soup. This can give the soup a slightly smoky taste that pairs well with the spices.
If you prefer a thicker soup, simply add more tortillas or reduce the amount of chicken broth. For those who like it spicy, consider adding an extra jalapeño or a dash of hot sauce.
This soup can easily be made ahead of time and stored in the refrigerator for up to three days, making it a convenient option for meal prep.
Honey Garlic Chicken
Honey Garlic Chicken is a delightful and savory dish that combines the sweet and tangy flavors of honey and garlic with tender, juicy chicken. This recipe is perfect for those nights when you need a quick yet satisfying meal that doesn’t compromise on taste. The Instant Pot makes it incredibly easy to cook, guaranteeing that the chicken is perfectly cooked and infused with the delicious sauce in a fraction of the time it would take using traditional methods.
The beauty of Honey Garlic Chicken lies in its simplicity and the depth of flavor achieved with minimal ingredients. It’s a versatile dish that pairs well with a variety of sides, from rice to steamed vegetables, making it a family favorite. The sauce is both sticky and savory, enveloping the chicken in a rich glaze that’s sure to please even the pickiest eaters.
With this recipe, you’ll have a delicious meal on the table in no time, perfect for busy weeknights or a comforting weekend dinner.
Ingredients (Serves 4-6):
- 2 pounds boneless, skinless chicken thighs
- 1/3 cup honey
- 1/2 cup low-sodium soy sauce
- 1/4 cup ketchup
- 4 cloves garlic, minced
- 1 tablespoon fresh ginger, minced
- 1 tablespoon olive oil
- 1 teaspoon sesame oil
- 1/4 teaspoon red pepper flakes (optional)
- 1 tablespoon cornstarch
- 1 tablespoon water
- 2 tablespoons sesame seeds (for garnish)
- 2 green onions, sliced (for garnish)
Cooking Instructions:
- Prepare the Chicken: Start by trimming any excess fat from the chicken thighs. Season them lightly with salt and pepper.
- Make the Sauce: In a medium bowl, whisk together honey, soy sauce, ketchup, minced garlic, minced ginger, olive oil, sesame oil, and red pepper flakes if using.
- Sear the Chicken: Set your Instant Pot to the ‘Sauté’ function. Once hot, add a little olive oil and sear the chicken thighs for about 2-3 minutes on each side until lightly browned. You may need to do this in batches. Remove chicken and set aside.
- Cook in the Sauce: Turn off the ‘Sauté’ function and pour the honey garlic sauce into the Instant Pot. Return the chicken to the pot, making sure it’s well coated with the sauce. Close the lid and set the Instant Pot to ‘Pressure Cook’ on high for 10 minutes.
- Release Pressure: After cooking, allow the pressure to release naturally for 5 minutes, then perform a quick release to vent any remaining steam.
- Thicken the Sauce: Remove the chicken and set aside. Set the Instant Pot to ‘Sauté’ again. In a small bowl, mix the cornstarch with water to create a slurry. Stir this mixture into the sauce in the Instant Pot and cook for about 2-3 minutes until the sauce has thickened.
- Serve: Return the chicken to the pot, coat with the sauce, and garnish with sesame seeds and sliced green onions. Serve hot over rice or your choice of side.
Extra Tips:
When searing the chicken, make sure not to overcrowd the Instant Pot to guarantee even browning. Adjust the red pepper flakes based on your preference for heat; they add a subtle kick to the dish.
If you find the sauce too thick after adding the cornstarch slurry, you can adjust the consistency by adding a little more water. This dish can also be made with chicken breasts, but be mindful that cooking time might vary slightly.
Finally, always taste the sauce before serving and adjust seasoning as needed, especially if using regular soy sauce instead of low-sodium.
Chicken Tikka Masala
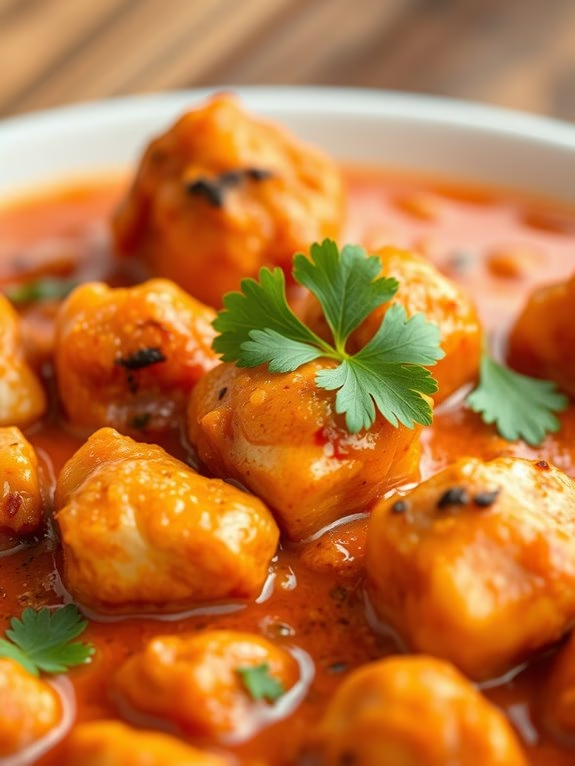
Chicken Tikka Masala is a beloved dish that has won the hearts of many for its robust flavors and creamy texture. This classic Indian-inspired recipe is perfect for those who love the combination of tender chicken pieces in a rich, spiced tomato sauce. By using an Instant Pot, you can greatly reduce the cooking time while still achieving deep and complex flavors. This method guarantees that the chicken is cooked to perfection, resulting in a dish that’s both satisfying and indulgent.
The Instant Pot allows you to sear the chicken, build layers of flavor with the spices, and then pressure cook everything together for a meal that’s ready in under an hour. Ideal for a cozy family dinner or a special occasion, this Chicken Tikka Masala will impress your guests with its restaurant-quality taste. The following recipe serves 4-6 people, making it a great option for feeding a crowd or saving leftovers for later enjoyment.
Ingredients:
- 1 ½ pounds boneless, skinless chicken thighs, cut into bite-sized pieces
- 1 cup plain yogurt
- 2 tablespoons lemon juice
- 1 tablespoon ground cumin
- 1 tablespoon ground coriander
- 1 teaspoon cayenne pepper
- 1 teaspoon garam masala
- 1 teaspoon turmeric
- 1 tablespoon butter
- 1 tablespoon vegetable oil
- 1 large onion, finely chopped
- 4 cloves garlic, minced
- 1 tablespoon fresh ginger, minced
- 1 (14-ounce) can tomato puree
- 1 cup heavy cream
- 1 teaspoon paprika
- Salt and pepper to taste
- Fresh cilantro leaves, for garnish
- Cooked basmati rice, for serving
Instructions:
- Marinate the Chicken:
- In a large bowl, combine the chicken pieces, yogurt, lemon juice, cumin, coriander, cayenne pepper, garam masala, and turmeric. Mix well to guarantee the chicken is evenly coated. Cover and refrigerate for at least 1 hour, or overnight for best results.
- Sauté Aromatics:
- Set the Instant Pot to ‘Sauté’ mode. Add the butter and vegetable oil. Once hot, add the chopped onion and sauté until translucent, about 5 minutes. Stir in the garlic and ginger, and cook for another 2 minutes until fragrant.
- Cook the Chicken:
- Add the marinated chicken to the pot, and cook until the chicken starts to brown, about 5-7 minutes. Make sure you stir occasionally to prevent sticking.
- Add Tomato Puree:
- Pour in the tomato puree and mix well, ensuring all chicken pieces are covered in the sauce. Season with salt, pepper, and paprika.
- Pressure Cook:
- Secure the lid on the Instant Pot, set the valve to ‘Sealing’, and select ‘Pressure Cook’ or ‘Manual’ for 10 minutes on high pressure. Once done, allow the pressure to release naturally for 10 minutes before performing a quick release.
- Finish the Sauce:
- Carefully open the lid and stir in the heavy cream. Select ‘Sauté’ mode again and let the sauce simmer for 5-10 minutes until it thickens to your desired consistency. Adjust seasoning if needed.
- Serve:
- Serve the Chicken Tikka Masala hot, garnished with fresh cilantro leaves, alongside cooked basmati rice.
Extra Tips:
For a deeper flavor, consider marinating the chicken overnight. If you prefer a less spicy dish, reduce the amount of cayenne pepper and garam masala.
Using chicken thighs instead of breast meat guarantees the chicken remains juicy and tender after cooking. To prevent the sauce from curdling, make sure the heavy cream is at room temperature before adding it to the hot mixture.
Finally, if you wish for a smokier flavor, you can add a small amount of smoked paprika or a dash of liquid smoke to the sauce.
Barbecue Chicken Sliders

Barbecue chicken sliders are a delightful and easy-to-make dish that’s perfect for family dinners or casual gatherings. Utilizing the Instant Pot, this recipe allows you to achieve tender, juicy chicken coated in a flavorful barbecue sauce in a fraction of the usual time. With the help of this kitchen gadget, you can have mouthwatering sliders ready in less than an hour, making it a great choice for a quick weekday meal or a weekend party snack.
These sliders feature shredded chicken that soaks up a tangy and sweet barbecue sauce, all served on soft, mini slider buns. You can customize your barbecue chicken sliders with additional toppings like coleslaw, pickles, or onions to add extra flavor and texture. This recipe yields enough for 4-6 people, making it an ideal choice for feeding a small group without too much hassle.
Ingredients (for 4-6 people):
- 2 lbs boneless, skinless chicken breasts
- 1 cup barbecue sauce
- 1 cup chicken broth
- 1 tablespoon olive oil
- 1 teaspoon garlic powder
- 1 teaspoon onion powder
- 1 teaspoon smoked paprika
- 1/2 teaspoon salt
- 1/4 teaspoon black pepper
- 12 slider buns
Cooking Instructions:
- Prepare the Chicken: Begin by seasoning the chicken breasts with garlic powder, onion powder, smoked paprika, salt, and pepper. Confirm that each piece is evenly coated with the spices for a well-rounded flavor.
- Sauté in the Instant Pot: Set your Instant Pot to the sauté setting and add the olive oil. Once the oil is hot, place the seasoned chicken breasts inside. Sear each side for about 2-3 minutes until they’re lightly browned. This step helps to lock in the flavors and gives the chicken a nice texture.
- Pressure Cook the Chicken: Cancel the sauté setting and pour the chicken broth into the pot, scraping any browned bits off the bottom with a wooden spoon. This prevents burning and enhances flavor. Place the lid on the Instant Pot and set it to “Manual” or “Pressure Cook” on high pressure for 10 minutes.
- Natural Release: Once the cooking time is up, allow the pressure to release naturally for 10 minutes. Afterward, carefully perform a quick release to remove any remaining pressure. Open the lid once it’s safe to do so.
- Shred the Chicken: Remove the chicken breasts from the pot and transfer them to a large bowl. Use two forks to shred the chicken until it reaches your desired consistency.
- Mix with Barbecue Sauce: Return the shredded chicken to the Instant Pot (empty any excess liquid if desired) and add the barbecue sauce. Stir well to confirm the chicken is fully coated with the sauce.
- Warm the Sliders: Turn the Instant Pot to “Sauté” again and let the chicken and sauce heat together for another 2-3 minutes, stirring occasionally. Meanwhile, slice the slider buns in half.
- Assemble the Sliders: Spoon the barbecue chicken onto the bottom half of each slider bun. Add any additional toppings like coleslaw or pickles if you prefer, then cover with the top half of the bun.
Extra Tips:
For an added depth of flavor, consider using a smoked barbecue sauce or adding a splash of apple cider vinegar to the sauce for a tangy twist.
If you prefer a spicier kick, mix in a pinch of cayenne pepper or a dash of hot sauce. To keep the buns from getting soggy, lightly toast them before assembling the sliders.
Finally, if you’re short on time, you can use pre-cooked rotisserie chicken and simply mix it with the barbecue sauce in the Instant Pot on the sauté setting for a few minutes to warm through.
Chicken and Vegetable Stew
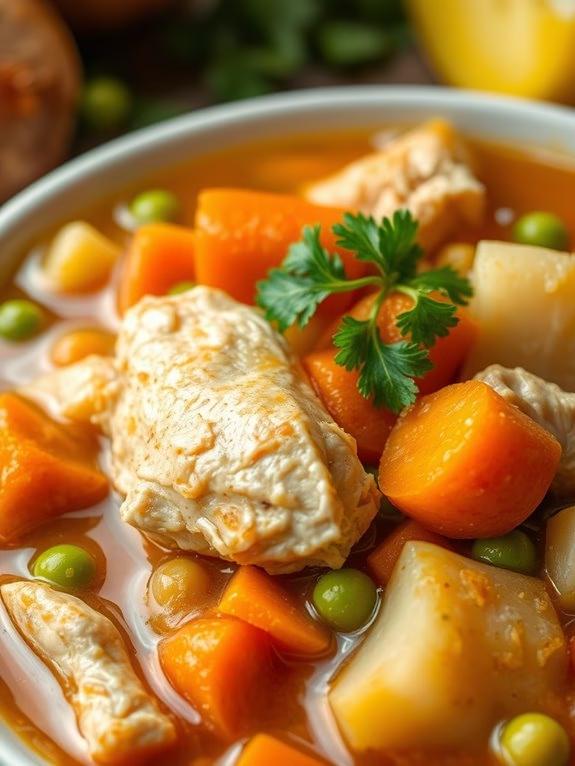
Chicken and Vegetable Stew is a hearty and comforting dish that’s perfect for any season. Prepared in an Instant Pot, this recipe takes all the traditional flavors of a chicken stew and elevates them with the convenience and speed of pressure cooking. The combination of tender chicken, vibrant vegetables, and a richly flavored broth is both nourishing and satisfying, making it an excellent choice for a family dinner or meal prep for the week.
The Instant Pot not only speeds up the cooking process but also locks in moisture and enhances the flavors, guaranteeing a delicious result every time.
The beauty of this Chicken and Vegetable Stew lies in its simplicity and versatility. You can easily adjust the vegetables to your preference or what you have on hand, making it a great dish for those looking to use up leftover produce. Additionally, the stew is packed with nutrients, providing a balanced meal that includes protein, fiber, and essential vitamins.
This recipe serves 4-6 people, making it ideal for a small gathering or a family meal with potential leftovers for busy days ahead.
Ingredients:
- 1 ½ pounds of boneless, skinless chicken thighs or breasts, cut into 1-inch pieces
- 2 tablespoons olive oil
- 1 large onion, diced
- 3 cloves garlic, minced
- 4 carrots, peeled and sliced
- 3 celery stalks, sliced
- 3 medium potatoes, peeled and diced
- 1 cup frozen peas
- 4 cups chicken broth
- 1 teaspoon dried thyme
- 1 teaspoon dried rosemary
- 1 bay leaf
- Salt and pepper to taste
- 2 tablespoons cornstarch mixed with 2 tablespoons water (optional, for thickening)
- Fresh parsley, chopped (for garnish)
Cooking Instructions:
- Sauté the Aromatics: Set the Instant Pot to the sauté function and add the olive oil. Once the oil is hot, add the diced onion and cook for about 3 minutes until translucent. Stir in the minced garlic and sauté for an additional minute until fragrant.
- Brown the Chicken: Add the chicken pieces to the pot. Season with salt and pepper, and cook for about 5 minutes, stirring occasionally, until the chicken is lightly browned on all sides.
- Add Vegetables and Seasoning: Stir in the carrots, celery, and potatoes. Sprinkle the dried thyme, dried rosemary, and a pinch more salt and pepper over the mixture. Add the bay leaf for extra flavor.
- Add the Broth: Pour the chicken broth into the Instant Pot, guaranteeing that all ingredients are submerged. Stir well to combine.
- Pressure Cook the Stew: Secure the lid on the Instant Pot and set the valve to the sealing position. Select the ‘Pressure Cook’ or ‘Manual’ function and set the timer for 15 minutes on high pressure.
- Release Pressure: Once the cooking time is complete, allow the pressure to release naturally for 10 minutes, then carefully release any remaining pressure manually.
- Add Peas and Thicken (Optional): Open the lid and stir in the frozen peas. If you prefer a thicker stew, add the cornstarch slurry by mixing cornstarch with water and stirring it into the stew. Set the Instant Pot to sauté and cook for an additional 3-5 minutes, stirring until thickened.
- Garnish and Serve: Remove the bay leaf, taste, and adjust seasoning if necessary. Serve the stew hot, garnished with chopped fresh parsley.
Extra Tips:
When making Chicken and Vegetable Stew in the Instant Pot, you can experiment with different herbs and spices to tailor the flavor to your preference. For a deeper flavor, consider adding a splash of white wine or a tablespoon of tomato paste before pressure cooking.
If you prefer a creamier consistency, stir in a cup of heavy cream or coconut milk after pressure cooking and before serving. Additionally, when cutting the vegetables, try to keep them uniform in size to promote even cooking.
This dish stores well in the refrigerator for up to 3 days and can be frozen for longer storage, making it a convenient option for meal planning.
Chicken Curry Delight
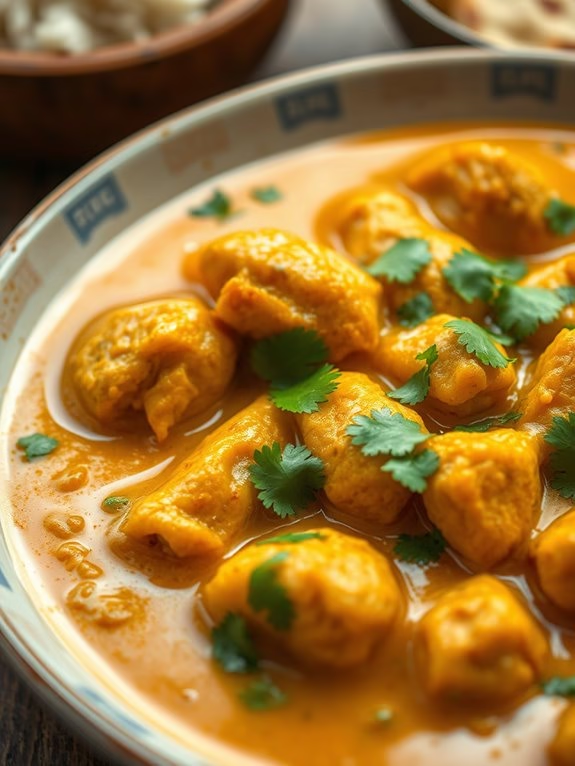
Chicken Curry Delight is a flavorful and aromatic dish that brings together the warmth of spices and the richness of coconut milk, all cooked to perfection in an Instant Pot. This recipe offers a convenient way to prepare a classic chicken curry that can be enjoyed by the whole family.
The use of the Instant Pot not only reduces cooking time but also enhances the depth of flavors, making it an ideal choice for busy weeknight dinners or cozy weekend meals. This dish is perfect for serving 4-6 people and is best paired with steamed rice or warm naan to soak up the delicious curry sauce.
The combination of tender chicken pieces, vibrant spices, and creamy coconut milk results in a delightful meal that’s sure to satisfy your taste buds. Let’s explore the ingredients and step-by-step instructions to create this mouthwatering Chicken Curry Delight.
Ingredients:
- 2 lbs chicken thighs, boneless and skinless, cut into bite-sized pieces
- 1 large onion, finely chopped
- 3 cloves garlic, minced
- 1-inch piece ginger, grated
- 1 can (14 oz) coconut milk
- 1 cup chicken broth
- 2 tablespoons curry powder
- 1 teaspoon turmeric powder
- 1 teaspoon cumin seeds
- 1 teaspoon garam masala
- 2 tablespoons olive oil
- Salt and pepper to taste
- 1/2 cup fresh cilantro, chopped
- 1 tablespoon lemon juice
Instructions:
- Prepare the Instant Pot: Set your Instant Pot to the sauté setting and add the olive oil. Once heated, add the cumin seeds and let them sizzle for about 30 seconds to release their aroma.
- Sauté Aromatics: Add the chopped onion to the pot and sauté for 3-4 minutes until they become translucent. Stir in the minced garlic and grated ginger, cooking for an additional 1 minute.
- Add Spices: Sprinkle the curry powder, turmeric, and garam masala over the sautéed onions and stir well to coat the mixture in the spices. This will help to bloom the spices and enhance their flavors.
- Incorporate Chicken: Add the chicken pieces to the pot, stirring them until they’re well coated in the spice mixture. Cook for about 5 minutes, allowing the chicken to brown slightly.
- Pour in Liquids: Pour in the chicken broth and coconut milk, then season with salt and pepper to taste. Stir everything together to combine.
- Pressure Cook: Secure the lid on the Instant Pot and set it to the Pressure Cook (or Manual) setting for 10 minutes. Confirm the valve is set to the sealing position.
- Release Pressure: After cooking, allow the pressure to naturally release for 10 minutes, then perform a quick release for any remaining pressure.
- Finish and Serve: Open the lid and stir in the lemon juice and chopped cilantro. Taste and adjust seasoning if necessary. Serve hot with rice or naan.
Tips: For an extra depth of flavor, you can marinate the chicken in the spices for 30 minutes before cooking. If you prefer a thicker curry, use the sauté function after pressure cooking to reduce the sauce to your desired consistency.
Additionally, adding diced tomatoes or a few potatoes can enhance the texture and flavor of the curry. Remember to taste and adjust the seasoning at the end to suit your preference. Enjoy your Chicken Curry Delight!
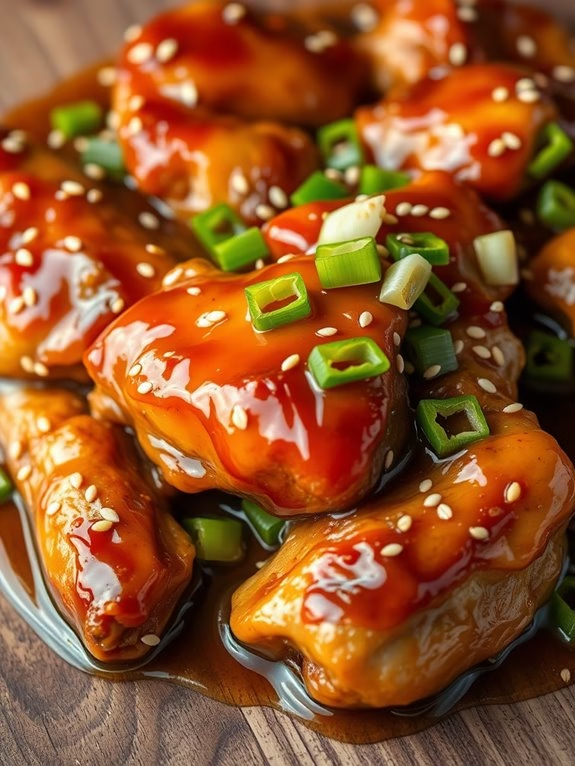
Sesame Orange Chicken
Sesame Orange Chicken is a delightful blend of sweet and savory flavors that can be easily prepared using an Instant Pot. This dish combines the vibrant taste of orange with the nutty essence of sesame, creating a mouthwatering meal that’s bound to become a family favorite.
The Instant Pot makes cooking this dish quick and efficient, while preserving the tenderness and juiciness of the chicken. Whether you’re preparing a weeknight dinner or a special weekend feast, this recipe will deliver a satisfying experience for everyone at the table.
This Sesame Orange Chicken recipe is perfect for serving 4-6 people. The rich sauce coats tender pieces of chicken, all infused with the aromatic flavors of orange and sesame. This dish is best paired with steamed rice or a side of stir-fried vegetables to balance the sweet and savory elements.
With just a few simple ingredients and your trusty Instant Pot, you can whip up this delicious meal in no time.
Ingredients (serves 4-6):
- 2 pounds boneless, skinless chicken thighs, cut into bite-sized pieces
- 1 cup freshly squeezed orange juice
- 1/4 cup soy sauce
- 1/4 cup honey
- 2 tablespoons rice vinegar
- 1 tablespoon sesame oil
- 2 cloves garlic, minced
- 1 tablespoon fresh ginger, grated
- 1 tablespoon cornstarch
- 1 tablespoon water
- 2 tablespoons sesame seeds, toasted
- 1/4 cup green onions, chopped
- Salt and pepper to taste
Cooking Instructions:
- Prepare the Sauce: In a mixing bowl, combine orange juice, soy sauce, honey, rice vinegar, sesame oil, minced garlic, and grated ginger. Stir until well mixed, and set aside.
- Sauté the Chicken: Set your Instant Pot to the sauté mode. Add a little bit of sesame oil, and once hot, add the chicken pieces. Season with salt and pepper, and sauté until the chicken is lightly browned on all sides, about 5-7 minutes.
- Pressure Cook: Pour the prepared sauce over the chicken in the Instant Pot. Close the lid, and confirm the valve is set to the sealing position. Set the Instant Pot to pressure cook on high for 10 minutes.
- Release Pressure: After the cooking time is complete, allow the pressure to release naturally for 5 minutes, then perform a quick release to remove any remaining pressure.
- Thicken the Sauce: In a small bowl, mix the cornstarch with water to create a slurry. Set the Instant Pot back to sauté mode, and stir the slurry into the chicken and sauce mixture. Cook for an additional 2-3 minutes, or until the sauce has thickened to your desired consistency.
- Finish and Serve: Stir in the toasted sesame seeds and chopped green onions. Taste and adjust seasoning if necessary. Serve the Sesame Orange Chicken hot, over rice or with your favorite side dish.
Extra Tips:
For a more intense orange flavor, consider adding some orange zest to the sauce mixture. If you prefer a spicier dish, you can incorporate a pinch of red pepper flakes during the sautéing process.
Additionally, if you’re looking to reduce sodium, opt for low-sodium soy sauce. Toasting the sesame seeds beforehand enhances their nutty flavor, providing an extra layer of taste to the dish.