
I’ve been on a quest for delicious yet healthy chicken appetizers, and let me tell you, the options are endless!
From grilled chicken skewers to baked chicken meatballs, there’s something for everyone to enjoy.
How about some spicy chicken lettuce wraps that are bursting with flavor and nutrients?
These recipes not only satisfy your cravings but also keep your diet on track.
Let’s get cooking and create some mouthwatering bites that your guests will adore!
Grilled Chicken Skewers
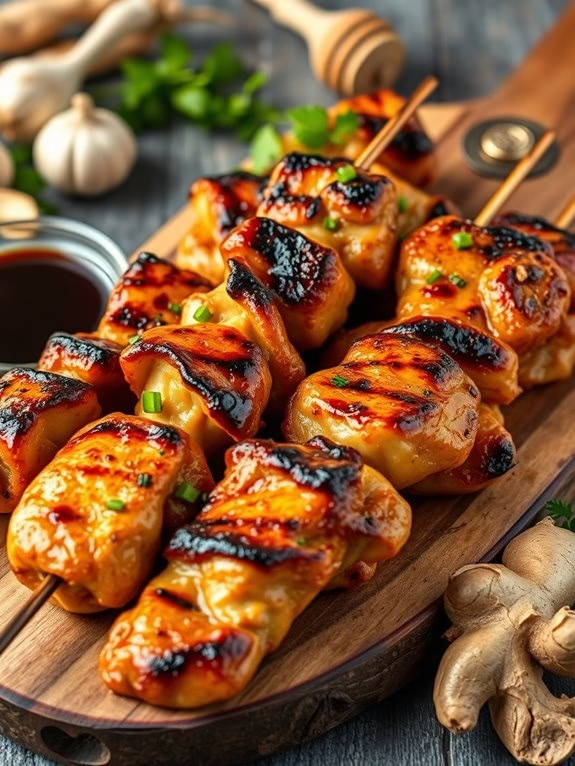
Grilled Chicken Skewers are a fantastic appetizer option for those looking to keep their meals healthy and light, yet flavorful. These skewers are easy to prepare and can be done ahead of time, making them perfect for parties, family gatherings, or even a simple weeknight dinner. The marinated chicken is grilled to perfection, delivering a succulent and juicy bite every time. The smoky flavor from the grill, combined with the tangy marinade, will have your taste buds dancing with delight.
Even better, Grilled Chicken Skewers can be customized to suit your taste. Feel free to experiment with different marinades or add vegetables to the skewers for added color and nutrition. This dish isn’t only delicious but also a great source of protein and low in fat, making it a guilt-free pleasure.
Ingredients:
- 1.5 pounds of boneless, skinless chicken breasts
- 1/4 cup of olive oil
- 1/4 cup of soy sauce
- 2 cloves of garlic, minced
- 1 teaspoon of grated fresh ginger
- 1 tablespoon of honey
- 1 tablespoon of lemon juice
- 1/2 teaspoon of black pepper
- 1/2 teaspoon of salt
- Wooden or metal skewers
Cooking Instructions:
- Start by cutting the chicken breasts into even, bite-sized pieces. This guarantees that they’ll cook evenly on the grill.
- In a large bowl, combine the olive oil, soy sauce, minced garlic, grated ginger, honey, lemon juice, black pepper, and salt to create the marinade.
- Add the chicken pieces to the marinade and mix well, confirming that all pieces are coated. Cover the bowl and refrigerate for at least one hour, but preferably overnight to allow the flavors to really penetrate the chicken.
- If you’re using wooden skewers, soak them in water for about 30 minutes before grilling. This prevents them from burning on the grill.
- Preheat your grill to medium-high heat.
- Thread the marinated chicken pieces onto the skewers. Make sure not to overcrowd the skewers, as this can prevent the chicken from cooking evenly.
- Grill the skewers for approximately 10-15 minutes, turning them occasionally, until the chicken is fully cooked and has a nice char on the outside.
Extra Tips:
When grilling the chicken skewers, it’s important to keep an eye on them to avoid overcooking. Chicken can become dry if it’s cooked for too long, so check for doneness by cutting into a piece of chicken. It should be white throughout with no pink remaining.
Also, remember to clean your grill before and after use to prevent unwanted flavors or food particles from sticking to your skewers. Enjoy these Grilled Chicken Skewers as a healthy appetizer or pair them with a side salad for a complete meal.
Baked Chicken Meatballs

Baked Chicken Meatballs are a delicious and healthy appetizer perfect for any gathering. They’re packed with flavor, moist, and tender, making them an instant hit among both adults and children. This recipe uses lean ground chicken, guaranteeing it’s a healthier choice compared to traditional meatballs. The recipe also includes a variety of herbs and spices to enhance the flavor, making it a crowd-pleaser.
These meatballs can be baked in the oven, making them a lot easier to prepare than their fried counterparts. The result is a delightful appetizer that isn’t only tasty but also low in fat and calories. The following recipe makes enough for 4-6 servings, so feel free to adjust the quantities if you’re catering for a larger group.
Ingredients:
- 1 lb lean ground chicken
- 1/2 cup breadcrumbs
- 1/4 cup finely chopped onion
- 2 cloves garlic, minced
- 1 egg, beaten
- 1/4 cup grated Parmesan cheese
- 1/4 cup chopped fresh parsley
- 1/2 teaspoon salt
- 1/2 teaspoon black pepper
- 1/2 teaspoon dried oregano
- 1/2 teaspoon dried basil
- Olive oil for brushing
Cooking Instructions:
- Preheat your oven to 400°F (200°C) and line a baking sheet with parchment paper.
- In a large bowl, combine the ground chicken, breadcrumbs, onion, garlic, egg, Parmesan cheese, parsley, salt, pepper, oregano, and basil. Mix until all the ingredients are well incorporated.
- Using your hands, shape the mixture into small meatballs, about 1 inch in diameter, and place them on the prepared baking sheet.
- Lightly brush the meatballs with olive oil. This will help them get a nice golden color when baked.
- Bake in the preheated oven for about 20-25 minutes, or until the meatballs are cooked through and golden brown.
- Remove from the oven and let the meatballs rest for a few minutes before serving.
Extra Tips:
When forming the meatballs, try not to overwork the mixture as this can lead to tough meatballs.
It’s also important to evenly space the meatballs on the baking sheet to guarantee they bake evenly. If you have the time, you can prepare the meatballs ahead and refrigerate them for a few hours before baking. This will help them hold their shape better during baking.
Serve these baked chicken meatballs with a dipping sauce of your choice for an added flavor boost.
Spicy Chicken Lettuce Wraps
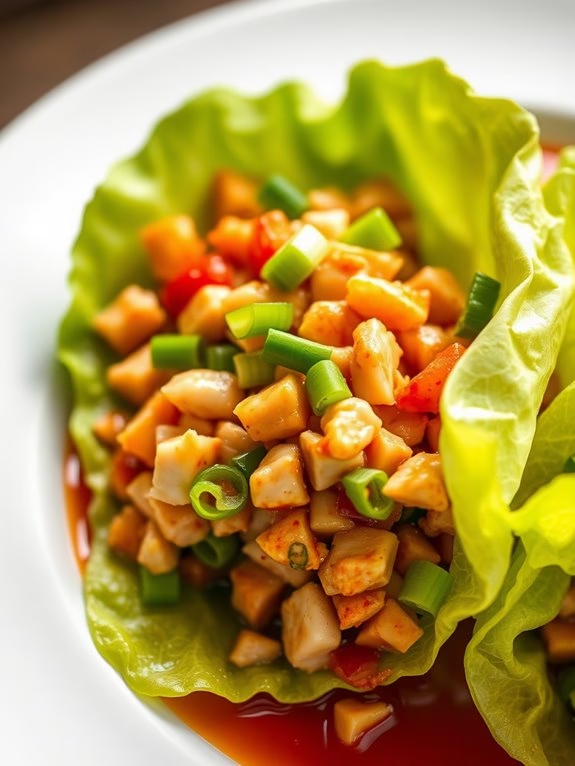
Spicy Chicken Lettuce Wraps are an excellent dish for those who are looking for a healthy yet exotic appetizer. The combination of minced chicken, fresh vegetables, and spicy sauce wrapped in crisp lettuce leaves delivers a satisfying crunch with every bite. Not only is this dish packed with protein from the chicken, but it also incorporates a variety of vegetables, making it a balanced option for those seeking to maintain a healthy diet.
In addition to its nutritional benefits, Spicy Chicken Lettuce Wraps are easy to prepare and perfect for serving at dinner parties or casual get-togethers. The vibrant colors of the ingredients make this dish visually appealing, while the tangy and spicy flavors are sure to be a hit among your guests.
Here’s how to prepare Spicy Chicken Lettuce Wraps, enough for 4-6 people.
Ingredients:
- 1 pound of ground chicken
- 1 tablespoon of vegetable oil
- 2 cloves of garlic, minced
- 1 onion, finely chopped
- 1/4 cup of hoisin sauce
- 2 tablespoons of soy sauce
- 1 tablespoon of rice vinegar
- 1 tablespoon of freshly grated ginger
- 1 tablespoon of Sriracha, or more to taste
- 1 (8-ounce) can of whole water chestnuts, drained and diced
- 2 green onions, thinly sliced
- Salt and black pepper to taste
- 1 head of lettuce
Cooking Instructions:
- Start by heating the vegetable oil in a saucepan over medium-high heat.
- Add the ground chicken to the heated oil and cook until browned. This should take about 3-5 minutes. Make sure to break up the chicken as it cooks.
- Stir in garlic, onion, hoisin sauce, soy sauce, rice vinegar, ginger, and Sriracha until onions become translucent, typically 1-2 minutes.
- Add diced water chestnuts, green onions, salt, and pepper, stirring to combine.
- Cook for an additional 2 minutes until the flavors meld together.
- Allow the mixture to cool slightly before serving.
- To serve, spoon several tablespoons of the chicken mixture into the center of a lettuce leaf and wrap it up like a burrito.
Extra Tips:
It’s best to use butter lettuce or iceberg lettuce for this recipe because of their crispness and shape. If the mixture is too spicy, you can adjust the amount of Sriracha sauce to taste.
Also, remember to wash the lettuce leaves carefully and pat them dry before using. This will guarantee that they’re clean and crisp, providing the perfect base for your Spicy Chicken Lettuce Wraps.
Healthy Buffalo Chicken Dip
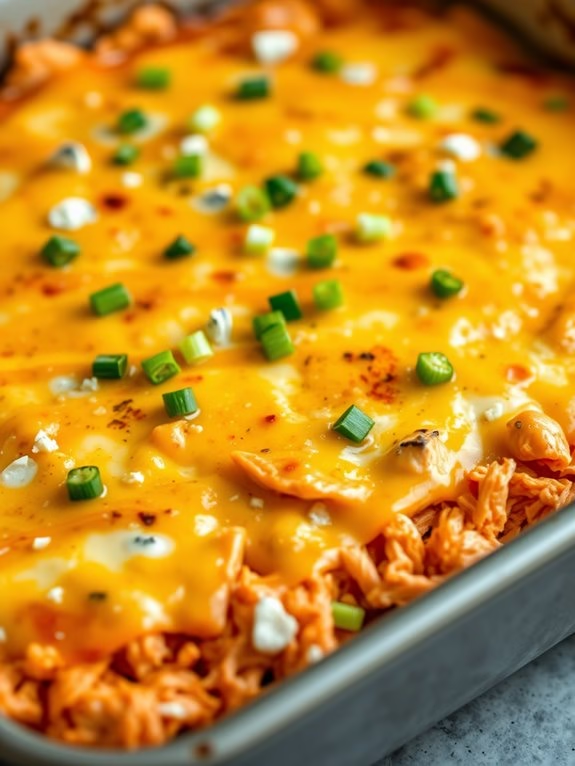
Healthy Buffalo Chicken Dip is a versatile appetizer that’s perfect for parties, game days, or as a tasty snack. This dip is a healthier version of the classic buffalo chicken dip and it’s just as delicious. It combines shredded chicken, tangy buffalo sauce, creamy Greek yogurt, and melted cheese for a flavorful and satisfying dish.
It’s also gluten-free and can be made in just 30 minutes. This recipe is designed for a serving size of 4-6 people.
For a healthier spin on traditional buffalo chicken dip, Greek yogurt is used in place of cream cheese. This substitution not only reduces the overall fat content but also adds a punch of protein. The dip is baked until the cheese is melted and bubbly, and is best served warm with your choice of dippers such as celery sticks, bell pepper strips, or whole grain crackers.
Ingredients:
- 2 cups shredded cooked chicken
- 1 cup buffalo sauce
- 1 cup Greek yogurt
- 1 cup shredded cheddar cheese
- 1/2 cup crumbled blue cheese
- 1/4 cup sliced green onions
- 1/4 teaspoon garlic powder
- Salt and pepper to taste
Instructions:
- Preheat your oven to 375°F (190°C). Lightly grease a baking dish and set aside.
- In a large bowl, combine the shredded chicken and buffalo sauce. Toss until the chicken is fully coated with the sauce.
- Add the Greek yogurt to the chicken mixture. Stir until well combined.
- Season the mixture with garlic powder, salt, and pepper to taste. Stir to combine.
- Transfer the chicken mixture to the prepared baking dish. Spread it out evenly.
- Sprinkle the shredded cheddar cheese and crumbled blue cheese evenly over the top of the chicken mixture.
- Bake the dip in the preheated oven for 20-25 minutes, or until the cheese is melted and bubbly.
- Remove the dip from the oven and let it cool slightly. Garnish with the sliced green onions before serving.
When making this Healthy Buffalo Chicken Dip, it’s important to use a buffalo sauce that you really enjoy, as it’s the main flavor component in this dish.
Also, for the shredded chicken, you can use leftover roasted chicken, rotisserie chicken, or even canned chicken in a pinch. And if you want to make it even lighter, use a low-fat cheese. This dip is best served warm, but it can also be served at room temperature if desired.
Oven-Baked Chicken Fingers
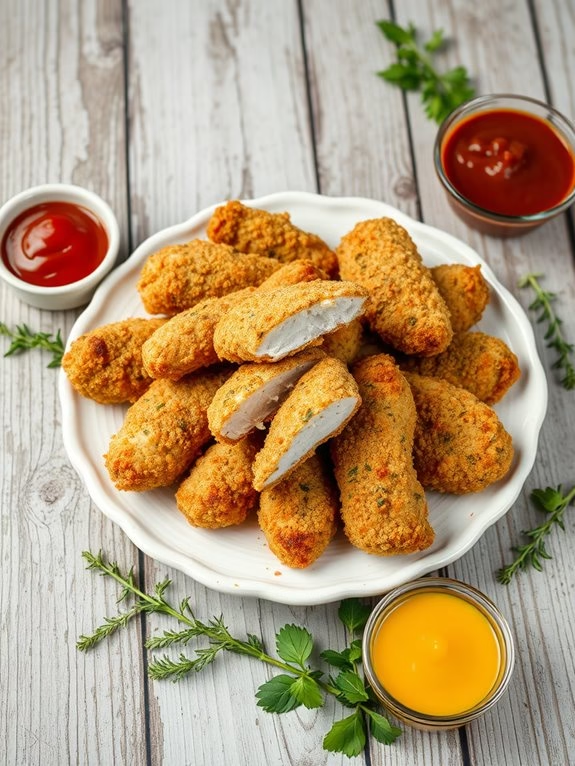
Chicken appetizers are a universally loved dish, perfect for any event or family gathering. Oven-Baked Chicken Fingers, in particular, are a healthy appetizer that’s easy to make, nutritious, and delicious. These crispy chicken fingers are made in the oven instead of the deep fryer, which reduces the amount of fat and calories without compromising on flavor. The chicken is coated with breadcrumbs and herbs, then baked until golden and crispy. This results in a dish that’s incredibly tasty, but still healthy.
Oven-Baked Chicken Fingers are a great option for a party appetizer or a quick family dinner. They’re easy to eat, satisfying, and can be served with a variety of dipping sauces. This recipe serves 4-6 people, making it ideal for small gatherings or family meals. The best part is that preparations are simple and the ingredients are readily available.
Ingredients:
- 1.5 lbs of boneless skinless chicken breasts
- 2 cups of whole wheat breadcrumbs
- 1 cup of all-purpose flour
- 2 large eggs
- 1 tablespoon of dried oregano
- 1 tablespoon of dried basil
- 1 teaspoon of garlic powder
- 1 teaspoon of onion powder
- Salt and pepper to taste
- Cooking spray for greasing
- Optional dipping sauces: ketchup, honey mustard, barbecue sauce
Cooking Instructions:
- Preheat your oven to 375°F (190°C). Line a baking sheet with parchment paper and lightly spray it with cooking spray.
- Cut the chicken breasts into strips or ‘fingers’. Try to make them an even size so they cook evenly.
- In a shallow dish, combine the breadcrumbs, oregano, basil, garlic powder, onion powder, salt, and pepper.
- In another dish, beat the eggs. In a separate dish place the all-purpose flour.
- Dip each chicken strip into the flour, then the beaten eggs, and finally the breadcrumb mixture. Confirm each strip is well coated.
- Place the coated chicken fingers onto the prepared baking sheet.
- Bake in the preheated oven for 20-25 minutes, or until the chicken is cooked through and the coating is golden and crispy.
- Allow the chicken fingers to cool for a few minutes before serving with your preferred dipping sauces.
Extra Tips:
For a crunchier texture, you can replace half the breadcrumbs with crushed cornflakes. If you want to make this dish gluten-free, use gluten-free breadcrumbs and flour. Always check the chicken is cooked through before serving – it should be white in the middle with no pink remaining.
For a different flavor profile, try adding some parmesan to the breadcrumb mixture. Finally, remember that oven temperatures can vary, so keep an eye on the chicken fingers towards the end of the cooking time to prevent them from burning.
Mini Chicken Quesadillas

Mini Chicken Quesadillas are a fun, delicious, and healthy option for an appetizer. Whether it’s for a casual weeknight dinner, a fancy cocktail party, or a game night with friends, these bite-sized treats are sure to be a hit. Made with tender chicken, zesty salsa, and creamy cheese, these quesadillas pack a punch of flavor and nutrition in every bite.
What’s more, they’re easy to make and can be prepared in advance, making them a convenient choice for busy hosts.
These Mini Chicken Quesadillas are also versatile. You can spice them up with some jalapenos, add some bell peppers for crunch, or mix in some corn for a touch of sweetness. With a side of salsa or sour cream, these quesadillas are truly irresistible. This recipe yields 24 mini quesadillas, perfect for serving 4-6 people.
Ingredients:
- 2 skinless, boneless chicken breasts
- 1 cup of salsa
- 1 cup of shredded cheddar cheese
- 1 cup of shredded Monterrey Jack cheese
- 24 mini flour tortillas
- 2 tablespoons of olive oil
- Sour cream and additional salsa for serving
- Optional: diced jalapenos, bell peppers, or corn
Cooking instructions:
- First, cook the chicken. Place the chicken breasts in a pot and cover them with water. Bring the water to a boil, then reduce the heat to a simmer and cook the chicken for 15-20 minutes, or until it’s no longer pink in the middle.
- Once the chicken is cooked, remove it from the pot and let it cool. Once it’s cool enough to handle, shred it using two forks.
- In a large bowl, combine the shredded chicken, salsa, and cheeses. If you’re using any of the optional ingredients, add them now.
- Preheat your oven to 375 degrees Fahrenheit and line a baking sheet with parchment paper.
- To assemble the quesadillas, place a spoonful of the chicken mixture in the center of each tortilla. Fold the tortilla in half over the filling and place it on the prepared baking sheet.
- Once all the quesadillas are assembled, brush the tops with the olive oil.
- Bake the quesadillas for 10-15 minutes, or until they’re golden brown and crispy.
- Let the quesadillas cool for a few minutes before serving with sour cream and salsa.
When making these Mini Chicken Quesadillas, don’t overfill the tortillas. This will make them harder to fold and could result in the filling spilling out during baking.
If you’re preparing these in advance, you can assemble the quesadillas and store them in the fridge until you’re ready to bake them. Just be sure to add an extra minute or two to the baking time. Enjoy these delicious, bite-sized treats that are sure to be a hit at any gathering!
Chicken Stuffed Mushrooms

Chicken Stuffed Mushrooms is a delicious and healthy chicken appetizer that can be enjoyed at any time of the day. This dish is a perfect combination of savory flavors, with juicy chicken, fresh mushrooms, herbs, and spices all coming together to create a delectable bite.
It’s not only tasty, but also low in calories and high in protein, making it an ideal choice for those who are health conscious or following a workout plan.
Preparing Chicken Stuffed Mushrooms is easy and straightforward. You start by hollowing out the mushrooms and sautéing the chicken. The chicken is then mixed with a variety of herbs and spices, stuffed into the mushroom caps, and baked until golden. The result is a mouth-watering appetizer that’s sure to impress your guests at your next gathering.
Ingredients:
- 24 large fresh mushrooms
- 2 tablespoons olive oil
- 2 cups shredded chicken breast
- 1 small onion, finely chopped
- 2 cloves garlic, minced
- 1 teaspoon dried oregano
- 1/2 teaspoon salt
- 1/4 teaspoon black pepper
- 1/4 cup grated Parmesan cheese
- 1/4 cup breadcrumbs
- Fresh parsley for garnish
Cooking Instructions:
- Preheat the oven to 375 degrees F (190 degrees C).
- Remove the stems from the mushrooms and chop them finely. Set the mushroom caps aside.
- In a large skillet, heat the olive oil over medium heat. Add the chopped mushroom stems, chicken, onion, and garlic. Sauté until the chicken is cooked through and the onions are translucent.
- Remove the skillet from the heat and stir in the oregano, salt, and pepper. Allow the mixture to cool for a few minutes.
- Once cooled, mix in the Parmesan cheese and breadcrumbs until well combined.
- Stuff each mushroom cap with the chicken mixture, making sure it’s packed tightly.
- Arrange the stuffed mushroom caps on a baking sheet and bake for 20 minutes, or until the mushrooms are tender and the tops are golden.
- Garnish with fresh parsley before serving.
Extra Tips:
Ensure that the chicken is well cooked before mixing it with the other ingredients to prevent any potential health risks.
You can also experiment with different types of cheese for a unique flavor. If you’re preparing this dish for a party, you can make them ahead of time and simply reheat in the oven just before serving.
Enjoy these healthy and delicious Chicken Stuffed Mushrooms as a light lunch, dinner, or as a crowd-pleasing appetizer.
Light Chicken Salad Bites

Light Chicken Salad Bites are the perfect healthy appetizer to serve at your next gathering. Delightfully full of flavors, these bites take a classic chicken salad recipe and modify it for easy, bite-sized eating. These appetizers aren’t only delicious, but also balanced and nutritious, making them the ideal choice for health-conscious individuals.
The great thing about these Light Chicken Salad Bites is how versatile they are. You can serve them as a finger food at parties, or even as a light lunch or dinner. The invigorating taste of chicken salad coupled with the crisp lettuce leaves will surely keep your guests coming back for more.
Ingredients:
- 2 boneless, skinless chicken breasts
- 2 celery stalks, finely chopped
- 1/2 red onion, finely chopped
- 1/2 cup plain Greek yogurt
- 1 tablespoon Dijon mustard
- 1 tablespoon fresh lemon juice
- Salt and pepper to taste
- 24 Bibb lettuce leaves
- Fresh dill for garnishing
Directions:
- Start by poaching the chicken breasts. Place them in a medium-sized saucepan, cover with water, and bring to a boil. Reduce heat to low, cover the pan, and simmer for about 15-20 minutes until the chicken is thoroughly cooked.
- Once cooked, drain the chicken and let it cool. When it’s cool enough to handle, shred the chicken into small, bite-sized pieces.
- In a large bowl, combine the shredded chicken, chopped celery, and red onion.
- In a separate bowl, whisk together the Greek yogurt, Dijon mustard, lemon juice, salt, and pepper. This will serve as your dressing.
- Pour the dressing over the chicken mixture and stir until well combined.
- Scoop a spoonful of the chicken salad onto each lettuce leaf.
- Garnish each chicken salad bite with fresh dill before serving.
Extra Tips:
When preparing these Light Chicken Salad Bites, always remember to be gentle when handling the lettuce leaves to avoid tearing.
You can also customize this recipe according to your taste. Feel free to add other ingredients like chopped apples for added crunch or dried cranberries for a hint of sweetness.
Finally, if you’re preparing these for a party, you can make the chicken salad a day ahead and assemble the bites a few hours before the event to make things easier.
Broiled Chicken Satay

Chicken Satay is an incredibly flavorful dish, often served on skewers, that hails from Southeast Asia. Traditionally, it’s made with marinated, skewered meat that’s grilled and served with a peanut sauce. However, this recipe gives a healthy twist to the classic dish by broiling the chicken instead of grilling, reducing the amount of oil required. The result is a light and delicious appetizer that’s packed with protein, making it an excellent choice for health-conscious eaters.
The marinade for the chicken satay is a delightful combination of bold flavors including ginger, garlic, soy sauce, and a touch of brown sugar. The peanut sauce, which is typically made with peanut butter, soy sauce, and other seasonings, is an integral part of this dish, adding a rich, creamy complement to the spicy, tangy chicken. This Broiled Chicken Satay recipe is perfect for serving at dinner parties, as it’s easy to prepare in large quantities and is sure to impress your guests.
Ingredients:
- 2 lbs boneless, skinless chicken breasts
- 1/2 cup low-sodium soy sauce
- 1/4 cup brown sugar
- 2 tablespoons minced fresh ginger
- 2 cloves garlic, minced
- 1 teaspoon turmeric
- 1/2 teaspoon ground coriander
- 1/4 cup canola oil
- 1/2 cup smooth peanut butter
- 2 tablespoons lime juice
- 1/2 teaspoon red pepper flakes
- 1/4 cup chopped fresh cilantro
- Wooden skewers, soaked in water for 30 minutes
Instructions:
- Begin by cutting the chicken breasts into 1-inch strips and set aside.
- In a large bowl, combine the soy sauce, brown sugar, ginger, garlic, turmeric, and coriander. Stir in the canola oil.
- Add the chicken to the marinade, making sure all pieces are well coated. Allow the chicken to marinate in the refrigerator for at least 2 hours, or up to overnight.
- Preheat your broiler. Thread the marinated chicken strips onto the pre-soaked wooden skewers.
- Arrange the skewers on a broiler pan and broil for about 5-7 minutes on each side, or until the chicken is cooked through and slightly charred.
- While the chicken is broiling, prepare the peanut sauce. Combine the peanut butter, lime juice, and red pepper flakes in a small saucepan over medium heat. Stir until smooth and heated through.
- Serve the broiled chicken satay with the peanut sauce and a sprinkle of fresh cilantro.
When preparing this Broiled Chicken Satay, keep in mind that the chicken can be marinated up to a day ahead, making this a great dish to prep in advance.
Be sure to soak the wooden skewers in water for at least 30 minutes before threading the chicken to prevent them from burning under the broiler. If you prefer a spicier dish, feel free to add more red pepper flakes to the peanut sauce.
Enjoy this tasty and healthy chicken appetizer that’s sure to become a favorite!
Chicken and Vegetable Spring Rolls
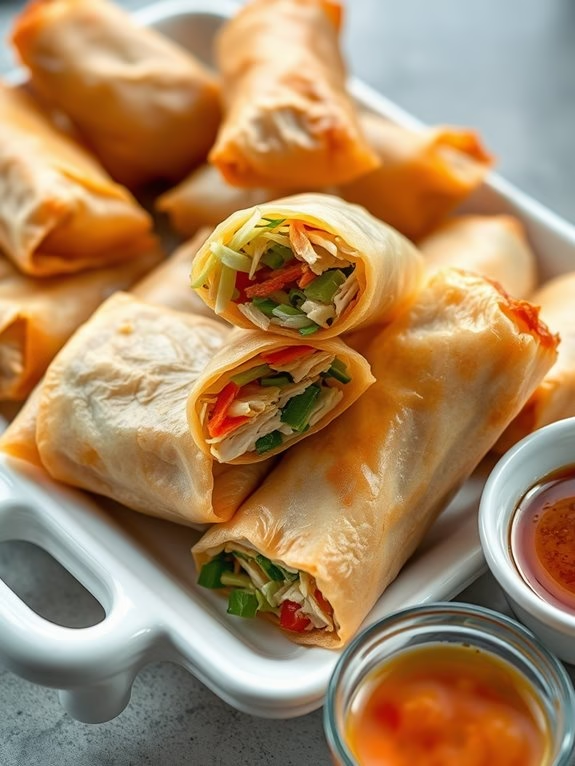
Chicken and Vegetable Spring Rolls are a delicious and healthy appetizer to serve your guests. This dish is a blend of fresh, crisp vegetables and tender chicken encased in a golden, crispy roll. Not only are these spring rolls easy to prepare, but they also offer a light and satisfying start to any meal, with the added benefit of being low in calories.
The combination of chicken and vegetables makes these spring rolls a nutritious option. The chicken provides a lean source of protein, while the vegetables contribute essential vitamins and fiber. This mouthwatering appetizer can be served with a variety of dipping sauces, allowing your guests to customize their experience to their taste preference.
Ingredients (for 4-6 people):
- 2 boneless, skinless chicken breasts
- 1 cup shredded cabbage
- 1 cup grated carrots
- 1 bell pepper, thinly sliced
- 3 green onions, finely chopped
- 2 cloves garlic, minced
- 1 tablespoon soy sauce
- 1 tablespoon sesame oil
- 12 spring roll wrappers
- Cooking oil for frying
- Salt and pepper to taste
Cooking Instructions:
- Begin by cooking the chicken breasts. Season them with salt and pepper and cook in a pan over medium heat until fully cooked. Once done, set them aside to cool.
- In the same pan, sauté the garlic until fragrant. Add the cabbage, carrots, bell pepper, and green onions. Cook until the vegetables are tender.
- Once the chicken has cooled, shred it into small pieces. Add the shredded chicken to the pan with the vegetables. Stir in the soy sauce and sesame oil, mixing well.
- Lay out the spring roll wrappers on a clean surface. Place a spoonful of the chicken and vegetable mixture onto the center of each wrapper. Fold the sides of the wrapper over the filling, then roll it up tightly. Repeat this process for all the spring rolls.
- In a deep fryer or large pot, heat the cooking oil. Once the oil is hot, fry the spring rolls until they’re golden brown. This should take about 2-3 minutes per side.
- Once done, remove the spring rolls from the oil and place them on a paper towel to drain any excess oil. Serve them while hot with your choice of dipping sauce.
Extra Tips:
When cooking the Chicken and Vegetable Spring Rolls, it’s important to verify the oil is hot enough before adding the rolls. This guarantees a crisp and golden exterior.
Also, be sure not to overfill the spring roll wrappers, as this could cause them to burst open while frying.
Finally, these spring rolls can be made ahead and frozen, making them a convenient option for parties or gatherings. Simply fry them straight from the freezer when ready to serve.
Chicken Bruschetta Skewers
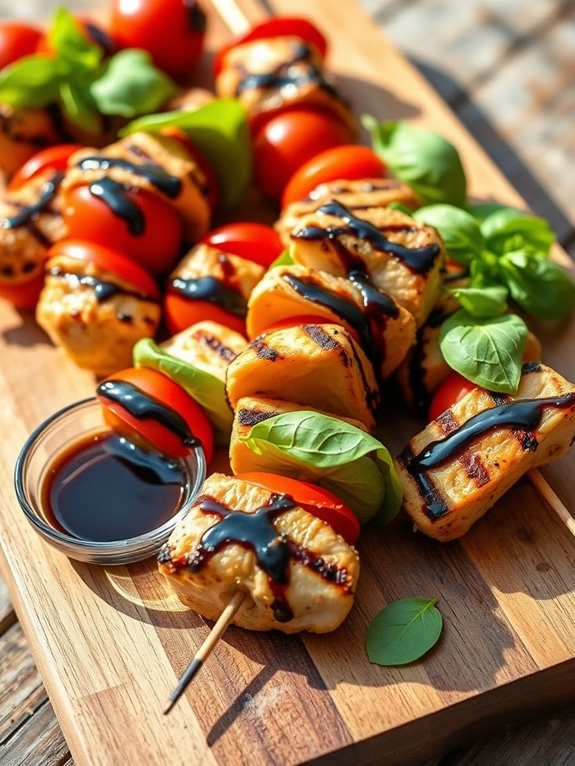
Searching for a healthy and delicious appetizer that you can whip up for your next dinner party? Search no more than Chicken Bruschetta Skewers. These skewers are a unique twist on the classic Italian antipasto dish, combining succulent chicken pieces with ripe tomatoes, fresh basil, and a tangy balsamic glaze. Not only are they bursting with flavor, but they’re also easy to make, and can be served either hot or cold, making them a versatile choice for any occasion.
What sets Chicken Bruschetta Skewers apart is its use of lean, protein-rich chicken, which is grilled to perfection and then threaded onto skewers along with the bruschetta toppings. The result is a dish that’s not just delicious, but also nutritious, making it perfect for health-conscious guests. It’s also an excellent option for people following a low-carb or gluten-free diet.
Ingredients:
- 2 boneless, skinless chicken breasts
- 2 cups of cherry tomatoes
- 1 cup of fresh basil leaves
- 2 cloves of garlic, minced
- 1/4 cup of extra virgin olive oil
- 1/4 cup of balsamic vinegar
- Salt and pepper to taste
- Wooden skewers, soaked in water
Cooking Instructions:
- Start by cutting the chicken breasts into bite-sized pieces. Season them with salt and pepper, and set them aside.
- In a large bowl, combine the cherry tomatoes, minced garlic, and fresh basil leaves. Drizzle the mixture with olive oil, and toss everything together until well coated.
- Heat a grill pan over medium heat. Once hot, add the chicken pieces and grill them until they’re cooked through and have a nice char on the outside. This should take about 5-7 minutes on each side.
- Once the chicken is cooked, start threading the ingredients onto the skewers. Start with a piece of chicken, followed by a cherry tomato and a basil leaf. Repeat this process until all the skewers are filled.
- Place the skewers back on the grill pan and drizzle them with balsamic vinegar. Let them cook for another 2-3 minutes, until the vinegar has reduced and formed a glaze.
- Remove the skewers from the grill pan and let them cool slightly before serving.
Extra Tips: It’s important to soak the wooden skewers in water for at least 30 minutes prior to use. This prevents them from burning on the grill.
Also, if you’re serving these skewers at a party, consider providing some extra balsamic glaze on the side for dipping. It adds an extra layer of flavor that your guests are sure to love.
Finally, these skewers can be made ahead of time and refrigerated until ready to serve. Just be sure to bring them to room temperature before grilling.
Lemon Herb Chicken Wings
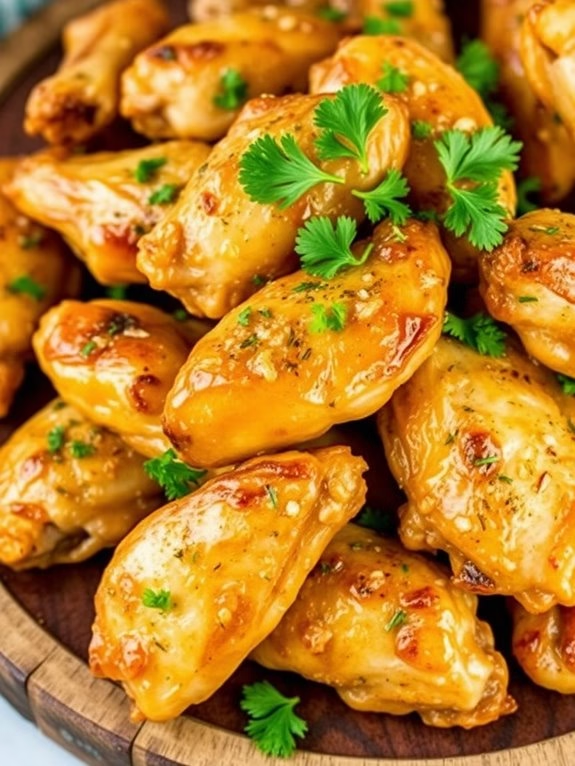
Lemon Herb Chicken Wings are a healthy alternative to the traditional deep-fried variety. These appetizer-worthy chicken wings are marinated in a blend of bright lemon, fresh herbs, and spices for a tangy and invigorating flavor. They’re then oven-baked to perfection, achieving a crispy exterior while maintaining juicy and tender meat inside. This appetizer is perfect for any occasion, be it a casual dinner party, a family gathering, or game night.
The key to attaining the perfect Lemon Herb Chicken Wings lies in the marinade. The combination of lemon, garlic, and a blend of herbs not only adds a burst of flavor but also breaks down the proteins in the chicken, making them more tender and juicy. The result is a chicken wing that’s flavorful right down to the bone.
Ingredients:
- 2 lbs chicken wings
- Juice and zest of 2 large lemons
- 4 cloves of garlic, minced
- 2 tablespoons olive oil
- 1 tablespoon dried rosemary
- 1 tablespoon dried thyme
- Salt and pepper to taste
- Fresh parsley for garnish
Cooking Instructions:
- In a large bowl, combine the lemon juice, lemon zest, minced garlic, olive oil, dried rosemary, dried thyme, salt, and pepper. Mix well until all ingredients are thoroughly combined.
- Add the chicken wings to the bowl and toss to coat well with the marinade. Cover the bowl and allow the chicken wings to marinate in the refrigerator for at least 2 hours, or overnight for best results.
- Preheat your oven to 400 degrees Fahrenheit (200 degrees Celsius). Line a baking sheet with aluminum foil for easy cleanup.
- Arrange the marinated chicken wings on the prepared baking sheet in a single layer. Make sure to leave some space between each wing to allow for even cooking.
- Bake the chicken wings in the preheated oven for about 40-45 minutes, or until they’re golden brown and crispy. Turn the wings halfway through to guarantee even cooking.
- Once done, remove the chicken wings from the oven and let them rest for a few minutes before serving.
- Garnish with fresh parsley and serve warm.
Extra Tips:
When marinating the chicken wings, make sure to turn them occasionally to confirm that all parts are well-coated with the marinade.
Also, while it’s tempting to immediately dig into the freshly baked chicken wings, allowing them to rest for a few minutes after removing from the oven helps the juices to redistribute throughout the meat, resulting in a more flavorful and juicy wing.
Finally, while this recipe calls for dried herbs, feel free to substitute with fresh ones for an even more vibrant flavor. Just remember that fresh herbs are more potent, so you’ll need less of them.
Enjoy these lemony, herb-infused wings as a healthy and delicious appetizer.