
When it comes to hosting a party, the right appetizers can truly make all the difference.
I always turn to easy chicken appetizers that are sure to impress my guests.
From mouthwatering grilled chicken skewers to creamy buffalo chicken dip, the options are endless!
Each bite is packed with flavor and leaves everyone wanting more.
Let’s explore 11 easy chicken appetizers that will take your next gathering to the next level!
Chicken Skewers
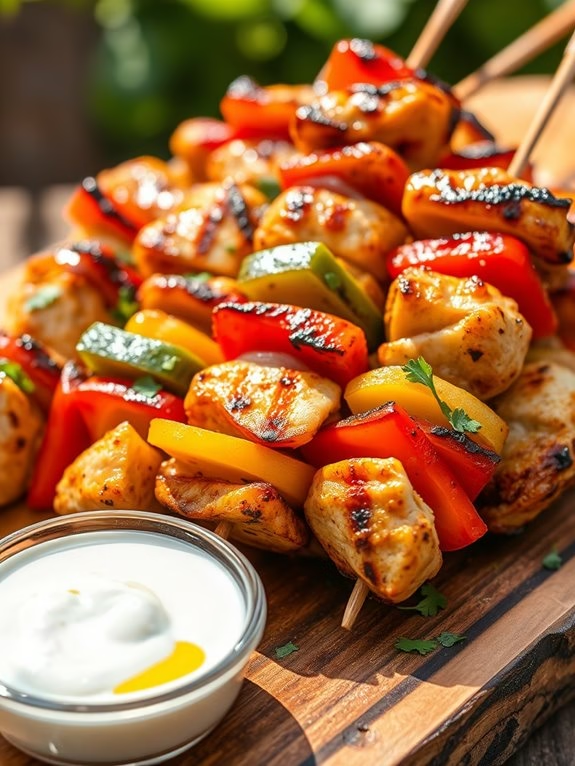
Chicken skewers are a fantastic choice for party appetizers, combining flavor, ease of preparation, and a fun presentation. These bite-sized delights are marinated in a savory mixture that infuses the chicken with a delicious taste, then grilled to perfection. Perfect for gatherings, they can be served with a variety of dipping sauces, making them a versatile option that guests will love.
The beauty of chicken skewers lies in their adaptability. You can easily customize the marinade and vegetables to suit your taste preferences or the theme of your party. Whether you prefer a tangy citrus marinade or a spicy chili blend, these skewers can accommodate your cravings. Plus, they’re quick to prepare and can be made ahead of time, allowing you to enjoy the party along with your guests.
Ingredients (serving size: 4-6 people)
- 1.5 pounds of boneless, skinless chicken breasts, cut into 1-inch cubes
- 1/4 cup olive oil
- 2 tablespoons soy sauce
- 2 tablespoons honey
- 2 tablespoons lemon juice
- 3 cloves garlic, minced
- 1 teaspoon paprika
- 1 teaspoon dried oregano
- 1/2 teaspoon black pepper
- 1/2 teaspoon salt
- 1 bell pepper, cut into 1-inch pieces
- 1 red onion, cut into 1-inch pieces
- Wooden or metal skewers (if using wooden skewers, soak them in water for at least 30 minutes)
Cooking Instructions
- Prepare the Marinade: In a large mixing bowl, combine the olive oil, soy sauce, honey, lemon juice, minced garlic, paprika, oregano, black pepper, and salt. Whisk until the ingredients are well blended to create a flavorful marinade.
- Marinate the Chicken: Add the cubed chicken to the marinade, ensuring each piece is evenly coated. Cover the bowl with plastic wrap and refrigerate for at least 30 minutes, or up to 2 hours for more intense flavor.
- Prepare the Skewers: If you’re using wooden skewers, make sure to soak them in water for at least 30 minutes to prevent burning on the grill. If using metal skewers, you can skip this step.
- Assemble the Skewers: Once marinated, thread the chicken pieces onto the skewers, alternating with pieces of bell pepper and red onion for added color and flavor. Aim for 4-5 pieces of chicken per skewer, along with vegetables.
- Preheat the Grill: Preheat your grill to medium-high heat. If using a grill pan, heat it over medium-high heat on the stovetop.
- Grill the Skewers: Place the assembled skewers on the grill. Cook for about 10-12 minutes, turning occasionally, until the chicken is cooked through and has nice grill marks. The internal temperature should reach 165°F (75°C).
- Serve: Once cooked, remove the skewers from the grill and let them rest for a couple of minutes. Serve warm with your choice of dipping sauces, such as tzatziki, ranch, or a spicy sriracha sauce.
Extra Tips
For an extra layer of flavor, consider adding additional spices or herbs to the marinade, such as cumin or fresh cilantro. You can also experiment with different vegetables like zucchini, cherry tomatoes, or mushrooms to mix up the skewers.
If you want a smoky flavor, try using a charcoal grill instead of a gas grill. For easier serving, you can pre-cut the skewers into smaller portions after grilling, allowing guests to pick them up easily.
Enjoy your delicious chicken skewers at your next party!
Buffalo Chicken Dip

Buffalo Chicken Dip is a crowd-pleasing appetizer that combines the bold flavors of buffalo sauce and creamy cheese, making it an ideal choice for parties and gatherings. This dish isn’t only easy to prepare, but it also offers a delightful balance of spicy and savory that will have your guests coming back for seconds.
Served warm with tortilla chips, celery sticks, or crackers, this dip is sure to be a hit with everyone. To make Buffalo Chicken Dip, shredded chicken is mixed with cream cheese, ranch dressing, and hot sauce, then baked until bubbly and golden brown.
Whether you’re hosting a game day party or a casual get-together, this recipe is simple enough for novice cooks while still being flavorful enough to impress even the most discerning palates. So gather your ingredients and get ready to whip up a batch of this irresistible dip that will have everyone raving!
Ingredients (serving size: 4-6 people)
- 2 cups shredded cooked chicken
- 1 (8 oz) package cream cheese, softened
- 1/2 cup ranch dressing
- 1/2 cup buffalo sauce (adjust to taste)
- 1 cup shredded cheddar cheese
- 1/2 cup crumbled blue cheese (optional)
- Tortilla chips, celery sticks, or crackers for serving
Cooking Instructions
- Preheat the Oven: Begin by preheating your oven to 350°F (175°C). This guarantees that your dip will cook evenly and thoroughly once it’s placed inside.
- Mix the Ingredients: In a large mixing bowl, combine the shredded chicken, softened cream cheese, ranch dressing, and buffalo sauce. Use a spatula to mix everything together until the ingredients are well blended and the cream cheese is fully incorporated.
- Add Cheese: Fold in the shredded cheddar cheese and crumbled blue cheese (if using) into the mixture. Make sure to distribute the cheese evenly throughout the dip for a cheesy flavor in every bite.
- Transfer to Baking Dish: Spoon the combined mixture into an oven-safe baking dish. Spread it out evenly with your spatula to guarantee it cooks uniformly.
- Bake the Dip: Place the baking dish in the preheated oven and bake for about 20-25 minutes. You want the dip to be heated through and bubbly, with a slight golden color on top, indicating that it’s ready to serve.
- Serve: Once baked, remove the dish from the oven and let it cool for a few minutes. Serve hot with tortilla chips, celery sticks, or crackers for dipping.
Extra Tips
For added flavor, consider using rotisserie chicken for a quick and easy option. You can also adjust the level of spiciness by varying the amount of buffalo sauce you add—start with less if you’re serving guests who may not enjoy too much heat.
If you want to make this dish ahead of time, you can prepare it in advance and store it in the refrigerator. Just remember to bake it right before serving to enjoy it warm and fresh!
Mini Chicken Quesadillas

Mini Chicken Quesadillas are a delightful and easy-to-make appetizer that will certainly impress your guests at any party. These bite-sized treats are filled with tender chicken, melted cheese, and vibrant veggies. They can be served with a variety of dips, such as salsa, guacamole, or sour cream, making them versatile enough to please any palate.
The best part? They’re quick to prepare, allowing you to spend more time enjoying the festivities with your friends and family. This dish not only satisfies cravings for savory flavors but also allows for customization based on your preferences. You can add different spices, swap out the cheese, or even incorporate other vegetables to suit your taste.
Whether you’re hosting a casual get-together or a festive celebration, Mini Chicken Quesadillas are sure to be a hit!
Ingredients (Serves 4-6):
- 2 cups cooked, shredded chicken
- 1 cup shredded cheese (cheddar, Monterey Jack, or a blend)
- 1/2 cup bell peppers, diced
- 1/4 cup red onion, diced
- 1 teaspoon taco seasoning
- 8 small flour tortillas
- 2 tablespoons olive oil
- Salsa, for serving
- Sour cream, for serving
- Fresh cilantro, chopped (optional, for garnish)
Cooking Instructions:
1. Prepare the Chicken Filling: In a mixing bowl, combine the shredded chicken, cheese, diced bell peppers, diced red onion, and taco seasoning. Mix well until all ingredients are evenly distributed. This filling is the heart of your quesadillas, so make sure everything is well blended for a flavorful bite.
2. Assemble the Quesadillas: Lay out four tortillas on a clean surface. Distribute the chicken filling evenly among these tortillas, placing the mixture on one half of each tortilla. Fold the tortillas over to cover the filling, creating a half-moon shape. This folding technique keeps the filling securely inside while cooking.
3. Cook the Quesadillas: Heat one tablespoon of olive oil in a large skillet over medium heat. Once the oil is hot, carefully place the folded quesadillas in the skillet. Cook for about 3-4 minutes on each side, or until they’re golden brown and the cheese has melted.
You may need to work in batches if your skillet isn’t large enough to accommodate all the quesadillas at once.
4. Slice and Serve: Once the quesadillas are cooked, remove them from the skillet and let them cool for a minute. Use a sharp knife or pizza cutter to slice each quesadilla into smaller wedges. Arrange them on a serving platter and garnish with fresh cilantro, if desired. Serve with salsa and sour cream on the side for dipping.
Extra Tips:
For an added kick, consider incorporating jalapeños or hot sauce into the chicken filling. If you want to make these quesadillas even more special, try mixing different types of cheese or adding black beans for extra protein and texture.
To keep the quesadillas warm while you cook the rest, place them in an oven set to low heat. Enjoy experimenting with flavors and watch your guests rave about this tasty appetizer!
Chicken Satay With Peanut Sauce
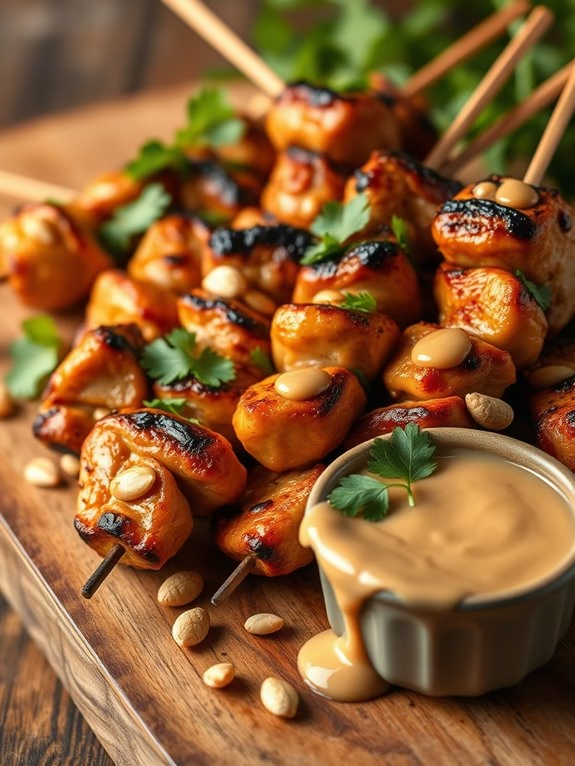
Chicken Satay with Peanut Sauce is a delightful appetizer that brings a taste of Southeast Asia to your party table. This dish features marinated chicken skewers grilled to perfection, served alongside a rich and creamy peanut sauce that balances savory, sweet, and spicy flavors. It’s a crowd-pleaser that’s perfect for gatherings, offering an exotic twist that will impress your guests.
To prepare Chicken Satay with Peanut Sauce, you’ll need to marinate the chicken in a flavorful blend of spices and coconut milk, which not only tenderizes the meat but also infuses it with deliciousness. Once grilled, the satay is served with a homemade peanut sauce that complements the chicken beautifully. This dish isn’t only easy to make but also a fun way to enjoy a variety of flavors in one bite.
Ingredients (Serves 4-6):
- 1.5 pounds boneless, skinless chicken thighs, cut into strips
- 1/4 cup coconut milk
- 2 tablespoons soy sauce
- 2 tablespoons brown sugar
- 1 tablespoon curry powder
- 1 tablespoon ground coriander
- 1 teaspoon garlic powder
- 1 teaspoon ginger powder
- 1 tablespoon lime juice
- Salt and pepper, to taste
- Bamboo skewers (soaked in water for 30 minutes)
For the Peanut Sauce:
- 1/2 cup creamy peanut butter
- 1/2 cup coconut milk
- 2 tablespoons soy sauce
- 1 tablespoon brown sugar
- 1 tablespoon lime juice
- 1 teaspoon sriracha (or more, to taste)
- 1/4 cup water (to thin, if needed)
Cooking Instructions:
1. Marinate the Chicken:
In a large bowl, combine the coconut milk, soy sauce, brown sugar, curry powder, ground coriander, garlic powder, ginger powder, lime juice, salt, and pepper. Whisk until well blended.
Add the chicken strips to the marinade, ensuring they’re evenly coated. Cover the bowl with plastic wrap and refrigerate for at least 1 hour, or up to overnight for more intense flavor.
2. Prepare the Peanut Sauce:
In a medium bowl, mix together the creamy peanut butter, coconut milk, soy sauce, brown sugar, lime juice, and sriracha. Use a whisk to blend until smooth.
If the sauce is too thick, gradually add water until you reach your desired consistency. Taste and adjust seasoning if needed, then set aside.
3. Preheat the Grill:
Preheat your grill to medium-high heat. If using an indoor grill or grill pan, make sure it’s properly heated before adding the chicken skewers.
4. Skewer the Chicken:
Remove the chicken from the marinade and thread the strips onto the soaked bamboo skewers. Make sure to leave a little space between each piece for even cooking.
5. Grill the Chicken:
Place the chicken skewers on the preheated grill. Grill for about 4-5 minutes on each side, or until the chicken is cooked through and has nice grill marks.
The internal temperature should reach 165°F (75°C).
6. Serve:
Once the chicken is done grilling, remove it from the skewers and transfer it to a serving platter. Drizzle some of the peanut sauce over the chicken and serve the remaining sauce on the side for dipping.
Extra Tips:
For a more authentic taste, you can add some chopped fresh cilantro or crushed peanuts as a garnish on top of the grilled chicken.
If you’re preparing this dish for a larger crowd, consider doubling the recipe and using a variety of vegetables, like bell peppers and onions, alongside the chicken on the skewers. This won’t only add color but also enhance the flavors.
Enjoy your party with this delicious Chicken Satay with Peanut Sauce!
Spinach and Chicken Stuffed Mushrooms

Spinach and Chicken Stuffed Mushrooms are a delightful appetizer that combines the savory flavors of seasoned chicken and fresh spinach, all nestled in tender mushroom caps. These bite-sized treats are perfect for any party or gathering, offering a deliciously rich filling that will have your guests coming back for more. Not only are they tasty, but they’re also easy to prepare, making them an ideal choice for both novice cooks and seasoned chefs alike.
The combination of cream cheese and Parmesan cheese adds creaminess and depth of flavor to the stuffing, while the mushrooms provide a hearty base that enhances each bite. These stuffed mushrooms can be made ahead of time and baked just before serving, allowing you to spend more time enjoying the party and less time in the kitchen.
Ingredients (Serves 4-6):
- 12 large mushrooms, stems removed
- 1 cup cooked chicken, shredded
- 1 cup fresh spinach, chopped
- 4 oz cream cheese, softened
- 1/2 cup grated Parmesan cheese
- 2 cloves garlic, minced
- 1/4 teaspoon salt
- 1/4 teaspoon black pepper
- 1/4 teaspoon red pepper flakes (optional)
- 2 tablespoons olive oil
- 1/4 cup breadcrumbs (for topping)
- Fresh parsley, chopped (for garnish)
Cooking Instructions:
- Prepare the Mushrooms: Preheat your oven to 375°F (190°C). Clean the mushrooms with a damp cloth and carefully remove the stems. Set aside the caps and chop the stems finely; you’ll be using them in the filling.
- Cook the Filling: In a skillet, heat 2 tablespoons of olive oil over medium heat. Add the chopped mushroom stems and minced garlic to the skillet and sauté for about 2-3 minutes until they’re softened and fragrant.
- Mix the Filling: In a large mixing bowl, combine the sautéed mushroom stems and garlic with the cooked shredded chicken, chopped spinach, cream cheese, and grated Parmesan cheese. Season with salt, black pepper, and red pepper flakes if you’re using them. Mix everything thoroughly until you have a well-combined filling.
- Stuff the Mushrooms: Using a small spoon or your hands, fill each mushroom cap generously with the chicken and spinach mixture. Make sure to pack the filling slightly to prevent it from falling out during baking.
- Top with Breadcrumbs: Place the stuffed mushrooms on a baking sheet lined with parchment paper. Sprinkle breadcrumbs over the top of each stuffed mushroom to add a crunchy texture.
- Bake: Bake in the preheated oven for 20-25 minutes or until the mushrooms are tender and the tops are golden brown.
- Garnish and Serve: Once baked, remove them from the oven and let them cool for a couple of minutes. Garnish with fresh chopped parsley before serving to add a touch of color and freshness.
Extra Tips:
For an even richer flavor, you can add some crumbled feta cheese to the filling or incorporate different herbs like thyme or oregano.
If you’re short on time, consider using rotisserie chicken for the filling. Additionally, feel free to experiment with different types of mushrooms, such as portobello or cremini, for a unique twist on this classic dish.
Remember to serve these stuffed mushrooms warm for the best taste and texture!
Crispy Chicken Sliders
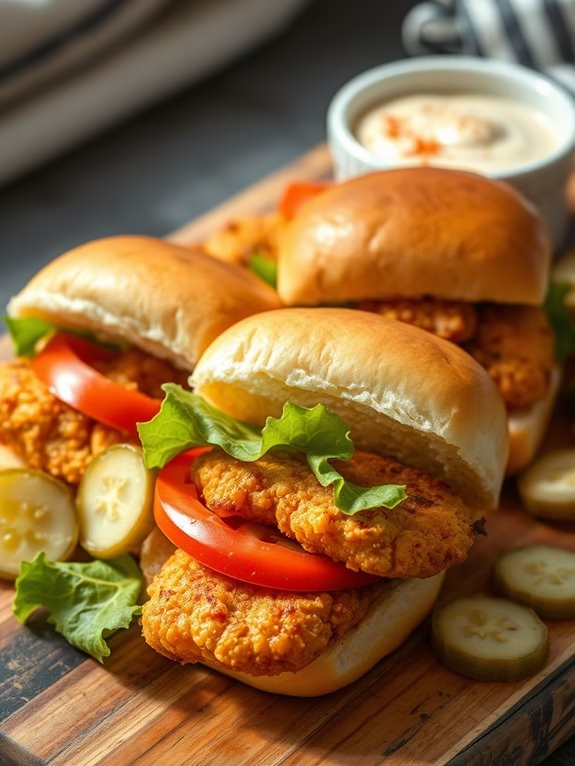
Crispy Chicken Sliders are the perfect addition to any party, providing a delicious and satisfying bite that guests will love. With tender chicken fillets coated in a crispy breading and nestled between soft slider buns, these little sandwiches are packed with flavor and can be customized to suit any palate.
Whether you’re serving them at a birthday bash, a casual get-together, or a game day gathering, these sliders are sure to be a hit.
The best part about these sliders is their versatility. You can serve them plain, or add a variety of toppings and sauces to enhance the flavor profile. Add some crunchy pickles, zesty mayo, or spicy slaw to elevate your sliders. Not only are they easy to make, but they also disappear quickly, making them an ideal finger food for parties.
Let’s explore the recipe for Crispy Chicken Sliders that serve 4-6 people.
Ingredients:
- 1 pound chicken breast, cut into small fillets
- 1 cup buttermilk
- 1 cup all-purpose flour
- 1 teaspoon garlic powder
- 1 teaspoon onion powder
- 1 teaspoon paprika
- 1 teaspoon salt
- ½ teaspoon black pepper
- ½ teaspoon cayenne pepper (optional for heat)
- Vegetable oil for frying
- 12 slider buns
- Lettuce leaves
- Slices of tomato
- Pickles (optional)
- Your choice of sauce (e.g., mayonnaise, barbecue sauce, or hot sauce)
Cooking Instructions:
- Marinate the Chicken: Begin by marinating the chicken fillets in buttermilk for at least 1 hour, or preferably overnight. This step tenderizes the chicken and adds moisture, helping to guarantee a juicy slider.
- Prepare the Breading Station: In a shallow dish, combine the flour, garlic powder, onion powder, paprika, salt, black pepper, and cayenne pepper. Mix well to guarantee the spices are evenly distributed. This seasoned flour mix will give the chicken a flavorful crust.
- Coat the Chicken: Once the chicken has marinated, remove each piece from the buttermilk, allowing excess liquid to drip off. Dredge each piece in the seasoned flour mixture, pressing down slightly to guarantee an even coating. Shake off any excess flour.
- Heat the Oil: In a large skillet, heat about ½ inch of vegetable oil over medium-high heat. To check if the oil is ready, drop a small piece of bread in; if it sizzles and bubbles, the oil is hot enough for frying.
- Fry the Chicken: Carefully place the coated chicken fillets into the hot oil, making sure not to overcrowd the pan. Fry for about 4-5 minutes on each side or until they’re golden brown and cooked through. Use a meat thermometer to check that the internal temperature reaches 165°F.
- Drain and Assemble: Once the chicken is cooked, transfer the fillets to a paper towel-lined plate to drain excess oil. While they’re still warm, place each crispy chicken fillet onto a slider bun. Add lettuce, tomato, pickles, and your choice of sauce.
- Serve: Arrange the sliders on a platter and serve immediately, allowing your guests to enjoy these crispy delights while they’re still warm.
Extra Tips: For extra crunch, you can double-dip the chicken in buttermilk and flour before frying, or try using panko breadcrumbs in place of regular flour for a more textured coating.
If you’re looking to save time, consider preparing the chicken in advance and just frying them just before your guests arrive. Serve with a variety of dipping sauces to cater to different tastes, and don’t forget to keep the sliders warm in a low oven if you’re making them ahead of time!
BBQ Chicken Meatballs

BBQ Chicken Meatballs are a delightful addition to any party spread, combining the rich flavors of barbecue sauce with the tender juiciness of chicken. They’re easy to prepare and can be served as finger food, making them perfect for mingling guests. Not only do they taste fantastic, but they also fill the room with a mouthwatering aroma that will have everyone enthusiastically anticipating the first bite.
These meatballs can be made in advance and reheated, which is a huge bonus for party planning. Pair them with toothpicks for easy serving, and consider having extra barbecue sauce on the side for dipping. These BBQ Chicken Meatballs are sure to be a hit, leaving your guests asking for the recipe!
Ingredients (Serves 4-6):
- 1 pound ground chicken
- 1/2 cup breadcrumbs
- 1/4 cup grated Parmesan cheese
- 1/4 cup chopped fresh parsley
- 1/4 cup finely chopped onion
- 2 cloves garlic, minced
- 1 large egg
- 1 teaspoon salt
- 1/2 teaspoon black pepper
- 1/2 teaspoon smoked paprika
- 1 cup BBQ sauce (plus extra for serving)
Cooking Instructions:
- Preheat the Oven: Begin by preheating your oven to 400°F (200°C). This guarantees that the meatballs will cook evenly and develop a nice golden-brown exterior.
- Prepare the Meatball Mixture: In a large mixing bowl, combine the ground chicken, breadcrumbs, grated Parmesan cheese, chopped parsley, onion, garlic, egg, salt, black pepper, and smoked paprika. Using your hands or a spatula, mix everything together until just combined. Be careful not to overmix, as this can make the meatballs tough.
- Form the Meatballs: Using your hands, scoop out a portion of the mixture and roll it into a ball about the size of a golf ball. Place the formed meatballs on a baking sheet lined with parchment paper. Make sure they’re spaced apart to allow for even cooking.
- Bake the Meatballs: Once all the meatballs are formed and placed on the baking sheet, place them in the preheated oven. Bake for approximately 20-25 minutes or until they’re fully cooked through and reach an internal temperature of 165°F (74°C).
- Glaze with BBQ Sauce: After the meatballs are cooked, remove them from the oven and brush them generously with BBQ sauce. You can also toss them in a bowl with the sauce for a more even coating.
- Serve and Enjoy: Transfer the glazed meatballs to a serving platter. If desired, provide extra BBQ sauce on the side for dipping. Enjoy these flavorful appetizers while they’re warm!
Extra Tips:
To enhance the flavor of your BBQ Chicken Meatballs, consider marinating the ground chicken in your favorite BBQ sauce for a few hours before mixing it with the other ingredients.
Additionally, you can experiment with different spices or add some chopped jalapeños for a spicy kick. If you’re short on time, using store-bought BBQ sauce is perfectly acceptable, but try to choose a high-quality brand for the best flavor.
Chicken and Cheese Pinwheels

Chicken and Cheese Pinwheels are a fun and delicious appetizer that’s perfect for any party. These bite-sized snacks combine the savory flavors of seasoned chicken with creamy cheese, all wrapped in a soft tortilla. They aren’t only easy to make but also visually appealing, making them a hit among guests.
Whether you’re hosting a birthday party, a casual get-together, or a holiday gathering, these pinwheels are sure to impress.
To create these delightful pinwheels, you can customize the ingredients according to your taste. You might opt for different types of cheese or add in some vegetables for an extra crunch. The beauty of this recipe lies in its versatility, allowing you to get creative while maintaining that classic chicken and cheese flavor.
Serve them with a zesty dipping sauce or a simple salsa for an added kick!
Ingredients (Serves 4-6)
- 2 cups cooked chicken, shredded
- 1 cup cream cheese, softened
- 1 cup shredded cheddar cheese
- 1/2 cup sour cream
- 1/4 cup chopped green onions
- 1 teaspoon garlic powder
- 1 teaspoon onion powder
- 4 large flour tortillas
- Salt and pepper to taste
- Optional: Fresh herbs for garnish
Cooking Instructions
- Prepare the Chicken Mixture: In a large bowl, combine the shredded chicken, softened cream cheese, shredded cheddar cheese, sour cream, chopped green onions, garlic powder, onion powder, and a pinch of salt and pepper. Mix everything thoroughly until well combined. The mixture should be creamy and spreadable.
- Spread the Mixture: Lay one flour tortilla on a clean, flat surface. Using a spatula or the back of a spoon, spread a generous layer of the chicken mixture evenly across the tortilla, leaving about half an inch from the edges to prevent overflow when rolling.
- Roll the Tortilla: Starting from one end, carefully roll the tortilla tightly around the filling. Make sure to keep it as tight as possible without tearing the tortilla. Continue rolling until you reach the edge of the tortilla, then press it gently to seal the roll.
- Slice the Pinwheels: Using a sharp knife, cut the rolled tortilla into bite-sized pieces, about 1-2 inches wide. Arrange these pinwheels on a serving platter, cut side up, for a beautiful presentation.
- Chill and Serve: For best flavor, cover the platter with plastic wrap and refrigerate the pinwheels for at least 30 minutes before serving. This helps the flavors meld together and makes them easier to handle.
Extra Tips
When making Chicken and Cheese Pinwheels, feel free to experiment with different ingredients based on your preferences. You can add diced bell peppers, jalapeños, or even olives for an added twist.
Additionally, if you’re short on time, you can use rotisserie chicken for the filling to save on preparation. Finally, consider serving these pinwheels with a variety of dips to cater to your guests’ tastes, making your appetizer spread even more enticing!
Teriyaki Chicken Bites
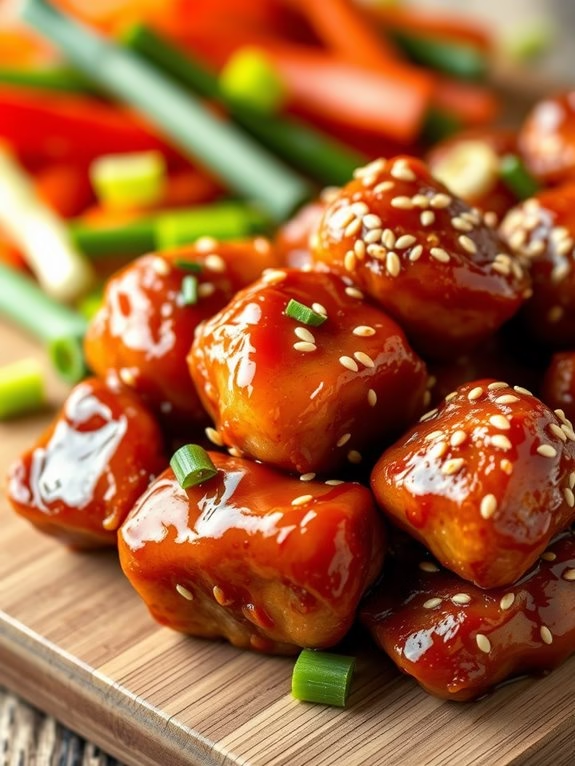
Teriyaki Chicken Bites are a delicious and crowd-pleasing appetizer that can elevate any party. These bite-sized pieces of chicken are marinated in a savory and slightly sweet teriyaki sauce, then grilled or baked to perfection. Not only are they easy to prepare, but they also bring an Asian-inspired twist to your appetizer spread, making them a favorite among guests of all ages.
Serve them with toothpicks for easy eating and watch as they disappear from the platter! This dish is perfect for gatherings as it can be made ahead of time and served warm or at room temperature. The balance of flavors combined with the tender chicken makes these bites incredibly satisfying.
Pair them with a side of steamed rice or a crunchy vegetable salad for a complete meal, or enjoy them on their own as a tasty finger food. Get ready to impress your guests with these tantalizing Teriyaki Chicken Bites!
Ingredients (serves 4-6)
- 1 pound boneless, skinless chicken breasts, cut into bite-sized pieces
- 1/2 cup teriyaki sauce
- 2 tablespoons soy sauce
- 2 tablespoons honey
- 1 tablespoon sesame oil
- 2 cloves garlic, minced
- 1 teaspoon fresh ginger, minced
- 1 tablespoon cornstarch
- 1 tablespoon water
- Sesame seeds, for garnish
- Green onions, sliced, for garnish
Cooking Instructions
- Prepare the Marinade: In a mixing bowl, whisk together the teriyaki sauce, soy sauce, honey, sesame oil, minced garlic, and minced ginger. This combination will create a flavorful marinade that infuses the chicken with an irresistible taste.
- Marinate the Chicken: Place the bite-sized chicken pieces in a resealable plastic bag or a shallow dish. Pour the marinade over the chicken, making sure that each piece is well coated. Seal the bag or cover the dish and refrigerate for at least 30 minutes, or up to 2 hours for more intense flavor.
- Preheat the Oven or Grill: If you’re using an oven, preheat it to 400°F (200°C). If grilling, preheat the grill to medium-high heat. This guarantees that the chicken cooks evenly and achieves a nice char.
- Thicken the Marinade: In a small saucepan, combine the cornstarch and water, stirring until smooth. Add the remaining marinade (set aside the portion used for marinating the chicken) to the saucepan. Cook over medium heat, stirring constantly until the sauce thickens, about 2-3 minutes. This will be used as a glaze for the chicken bites.
- Cook the Chicken: For baking, spread the marinated chicken on a lined baking sheet in a single layer. Bake for 15-20 minutes, flipping halfway through, until the chicken is cooked through and has a nice glaze. For grilling, thread the marinated chicken pieces onto skewers and grill for about 8-10 minutes, turning occasionally, until fully cooked.
- Garnish and Serve: Once cooked, remove the chicken from the oven or grill. Drizzle the thickened marinade over the chicken bites and sprinkle with sesame seeds and sliced green onions for garnish. Serve immediately while warm.
Extra Tips
For an added layer of flavor, consider adding vegetables like bell peppers or onions to the skewers while grilling. You can also adjust the sweetness of the teriyaki sauce by adding more honey or using low-sugar alternatives.
If you plan to make this dish in advance, reheat the chicken in the oven or microwave before serving to ascertain it remains juicy and flavorful. Enjoy your Teriyaki Chicken Bites!
Garlic Parmesan Chicken Wings

Garlic Parmesan Chicken Wings are a delightful appetizer that will surely impress your guests at any party. These wings are crispy on the outside and tender on the inside, coated in a savory blend of garlic, butter, and Parmesan cheese. They’re perfect for dipping in your favorite sauces and pair wonderfully with a cold beverage.
With their irresistible flavor and tantalizing aroma, these wings will be the star of your appetizer spread. The best part about these Garlic Parmesan Chicken Wings is how easy they’re to prepare. With just a handful of ingredients, you can whip up a batch that serves 4-6 people in no time.
Whether you’re hosting a game day party or a casual get-together, these wings will be a hit. So gather your ingredients and get ready to indulge in a mouthwatering treat that everyone will love!
Ingredients:
- 2 pounds chicken wings
- 1/2 cup unsalted butter
- 1/4 cup grated Parmesan cheese
- 4 cloves garlic, minced
- 1 teaspoon garlic powder
- 1 teaspoon onion powder
- 1 teaspoon dried parsley
- 1/2 teaspoon salt
- 1/4 teaspoon black pepper
- Optional: fresh parsley for garnish
Cooking Instructions:
- Preheat the Oven: Start by preheating your oven to 400°F (200°C). This high temperature is vital for achieving crispy wings that are cooked through.
- Prepare the Chicken Wings: Rinse the chicken wings under cold water and pat them dry with paper towels. Drying them thoroughly helps to guarantee that they crisp up nicely in the oven. You can also cut the wings at the joint to separate them into flats and drumsticks if desired.
- Season the Wings: In a large bowl, toss the chicken wings with salt, pepper, garlic powder, and onion powder until they’re evenly coated. This seasoning will enhance the flavor of the wings before they’re baked.
- Bake the Wings: Arrange the seasoned wings in a single layer on a baking sheet lined with parchment paper. Bake in the preheated oven for 40-45 minutes, flipping them halfway through the cooking time. This guarantees that they become crispy and golden on both sides.
- Prepare the Garlic Parmesan Sauce: While the wings are baking, melt the butter in a small saucepan over medium heat. Add the minced garlic and sauté for about 1-2 minutes until fragrant, being careful not to let it brown. Remove from heat and stir in the grated Parmesan cheese and dried parsley until well combined.
- Toss the Wings: Once the wings are done baking, remove them from the oven and transfer them to a large mixing bowl. Pour the garlic Parmesan sauce over the wings and toss them until they’re evenly coated.
- Garnish and Serve: If desired, garnish the wings with additional grated Parmesan and fresh parsley. Serve immediately with your favorite dipping sauces, such as ranch or blue cheese dressing.
Extra Tips:
For extra crispy wings, consider broiling them for the last 2-3 minutes of baking after tossing them in the sauce. Keep a close eye on them to prevent burning.
Additionally, you can marinate the wings in the seasoning overnight for even more flavor. Feel free to adjust the amount of garlic and cheese in the sauce according to your taste preferences. Enjoy your Garlic Parmesan Chicken Wings at your next party!
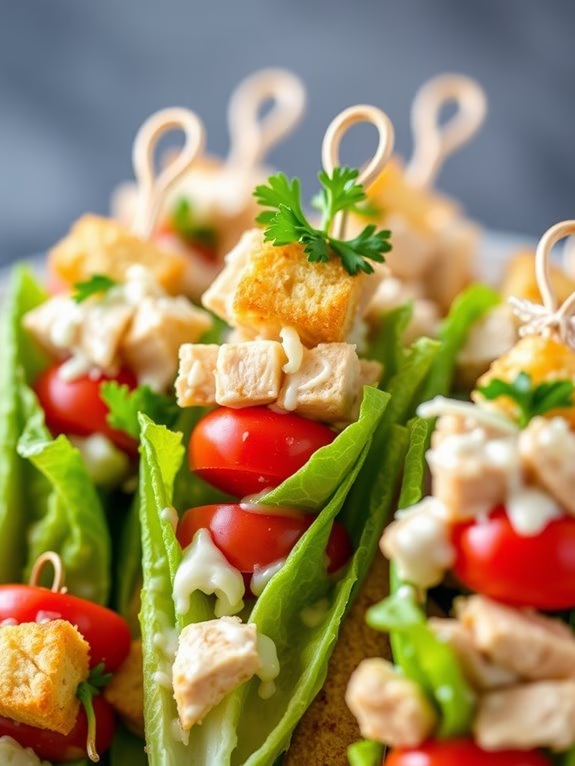
Chicken Caesar Salad Bites
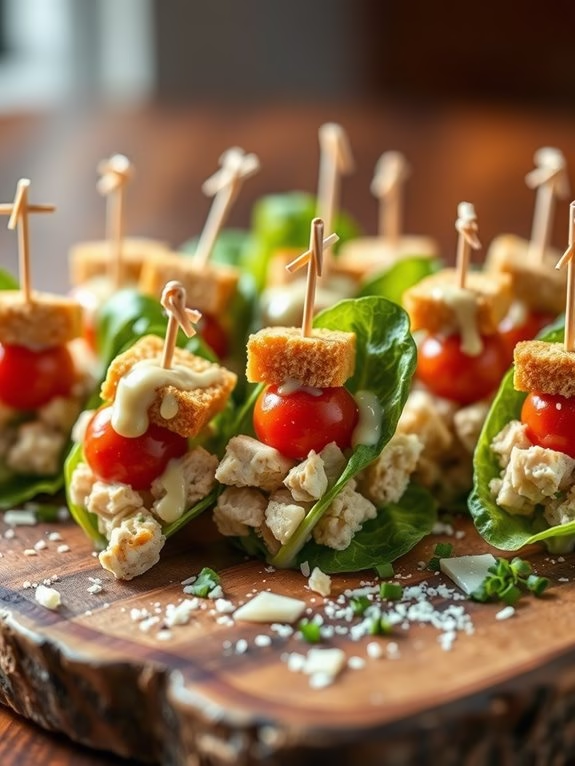
Chicken Caesar Salad Bites are the perfect party appetizer that combines the classic flavors of a Caesar salad in a bite-sized form. These mini delights aren’t only visually appealing but also incredibly easy to prepare, making them an ideal choice for gatherings.
The combination of tender chicken, crisp romaine lettuce, creamy Caesar dressing, and savory Parmesan cheese creates a burst of flavor that will leave your guests wanting more. With a delightful crunch from the crunchy croutons, these bites are sure to be a hit at your next event.
These Chicken Caesar Salad Bites are versatile enough to be served as an appetizer or even as a light meal. You can prepare them in advance, making them a stress-free option for entertaining. The assembly is quick and can be completed just before your guests arrive, ensuring everything is fresh and delicious.
So gather your ingredients, and let’s get started on creating these scrumptious bites that everyone will love!
Ingredients (Serves 4-6):
- 2 cups cooked chicken breast, diced
- 2 cups romaine lettuce, chopped
- 1 cup cherry tomatoes, halved
- ½ cup Caesar dressing
- ½ cup Parmesan cheese, grated
- 1 cup croutons
- Salt and pepper to taste
- Fresh parsley, chopped (for garnish)
- Mini skewers or toothpicks (for assembly)
Cooking Instructions:
- Prepare the Chicken: Start by cooking the chicken breast if it’s not pre-cooked. You can grill, boil, or sauté it until fully cooked. Once done, let it cool for a few minutes before dicing it into small, bite-sized pieces.
- Chop the Vegetables: While the chicken is cooling, wash and chop the romaine lettuce into small pieces. Cut the cherry tomatoes in half. Make sure the sizes are manageable for bite-sized servings.
- Mix the Salad: In a large mixing bowl, combine the diced chicken, chopped romaine, halved cherry tomatoes, and grated Parmesan cheese. Drizzle the Caesar dressing over the mixture and toss gently until everything is well coated. Add salt and pepper to taste.
- Assemble the Bites: Using mini skewers or toothpicks, start assembling the bites. Begin with a piece of romaine, followed by a scoop of the chicken mixture, and then top with a crouton. You can repeat this process if desired, depending on the size of your skewers.
- Garnish and Serve: Once all the bites are assembled, place them on a serving platter. Garnish with chopped fresh parsley for an added touch of color and flavor. Serve immediately or refrigerate until ready to serve.
Extra Tips:
For an even more flavorful experience, consider marinating the chicken in a bit of Caesar dressing before cooking it. This will infuse the meat with rich flavors right from the start.
Additionally, you can customize these bites by adding other ingredients like bacon bits or avocado for a twist on the classic Caesar salad. Just remember to keep the assembly simple and the ingredients fresh for the best taste. Enjoy your party!