

When it comes to hosting gatherings, chicken appetizers are always a hit!
They’re the perfect way to kick off any celebration with friends and family.
From savory Chicken Satay Skewers that are simply irresistible to creamy Buffalo Chicken Dip that everyone loves, there’s something for everyone.
And let’s not forget the crunchy Coconut Chicken Bites and the elegant Spinach and Chicken Stuffed Mushrooms that make your spread look so fancy!
Get ready to impress your guests with these delightful options that are sure to steal the show!
Chicken Satay Skewers

Chicken Satay Skewers are a delicious and popular appetizer that hails from Southeast Asia, particularly Indonesia and Thailand. These skewers feature marinated chicken pieces that are grilled to perfection and served with a creamy and flavorful peanut sauce. The combination of the savory marinated chicken and the rich peanut sauce creates a delightful taste experience that’s sure to please any crowd.
Perfect for parties or as a starter for a casual dinner, Chicken Satay Skewers are easy to prepare and make for a fun and interactive meal.
To achieve the best flavor, the chicken should be marinated for at least 30 minutes, but if you have time, letting it sit overnight will enhance the taste even more. The skewers can be cooked on a grill or in the oven, making them versatile for any cooking environment. Serve these skewers with fresh vegetables or a side of rice to complete the meal.
Ingredients (Serves 4-6):
- 1.5 lbs boneless, skinless chicken thighs, cut into bite-sized pieces
- 1/4 cup soy sauce
- 2 tablespoons brown sugar
- 1 tablespoon sesame oil
- 2 cloves garlic, minced
- 1 tablespoon fresh ginger, grated
- 1 teaspoon ground turmeric
- 1 teaspoon chili powder (adjust for spice preference)
- 1/2 cup creamy peanut butter
- 1/2 cup coconut milk
- 1 tablespoon lime juice
- 1 tablespoon soy sauce (for peanut sauce)
- Skewers (wooden or metal)
Cooking Instructions:
- Prepare the Marinade: In a bowl, combine soy sauce, brown sugar, sesame oil, minced garlic, grated ginger, ground turmeric, and chili powder. Mix well until the sugar is dissolved. This marinade will infuse the chicken with flavors and tenderness.
- Marinate the Chicken: Add the bite-sized chicken pieces to the marinade, ensuring they’re well coated. Cover the bowl and refrigerate for at least 30 minutes, or preferably overnight for the best flavor.
- Prepare the Peanut Sauce: In a separate bowl, whisk together the peanut butter, coconut milk, lime juice, and additional soy sauce. Mix until smooth and creamy. Adjust the consistency by adding more coconut milk if needed. Set aside for serving.
- Preheat the Grill or Oven: If using a grill, preheat it to medium-high heat. If using an oven, preheat to 400°F (200°C) and line a baking sheet with parchment paper.
- Skewer the Chicken: Thread the marinated chicken pieces onto the skewers, leaving a little space between each piece for even cooking. If you’re using wooden skewers, soak them in water for about 30 minutes to prevent burning.
- Cook the Skewers: Place the skewers on the grill or baking sheet. Grill for about 8-10 minutes, turning occasionally, until the chicken is cooked through and has nice char marks. If using the oven, bake for 15-20 minutes or until the chicken is cooked through.
- Serve: Once cooked, remove the skewers from the grill or oven and let them rest for a few minutes. Serve warm with the peanut sauce drizzled on top or on the side for dipping.
Extra Tips:
For an added layer of flavor, you can include chopped fresh herbs like cilantro or mint in the marinade.
Additionally, feel free to experiment with vegetables by adding bell peppers or onions to the skewers for a colorful presentation. If you’re grilling, make sure not to overcrowd the grill for even cooking.
Finally, serve with lime wedges for an extra burst of freshness!
Buffalo Chicken Dip

Buffalo Chicken Dip is a crowd-pleasing appetizer that combines the spicy flavor of buffalo wings with the creamy texture of dip. This dish is perfect for parties, game days, or any gathering where you want to impress your guests with minimal effort. The blend of shredded chicken, cream cheese, hot sauce, and cheese creates an irresistible concoction that pairs wonderfully with tortilla chips, celery sticks, or crackers.
Whether you’re a seasoned cook or a beginner in the kitchen, this recipe is simple to follow and guarantees delicious results. This dip isn’t only easy to prepare but also incredibly versatile. You can adjust the level of spiciness by varying the amount of hot sauce used, and you can even make it ahead of time to save on prep work.
Once baked, the Buffalo Chicken Dip becomes wonderfully bubbly and golden on top, making it as appealing to the eyes as it’s to the palate. Gather your ingredients, and let’s embark on creating this delightful appetizer that everyone will love!
Ingredients
(Serves 4-6 people):
- 2 cups cooked shredded chicken
- 1 package (8 oz) cream cheese, softened
- 1/2 cup ranch dressing
- 1/2 cup blue cheese dressing (or additional ranch)
- 3/4 cup buffalo wing sauce
- 1 cup shredded cheddar cheese
- 1/2 cup crumbled blue cheese (optional)
- Tortilla chips, celery sticks, or crackers for serving
Cooking Instructions:
- Preheat the Oven: Begin by preheating your oven to 350°F (175°C). This guarantees that your dip will bake evenly and get hot enough to melt the cheese perfectly.
- Mix the Base Ingredients: In a large mixing bowl, combine the softened cream cheese, ranch dressing, and buffalo wing sauce. Use a hand mixer or a spatula to mix until the ingredients are well-blended and smooth. This will be the creamy base of your dip.
- Add the Chicken and Cheese: Next, fold in the shredded chicken, shredded cheddar cheese, and crumbled blue cheese (if using) into the cream cheese mixture. Make sure to mix everything thoroughly so that the chicken and cheese are evenly distributed throughout the dip.
- Transfer to Baking Dish: Pour the mixture into a 9×9-inch baking dish or a similar-sized oven-safe dish. Spread it out evenly with a spatula to ensure even cooking and melting.
- Bake the Dip: Place the baking dish in the preheated oven and bake for about 20-25 minutes, or until the dip is hot and bubbly. You can broil it for an additional 2-3 minutes at the end for a golden top, but keep a close eye on it to avoid burning.
- Serve and Enjoy: Once baked, remove the dip from the oven and let it cool for a few minutes. Serve warm with tortilla chips, celery sticks, or crackers for dipping. Enjoy the flavor explosion of this spicy, creamy appetizer!
Extra Tips:
To make your Buffalo Chicken Dip even more flavorful, consider adding diced green onions or chopped jalapeños for an extra kick. You can also use rotisserie chicken to save time on cooking and shredding the chicken.
If you have leftovers, they can be stored in an airtight container in the refrigerator for up to 3 days and reheated in the oven or microwave. Finally, feel free to experiment with different cheeses or sauces to personalize the dip to your liking!
Mini Chicken Quesadillas

Mini Chicken Quesadillas are a perfect appetizer for gatherings, game days, or as a fun treat for the family. These bite-sized quesadillas are easy to prepare and can be customized to fit your taste preferences. Stuffed with seasoned chicken and melted cheese, they’re sure to be a crowd-pleaser.
Pair them with your favorite dipping sauces like salsa, guacamole, or sour cream for an added kick. This recipe is designed to serve 4-6 people, making it ideal for small parties or cozy family nights. The preparation is quick, and the cooking time is minimal, so you can whip these up in no time.
Let’s explore the ingredients and cooking instructions to create these delicious Mini Chicken Quesadillas.
Ingredients
- 2 cups cooked chicken, shredded
- 1 cup shredded cheddar cheese
- 1 cup shredded mozzarella cheese
- 1/2 cup diced bell peppers (red, green, or a mix)
- 1/2 cup diced onion
- 1 teaspoon taco seasoning
- 1 tablespoon olive oil
- 8 small flour tortillas
- Cooking spray or additional olive oil for frying
- Salsa or sour cream for serving (optional)
Cooking Instructions
- Prepare the Chicken Mixture: In a large bowl, combine the shredded chicken, cheddar cheese, mozzarella cheese, diced bell peppers, diced onion, and taco seasoning. Mix everything well until the ingredients are evenly distributed. This mixture will be the flavorful filling for your quesadillas.
- Assemble the Quesadillas: Lay out four flour tortillas on a clean surface. Evenly distribute the chicken mixture onto each tortilla, spreading it out but leaving a small border around the edges. Top with the remaining tortillas to create a sandwich.
- Heat the Pan: In a large skillet, heat 1 tablespoon of olive oil over medium heat. Once the oil is hot, you can also use cooking spray if you prefer a lighter option. Make sure the oil coats the bottom of the pan for even cooking.
- Cook the Quesadillas: Carefully place two quesadillas in the skillet (or more, depending on the size of your skillet) and cook for about 3-4 minutes, until the bottom is golden brown and crispy. Use a spatula to gently flip the quesadillas and cook the other side for another 3-4 minutes, until it’s also golden and the cheese is melted.
- Slice and Serve: Once cooked, remove the quesadillas from the skillet and let them cool for a minute. Use a pizza cutter or a sharp knife to slice each quesadilla into quarters. Serve with salsa or sour cream on the side for dipping.
Extra Tips
For added flavor, consider marinating the cooked chicken in lime juice and spices before shredding it. You can also experiment with different cheeses or add additional ingredients such as jalapeños or corn to the filling.
If you want to make them ahead of time, assemble the quesadillas, refrigerate them, and cook them just before serving for a fresh, warm appetizer. Enjoy your Mini Chicken Quesadillas!
Chicken Wings With Dipping Sauces

Chicken wings are the ultimate finger food, perfect for gatherings, game day, or just a casual night in. These crispy, juicy bites aren’t only delicious on their own but also incredibly versatile when paired with a variety of dipping sauces. Whether you prefer a classic buffalo sauce, a tangy barbecue, or a cooling ranch, chicken wings can cater to every palate. This recipe will guide you through making perfectly seasoned and crispy chicken wings, accompanied by a selection of delectable sauces for dipping.
To create the ultimate chicken wing experience, it’s vital to properly season and prepare the wings. A good marinade or dry rub can enhance the flavor and tenderness of the chicken. Additionally, cooking methods such as baking, frying, or air-frying can all yield fantastic results. In this recipe, we’ll focus on baking the wings to keep things healthier while still achieving that crispy texture.
Get ready to impress your friends and family with these mouthwatering chicken wings and their tasty accompaniments!
Ingredients (Serves 4-6 People):
- 3 lbs chicken wings
- 2 tablespoons olive oil
- 1 teaspoon garlic powder
- 1 teaspoon onion powder
- 1 teaspoon smoked paprika
- 1 teaspoon salt
- ½ teaspoon black pepper
- ½ teaspoon cayenne pepper (optional, for heat)
Dipping Sauces:
- ½ cup buffalo sauce
- ½ cup barbecue sauce
- ½ cup ranch dressing
- ½ cup blue cheese dressing
- Celery sticks (for serving)
Cooking Instructions:
- Preheat the Oven: Start by preheating your oven to 425°F (220°C). Preheating is important as it allows the chicken wings to cook evenly and become crispy.
- Prepare the Wings: In a large bowl, combine the chicken wings with olive oil, garlic powder, onion powder, smoked paprika, salt, black pepper, and cayenne pepper (if using). Toss the wings until they’re evenly coated with the seasoning mixture.
- Arrange on Baking Sheet: Line a baking sheet with aluminum foil for easy cleanup and place a wire rack on top of the baking sheet. Arrange the seasoned chicken wings in a single layer on the wire rack. This setup allows air to circulate around the wings, promoting even cooking and crispiness.
- Bake the Wings: Place the baking sheet in the preheated oven and bake the wings for 40-45 minutes, turning them halfway through to guarantee even browning. Bake until the wings are golden brown and crispy.
- Prepare the Dipping Sauces: While the wings are baking, prepare your dipping sauces. In small bowls, pour out the buffalo sauce, barbecue sauce, ranch dressing, and blue cheese dressing. Arrange them on a serving platter.
- Serve: Once the wings are done, remove them from the oven and let them cool for a couple of minutes. Serve the hot wings with the prepared dipping sauces and celery sticks on the side.
Extra Tips:
For extra crispy wings, you can pat them dry with paper towels before seasoning them. This helps remove excess moisture that can prevent crisping.
Additionally, feel free to experiment with different spices or sauces to tailor the flavor to your liking. If you want to make a larger batch, simply double the ingredients and use multiple baking sheets.
Enjoy your delicious homemade chicken wings!
Spinach and Chicken Stuffed Mushrooms

Spinach and Chicken Stuffed Mushrooms are a delightful appetizer that combines the earthy flavors of mushrooms with the savory richness of chicken and the vibrant freshness of spinach. These bite-sized treats are perfect for parties, gatherings, or simply as a delicious snack.
The combination of tender mushrooms filled with a creamy, flavorful stuffing creates a satisfying dish that’s sure to impress your guests and leave them wanting more.
The preparation of these stuffed mushrooms is quite simple, making it an ideal choice for both novice and experienced cooks. You can customize the filling to suit your taste by adding different herbs or spices.
Serving these mushrooms warm, with a sprinkle of cheese on top, enhances their appeal and adds an extra layer of flavor that complements the dish beautifully. Gather your ingredients, and let’s get started on this scrumptious appetizer!
Ingredients (Serves 4-6):
- 12 large white or cremini mushrooms
- 1 cup cooked chicken, shredded
- 1 cup fresh spinach, chopped
- 1/2 cup cream cheese, softened
- 1/4 cup grated Parmesan cheese
- 1/4 cup breadcrumbs
- 2 cloves garlic, minced
- 1 teaspoon Italian seasoning
- Salt and pepper to taste
- Olive oil for drizzling
### Cooking Instructions:
1. Preheat the Oven: Start by preheating your oven to 375°F (190°C). This guarantees that your mushrooms will bake evenly and become nicely golden as they cook.
2. Prepare the Mushrooms: Gently clean the mushrooms with a damp cloth to remove any dirt. Carefully remove the stems from the mushrooms and set them aside.
Use a small spoon to scoop out a little of the insides of the caps to create more space for the filling.
3. Make the Filling: In a medium bowl, combine the shredded chicken, chopped spinach, cream cheese, grated Parmesan cheese, breadcrumbs, minced garlic, Italian seasoning, salt, and pepper.
Mix well until all ingredients are thoroughly combined and the mixture is creamy.
4. Stuff the Mushrooms: Using a small spoon or your hands, fill each mushroom cap generously with the chicken and spinach mixture.
Make sure to pack the filling in well for peak flavor.
5. Arrange and Drizzle: Place the stuffed mushrooms on a baking sheet lined with parchment paper. Drizzle a little olive oil over the top of each mushroom to help them brown and add flavor during baking.
6. Bake: Place the baking sheet in the preheated oven and bake for about 20-25 minutes, or until the mushrooms are tender and the tops are golden brown.
7. Serve: Remove the mushrooms from the oven and let them cool slightly before serving. Enjoy them warm as a delicious appetizer!
Extra Tips:
For an added burst of flavor, consider incorporating some sautéed onions or bell peppers into the filling.
If you prefer a bit of spice, you can add a pinch of red pepper flakes. Additionally, feel free to experiment with different cheeses, such as mozzarella or feta, for a unique twist.
Make sure to serve the stuffed mushrooms immediately after baking for the best taste and texture. Enjoy your culinary creation!
Crispy Chicken Tenders
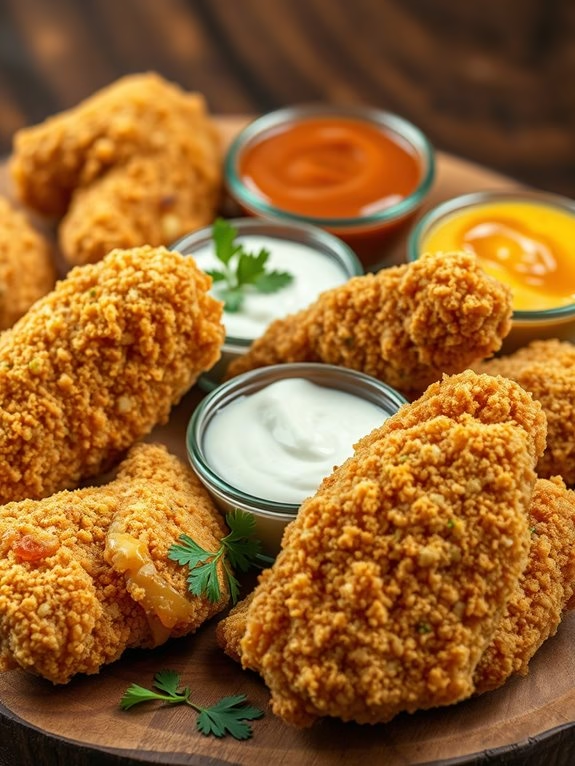
Crispy chicken tenders are a quintessential appetizer that never fails to impress. With their golden-brown coating and juicy, tender meat, they’re perfect for gatherings, game days, or simply as a delicious snack. This dish isn’t only easy to make but also customizable; you can add your favorite spices or serve them with a variety of dipping sauces.
Whether you’re dipping them in classic ranch, zesty barbecue, or spicy honey mustard, these chicken tenders are sure to please everyone at the table.
To achieve that perfect crispiness, the secret lies in the double-dipping technique. This involves coating the chicken tenders in flour, then dipping them in egg, and finally covering them in breadcrumbs. This method creates a thicker, crunchier crust that holds up well during frying.
Pair these crispy chicken tenders with a fresh salad or some crispy fries for a complete meal that your family and friends will rave about!
Ingredients (Serves 4-6):
- 1.5 pounds chicken tenderloins
- 1 cup all-purpose flour
- 2 large eggs
- 1 cup breadcrumbs (panko preferred for extra crunch)
- 1 teaspoon garlic powder
- 1 teaspoon onion powder
- 1 teaspoon paprika
- Salt and pepper, to taste
- Vegetable oil (for frying)
Cooking Instructions:
1. Prepare the Chicken: Start by rinsing the chicken tenderloins under cold water and patting them dry with paper towels. This helps to guarantee a good sear during frying. Season the chicken with salt and pepper to taste.
2. Set Up a Breading Station: In three separate shallow dishes, place the flour in the first, beaten eggs in the second, and breadcrumbs mixed with garlic powder, onion powder, paprika, salt, and pepper in the third. This organized setup will streamline the breading process.
3. Bread the Chicken Tenders: Take one chicken tender and coat it in the flour, ensuring it’s fully covered. Shake off any excess flour, then dip it into the beaten eggs, allowing any excess to drip off. Finally, roll the tender in the seasoned breadcrumbs, pressing gently to help the breadcrumbs adhere.
Repeat this process for all chicken tenders.
4. Heat the Oil: In a large skillet, pour enough vegetable oil to cover the bottom by about half an inch. Heat the oil over medium-high heat until it shimmers. You can test if the oil is hot enough by dropping a small piece of breadcrumb into it; it should sizzle immediately.
5. Fry the Chicken Tenders: Carefully add the breaded chicken tenders to the hot oil in batches to avoid overcrowding. Fry for about 3-4 minutes on each side, or until they’re golden brown and cooked through. Use a slotted spoon to transfer them to a plate lined with paper towels to drain excess oil.
6. Serve: Once all the chicken tenders are fried, arrange them on a serving platter. Serve hot with your choice of dipping sauces.
Extra Tips:
To guarantee your chicken tenders remain crispy, serve them immediately after frying. If you need to keep them warm, place them in a single layer on a baking sheet in a preheated oven at 200°F (93°C) while you finish frying the rest.
Additionally, if you want to make a large batch, you can freeze uncooked, breaded tenders on a baking sheet and then transfer them to a zip-top bag for future use. When ready to cook, simply fry them directly from frozen, adding a couple of extra minutes to the cooking time.
Enjoy your delicious crispy chicken tenders!
Chicken Meatballs in BBQ Sauce

Chicken Meatballs in BBQ Sauce is the perfect appetizer for any gathering or family meal. These succulent meatballs, infused with a blend of herbs and spices, are coated in a rich, tangy BBQ sauce that will tantalize your taste buds. Not only are they easy to prepare, but they also offer a delightful combination of flavors that will leave your guests coming back for more.
Whether served at a game day party, a holiday gathering, or simply as a comforting snack, these meatballs are sure to impress.
The beauty of Chicken Meatballs in BBQ Sauce lies in their versatility. You can serve them on skewers for a fun, finger-food experience, or place them in a warm dish for a cozy presentation. Pair them with toothpicks for easy serving, and watch as they disappear from the platter.
This dish isn’t only delicious but also a healthier alternative to traditional meatballs, making it a fantastic choice for those looking to indulge without the guilt.
Ingredients (serving size: 4-6 people):
- 1 pound ground chicken
- 1/2 cup breadcrumbs
- 1/4 cup grated Parmesan cheese
- 1/4 cup finely chopped onion
- 2 cloves garlic, minced
- 1 large egg
- 1 teaspoon dried oregano
- 1 teaspoon salt
- 1/2 teaspoon black pepper
- 1 cup BBQ sauce (your favorite brand)
- Fresh parsley (for garnish, optional)
Cooking Instructions:
- Preheat the Oven: Begin by preheating your oven to 400°F (200°C). This guarantees that your meatballs will cook evenly and develop a nice golden brown color.
- Prepare the Meatball Mixture: In a large mixing bowl, combine the ground chicken, breadcrumbs, grated Parmesan cheese, chopped onion, minced garlic, egg, oregano, salt, and black pepper. Use your hands or a spoon to mix the ingredients until they’re well-combined, but be careful not to overmix, as this can make the meatballs tough.
- Form the Meatballs: Once the mixture is combined, use your hands to shape the mixture into small meatballs, about 1 to 1.5 inches in diameter. Place the formed meatballs on a baking sheet lined with parchment paper, making sure to leave some space between each one to allow for even cooking.
- Bake the Meatballs: Place the baking sheet in the preheated oven and bake the meatballs for approximately 15-20 minutes or until they’re cooked through and reach an internal temperature of 165°F (75°C). They should be slightly golden on the outside.
- Coat with BBQ Sauce: Once the meatballs are done baking, remove them from the oven and transfer them to a large mixing bowl. Pour the BBQ sauce over the meatballs and gently toss until they’re evenly coated.
- Serve: You can serve the chicken meatballs immediately, or return them to the oven for an additional 5-10 minutes to warm the sauce and allow the flavors to meld together. Garnish with fresh parsley if desired, and serve with toothpicks for easy eating.
Extra Tips:
For an added layer of flavor, consider marinating the ground chicken with the BBQ sauce for a few hours before forming the meatballs.
Additionally, you can experiment with different BBQ sauces, such as spicy or smoky varieties, to customize the flavor profile according to your preference.
If you have leftovers, store them in an airtight container in the refrigerator for up to three days, and reheat them in the oven or microwave for a quick snack.
Enjoy your delicious Chicken Meatballs in BBQ Sauce!
Garlic Parmesan Chicken Bites
Garlic Parmesan Chicken Bites are the perfect appetizer for any gathering, offering a delightful combination of crispy, flavorful bites that are sure to impress your guests. These little pieces of heaven are coated in a savory garlic and Parmesan mixture that packs a punch, making them perfect for parties, game days, or just a cozy night in.
They’re easy to prepare and can be served with a variety of dipping sauces, allowing your guests to customize their experience. The beauty of these chicken bites lies not only in their delicious taste but also in their versatility. You can easily adjust the seasoning to suit your preferences, and they can be baked or fried, depending on your desired texture.
Pair them with a revitalizing dipping sauce like ranch or a spicy sriracha mayo to elevate the flavor even further. Whether served as a starter or a snack, Garlic Parmesan Chicken Bites are guaranteed to be a crowd-pleaser.
Ingredients (Serves 4-6):
- 1 lb boneless, skinless chicken breasts, cut into bite-sized pieces
- 1 cup all-purpose flour
- 2 large eggs, beaten
- 1 cup breadcrumbs (preferably panko for extra crunch)
- 1/2 cup grated Parmesan cheese
- 4 cloves garlic, minced
- 1 teaspoon dried parsley
- 1 teaspoon salt
- 1/2 teaspoon black pepper
- 1/4 teaspoon red pepper flakes (optional for a kick)
- Cooking oil (for frying, if frying)
Cooking Instructions:
1. Preheat the Oven or Oil: If you’re baking the chicken bites, preheat your oven to 400°F (200°C). For frying, heat about 1 inch of cooking oil in a large skillet over medium-high heat.
2. Prepare the Chicken: In a large mixing bowl, combine the bite-sized chicken pieces with salt, black pepper, and red pepper flakes if using. Mix until the chicken is evenly coated with the seasoning.
3. Set Up Breading Station: Prepare three shallow dishes: one for flour, one for beaten eggs, and one for the breadcrumb mixture. In the breadcrumb dish, mix together the breadcrumbs, grated Parmesan cheese, minced garlic, and dried parsley until well combined.
4. Bread the Chicken: Take each piece of seasoned chicken, first dip it into the flour, ensuring it’s fully coated. Then shake off the excess flour, dip it into the beaten eggs, and finally press it into the breadcrumb mixture until it’s fully coated.
Place the breaded chicken bites on a baking sheet or a plate while you repeat with the remaining chicken.
5. Cooking the Chicken: If baking, arrange the coated chicken bites on a greased baking sheet. Bake in the preheated oven for 15-20 minutes, or until golden brown and cooked through, flipping halfway through for even cooking.
If frying, carefully add the chicken bites to the hot oil in batches, cooking for about 3-4 minutes per side or until golden brown and cooked through. Remove with a slotted spoon and drain on paper towels.
6. Serve: Once cooked, transfer the Garlic Parmesan Chicken Bites to a serving platter. You can sprinkle a bit more Parmesan cheese and chopped parsley on top for garnish, and serve with your choice of dipping sauces.
Extra Tips:
For an extra flavor boost, consider marinating the chicken pieces in a mixture of olive oil, minced garlic, and herbs for a couple of hours before breading them. This will infuse the chicken with more flavor and tenderness.
If you want to make these bites healthier, baking is the way to go, and you can also experiment with whole wheat breadcrumbs or gluten-free alternatives. Don’t forget to keep a close eye on the chicken while frying, as cooking times can vary based on the size of the bites and the temperature of the oil. Enjoy!
Chicken Nachos

Chicken Nachos are a delicious and crowd-pleasing appetizer that combines the savory flavors of seasoned chicken, melted cheese, and a variety of toppings all piled on a bed of crispy tortilla chips. This dish is perfect for game day, parties, or a casual movie night at home.
The beauty of Chicken Nachos lies in their versatility; you can customize them to fit your taste preferences and dietary restrictions. Whether you like it spicy or prefer a milder flavor, this dish can easily be adjusted to suit your palate.
To prepare Chicken Nachos, you’ll need to start with some cooked chicken, which can be shredded, diced, or even pulled for a more rustic look. The chicken is then seasoned with spices and combined with a mix of cheeses to create a melty, gooey topping that pairs perfectly with the crunch of the tortilla chips.
Add your favorite toppings like jalapeños, tomatoes, black olives, or guacamole for an extra burst of flavor. Gather your friends and family around for a fun and interactive eating experience as everyone digs in!
Ingredients (Serves 4-6):
- 2 cups cooked chicken (shredded or diced)
- 1 teaspoon chili powder
- 1 teaspoon cumin
- 1 teaspoon garlic powder
- 1/2 teaspoon onion powder
- Salt and pepper to taste
- 8 ounces tortilla chips
- 2 cups shredded cheddar cheese
- 1 cup shredded Monterey Jack cheese
- 1/2 cup sliced jalapeños (optional)
- 1/2 cup diced tomatoes
- 1/2 cup black olives (sliced)
- 1/4 cup chopped green onions
- Sour cream and guacamole for serving (optional)
Cooking Instructions:
- Preheat the Oven: Start by preheating your oven to 375°F (190°C). This will guarantee that your nachos cook evenly and the cheese melts perfectly.
- Prepare the Chicken: In a mixing bowl, combine the cooked chicken with chili powder, cumin, garlic powder, onion powder, salt, and pepper. Mix well until the chicken is evenly coated with the spices. This step adds a delicious flavor to the chicken that complements the nachos.
- Layer the Chips: On a large baking sheet or oven-safe dish, spread out the tortilla chips in an even layer. Make sure the chips aren’t overcrowded to allow for even cheese melting.
- Add the Chicken: Distribute the seasoned chicken evenly over the layer of chips. This guarantees that each bite has a good amount of chicken.
- Add the Cheese: Sprinkle the shredded cheddar and Monterey Jack cheese generously over the chicken and chips. The more cheese, the better!
- Top with Extras: If you’re using jalapeños, tomatoes, or olives, sprinkle them over the cheese layer. This adds color and additional flavors to your nachos.
- Bake: Place the nachos in the preheated oven and bake for about 10-15 minutes, or until the cheese is fully melted and bubbly. Keep an eye on them to prevent burning.
- Garnish and Serve: Once baked, remove the nachos from the oven and let them cool for a minute. Top with chopped green onions and serve with sour cream and guacamole on the side for dipping.
Extra Tips:
For an extra layer of flavor, consider marinating your chicken in lime juice and spices before cooking it. Additionally, feel free to mix and match your favorite toppings – adding black beans, corn, or avocado can elevate the dish even more.
If you want to make it even more decadent, drizzle some melted cheese sauce over the top just before serving. Always serve your Chicken Nachos immediately after baking to maintain the crispiness of the chips!
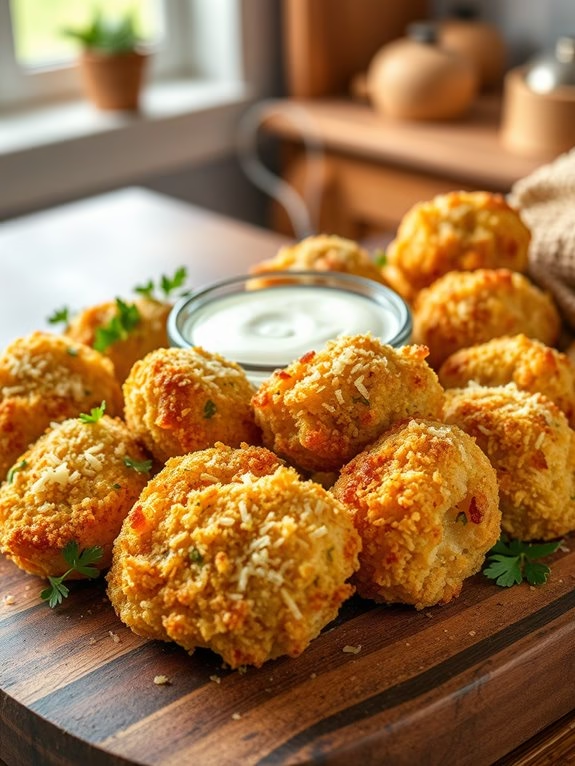
Coconut Chicken Bites

Coconut Chicken Bites are a delightful and crispy appetizer that brings a tropical twist to your table. These bite-sized morsels are perfect for gatherings, parties, or even a casual family dinner. The combination of tender chicken coated in a crunchy coconut crust offers a satisfying crunch with every bite, making them an instant crowd-pleaser.
Served with a sweet and tangy dipping sauce, these chicken bites are bound to impress your guests and keep them coming back for more. This dish isn’t only delicious but also easy to prepare, making it an excellent choice for cooks of all skill levels. The use of shredded coconut adds a unique flavor and texture, while the chicken remains juicy and tender inside.
Whether you’re looking for an appetizer to kick off a meal or a snack for game day, Coconut Chicken Bites are an ideal choice that packs a flavorful punch.
Ingredients (Serves 4-6):
- 1 pound chicken breast, cut into bite-sized pieces
- 1 cup all-purpose flour
- 2 large eggs, beaten
- 1 cup shredded unsweetened coconut
- 1 cup panko breadcrumbs
- 1 teaspoon garlic powder
- 1 teaspoon onion powder
- 1 teaspoon salt
- ½ teaspoon black pepper
- ½ teaspoon paprika
- ½ cup sweet chili sauce (for dipping)
Cooking Instructions:
- Prepare the Chicken: Start by cutting the chicken breast into bite-sized pieces. Make sure they’re evenly sized to guarantee uniform cooking. Pat the chicken pieces dry with a paper towel to help the coating stick better.
- Set Up Breading Stations: In three separate shallow dishes, set up your breading stations. In the first dish, place the all-purpose flour. In the second dish, beat the two eggs until well combined. In the third dish, mix the shredded coconut, panko breadcrumbs, garlic powder, onion powder, salt, black pepper, and paprika together.
- Bread the Chicken: Take a piece of chicken and first coat it in the flour, shaking off any excess. Then, dip it into the beaten eggs, making sure it’s fully coated. Finally, roll the chicken in the coconut and breadcrumb mixture, pressing gently to confirm the coating adheres well. Repeat this process with all the chicken pieces.
- Preheat the Oven: Preheat your oven to 400°F (200°C). Line a baking sheet with parchment paper or lightly grease it with cooking spray to prevent sticking.
- Bake the Chicken Bites: Place the breaded chicken bites on the prepared baking sheet in a single layer, making sure they aren’t touching. Bake in the preheated oven for 15-20 minutes, or until the chicken is cooked through and the coating is golden brown and crispy. Flip the chicken bites halfway through cooking for even browning.
- Serve: Once cooked, remove the chicken bites from the oven and let them cool slightly. Serve warm with sweet chili sauce for dipping.
Extra Tips:
For an added layer of flavor, consider marinating the chicken pieces in a mixture of lime juice, soy sauce, and a touch of honey for at least 30 minutes before breading. This not only enhances the taste but also makes sure that the chicken stays moist during baking.
Additionally, feel free to experiment with different spices in the coating mixture to suit your taste preferences. If you prefer frying, you can also shallow fry the bites in a skillet with oil over medium heat until golden brown and cooked through.