
If you’re looking to elevate your next gathering, these chicken appetizers are just the ticket!
From crispy chicken wontons to tender chicken satay skewers drizzled with a rich peanut sauce, there’s something here for everyone.
Mini chicken tacos let you add your own personal flair, while chicken liver pâté on toast brings a touch of elegance to the table.
And who could resist smoked chicken canapés or spicy chicken spring rolls?
With these recipes in hand, you’ll be ready to impress your guests in style!
Crispy Chicken Wontons
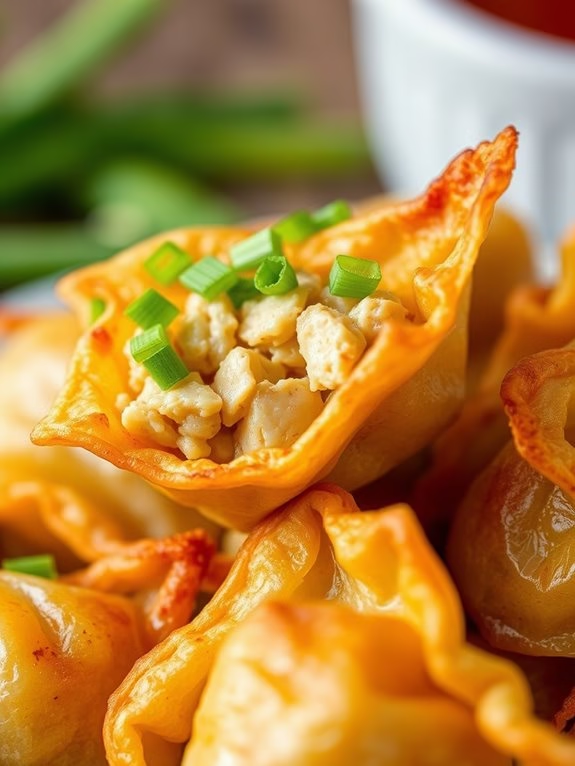
Crispy Chicken Wontons are a delightful appetizer that will surely impress your guests at any fine dining occasion. These small bites pack a punch of flavor, with a savory filling of chicken and vegetables tucked inside a golden, crispy wonton wrapper. The contrast of the crunchy exterior and the juicy, flavorful interior is truly irresistible. As an added bonus, these wontons are surprisingly easy to make at home.
Creating this dish is a two-part process: preparing the filling and folding the wontons. The filling is a simple sauté of ground chicken, onions, and garlic, seasoned with soy sauce and sesame oil. The fun part comes with folding the wontons; it might take a few tries to get the hang of it, but once you do, you’ll be folding them like a pro. This recipe makes enough for 4-6 people, perfect for a dinner party or a family gathering.
Ingredients:
- 1 lb ground chicken
- 1 medium onion, finely chopped
- 4 cloves garlic, minced
- 2 tablespoons soy sauce
- 1 tablespoon sesame oil
- 1 package of wonton wrappers (about 40 wrappers)
- Vegetable oil, for frying
- Salt and pepper, to taste
- Green onions, finely chopped (for garnish)
Cooking Instructions:
- Start by preparing the filling. Heat a large skillet over medium heat. Add the ground chicken and cook until it’s no longer pink, breaking it up into small pieces as it cooks.
- Add the chopped onions and minced garlic to the skillet. Cook until the onions become translucent and the garlic is fragrant, about 5 minutes.
- Season the chicken mixture with soy sauce, sesame oil, salt, and pepper. Stir well to combine. Remove from heat and set aside.
- Now it’s time to fold the wontons. Place a spoonful of the chicken mixture in the center of a wonton wrapper. Fold the wrapper in half diagonally, forming a triangle. Press the edges to seal. Fold the two opposite corners together and press to seal.
- Repeat with the remaining wrappers and filling.
- Heat a generous amount of vegetable oil in a deep frying pan or pot. Fry the wontons in batches, turning often, until they’re golden brown and crispy. This should take about 2-3 minutes per batch.
- Drain the fried wontons on a paper towel-lined plate. Garnish with chopped green onions before serving.
Extra Tips:
The key to crispy wontons is to make certain the oil is hot enough before you start frying. If the oil isn’t hot enough, the wontons will absorb too much oil and become soggy instead of crispy.
Also, be careful not to overfill your wontons, as this can cause them to burst open during frying. A teaspoon of filling per wrapper is usually a good amount.
Finally, the wontons are best enjoyed fresh from the fryer, so serve them immediately to guarantee maximum crispiness.
Chicken Satay Skewers

Elevate your appetizer game with Chicken Satay Skewers, a gourmet dish that’s sure to impress at any fine dining event. Originating from Southeast Asia, this dish is a delightful medley of succulent chicken pieces marinated in a tangy blend of spices and herbs, skewered, and grilled to perfection. Topped off with a flavorful peanut sauce, these skewers are a tasty treat that will tantalize the taste buds of your guests.
Chicken Satay Skewers aren’t only incredibly delicious but also quite simple to prepare. The key to achieving the perfect balance of flavors lies in the marinade and the peanut sauce, both of which can be customized to suit your palate. So let’s explore this easy-to-follow recipe that serves 4-6 people.
Ingredients:
- 1.5 pounds of boneless, skinless chicken breasts
- 1/2 cup of soy sauce
- 2 tablespoons of honey
- 2 cloves of garlic, minced
- 1 tablespoon of minced ginger
- 1 tablespoon of sesame oil
- 1 teaspoon of chili flakes
- 1 teaspoon of ground turmeric
- 1 teaspoon of ground coriander
- 10-12 wooden skewers, soaked in water
- Salt and pepper to taste
For the Peanut Sauce:
- 1/2 cup of smooth peanut butter
- 1 tablespoon of soy sauce
- 1 tablespoon of lime juice
- 1 tablespoon of honey
- 1 clove of garlic, minced
- 1/2 teaspoon of chili flakes
- Warm water as needed
Cooking Instructions:
- Start by cutting the chicken breasts into thin, long strips. Keep them aside.
- In a mixing bowl, combine soy sauce, honey, minced garlic, ginger, sesame oil, chili flakes, ground turmeric, ground coriander, salt, and pepper. Stir well until all the ingredients are fully incorporated.
- Add the chicken pieces to the marinade and toss until each piece is well coated. Cover the bowl and let it sit in the refrigerator for at least 2 hours, or overnight for best results.
- Preheat your grill or grill pan to medium-high heat.
- Thread each piece of marinated chicken onto the soaked wooden skewers.
- Place the skewers on the grill and cook for about 3-4 minutes on each side, or until the chicken is fully cooked and has nice grill marks.
- While the chicken is grilling, prepare the peanut sauce. In a small saucepan, combine peanut butter, soy sauce, lime juice, honey, minced garlic, and chili flakes. Stir over medium heat until the sauce is smooth. If needed, add warm water to thin out the sauce.
- Serve the cooked chicken skewers with the warm peanut sauce on the side for dipping.
In terms of extra tips, remember to soak the wooden skewers in water for at least 20-30 minutes before grilling to prevent them from burning.
Also, the marinating time is essential for this recipe; the longer the chicken marinates, the more flavorful it will be. If you prefer a spicier satay, feel free to add more chili flakes to both the marinade and the peanut sauce.
Enjoy your fine dining experience with these delectable Chicken Satay Skewers!
Mini Chicken Tacos

Mini Chicken Tacos are a perfect appetizer for any fine dining experience. They’re small, yet packed with flavor and can be served in a variety of ways to suit any palate. With a crispy tortilla shell, succulent chicken, and a variety of toppings, these mini tacos are sure to be a crowd-pleaser. They’re also versatile and can be customized to fit any dietary needs or preferences.
The secret to making these mini chicken tacos is in the preparation. The chicken needs to be cooked just right so that it’s tender and juicy. The tortillas need to be crispy but not overcooked. And the toppings, well, they can be whatever you want them to be. The possibilities are endless.
Ingredients:
- 2 boneless, skinless chicken breasts
- 1 packet taco seasoning
- 12 mini tortillas
- 1 cup shredded lettuce
- 1/2 cup diced tomatoes
- 1/2 cup diced onions
- 1/2 cup sliced black olives
- 1/2 cup shredded cheddar cheese
- 1/2 cup sour cream
- 1/2 cup guacamole
- 1/4 cup chopped fresh cilantro
- 2 tablespoons olive oil
- Salt and pepper to taste
Instructions:
- Start by preheating your oven to 400 degrees Fahrenheit.
- While the oven is heating up, season the chicken breasts with the taco seasoning, salt, and pepper.
- Heat the olive oil in a skillet over medium heat. Add the chicken breasts and cook for about 5-7 minutes on each side, or until the chicken is cooked through and no longer pink in the middle.
- Once the chicken is cooked, remove it from the skillet and let it rest for a few minutes. Then, using two forks, shred the chicken into small pieces.
- Arrange the mini tortillas on a baking sheet and place a small amount of shredded chicken in the center of each tortilla.
- Top each tortilla with a bit of lettuce, tomatoes, onions, black olives, and cheddar cheese.
- Bake the mini tacos in the preheated oven for about 10-15 minutes, or until the tortillas are crispy and the cheese is melted.
- Remove the tacos from the oven and top each one with a dollop of sour cream, guacamole, and a sprinkle of fresh cilantro.
In terms of extra tips, it’s important to remember to not overfill the tortillas. If they’re too full, it will be difficult to eat them as an appetizer.
Also, feel free to play around with the toppings. You can add jalapenos for some heat, or corn and black beans for a more southwestern feel. The key is to have fun with it and make it your own. Enjoy your mini chicken tacos!
Baked Chicken Croquettes
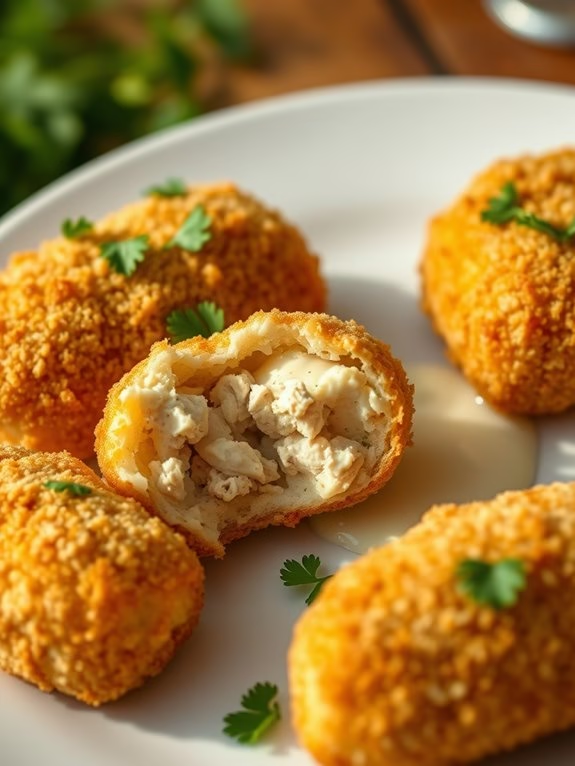
Baked Chicken Croquettes are the epitome of fine dining appetizers, bringing together the flavors of succulent chicken, rich béchamel sauce, and a crunch from the breadcrumb coating. The creamy interior complements the crispy exterior, making it a tantalizing treat for the palate.
This Spanish-inspired delicacy is traditionally deep-fried; however, our version opts for a healthier approach by baking them. The result is a light, yet satisfying appetizer that perfectly sets the stage for the main course.
The recipe is straightforward and is an ideal choice for a dinner party or a high-end event. You can prepare the croquettes ahead of time and simply bake them just before your guests arrive. This way, you can serve them hot and fresh, capturing the essence of fine dining in your own home.
Ingredients:
- 3 cups of cooked chicken, finely chopped
- 2 tablespoons of olive oil
- 1/2 cup of finely chopped onions
- 1 teaspoon of minced garlic
- 2 cups of whole milk
- 1/2 cup of all-purpose flour
- 1/4 teaspoon of nutmeg
- Salt and black pepper to taste
- 2 large eggs
- 1 cup of breadcrumbs
- Fresh parsley for garnish
Instructions:
- Preheat your oven to 200 degrees Celsius (392 degrees Fahrenheit) and line a baking tray with parchment paper.
- Heat the olive oil in a skillet over medium heat. Add the onions and garlic and sauté until they’re soft and translucent.
- Stir in the flour, making sure that the onions and garlic are well-coated. Cook for a minute to remove the raw flour taste.
- Gradually pour in the milk, whisking constantly to prevent lumps from forming. Continue to cook until the mixture thickens into a smooth béchamel sauce.
- Season the sauce with nutmeg, salt, and black pepper. Then, add the finely chopped chicken, mixing well to combine. Remove from heat and allow it to cool slightly.
- Once the mixture is cool enough to handle, shape it into small logs or balls. Place them on the prepared baking tray.
- Beat the eggs in a shallow dish. In another dish, spread out the breadcrumbs. Dip each croquette first in the egg, then roll in the breadcrumbs until completely coated.
- Arrange the coated croquettes on the baking tray and bake for about 20-25 minutes, or until golden brown and crispy.
- Garnish with fresh parsley before serving.
Extra Tips:
Using a thick béchamel sauce is essential to hold the shape of the croquettes, so make sure it’s not too runny.
Also, for a uniform golden color, turn the croquettes halfway through the baking process. You can serve these baked chicken croquettes with a side of aioli or your favorite dipping sauce.
To make this appetizer even more decadent, consider adding some grated cheese to the chicken mixture before shaping it into croquettes.
Spicy Chicken Spring Rolls

Spicy Chicken Spring Rolls are a perfect appetizer to kick off a fine dining experience. These crispy, golden brown rolls are packed with spicy chicken, fresh vegetables, and flavorful spices, creating a delightful contrast of textures and flavors. Not only do they make for a stunning presentation, but they’re also surprisingly easy to prepare at home, allowing you to bring a touch of fine dining to your own kitchen.
The key to perfect Chicken Spring Rolls lies in the balance of flavors within the filling. The chicken needs to be well-seasoned and cooked just right, the vegetables should be crisp, and the spices carefully measured to give just the right amount of heat. All of this is wrapped in thin, delicate spring roll wrappers and fried until crispy and golden.
Ingredients:
- 2 boneless, skinless chicken breasts
- 2 tablespoons of vegetable oil
- 1 teaspoon of salt
- 1 teaspoon of black pepper
- 1 teaspoon of red chili flakes
- 1 large carrot, julienned
- 1 bell pepper, thinly sliced
- 1 medium onion, thinly sliced
- 1 cup of cabbage, shredded
- 2 cloves of garlic, minced
- 1 tablespoon of soy sauce
- 1 tablespoon of oyster sauce
- 14-16 spring roll wrappers
- 1 egg, beaten
- Vegetable oil for frying
Cooking Instructions:
- Start by seasoning the chicken breasts with salt, black pepper, and red chili flakes. Heat the vegetable oil in a pan over medium heat and add the chicken. Cook until it’s no longer pink in the center, then remove from the pan and set it aside to cool. Once cooled, shred the chicken.
- Using the same pan, sauté the minced garlic until it’s fragrant. Add the onions, carrots, bell pepper, and cabbage. Cook until the vegetables are just softened.
- Add the shredded chicken back into the pan, along with the soy sauce and oyster sauce. Stir well to combine all the ingredients and cook for another 2-3 minutes. Remove from heat and allow the mixture to cool.
- Place a tablespoon of the cooled chicken and vegetable mixture on each spring roll wrapper. Fold in the sides and roll up tightly, sealing the edges with the beaten egg.
- Heat the vegetable oil in a deep fryer or a deep pot. Fry the spring rolls until they’re golden brown and crispy. This should take about 2-3 minutes on each side. Remove from oil and drain on paper towels.
Extra Tips:
When cooking the spring rolls, it’s important not to overcrowd the pan. This will guarantee that they cook evenly and achieve a uniformly golden color.
Also, be sure to seal the edges of the rolls securely with egg to prevent the filling from spilling out during frying.
Finally, serve these spicy chicken spring rolls hot, with a side of sweet chili sauce or soy sauce for dipping, to enhance the overall fine dining experience.
Chicken Liver Pâté on Toast
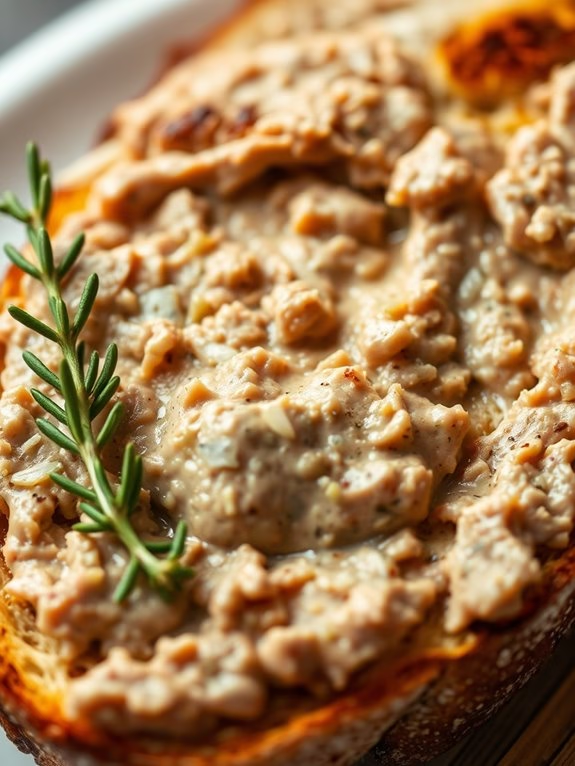
Chicken Liver Pâté on Toast is an elegant and indulgent appetizer perfect for any fine dining experience. This luxurious spread combines the rich, deep flavors of chicken liver with the creamy, buttery texture of a traditional pâté, all served atop a crunchy slice of toasted bread.
It’s a dish that may sound intimidating to prepare, but with careful attention to detail, you can easily whip this up in your home kitchen and impress your guests with your culinary prowess.
This recipe serves 4-6 people, making it ideal for intimate gatherings or a small dinner party. The buttery pâté and crispy toast provide a delightful contrast in texture, while the simplicity of the ingredients allows the flavors to truly shine.
Here’s how to make Chicken Liver Pâté on Toast.
Ingredients:
- 500 grams of chicken livers
- 2 medium-sized onions, finely chopped
- 4 cloves of garlic, minced
- 100 grams of unsalted butter, divided
- 1/4 cup of cognac or brandy
- Salt and pepper to taste
- 1 tablespoon of fresh thyme leaves
- 1/2 cup of heavy cream
- Freshly squeezed juice from half a lemon
- Slices of baguette or sourdough bread, toasted
Cooking Instructions:
- Begin by rinsing the chicken livers under cold water, then pat them dry with a kitchen towel. Remove any connective tissue if necessary.
- In a large skillet over medium heat, melt half of the butter. Add the chopped onions and minced garlic, cooking until they become translucent and aromatic.
- Add the chicken livers to the skillet. Season with salt, pepper, and thyme. Cook until the livers are browned but still pink in the middle, approximately 3-4 minutes on each side.
- Pour the cognac or brandy into the skillet. Allow the alcohol to simmer and reduce for a couple of minutes. This process will cook off the alcohol and leave only the flavor behind.
- Transfer the liver mixture to a food processor. Add the remaining butter, heavy cream, and lemon juice. Blend until smooth.
- Taste the pâté and adjust the seasoning if necessary. If the mixture is too thick, add a splash of cream until it reaches your desired consistency.
- Spread the pâté onto the toasted bread slices and serve.
Extra Tips:
When making Chicken Liver Pâté on Toast, the key is to not overcook the livers. They should still be slightly pink in the middle when you remove them from the heat, as they’ll continue to cook in the residual heat.
Overcooking can result in a grainy texture. Also, make sure to use high-quality, fresh bread for toasting. The crunchiness of the toast complements the creamy pâté, enhancing the overall dining experience.
Chicken and Mushroom Vol-au-vents

Chicken and Mushroom Vol-au-vents are a classic French appetizer that will add a touch of elegance to any fine dining experience. This dish combines the richness of chicken and mushrooms with the light, flaky texture of puff pastry, creating a balance of flavors and textures that’s bound to impress.
Vol-au-vents, which means “windblown” in French, are named for their lightness, and they make a perfect vehicle for the savory filling in this recipe.
This recipe is versatile and can be adapted to fit your personal tastes or the preferences of your guests. You can experiment with different types of mushrooms for variety or add a sprinkle of fresh herbs for added flavor. With a little bit of patience and precision, you can create a beautiful and delicious appetizer that will elevate your fine dining experience.
Ingredients:
- 2 sheets of puff pastry
- 1 egg (for egg wash)
- 500 grams of chicken breast, diced
- 200 grams of mushrooms, finely chopped
- 1 medium onion, finely chopped
- 2 cloves of garlic, minced
- 1 tablespoon of olive oil
- 1 cup of white wine
- 1 cup of heavy cream
- Salt and pepper to taste
- Fresh parsley for garnish
Cooking Instructions:
- Preheat your oven to 200°C (392°F).
- Roll out the puff pastry sheets and cut into circles using a cookie cutter. Cut smaller circles in the center of half of the pastry circles to create rings. These will serve as the lids of your vol-au-vents.
- Brush the whole circles with egg wash, then place the pastry rings on top. Brush the tops with more egg wash.
- Bake the puff pastry in the preheated oven for 10-15 minutes, or until golden brown. Allow to cool.
- While the pastry is baking, heat the olive oil in a frying pan over medium heat. Add the onions, garlic, and mushrooms and sauté until soft and fragrant.
- Add the diced chicken to the pan and cook until it’s no longer pink.
- Pour in the white wine, making sure to scrape the bottom of the pan to deglaze it. Allow the wine to reduce by half.
- Add the heavy cream to the pan and stir well. Season with salt and pepper to taste. Allow the mixture to simmer until it thickens into a creamy sauce.
- Spoon the chicken and mushroom mixture into the baked vol-au-vents. Garnish with fresh parsley.
Extra Tips:
When making vol-au-vents, it’s important to be precise with your pastry. Make sure the pastry is rolled out evenly to guarantee that it cooks evenly.
Additionally, don’t overfill the vol-au-vents as this can cause the pastry to become soggy. If you have leftover filling, it can be served on the side or saved for another use.
Finally, remember to serve the vol-au-vents while they’re still warm to guarantee the best flavor and texture.
Chicken Teriyaki Lettuce Wraps

If you’re hoping to impress your guests with a fine dining experience at your next gathering, chicken teriyaki lettuce wraps are an excellent choice. This appetizer isn’t only delicious and sophisticated, but it’s also healthy and relatively easy to prepare. The succulent chicken pieces are marinated in a savory teriyaki sauce and then served in crispy lettuce cups, making this dish a perfect blend of flavors and textures.
Serve these chicken teriyaki lettuce wraps as the first course at your dinner party. They’re a fun, interactive dish that will get your guests excited for the main course. You can prepare most of the elements in advance, and then assemble just before serving. This reduces stress on the day of the party and guarantees that your appetizers are as fresh and tasty as possible.
Ingredients (serving size: 4-6 people):
- 2 boneless, skinless chicken breasts
- 3 tablespoons of teriyaki sauce
- 1 tablespoon of sesame oil
- 1 large head of lettuce (Bibb or Iceberg)
- 1 red bell pepper, finely chopped
- 1 carrot, finely chopped
- 2 green onions, finely chopped
- 1 teaspoon of minced garlic
- 1 teaspoon of minced ginger
- Salt and pepper to taste
- Sesame seeds for garnish
Cooking Instructions:
- Start by slicing the chicken breasts into small, bite-sized pieces. Season them with salt and pepper.
- In a large skillet, heat the sesame oil over medium heat. Add the chicken pieces to the skillet and cook until they’re no longer pink in the middle, which should take about 5-7 minutes.
- While the chicken is cooking, combine the teriyaki sauce, minced garlic, and minced ginger in a small bowl. Stir until the ingredients are well mixed.
- Once the chicken is fully cooked, pour the teriyaki sauce mixture over the chicken in the skillet. Stir to confirm that all the chicken pieces are coated in the sauce. Let it simmer for a few minutes until the sauce has thickened slightly.
- While the chicken is simmering, prepare your lettuce cups. Wash and dry the lettuce leaves and set them aside.
- When the chicken is ready, spoon it into the lettuce cups. Top each wrap with the chopped red bell pepper, carrot, and green onions.
- Finally, sprinkle sesame seeds over the top of each wrap for an added crunch and presentation.
When preparing these chicken teriyaki lettuce wraps, keep in mind that the quality of your ingredients will greatly affect the final result. Use fresh vegetables for the best flavor and texture.
Also, be careful not to overcook the chicken, as it can become tough. If you want to add a spicy kick to these wraps, consider adding a drizzle of sriracha sauce or some crushed red pepper flakes to the teriyaki sauce.
Enjoy this delicious and healthy appetizer at your fine dining occasion.
Smoked Chicken Canapés

Smoked Chicken Canapés are an exquisite choice when it comes to fine dining appetizers. These small bites of heaven are made with smoked chicken breast, creamy cheese, fresh herbs, and a hint of lemon zest for a burst of flavor. They’re easy to make, yet fancy enough to serve at any dinner party or special event.
The smoky taste of the chicken pairs wonderfully with the creamy cheese and the tang of the lemon zest, creating a flavor profile that’s certain to impress.
As an added bonus, Smoked Chicken Canapés are versatile and can be adjusted to fit your personal preference or dietary needs. For example, you can substitute the cheese with a dairy-free option or use gluten-free bread for the base. No matter how you decide to make them, these canapés are sure to be a hit.
Ingredients:
- 2 smoked chicken breasts
- 1 baguette
- 200g cream cheese
- 1 lemon
- 2 tablespoons fresh chives
- 2 tablespoons fresh parsley
- Salt to taste
- Pepper to taste
Cooking Instructions:
- Begin by thinly slicing the smoked chicken breasts. Each slice should be thin enough to fold over the baguette slice but thick enough to hold its shape.
- Next, slice the baguette into thin rounds. These will serve as the base for your canapés.
- Zest the lemon and set it aside. You’ll be using this later to add a hint of brightness to your canapés.
- In a bowl, combine the cream cheese, lemon zest, chives, parsley, salt, and pepper. Mix until all the ingredients are well incorporated.
- Spread a generous amount of the cream cheese mixture onto each baguette slice. Be sure to cover the entire surface of the bread to create a full flavor experience.
- Fold a slice of smoked chicken on top of the cream cheese mixture. The chicken should cover most of the cream cheese but leave a small border so the cream cheese is visible.
- Repeat this process until all of your canapés are assembled. Arrange them on a serving platter and garnish with additional chives or parsley if desired.
Extra Cooking Tips:
When spreading the cream cheese mixture onto the baguette slices, be sure not to use too much pressure as this can cause the bread to become soggy.
Also, while the recipe calls for smoked chicken breasts, you can easily substitute with any smoked poultry of your choice, such as duck or turkey, for a unique twist.
Finally, these canapés can be made a few hours ahead of your event and kept refrigerated. Just remember to bring them to room temperature before serving to guarantee the best flavor.
Chicken Cordon Bleu Bites
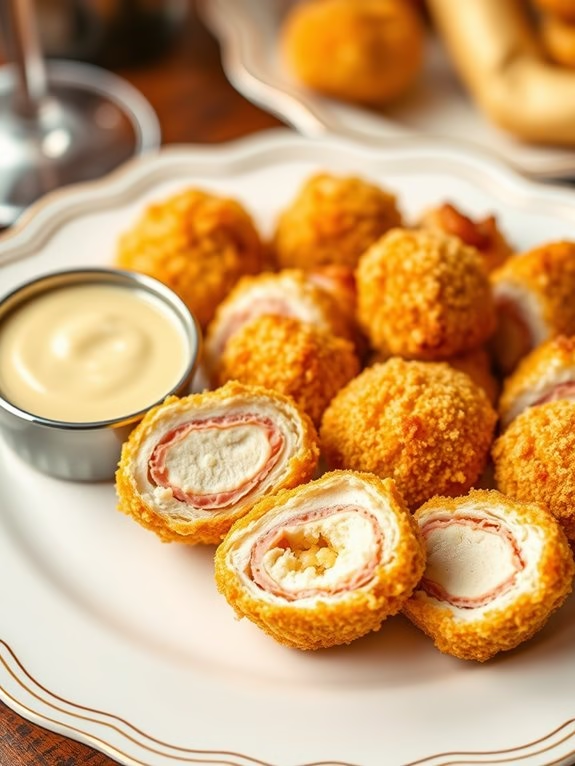
Chicken Cordon Bleu Bites are an exquisite appetizer choice for fine dining, combining the refined flavors of chicken, ham, and cheese in a delicately breaded bite-sized package. Ideal as a prelude to a gourmet meal or as part of a sophisticated cocktail party spread, this recipe will wow your guests with its intricate taste and elegant presentation.
This dish is a miniaturized version of the classic Chicken Cordon Bleu, retaining all the exquisite flavors and richness of the original. The outside is a crispy golden brown, while the inside reveals a delightful ham and cheese filling that’s both comforting and luxurious. This recipe serves 4-6 people, making it an ideal choice for intimate gatherings or small dinner parties.
Ingredients:
- 2 boneless, skinless chicken breasts
- 1 cup of all-purpose flour
- 2 large eggs
- 1.5 cups of breadcrumbs
- 1 cup of shredded Swiss cheese
- 8 slices of thin deli ham
- Salt and pepper to taste
- 1/4 cup of melted unsalted butter
- Cooking spray
Cooking Instructions:
- Start by preheating your oven to 375 degrees Fahrenheit and lining a baking sheet with parchment paper, set aside.
- Flatten each chicken breast to about 1/4-inch thickness using a meat mallet.
- Season the chicken breasts with salt and pepper, then lay four slices of ham and sprinkle a quarter cup of Swiss cheese on each flattened chicken breast.
- Roll each chicken breast tightly and secure with toothpicks.
- Set up three separate bowls for your breading station: one with flour, one with beaten eggs, and one with breadcrumbs.
- Dip each rolled chicken into the flour, then the eggs, and finally the breadcrumbs, guaranteeing it’s fully coated.
- Slice each rolled and breaded chicken breast into bite-sized pieces – about one inch thick.
- Arrange the slices on the prepared baking sheet and drizzle with the melted butter.
- Bake for about 25 minutes or until golden brown and cooked through.
- Allow the bites to cool slightly before serving.
When preparing Chicken Cordon Bleu Bites, it’s important to confirm the chicken breasts are thoroughly cooked. Use a meat thermometer to check the internal temperature reaches 165 degrees Fahrenheit, to guarantee safety.
The bites can be served with a side of Dijon mustard or a creamy béchamel sauce for dipping, to add an extra layer of flavor. Remember to remove the toothpicks before serving to avoid any unexpected surprises.
This appetizer is sure to be a hit, adding a touch of class and sophistication to your dining experience.